Agent API Creation and External Invocation
Objective: Generate an API Key for a published Agent so it can be called by external systems, and obtain the official API documentation for integration.
Create an API Key
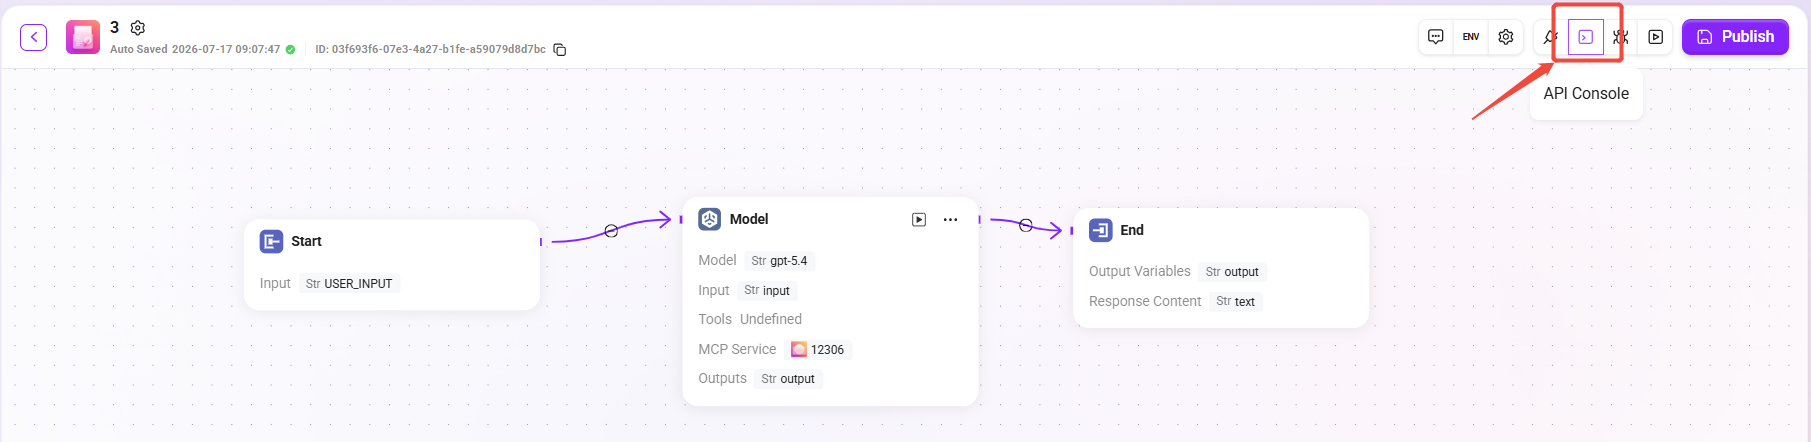
Enter the Agent's API Console
- On the Agent orchestration page, click API Console in the upper-right corner.
- After entering, you will see the API channels list page.
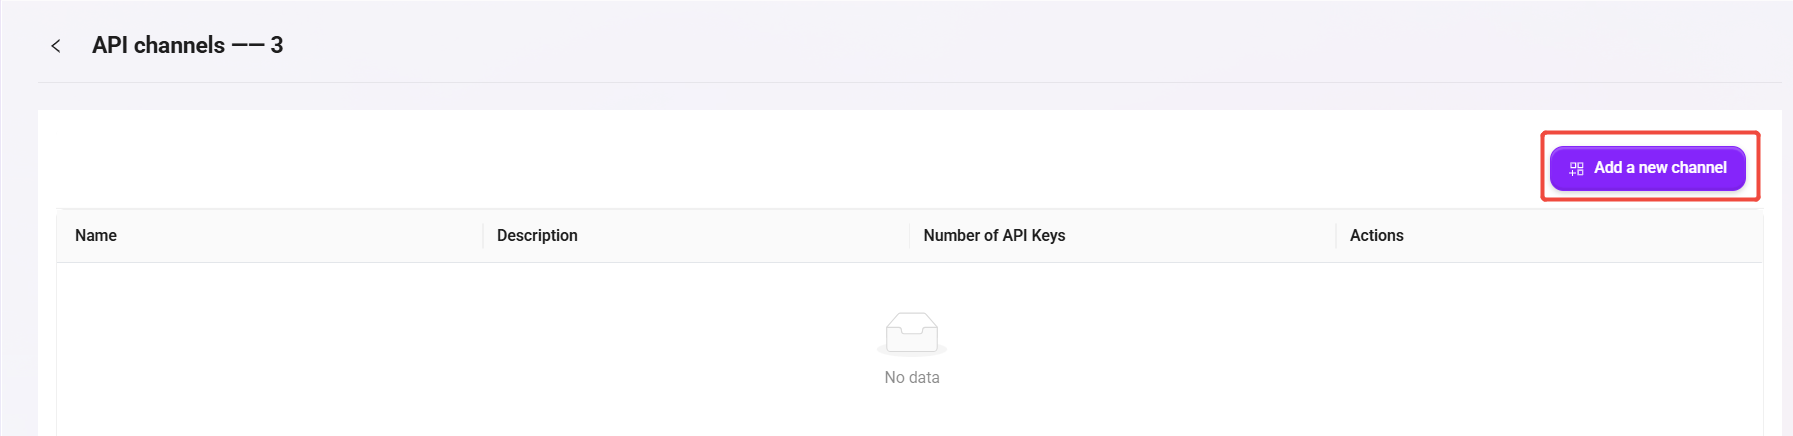
Create an API Channel
- Click Add a new channel.
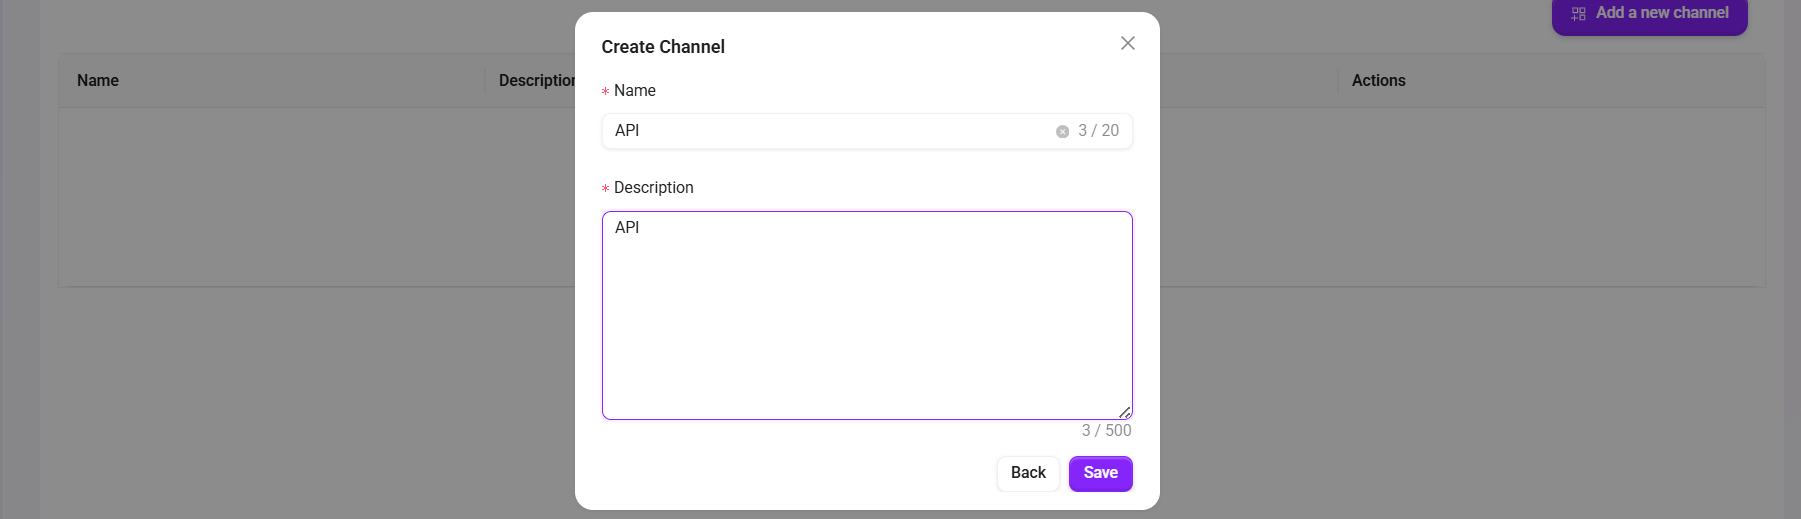
- In the pop-up window, fill in:
- Name: for example
API - Description: for example
API
- Name: for example
- Click Save to save.
Enter the Channel's key page
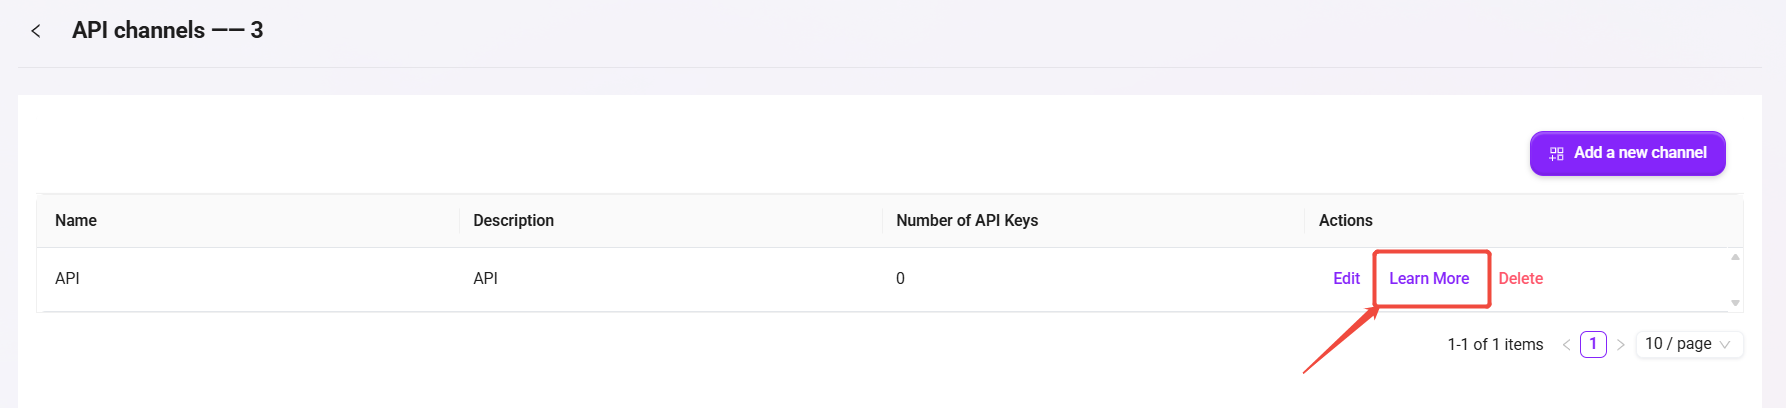
- Find the record you just created in the channel list.
- Click Learn More to enter the API Keys page.
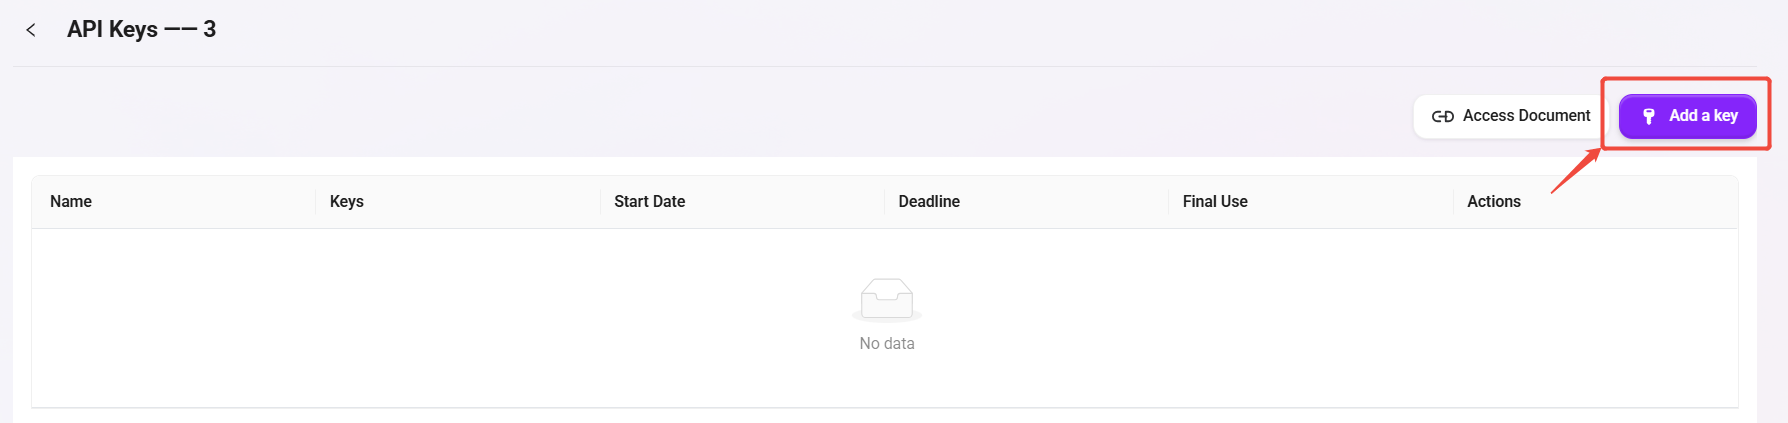
Generate an API Key
- Click Add a key.
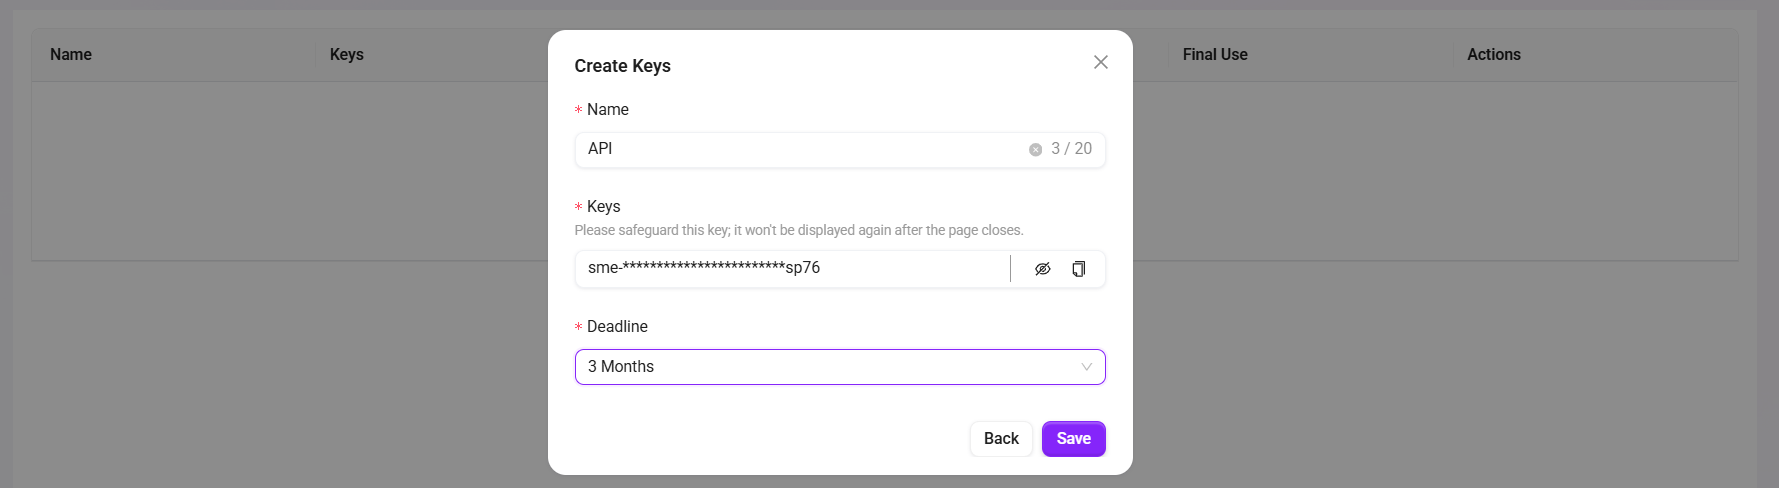
- In the pop-up window, set:
- Name: for example
API - Deadline: select the validity period as needed (for example, 3 Months)
- Name: for example
- Click Save to generate the key.
- Copy and securely save the Key immediately (it is usually no longer fully displayed after the page is closed).
Obtain the API documentation and integrate
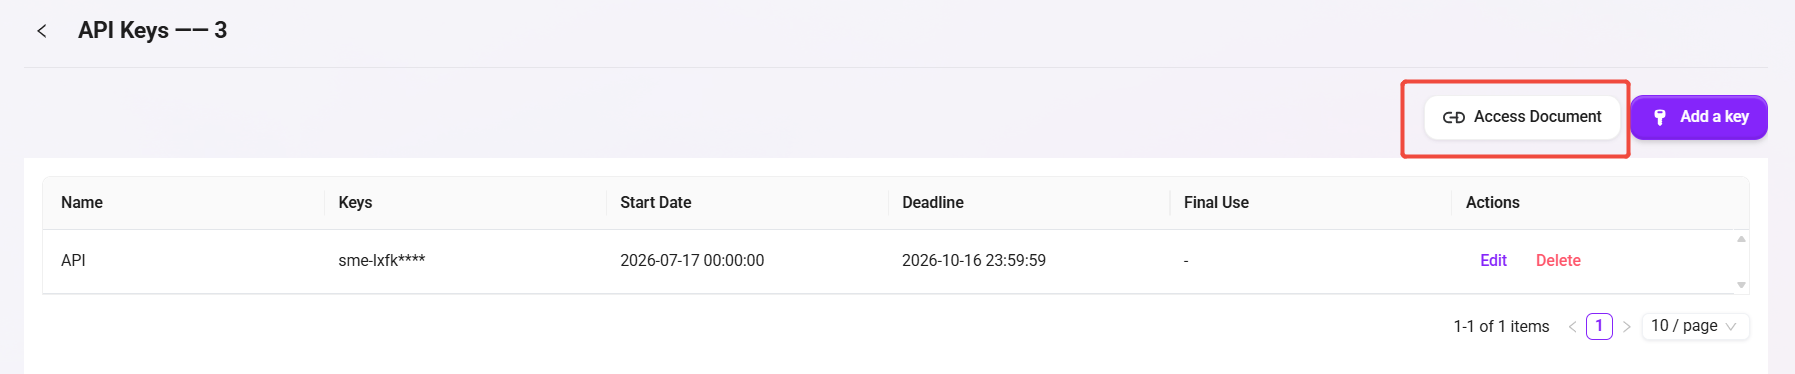
- On the API Keys page, click Access Document.
- In the documentation, copy the following information for external system integration:
- Request URL (Endpoint)
- Authentication method (usually
Authorization: Bearer <API_KEY>) - Request body example (input parameters)
- Response body example (output fields)
- The external system can call the Agent by sending an HTTP request according to the examples in the documentation.
Call the API and Chat with the Agent
API Key Authentication
- Method:
POST - Endpoint:
https://{host}/webapi/lite_api/v2/api/chat-with-bot/chat - Header:
api-key: YOUR_API_KEY
Key fields in the request body (JSON):
messages(required): an array of conversation messages;rolesupportsuser/ai/system/human/assistantstream(optional, defaultfalse): whether to return a streaming responseshow_tool_result(optional, defaultfalse): whether to return tool results or referencesfile_id(optional): file ID (string or array of strings)workspace_id(optional): workspace ID (string or array of strings)layout_mode(optional, default0):1returns knowledge retrieval content,0for normal chatskip_hint(optional, defaultfalse): whether to skip the PII prompt
Notes:
- It is recommended that the
roleof the last message behumanoruser - For image input, you must first call the "Upload Image API" to obtain
image_ids
Minimal request example:
{
	"messages": [
		{"role": "system", "content": "Today is Monday"},
		{
			"role": "user",
			"content": [
				{"type": "text", "text": "Please describe the following images"},
				{"type": "image_ids", "image_ids": ["uuid1", "uuid2"]}
			]
		}
	],
	"stream": false,
	"show_tool_result": false
}
Successful response highlights:
- Non-streaming:
data.full_outputis the final answer, anddata.tool_resultis the optional tool result - Streaming: the event stream includes
stream,tool_result, andend
Get Access Token
An Access Token is obtained in three steps: Create a Client → Query the Client to get credentials → Generate the Token.
1. Create a Client
- Method:
POST - Endpoint:
https://{host}/webapi/lite_api/v1/admin/clients - Header:
Authorization: Bearer YOUR_ADMIN_TOKEN
Key fields in the request body (JSON):
name(required): Client namedescription(optional): Descriptiontrusted domains(optional): List of trusted domains, defaults to an empty array
curl --location 'https://{host}/webapi/lite_api/v1/admin/clients' \
  --header 'Content-Type: application/json' \
  --header 'Accept: application/json' \
  --header 'Authorization: Bearer YOUR_ADMIN_TOKEN' \
  --data '{
    "name": "test",
    "description": "test",
    "trusted domains": []
  }'
The successful response will return client_id and client_secret. Save them securely.
2. Query Client List (Optional)
To view existing Clients and their client_id, use the following endpoint:
- Method:
GET - Endpoint:
https://{host}/webapi/lite_api/v1/admin/clients?page=1&page_size=10 - Header:
Authorization: Bearer YOUR_ADMIN_TOKEN
curl --location 'https://{host}/webapi/lite_api/v1/admin/clients?page=1&page_size=10' \
  --header 'Accept: application/json' \
  --header 'Authorization: Bearer YOUR_ADMIN_TOKEN'
3. Generate Access Token
Use the client_id and client_secret obtained in step 1 to generate an access token:
- Method:
POST - Endpoint:
https://{host}/webapi/lite_api/v1/iam/client_token
Key fields in the request body (JSON):
client_id(required): The ID obtained when creating the Clientclient_secret(required): The secret obtained when creating the Clientusername(required): The associated username
curl --location 'https://{host}/webapi/lite_api/v1/iam/client_token' \
  --header 'Content-Type: application/json' \
  --header 'Accept: application/json' \
  --data '{
    "client_id": "YOUR_CLIENT_ID",
    "client_secret": "YOUR_CLIENT_SECRET",
    "username": "YOUR_USERNAME"
  }'
Successful response example:
{
  "code": 200,
  "data": {
    "access_token": "eyJhbGci...",
    "token_type": "Bearer",
    "expires_in": 3600
  },
  "message": "success"
}
Use the access_token value from the response as YOUR_ACCESS_TOKEN in the API below.
Access Token Authentication
- Method:
POST - Endpoint:
https://{host}/webapi/lite_api/v2/api/chat-with-bot/{agent_id} - Header:
Authorization: Bearer YOUR_ACCESS_TOKEN
Path parameters:
agent_id: the UUID of the target Agent (can be obtained from the Agent page URL)
Key fields in the request body (JSON):
messages(required):roleis limited touser/human, and the maximum array length is 1stream,show_tool_result,file_id,workspace_id,layout_mode,skip_hint(same as above)conversation_id(optional): multi-turn conversation session ID; if not provided, the system creates one and returns it in the response
Minimal request example:
{
	"messages": [
		{
			"role": "user",
			"content": [
				{"type": "text", "text": "Please describe the following images"},
				{"type": "image_ids", "image_ids": ["uuid1", "uuid2"]}
			]
		}
	],
	"stream": false,
	"show_tool_result": false,
	"layout_mode": 0,
	"conversation_id": null
}
Successful response highlights:
data.conversation_id: used for reuse in subsequent multi-turn conversationsdata.full_output: the final answer
Upload Images
- Method:
POST - New Endpoint (recommended):
https://{host}/webapi/lite_api/v2/api/chat-with-bot/upload-images - Old Endpoint (to be deprecated soon):
https://{host}/webapi/lite_api/v2/api/chat-with-bot/{agent_id}/upload-images - Header (example):
api-key: YOUR_API_KEY - Content-Type:
multipart/form-data
Request parameters:
files(required): one or more image files
Successful response example:
{
	"code": 201,
	"data": {
		"ids": ["2973a321-905d-4f07-9ad4-ff0ef47a174f"]
	},
	"message": "success"
}
Description:
- Fill the returned
idsinto theimage_idsfield inmessages[].contentof the chat API to complete image-based Q&A.
Chat Image / File Retrieval Guide
Last updated by | Gavin Guo (Medalsoft) | Aug 12, 2026 at GMT+8 14:23
This section summarizes the complete API flow for chat (message) scenarios, from "ID returned" to "final preview/download", so troubleshooting can be done quickly.
1. Image
Flow Overview
- The message returns an image ID
- Call
ekb-temporaryand exchangefile_idfor a temporary link - Access the temporary link with the
authorizationheader - Render/preview the image
1) Message returns image ID
In chat messages, images are returned in Markdown image syntax, and the link contains a temporary file ID:

7485579177907720192 is the image file_id, used to get the real temporary download link in the next step.
2) Exchange file_id for temporary link
- Endpoint:
POST /webapi/knowledge/v1/file/ekb-temporary - Purpose: pass
file_idfrom step 1 to obtain a real accessible temporary file link
Request example:
curl 'https://demo.next.serviceme.com/webapi/knowledge/v1/file/ekb-temporary' \
	-H 'accept: application/json, text/plain, */*' \
	-H 'authorization: Bearer <token>' \
	-H 'content-type: application/json' \
	-H 'locale: zh-CN' \
	--data-raw '{"file_id":["7485579177907720192"]}'
Key parameters:
| Parameter | Location | Description |
|---|---|---|
authorization | Header | Bearer token is required; request will be rejected without it |
file_id | Body (array) | List of file IDs to exchange; batch is supported |
Returned value (example, signature truncated):
https://demo.next.serviceme.com/webapi/knowledge/v1/file/ekb-temporary-file/83ba1459f010783229f5787c
3) Access the temporary link
GET the returned temporary link to retrieve image content. authorization is still required.
GET https://demo.next.serviceme.com/webapi/knowledge/v1/file/ekb-temporary-file/<signed temporary file identifier>
authorization: Bearer <token>
Troubleshooting checklist:
- The numeric ID in the message is only a
file_id; it cannot be accessed directly - Temporary links are not anonymous; always include
authorization - If image loading fails, check
file_id, token validity, and temporary link expiration
2. File
Flow Overview
- The message returns file ID information (often identified by
category: "tool") - Call
get_detailto fetch file details (document_idmapping) - Call
ekb-previewfor file preview
1) Message returns file ID
When a chat message has category: "tool", it usually indicates a file-related message and includes a file identifier (for example, document_id).
2) Get file details
- Endpoint:
GET /webapi/knowledge/v1/rag/get_detail?document_id={document_id} - Purpose: query detailed file metadata (filename, type,
objectType, etc.) for preview request assembly
Request example:
curl 'https://demo.next.serviceme.com/webapi/knowledge/v1/rag/get_detail?document_id=7485164512316755968' \
	-H 'accept: application/json, text/plain, */*' \
	-H 'authorization: Bearer <token>' \
	-H 'content-type: application/json' \
	-H 'locale: zh-CN' \
	--data-raw '{}'
Key parameters:
| Parameter | Location | Description |
|---|---|---|
document_id | Query String | File document ID from message |
authorization | Header | Bearer token is required |
3) Preview file
- Endpoint:
POST /webapi/knowledge/v1/file/ekb-preview - Purpose: use file ID, object type, and file type to get preview content or preview URL
Request example:
curl 'https://demo.next.serviceme.com/webapi/knowledge/v1/file/ekb-preview' \
	-H 'accept: application/json, text/plain, */*' \
	-H 'authorization: Bearer <token>' \
	-H 'content-type: application/json' \
	-H 'locale: zh-CN' \
	--data-raw '{"id":"7485164641157386241","objectType":"2","filetype":1}'
Key parameters:
| Parameter | Description |
|---|---|
id | File ID (usually from get_detail; may differ from document_id) |
objectType | Object type (use value returned by get_detail) |
filetype | File type identifier |
authorization | Bearer token is required |
Troubleshooting checklist:
- File-related messages are commonly identified via
category: "tool" - Call
get_detailfirst, thenekb-preview - Expired token typically causes 401 on all related APIs
3. Image vs File API Comparison
| Scenario | Message Identifier | Key API Flow | Requires authorization |
|---|---|---|---|
| Image | Markdown image syntax  | ekb-temporary (exchange link) -> access temporary link | Yes (both steps) |
| File | category: "tool" | get_detail (details) -> ekb-preview (preview) | Yes (both steps) |
Common rule: all calls require a valid Bearer Token; token expiry is the most common root cause.