Agent API 创建与外部调用
目标:给已发布的 Agent 生成可供外部系统调用的 API Key,并拿到官方调用文档进行对接。
创建API Key
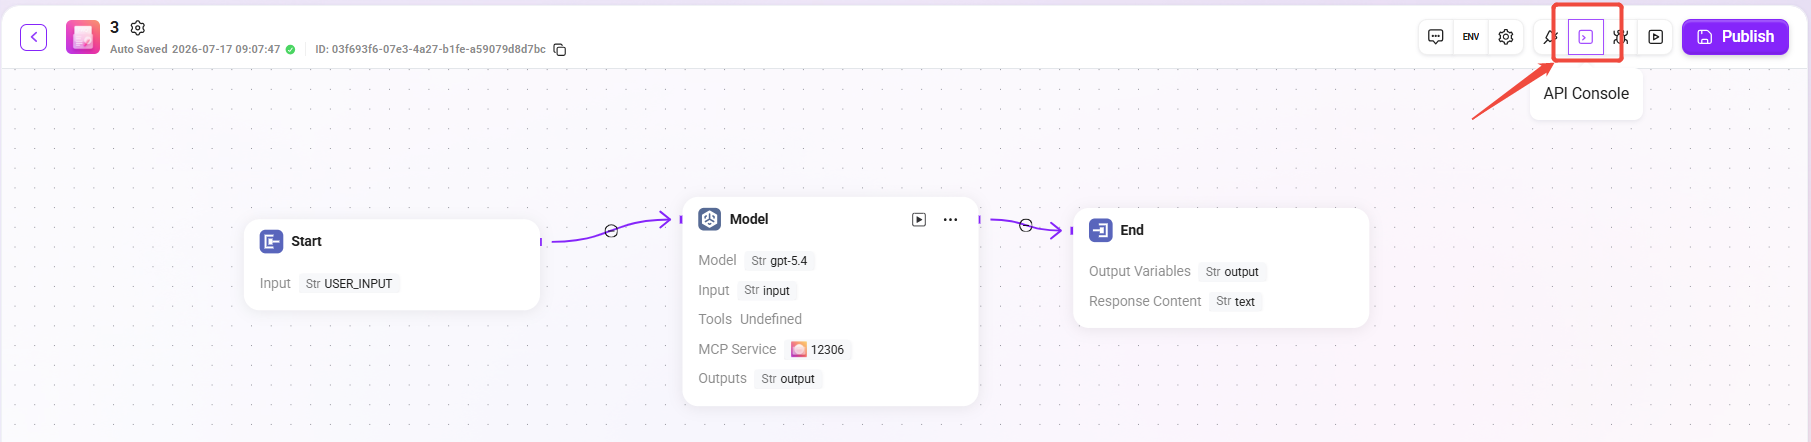
进入 Agent 的 API Console
- 在 Agent 编排页右上角点击 API Console。
- 进入后会看到 API channels 列表页。
创建 API Channel
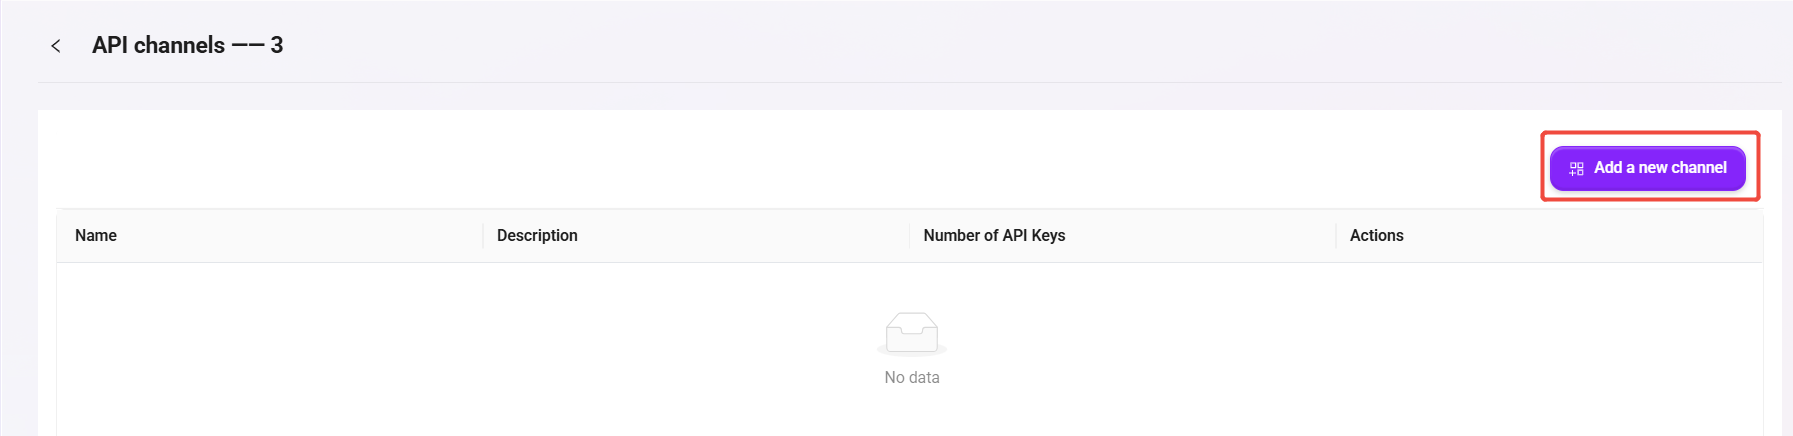
- 点击 Add a new channel。
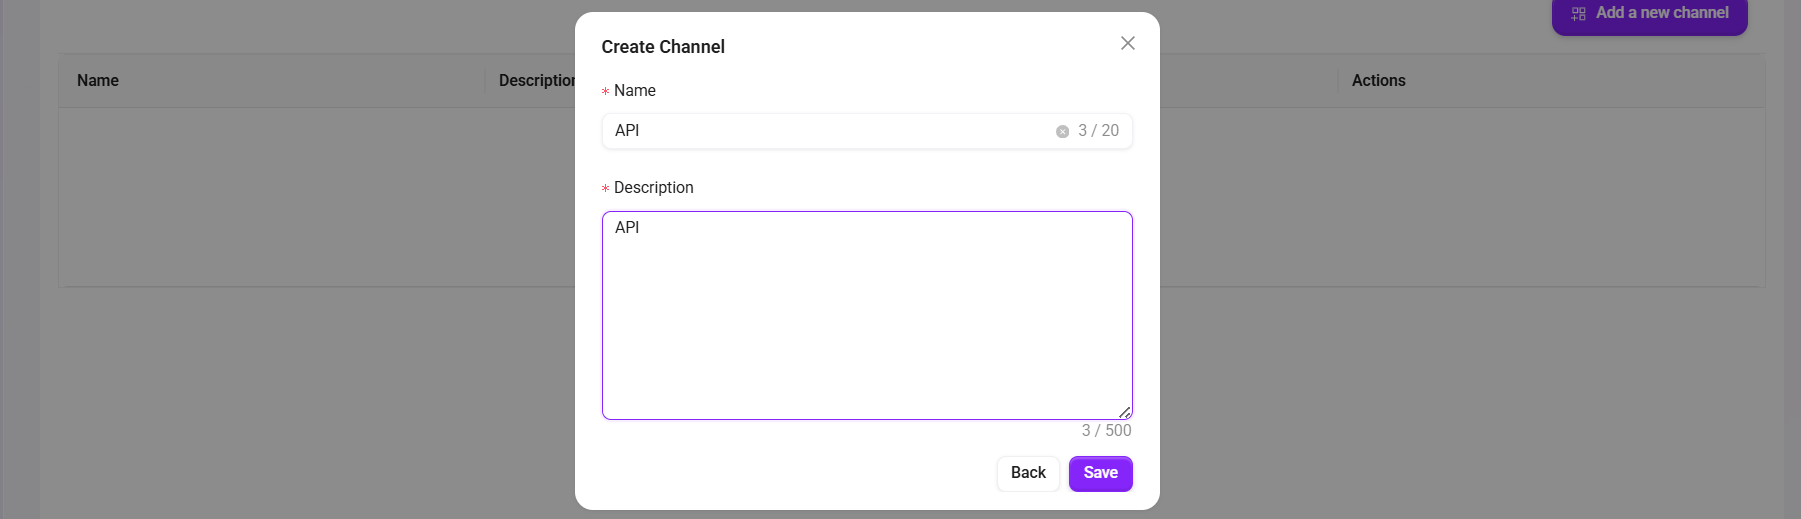
- 在弹窗中填写:
- Name:如
API - Description:如
API
- Name:如
- 点击 Save 保存。
进入 Channel 的密钥页
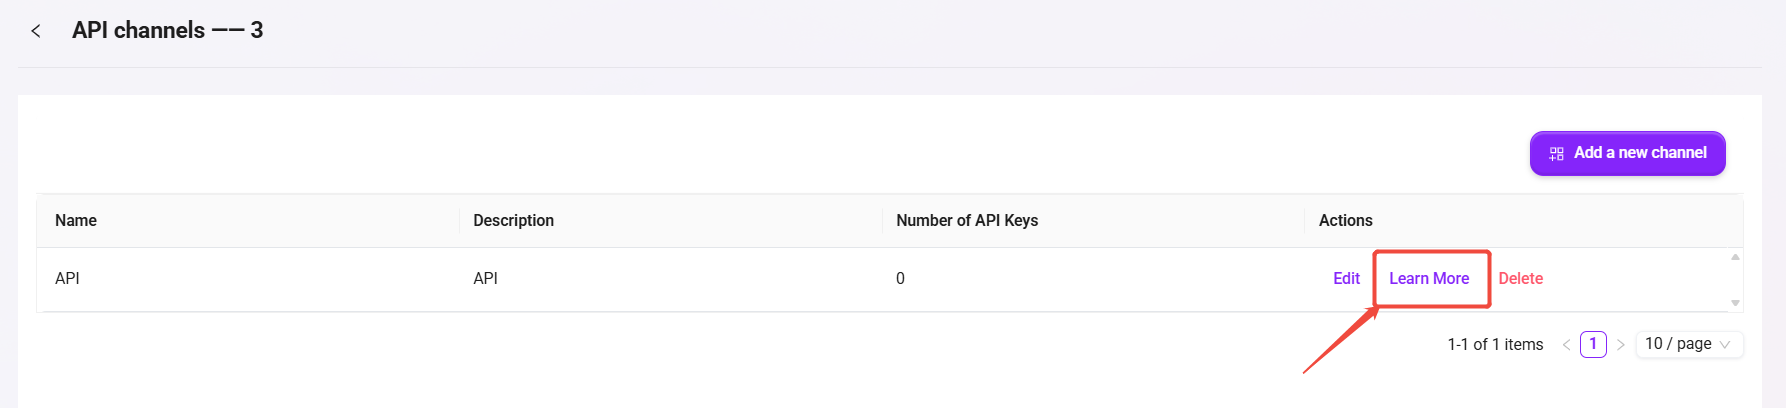
- 在 channel 列表中找到刚创建的记录。
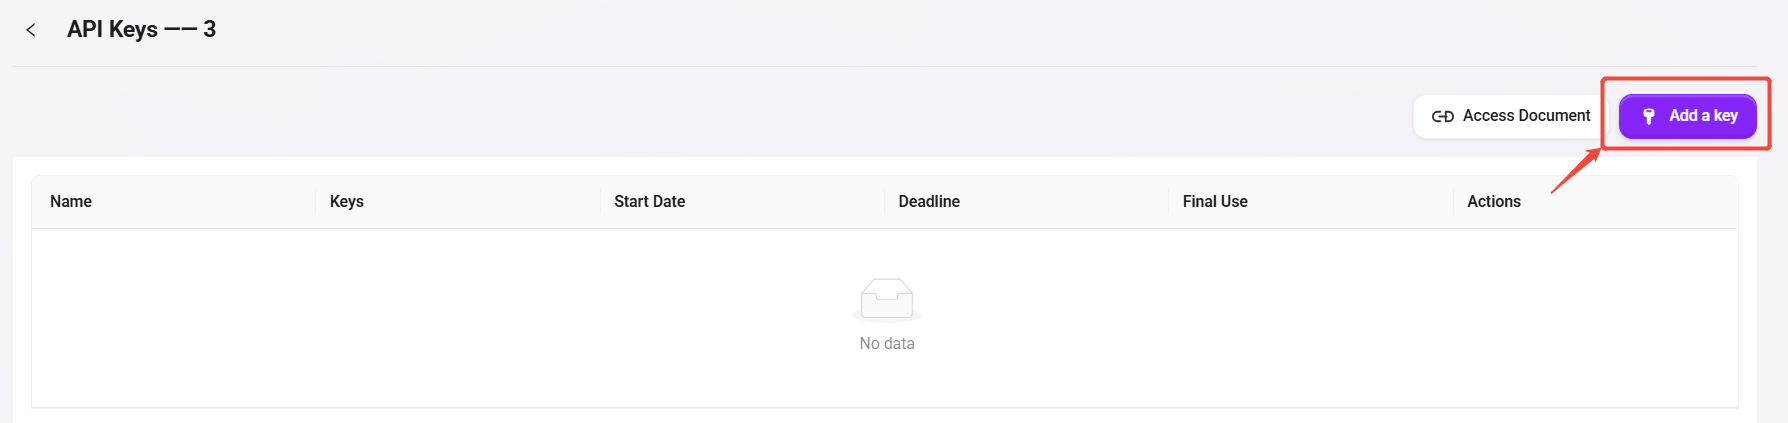
- 点击 Learn More 进入 API Keys 页面。
生成 API Key
- 点击 Add a key。
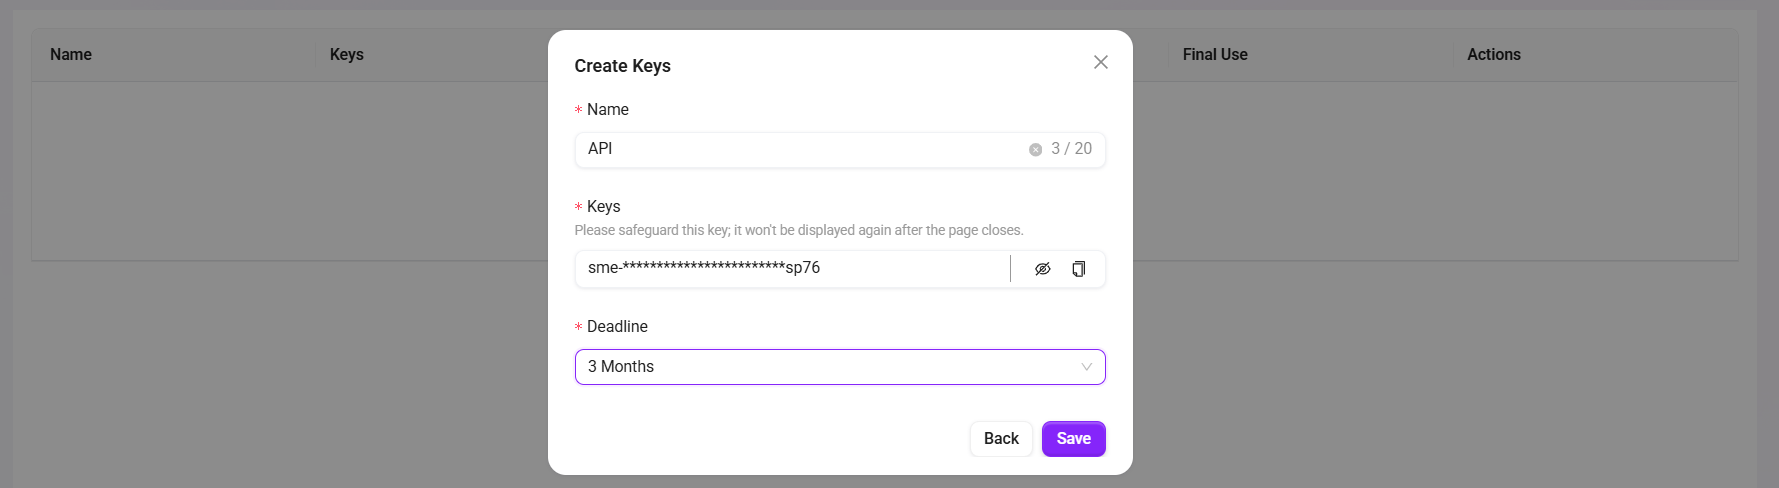
- 在弹窗中设置:
- Name:如
API - Deadline:按需求选择有效期(如 3 Months)
- Name:如
- 点击 Save 生成密钥。
- 立即复制并安全保存 Key(页面关闭后通常不再完整展示)。
获取调用文档并对接
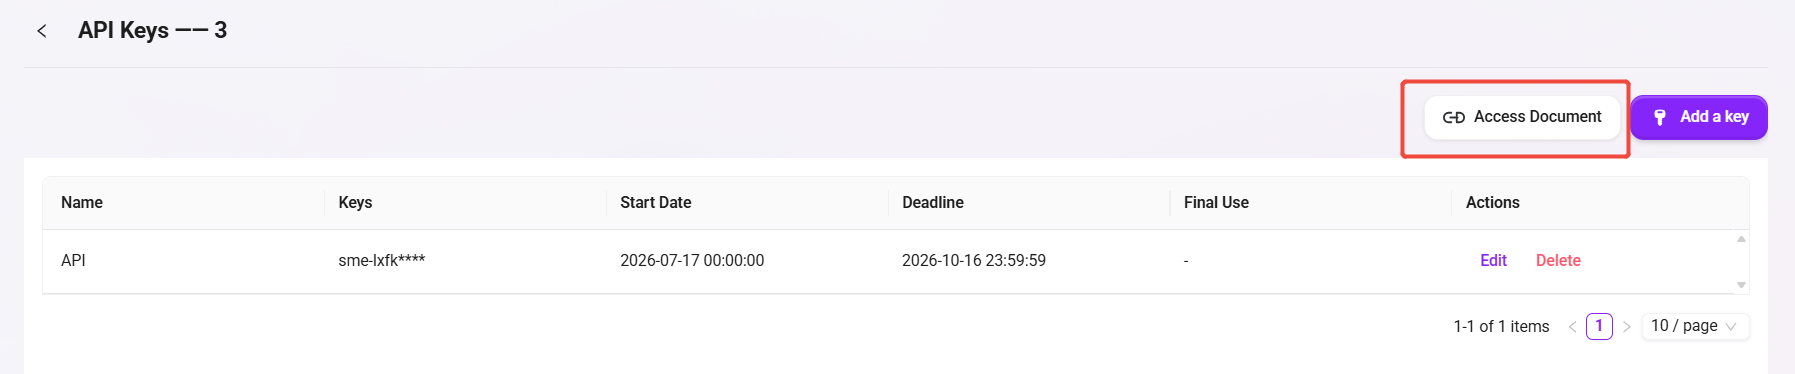
- 在 API Keys 页面点击 Access Document。
- 在文档中复制以下信息用于外部系统接入:
- 请求地址(Endpoint)
- 鉴权方式(通常是
Authorization: Bearer <API_KEY>) - 请求体示例(输入参数)
- 返回体示例(输出字段)
- 外部系统按文档示例发起 HTTP 请求即可调用该 Agent。
调用接口与 Agent 聊天
API Key 授权
- Method:
POST - Endpoint:
https://{host}/webapi/lite_api/v2/api/chat-with-bot/chat - Header:
api-key: YOUR_API_KEY
请求体(JSON)关键字段:
messages(必填):对话消息数组,role支持user/ai/system/human/assistantstream(可选,默认false):是否流式返回show_tool_result(可选,默认false):是否返回工具结果或引用file_id(可选):文件 ID(字符串或字符串数组)workspace_id(可选):工作空间 ID(字符串或字符串数组)layout_mode(可选,默认0):1返回知识检索内容,0正常聊天skip_hint(可选,默认false):是否跳过 PII 提示
注意:
- 最后一条消息的
role建议使用human或user - 图片输入需先调用“上传图片 API”获取
image_ids
最小请求示例:
{
	"messages": [
		{"role": "system", "content": "Today is Monday"},
		{
			"role": "user",
			"content": [
				{"type": "text", "text": "Please describe the following images"},
				{"type": "image_ids", "image_ids": ["uuid1", "uuid2"]}
			]
		}
	],
	"stream": false,
	"show_tool_result": false
}
成功响应要点:
- 非流式:
data.full_output为最终回答,data.tool_result为可选工具结果 - 流式:事件流包含
stream、tool_result、end
获取 Access Token
Access Token 通过以下三步获取:创建 Client → 查询 Client 获得凭证 → 生成 Token。
1. 创建 Client
- Method:
POST - Endpoint:
https://{host}/webapi/lite_api/v1/admin/clients - Header:
Authorization: Bearer YOUR_ADMIN_TOKEN
请求体(JSON)关键字段:
name(必填):Client 名称description(可选):描述trusted domains(可选):可信域名列表,默认为空数组
curl --location 'https://{host}/webapi/lite_api/v1/admin/clients' \
  --header 'Content-Type: application/json' \
  --header 'Accept: application/json' \
  --header 'Authorization: Bearer YOUR_ADMIN_TOKEN' \
  --data '{
    "name": "测试",
    "description": "测试",
    "trusted domains": []
  }'
成功响应中会返回 client_id 与 client_secret,请妥善保存。
2. 查询 Client 列表(可选)
如需查看已创建的 Client 及其 client_id,可通过以下接口查询:
- Method:
GET - Endpoint:
https://{host}/webapi/lite_api/v1/admin/clients?page=1&page_size=10 - Header:
Authorization: Bearer YOUR_ADMIN_TOKEN
curl --location 'https://{host}/webapi/lite_api/v1/admin/clients?page=1&page_size=10' \
  --header 'Accept: application/json' \
  --header 'Authorization: Bearer YOUR_ADMIN_TOKEN'
3. 生成 Access Token
使用步骤 1 获取的 client_id 和 client_secret 生成访问令牌:
- Method:
POST - Endpoint:
https://{host}/webapi/lite_api/v1/iam/client_token
请求体(JSON)关键字段:
client_id(必填):创建 Client 时获取的 IDclient_secret(必填):创建 Client 时获取的密钥username(必填):关联的用户名
curl --location 'https://{host}/webapi/lite_api/v1/iam/client_token' \
  --header 'Content-Type: application/json' \
  --header 'Accept: application/json' \
  --data '{
    "client_id": "YOUR_CLIENT_ID",
    "client_secret": "YOUR_CLIENT_SECRET",
    "username": "YOUR_USERNAME"
  }'
成功响应示例:
{
  "code": 200,
  "data": {
    "access_token": "eyJhbGci...",
    "token_type": "Bearer",
    "expires_in": 3600
  },
  "message": "success"
}
将响应中的 access_token 值作为下方接口中的 YOUR_ACCESS_TOKEN 使用。
Access Token 授权
- Method:
POST - Endpoint:
https://{host}/webapi/lite_api/v2/api/chat-with-bot/{agent_id} - Header:
Authorization: Bearer YOUR_ACCESS_TOKEN
路径参数:
agent_id:目标 Agent 的 UUID(可从 Agent 页面 URL 中获取)
请求体(JSON)关键字段:
messages(必填):role限制为user/human,且数组长度最大为 1stream、show_tool_result、file_id、workspace_id、layout_mode、skip_hint(同上)conversation_id(可选):多轮对话会话 ID;不传则系统创建并在响应返回
最小请求示例:
{
	"messages": [
		{
			"role": "user",
			"content": [
				{"type": "text", "text": "Please describe the following images"},
				{"type": "image_ids", "image_ids": ["uuid1", "uuid2"]}
			]
		}
	],
	"stream": false,
	"show_tool_result": false,
	"layout_mode": 0,
	"conversation_id": null
}
成功响应要点:
data.conversation_id:用于后续多轮对话复用data.full_output:最终回答
上传图片
- Method:
POST - 新 Endpoint(推荐):
https://{host}/webapi/lite_api/v2/api/chat-with-bot/upload-images - 旧 Endpoint(即将废弃):
https://{host}/webapi/lite_api/v2/api/chat-with-bot/{agent_id}/upload-images - Header(示例):
api-key: YOUR_API_KEY - Content-Type:
multipart/form-data
请求参数:
files(必填):一个或多个图片文件
成功响应示例:
{
	"code": 201,
	"data": {
		"ids": ["2973a321-905d-4f07-9ad4-ff0ef47a174f"]
	},
	"message": "success"
}
说明:
- 将返回的
ids填入聊天接口messages[].content中的image_ids字段即可完成图片问答。
聊天消息中图片与文件的获取
聊天消息返回图片或文件 ID 后,需通过额外接口换取可访问的链接或预览内容。以下说明从「返回 ID」到「最终预览/下载」的完整调用流程。
图片获取流程
第一步:从 message 中提取图片 ID
聊天消息中,图片以 Markdown 图片语法返回,链接里包含图片的临时文件 ID:

其中 7485579177907720192 即为 file_id,用于下一步换取可访问的临时链接。
第二步:用 file_id 换取临时链接
- Method:
POST - Endpoint:
https://{host}/webapi/knowledge/v1/file/ekb-temporary - Header:
authorization: Bearer YOUR_TOKEN
请求体(JSON)关键字段:
file_id(必填):文件 ID 数组,支持批量传多个
curl 'https://{host}/webapi/knowledge/v1/file/ekb-temporary' \
  -H 'accept: application/json, text/plain, */*' \
  -H 'authorization: Bearer YOUR_TOKEN' \
  -H 'content-type: application/json' \
  --data-raw '{"file_id":["7485579177907720192"]}'
成功响应将返回真实可访问的临时文件链接:
https://{host}/webapi/knowledge/v1/file/ekb-temporary-file/<签名后的临时文件标识>
第三步:访问临时链接
直接 GET 上一步返回的临时链接即可获取图片内容,需携带 authorization 请求头,否则将返回 401/403。
GET https://{host}/webapi/knowledge/v1/file/ekb-temporary-file/<签名后的临时文件标识>
Header: authorization: Bearer YOUR_TOKEN
注意:
- 消息中的数字 ID 仅为
file_id,不能直接访问,必须先调用ekb-temporary换取真实临时链接 - 临时链接同样需要鉴权,访问时必须携带
authorization - 图片加载失败时,优先检查:①
file_id是否正确 ② Token 是否过期 ③ 临时链接是否已过期
文件获取流程
第一步:从 message 中识别文件消息
当聊天消息的 category 字段为 "tool" 时,表示这是一条与文件相关的消息,其中会携带文件对应的 document_id。
第二步:获取文件详情
- Method:
GET - Endpoint:
https://{host}/webapi/knowledge/v1/rag/get_detail?document_id={document_id} - Header:
authorization: Bearer YOUR_TOKEN
请求参数:
document_id(Query String,必填):文件对应的文档 ID,从 message 中获取
curl 'https://{host}/webapi/knowledge/v1/rag/get_detail?document_id=7485164512316755968' \
  -H 'accept: application/json, text/plain, */*' \
  -H 'authorization: Bearer YOUR_TOKEN' \
  -H 'content-type: application/json' \
  --data-raw '{}'
返回结果中包含后续预览接口所需的 id、objectType、filetype 等字段。
第三步:预览文件
- Method:
POST - Endpoint:
https://{host}/webapi/knowledge/v1/file/ekb-preview - Header:
authorization: Bearer YOUR_TOKEN
请求体(JSON)关键字段:
| 参数 | 说明 |
|---|---|
id | 文件 ID(从 get_detail 返回结果中获取,与 document_id 可能不同) |
objectType | 对象类型(从 get_detail 返回结果中获取) |
filetype | 文件类型标识(从 get_detail 返回结果中获取) |
curl 'https://{host}/webapi/knowledge/v1/file/ekb-preview' \
  -H 'accept: application/json, text/plain, */*' \
  -H 'authorization: Bearer YOUR_TOKEN' \
  -H 'content-type: application/json' \
  --data-raw '{"id":"7485164641157386241","objectType":"2","filetype":1}'
注意:
- 文件类消息通过
category: "tool"区分 - 需先调
get_detail获取完整详情(包含预览接口所需参数),再调ekb-preview完成预览 - Token 过期将导致所有接口均返回 401
图片与文件接口对比
| 场景 | 消息标识 | 关键接口 | 需要 authorization |
|---|---|---|---|
| 图片 | Markdown 图片语法  | ekb-temporary → 访问临时链接 | 是(两步均需要) |
| 文件 | category: "tool" | get_detail → ekb-preview | 是(两步均需要) |
注意:所有接口均需携带有效的 Bearer Token,Token 过期是最常见的排查突破口。