How to Manage Knowledge Spaces?
How to Create a Knowledge Space?
- Log in to the SERVICEME platform;
- Switch to the "Admin" platform;
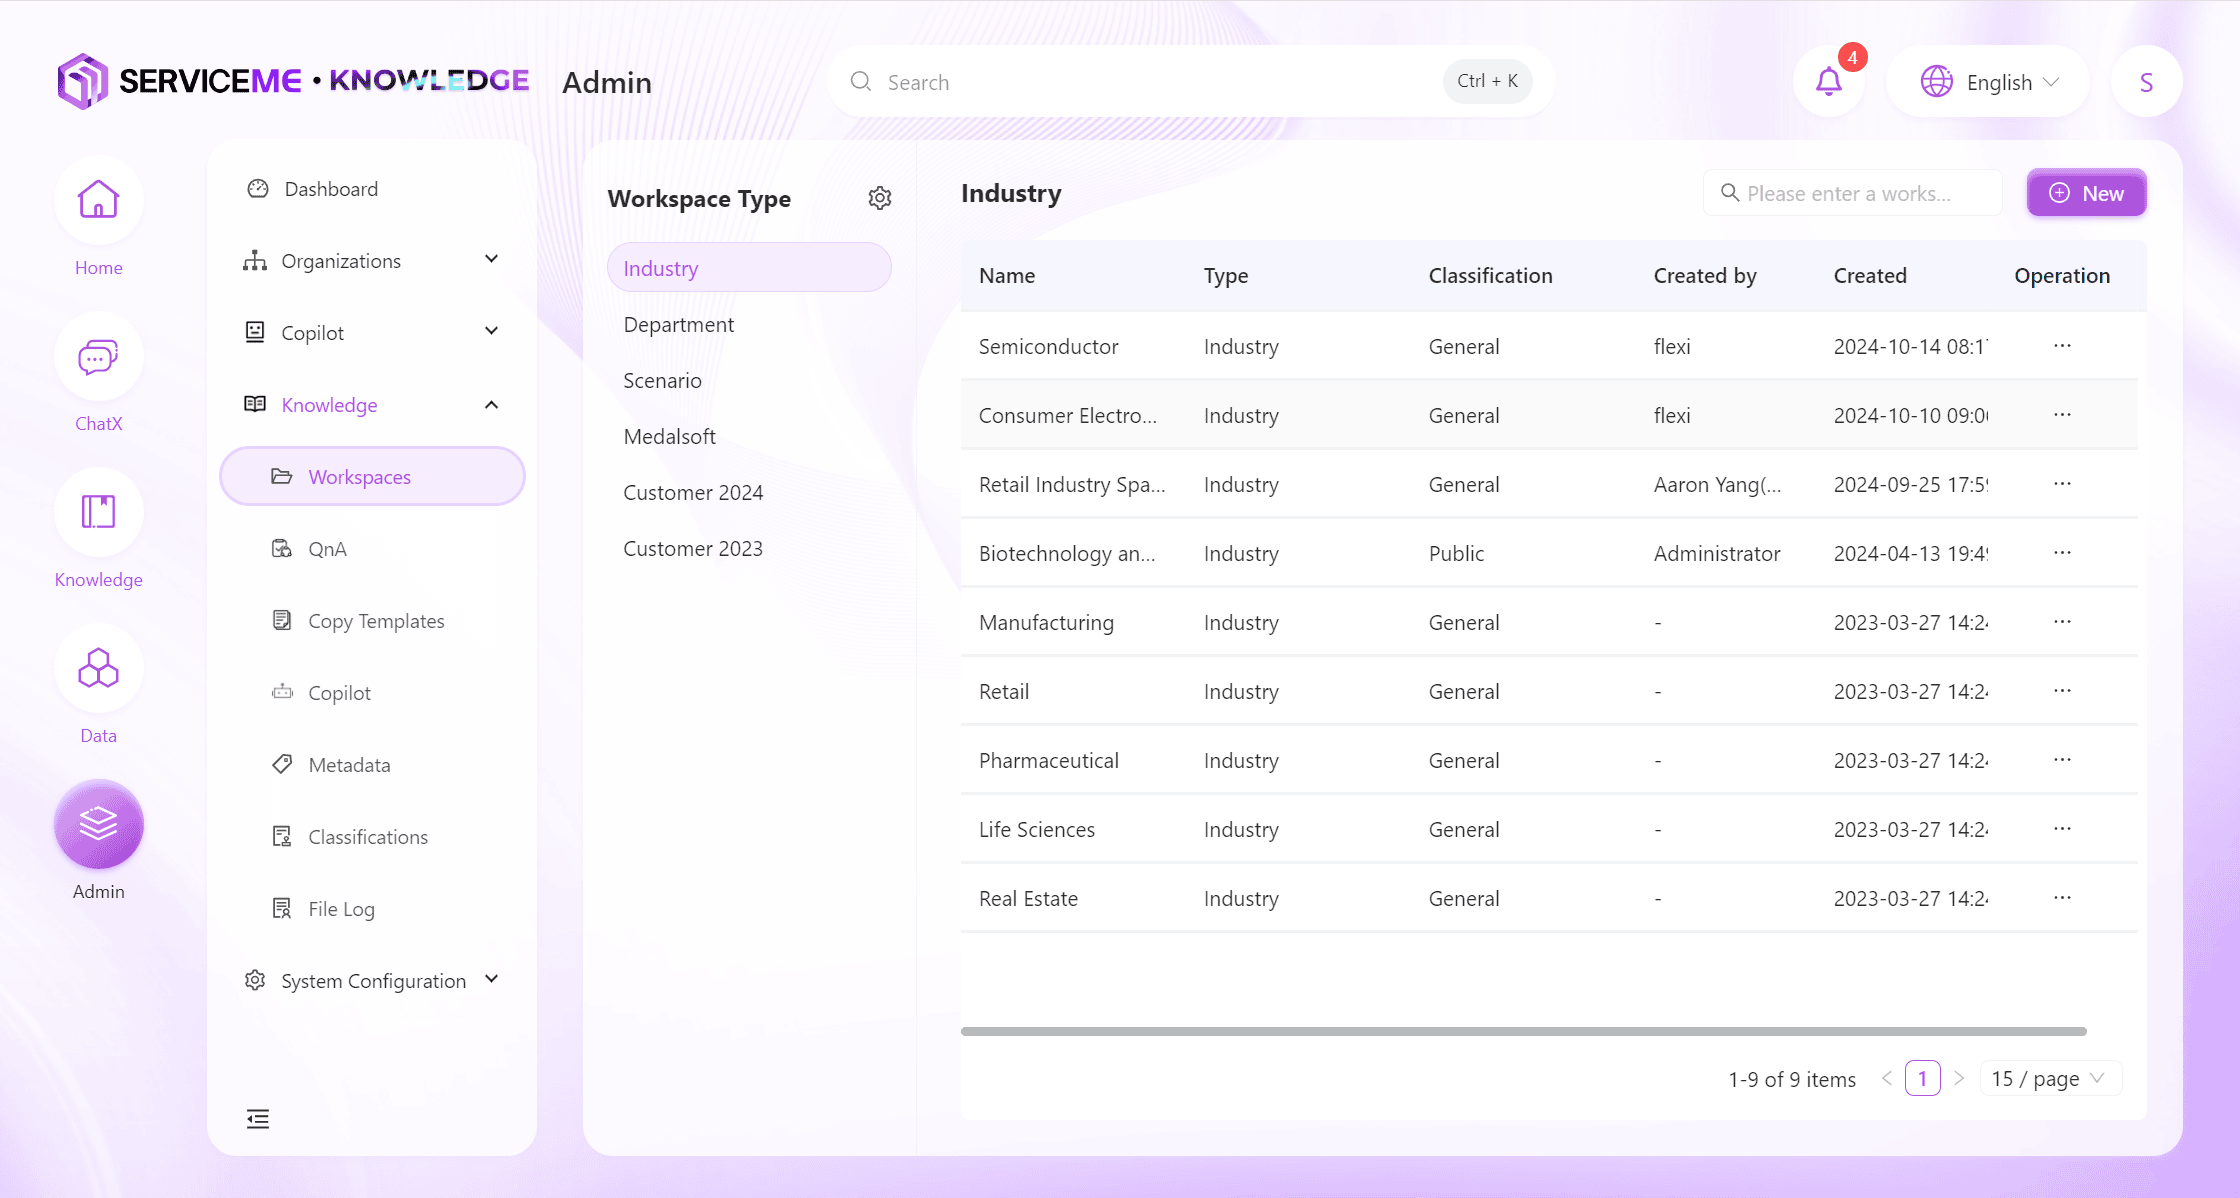
- Go to "Knowledge Management > File Spaces";
-
Click the "Add" button in the upper right corner of the page to open the new file space window;
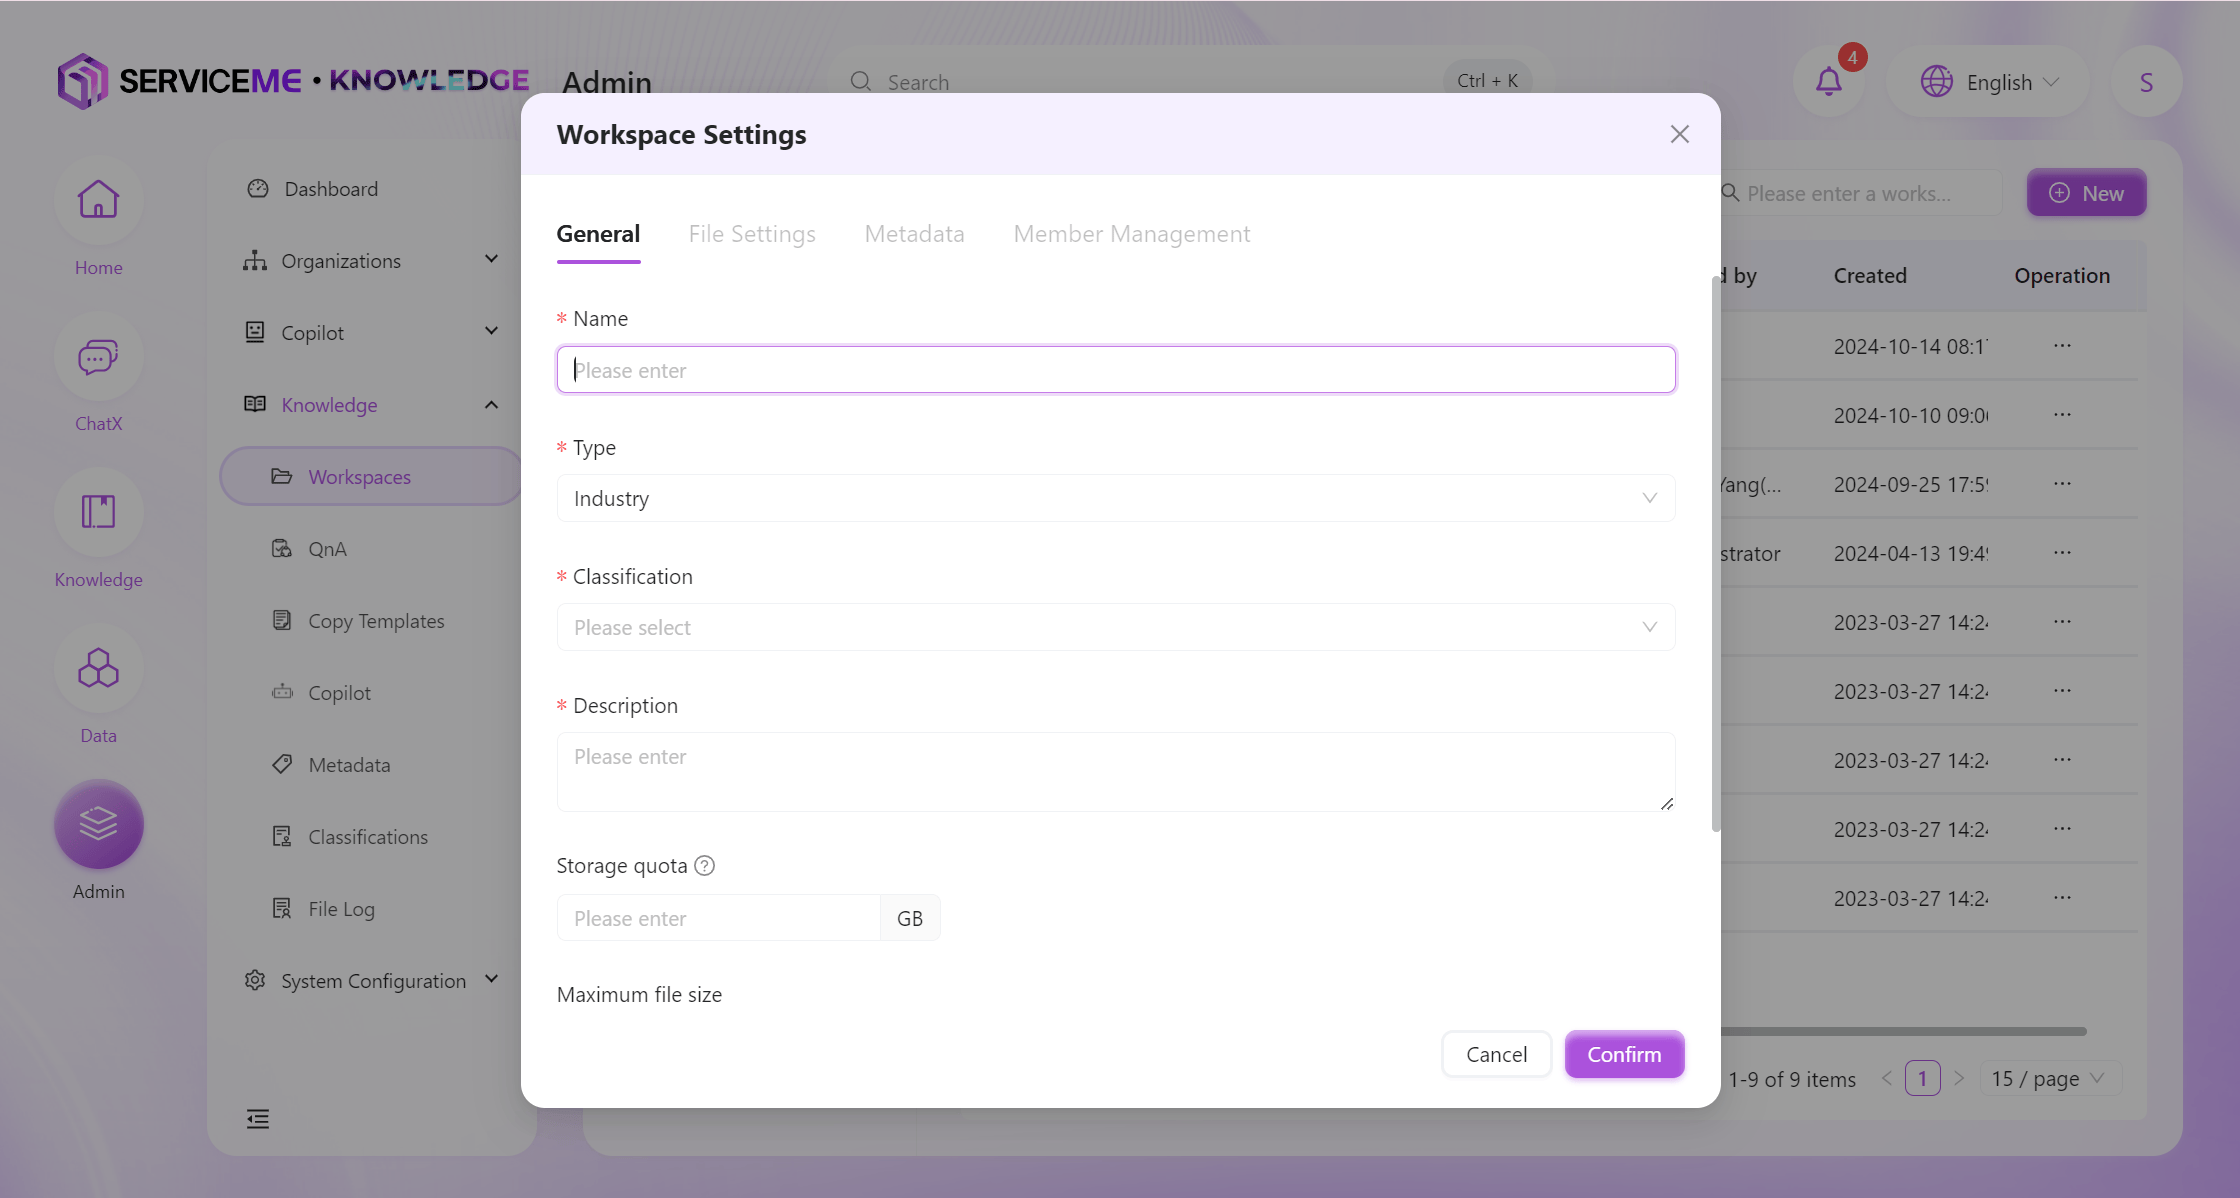
Enter a custom file space name in "Name", for example,Product Operations Space;
Select the file space type from the "Type" dropdown, for example,Enterprise Knowledge Base;
Select the file space security level from the "Security Level" dropdown, for example,Public;
Enter a custom description for the file space in "Description", for example,Product operations file space, including daily promotional materials, product introduction manuals, etc.;
Keep "Storage Quota" as the default empty configuration;
Keep "File Size Limit" as the default empty configuration;
Keep "Supported File Formats" as the default empty configuration; -
Click the "OK" button to successfully add the knowledge space.
How to Manage Access Permissions for Space Members?
- Log in to the SERVICEME platform;
- Switch to the "Admin" platform;
- Go to "Knowledge Management > File Spaces";

-
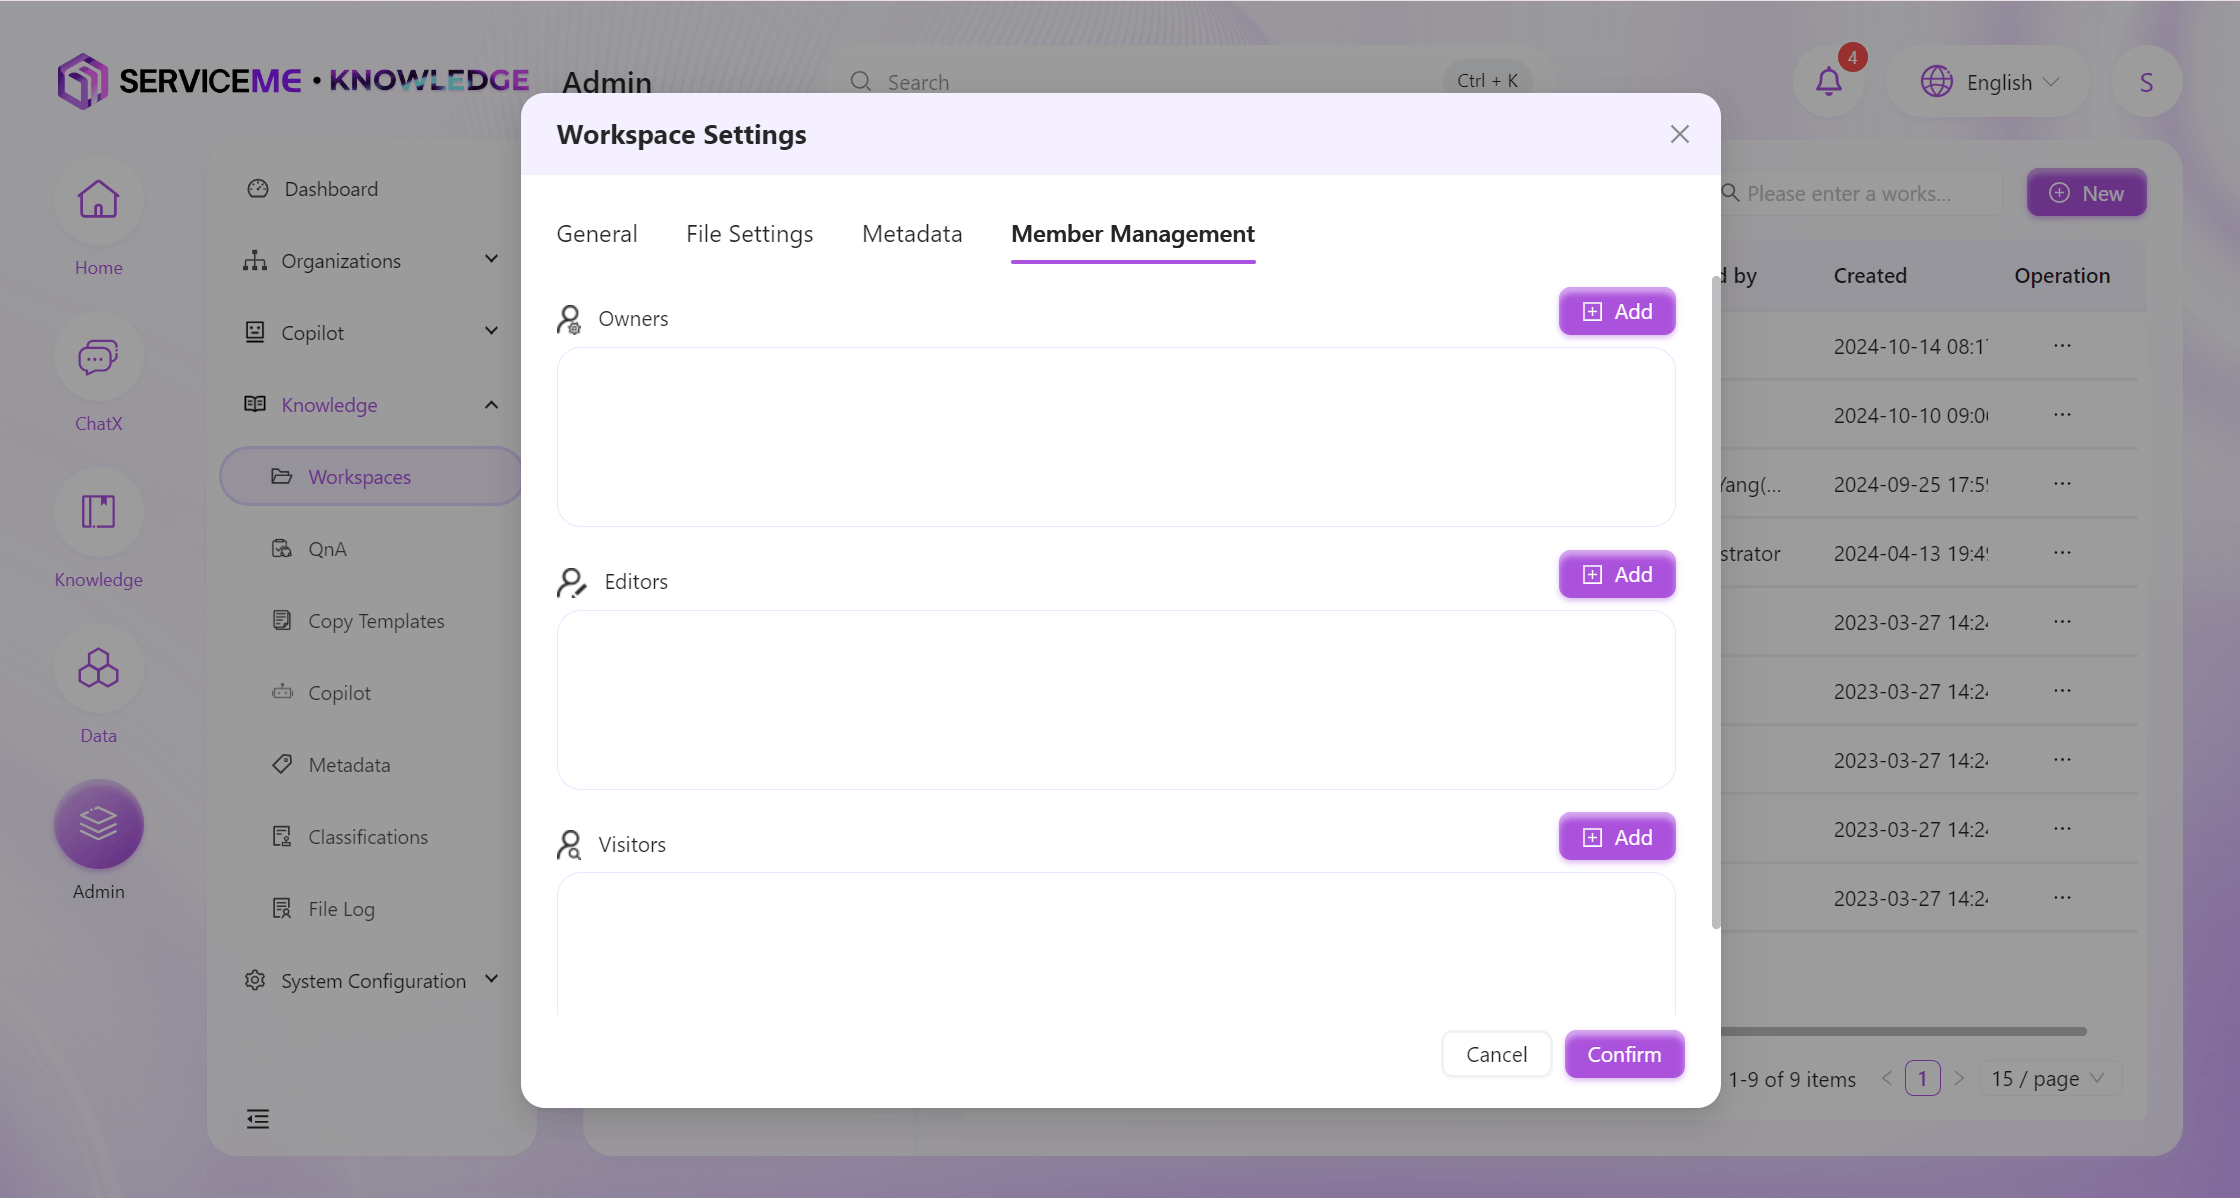
Select the file space to authorize, expand the "Actions" button, and click the "Member Management" button to open the authorization page;
-
For "Owner", click the "Add" button to open the authorization page and select the organization and users to authorize, for example,
Operations Center;
Authorize "Editor" toDesign Center;
Authorize "Guest" toInternal Organization;
- File space owners have the right to manage members and operate all file functions;
- File space editors have the right to operate all file functions;
- File space guests can only operate basic file functions, including preview, share, download, etc.
- Click the "OK" button to authorize successfully.
How to Grant Access to Knowledge Spaces for Other Users?
- The file space owner logs in to the SERVICEME platform;
- Switch to the "Knowledge" platform;
- Go to "File Spaces";
- Select any file space, for example,
Product Operations Space; - Click "Member Management" to open the member selector;
- For "Owner", click the "Add" button to open the authorization page and select the organization and users to authorize, for example,
Operations Center;
Authorize "Editor" toDesign Center;
Authorize "Guest" toInternal Organization; - Click the "OK" button to successfully set up member management.
- File space owners have the right to manage members and operate all file functions;
- File space editors have the right to operate all file functions;
- File space guests can only operate basic file functions, including preview, share, download, etc.
How to Restrict Upload File Size and Format in Knowledge Spaces?
- Log in to the SERVICEME platform;
- Switch to the "Admin" platform;
- Go to "Knowledge Management > File Spaces";
-
Select the file space to configure, for example,
Product Operations Space, expand the "Actions" button, and click the "Settings" button to open the edit page; -
Enter a custom number in "File Size Limit", for example,
5MB;
Select custom file extensions in "Supported File Formats", for example,.txt,.docx,.xlsx,.pptx; -
Click the "OK" button to successfully set up the knowledge space.
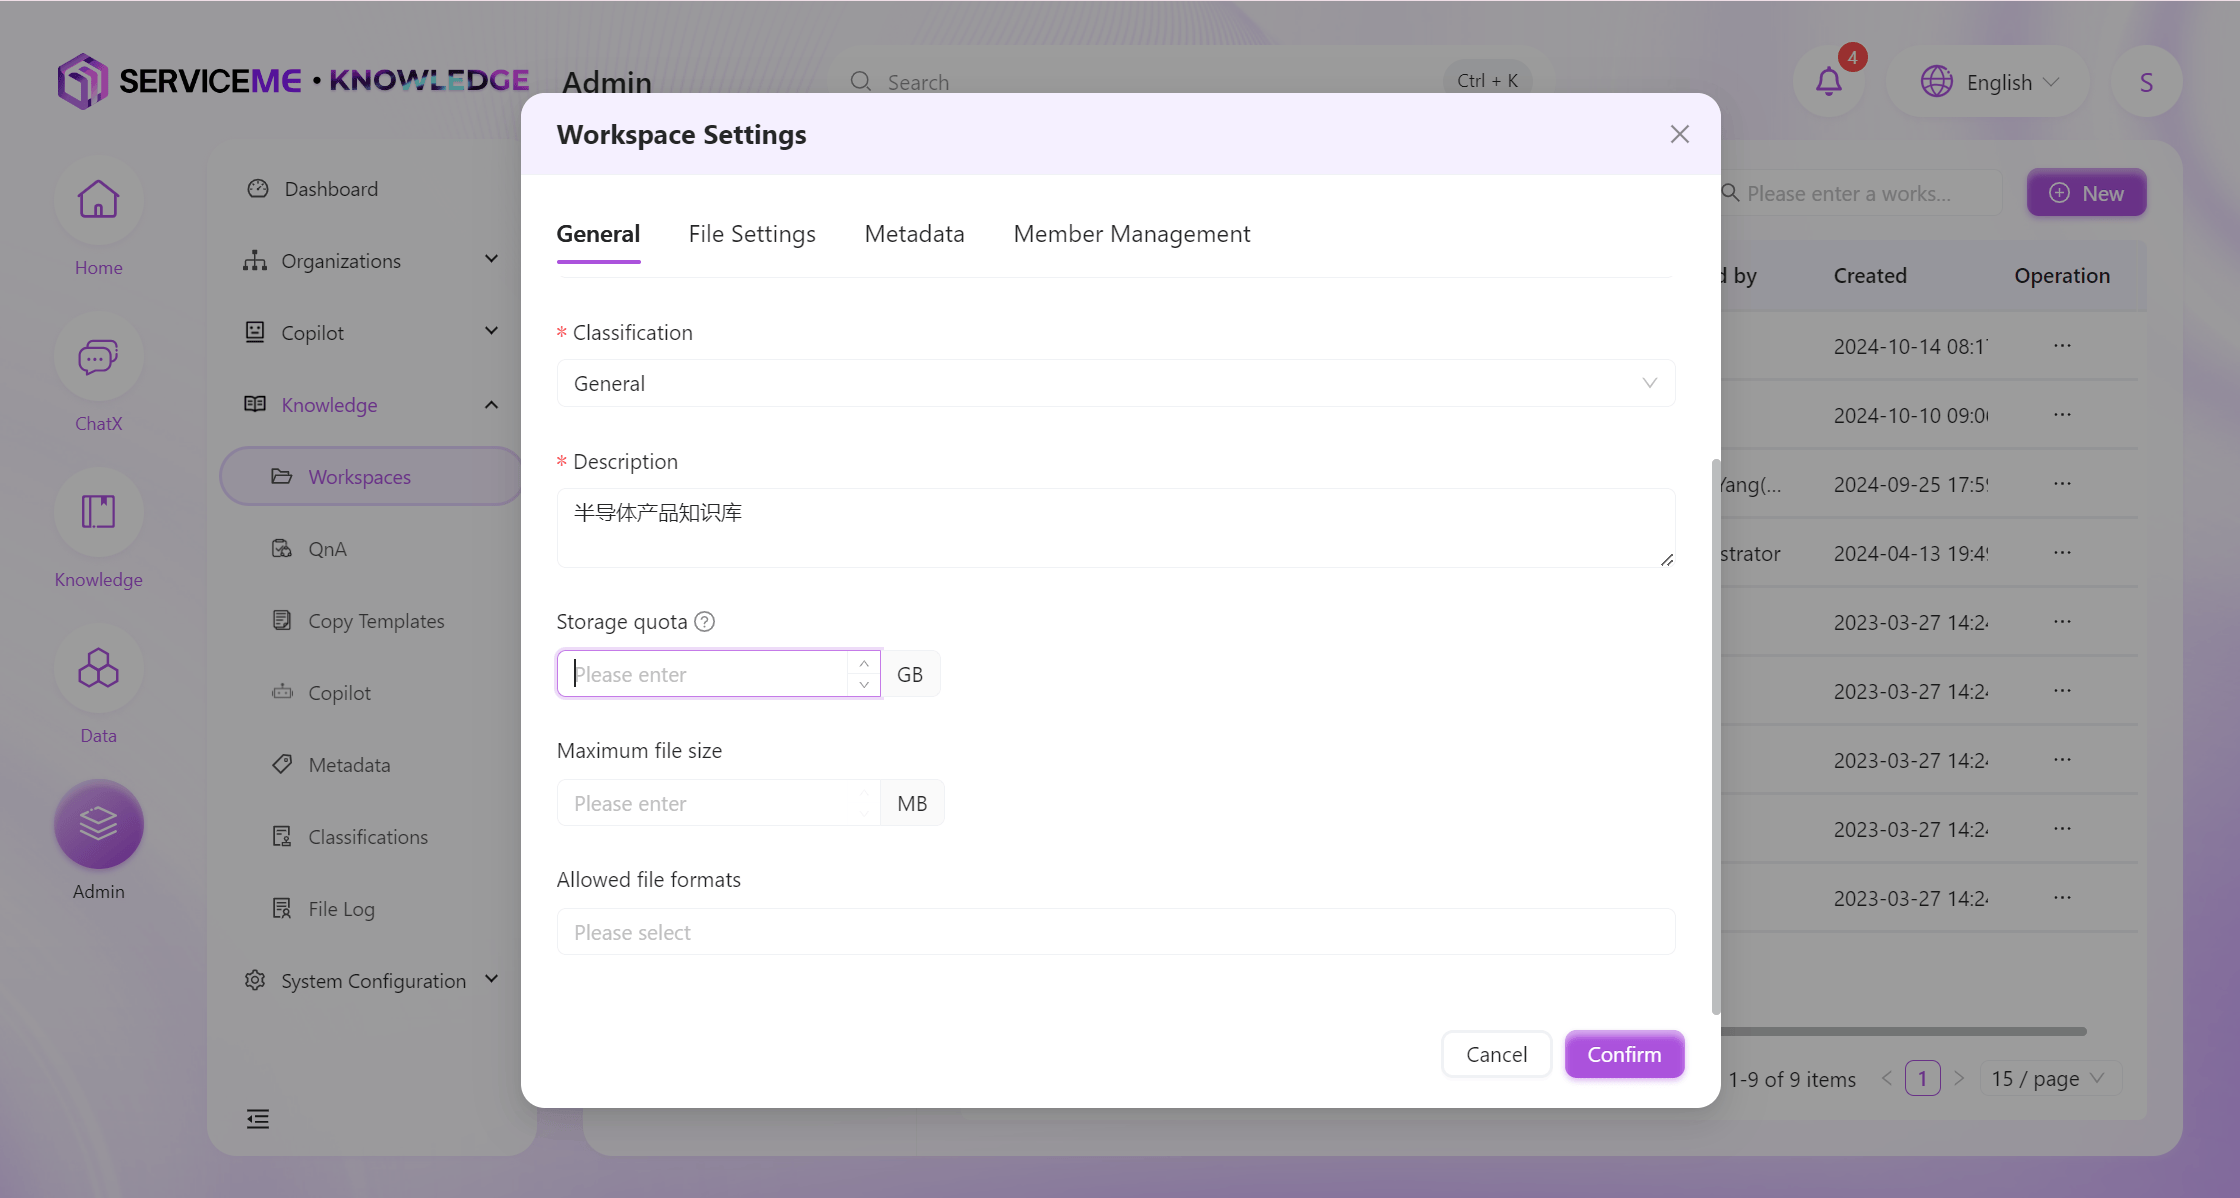
- If a user uploads a single file larger than 5MB or a file type outside the allowed formats, the system will prompt accordingly.
How to Restrict Operations in Knowledge Spaces (e.g., Disable Download)?
- Log in to the SERVICEME platform;
- Switch to the "Admin" platform;
- Go to "Knowledge Management > File Spaces";
- Select the file space to configure, for example,
Product Operations Space, expand the "Actions" button, and click the "Settings" button to open the edit page; - Modify the "Security Level", for example,
Highly confidential; - Click the "OK" button to successfully set up the knowledge space.
- Knowledge space users will not have a download option.

- The system uses security levels to control file space operation permissions. For example,
Confidentialcannot download files. For operation permissions corresponding to each security level, please refer to How to Add Security Levels to Knowledge Spaces?.
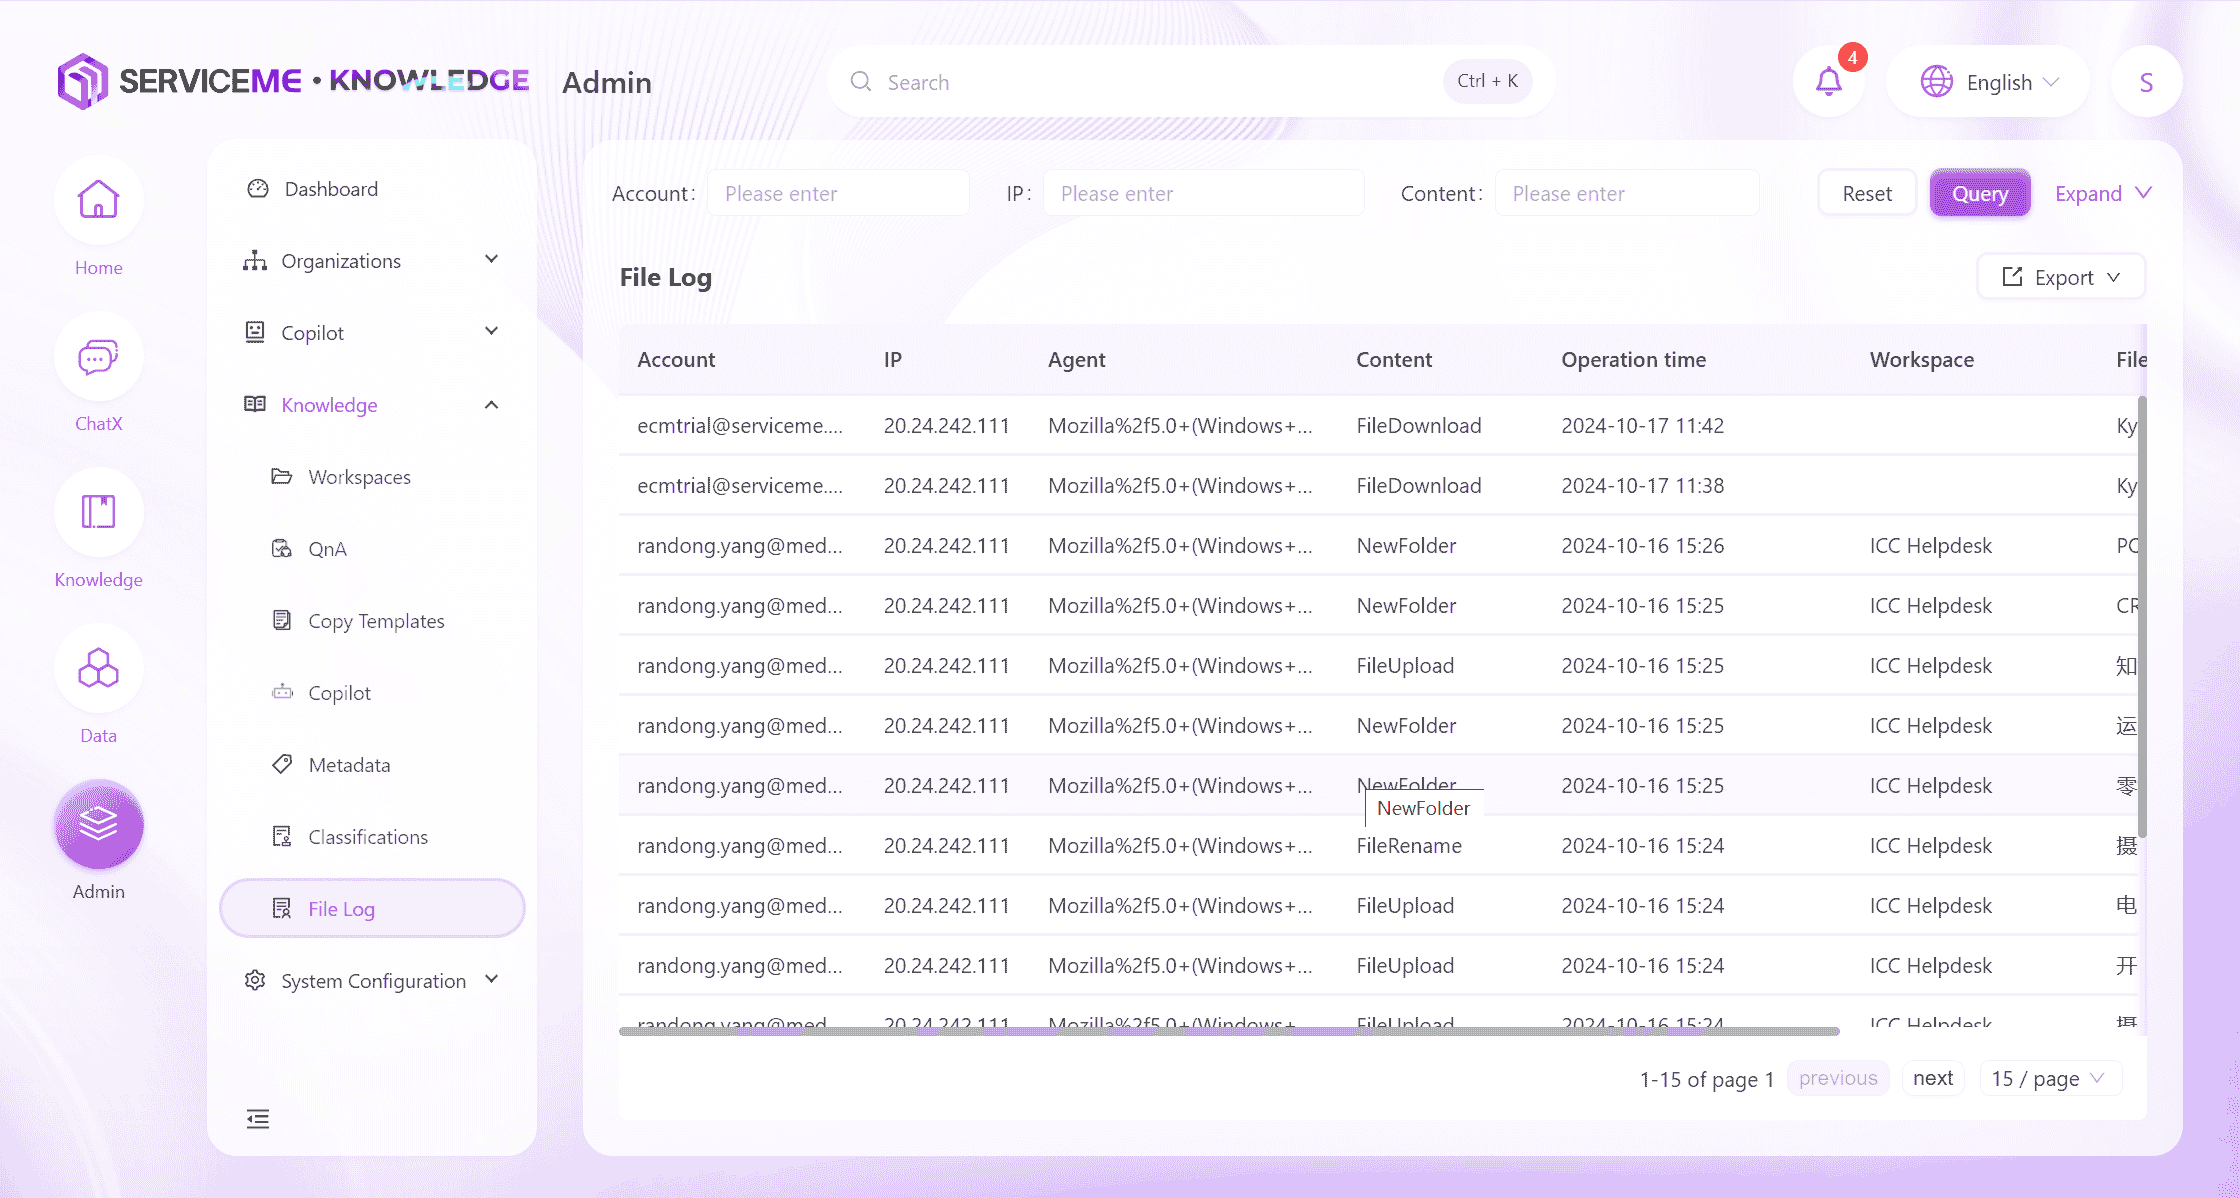
How to View All Users' File Operation Logs?
- Log in to the SERVICEME platform;
- Switch to the "Admin" platform;
- Go to "Knowledge Management > File Logs";
- You can view file operation logs.
Security Level Management
- Log in to the SERVICEME platform;
- Switch to the "Admin" platform;
- Go to "Knowledge Management > Security Level Management";
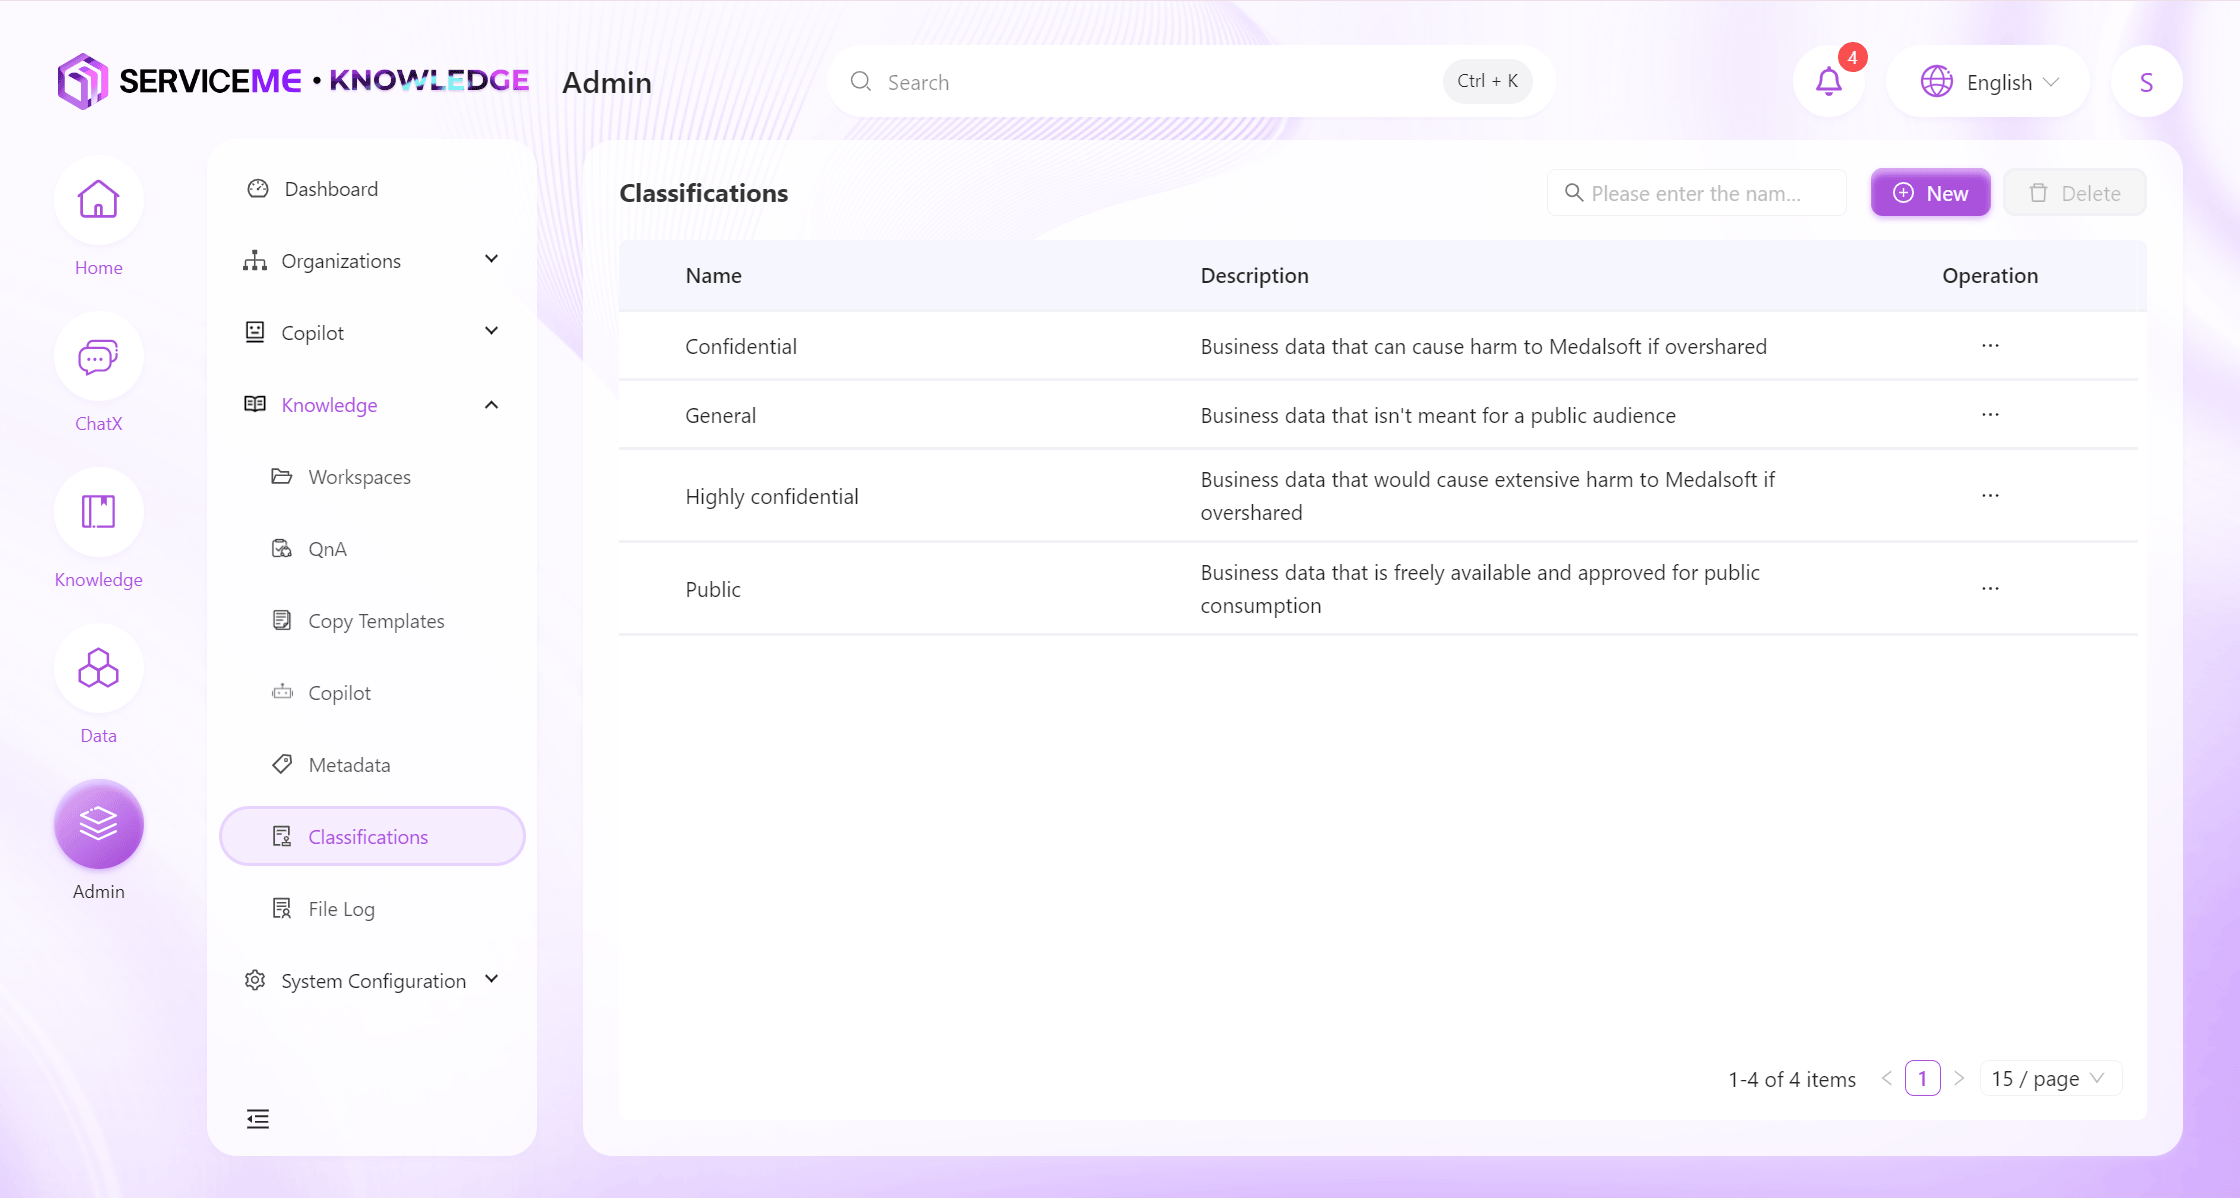
- Click the "Add" button in the upper right corner of the page to open the new security level window;
Enter a custom security level name in "Name", for example,Confidential;
Enter a custom number in "Order" to control the order in the list, for example,1;
Enter a custom description in "Description", for example,Preview only;
In "Actions", only checkPreview; - Click the "OK" button to successfully add the security level.
Advanced Settings
Add New File Types or Formats
- Log in to the SERVICEME platform;
- Switch to the "Admin" platform;
- Go to "Knowledge Management > Master Data Management";
Add/Edit File Types
- Switch to "File Types";
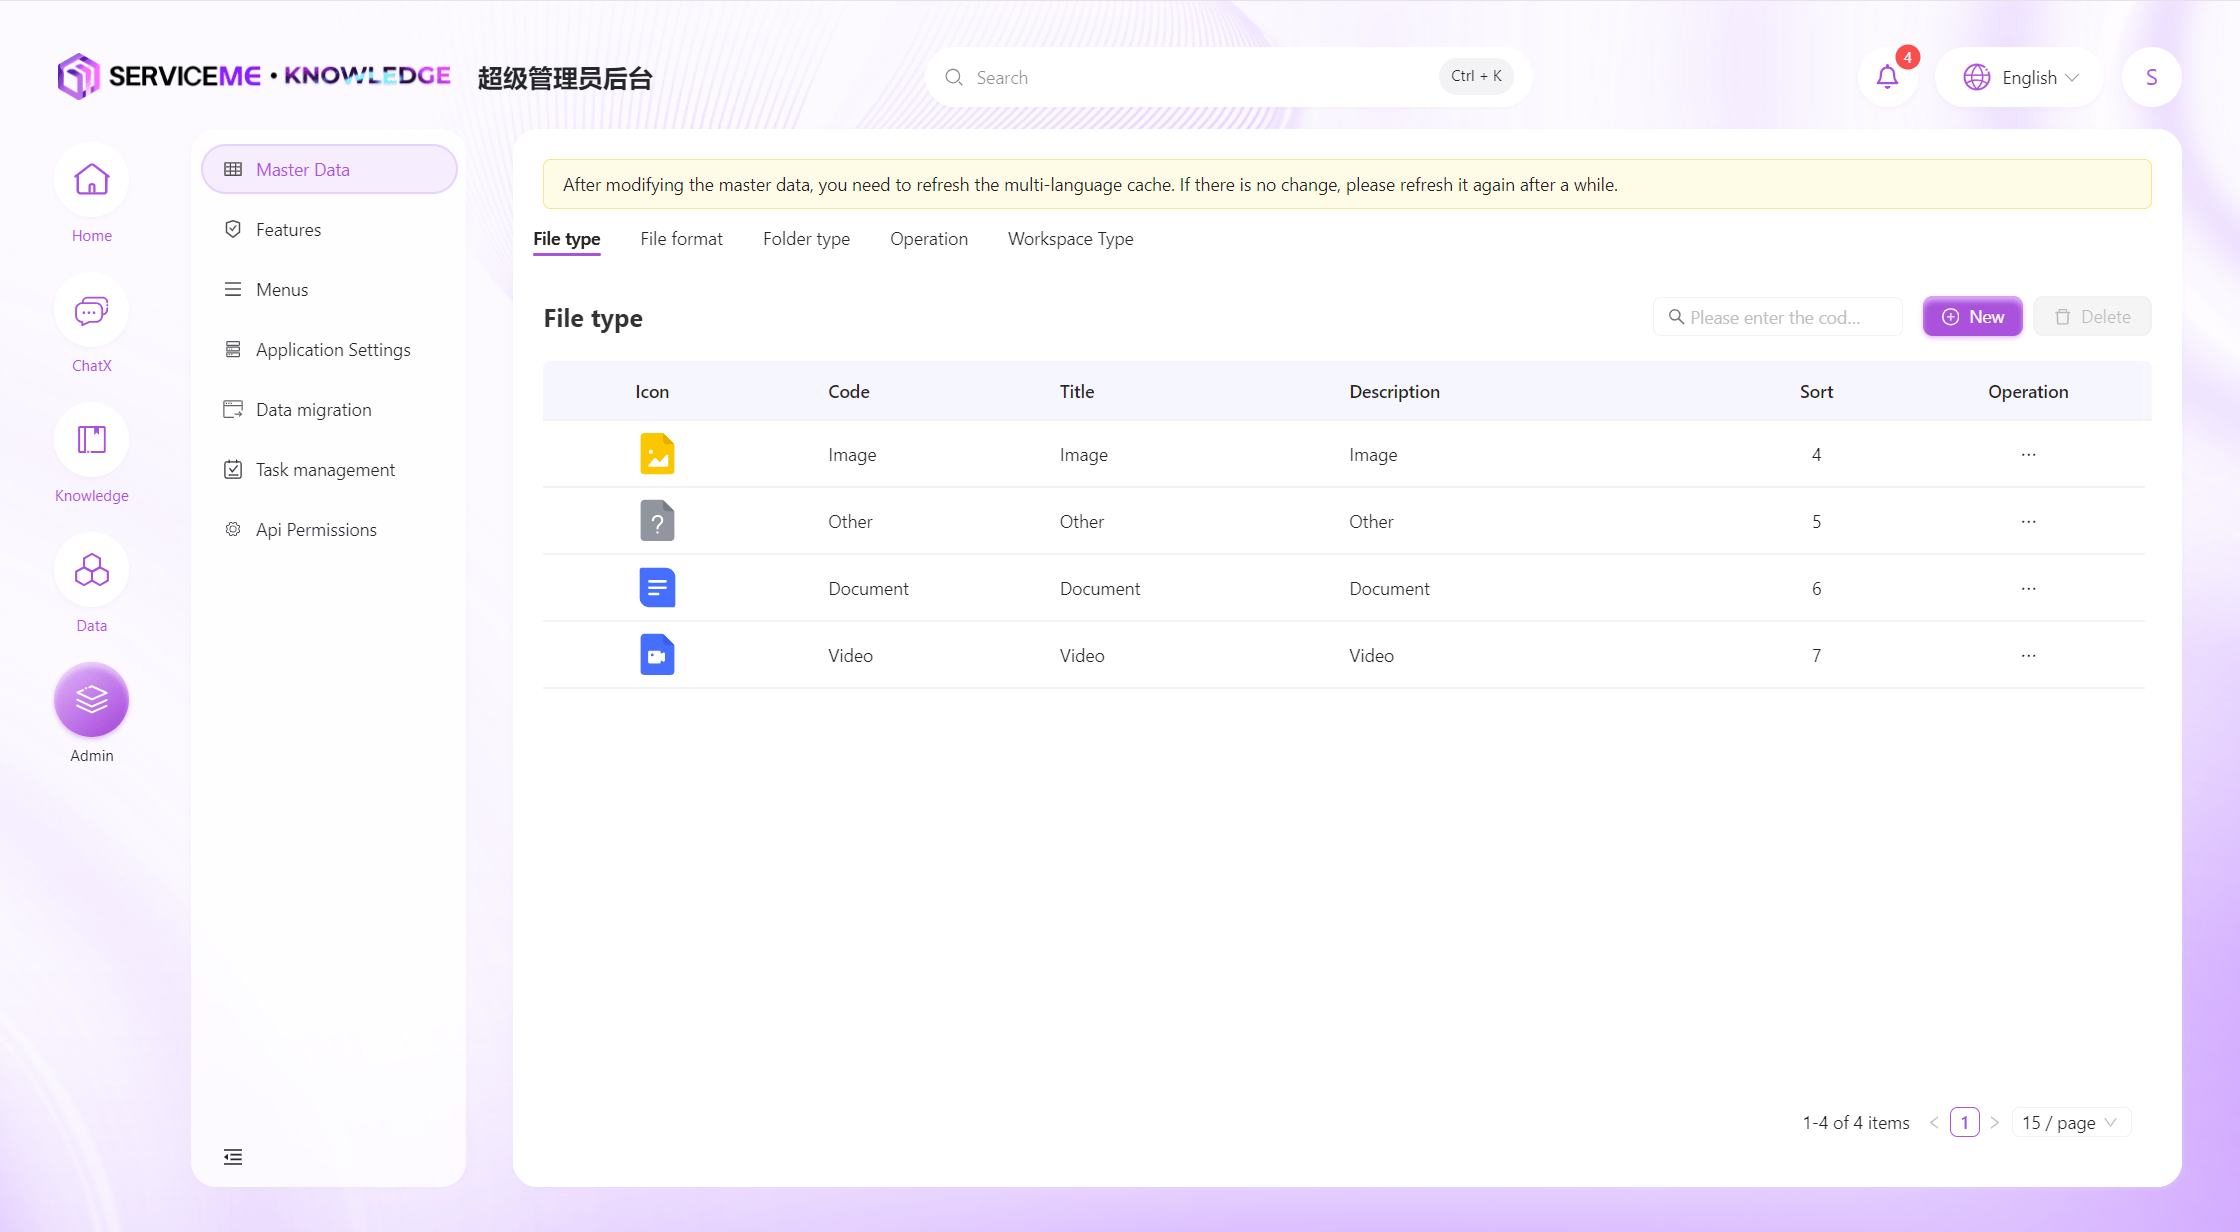
- Click the "Add" button in the upper right corner of the page to open the new file type window;
Enter a custom file type code in "Code", for example,Document;
Enter a custom multilingual title in "Title";
Upload a custom icon in "Icon";
Enter a custom number in "Order" to control the order in the list, for example,6;
Enter a custom description in "Description", for example,Document; - Click the "OK" button to successfully add the file type.

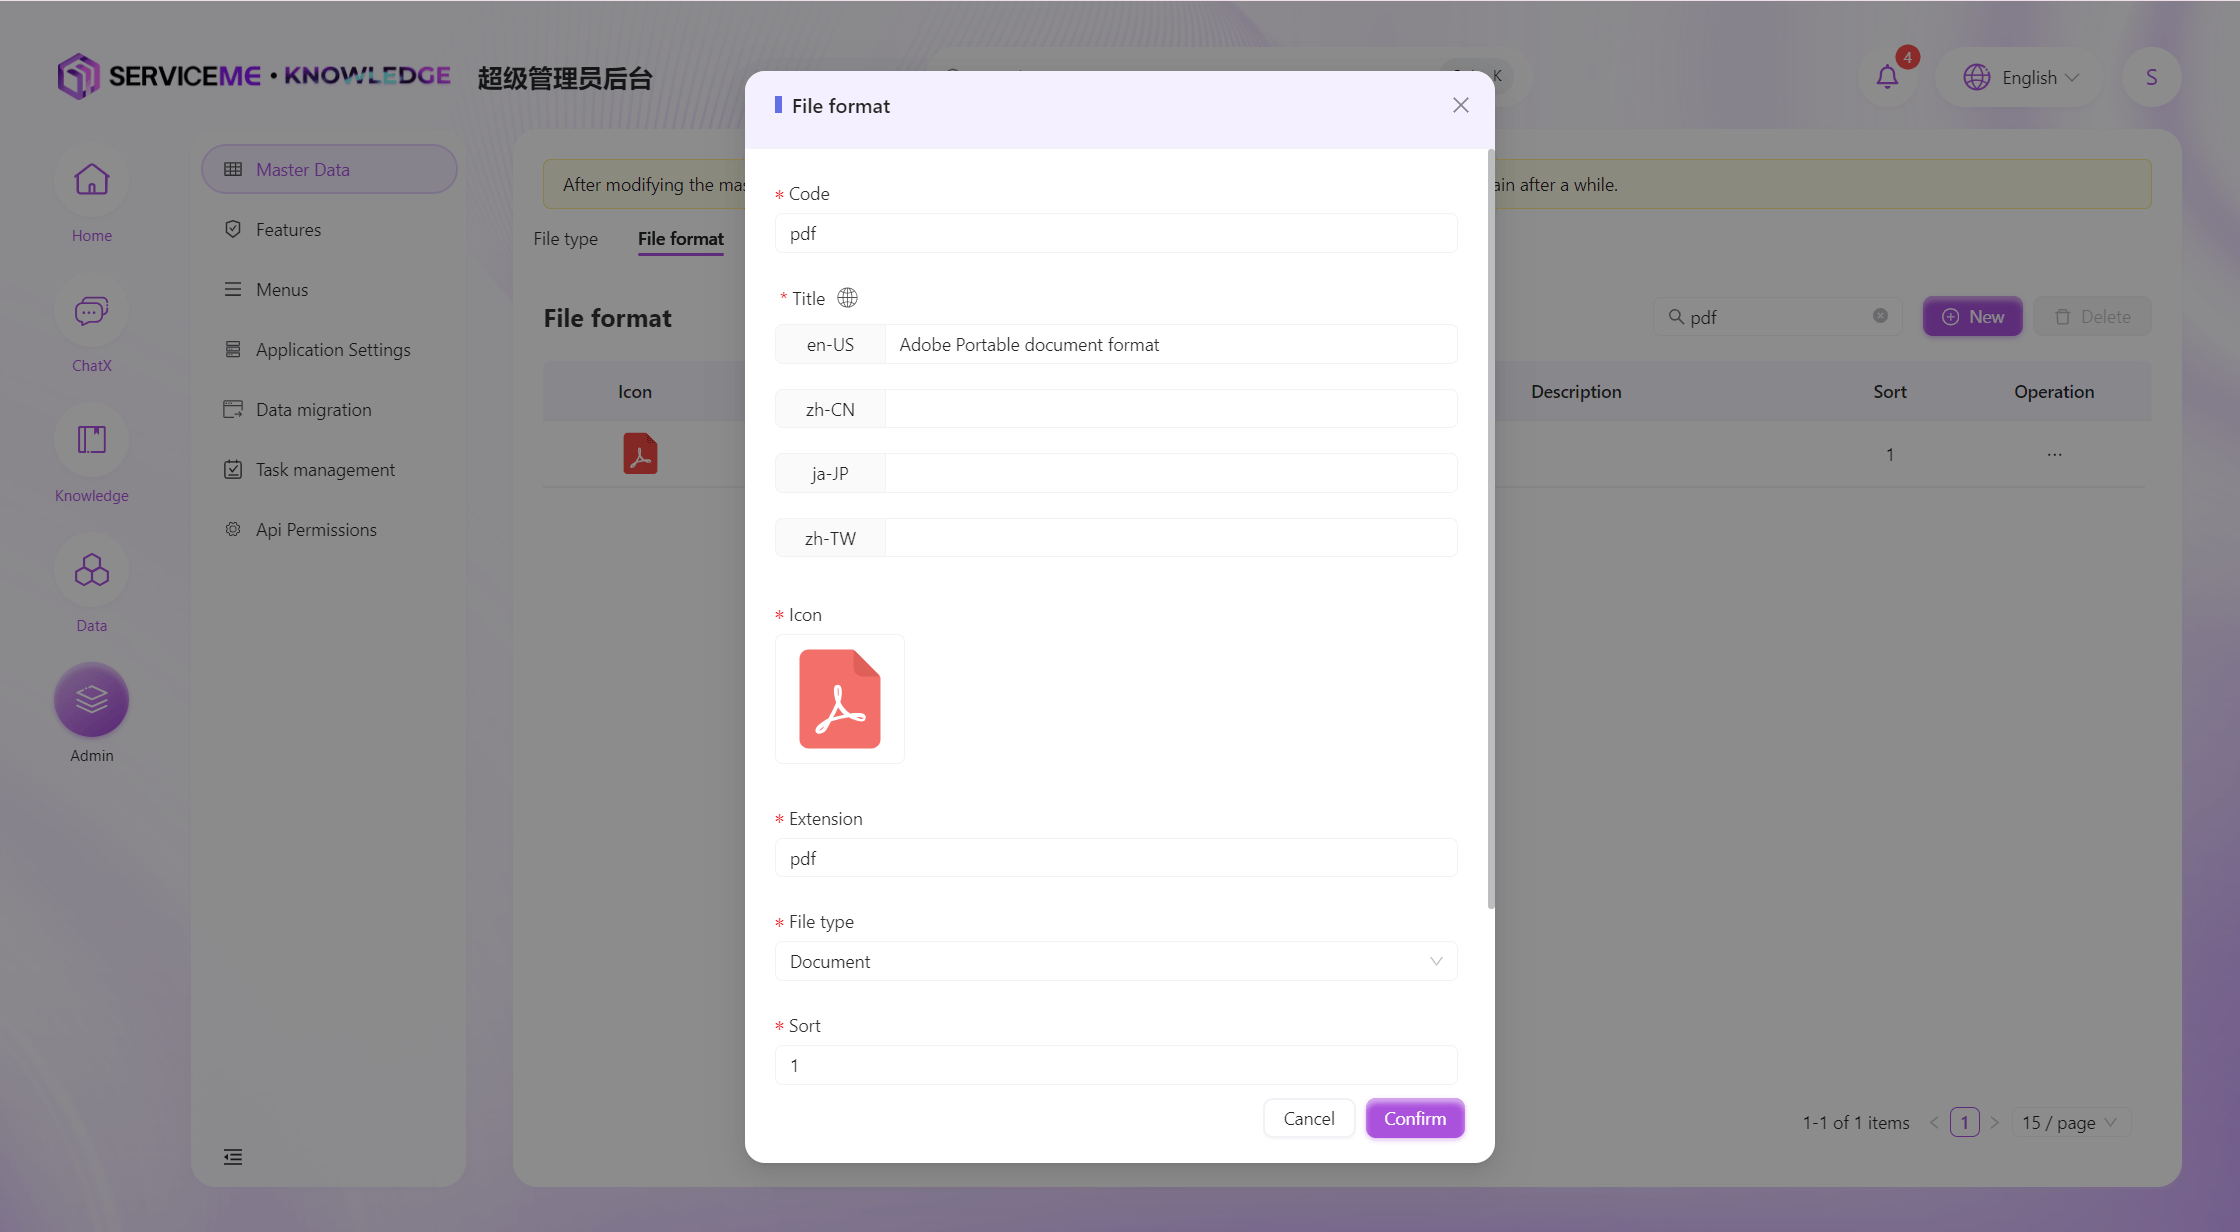
Add/Edit File Formats
- Switch to "File Formats";
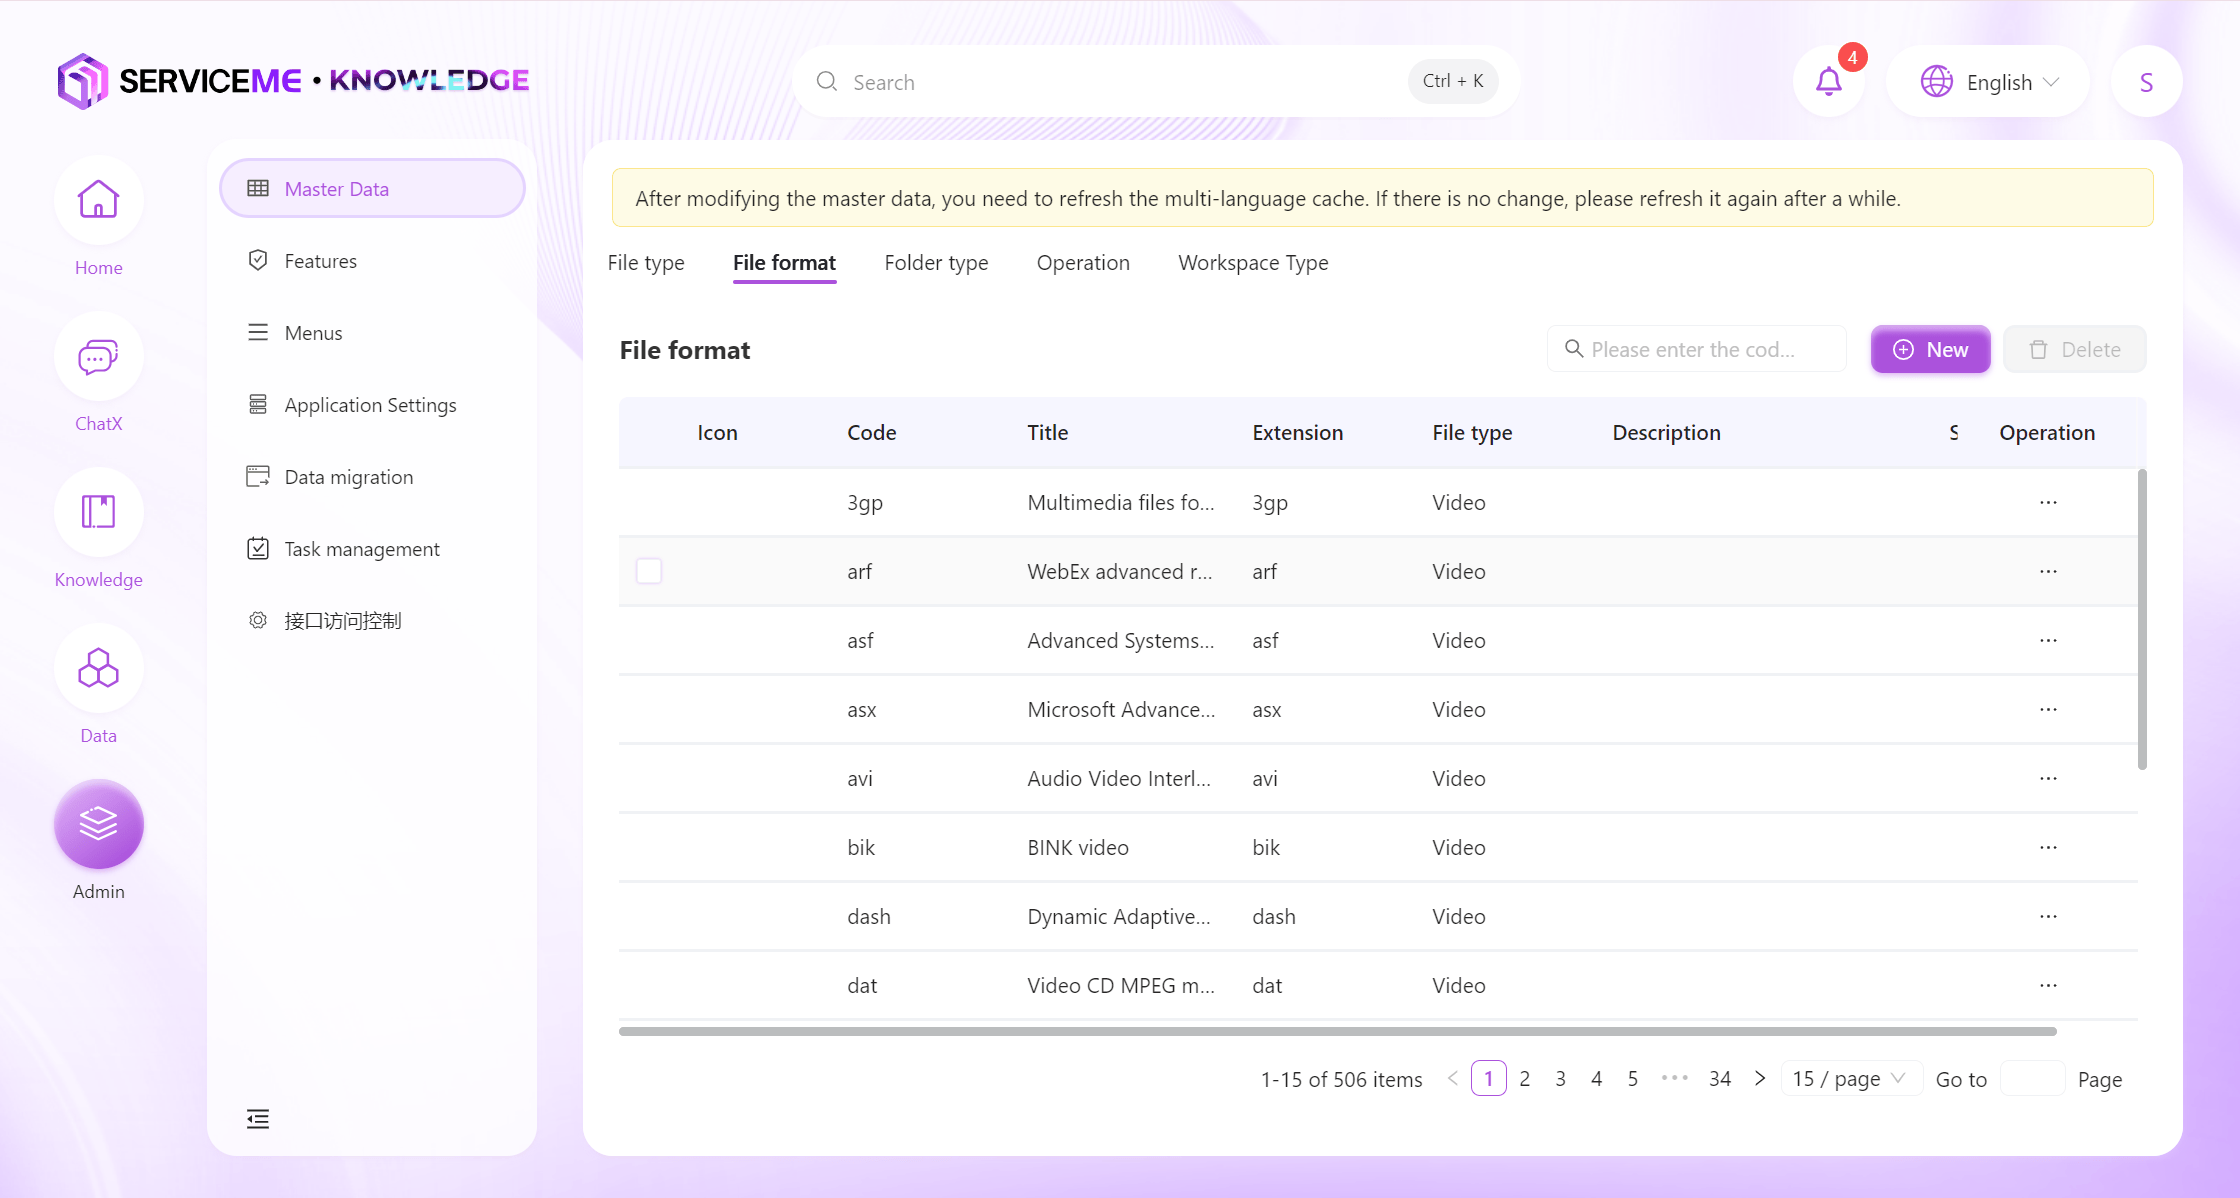
- Click the "Add" button in the upper right corner of the page to open the new file format window;
Enter a custom file type code in "Code", for example,docx;
Enter a custom multilingual title in "Title";
Upload a custom icon in "Icon";
Enter the file extension in "Extension", for example,docx;
Select the file type from the "File Type" dropdown;
Enter a custom number in "Order" to control the order in the list, for example,1;
Enter a custom description in "Description", for example,Microsoft Word Open XML document; - Click the "OK" button to successfully add the file format.
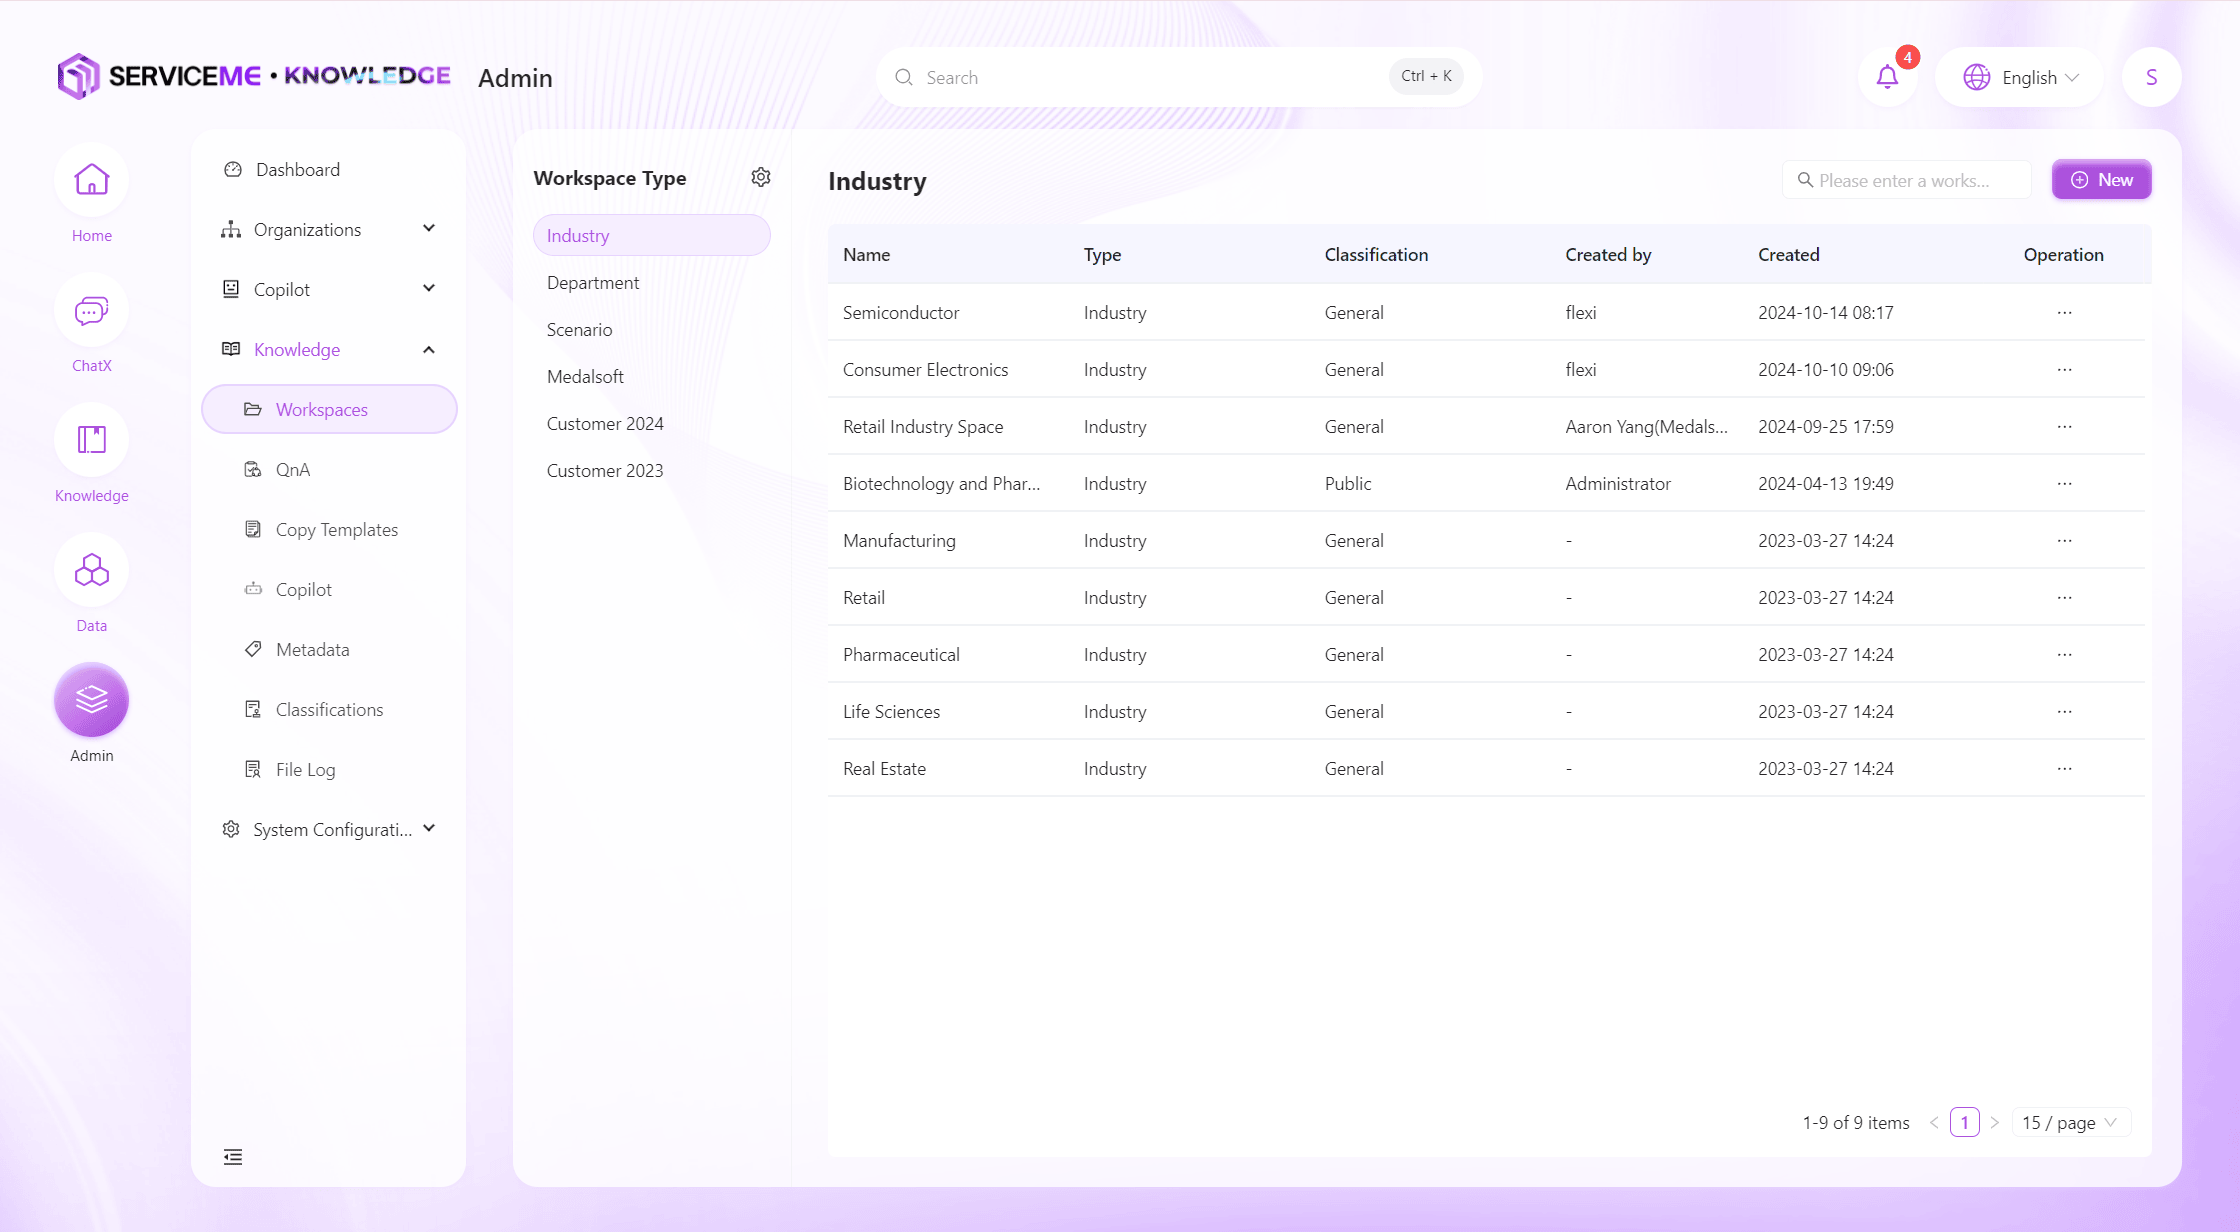
Add/Edit Knowledge Space Categories
- Log in to the SERVICEME platform;
- Switch to the "Admin" platform;
- Go to "Knowledge Management > Master Data Management";
- Switch to "File Space Types";
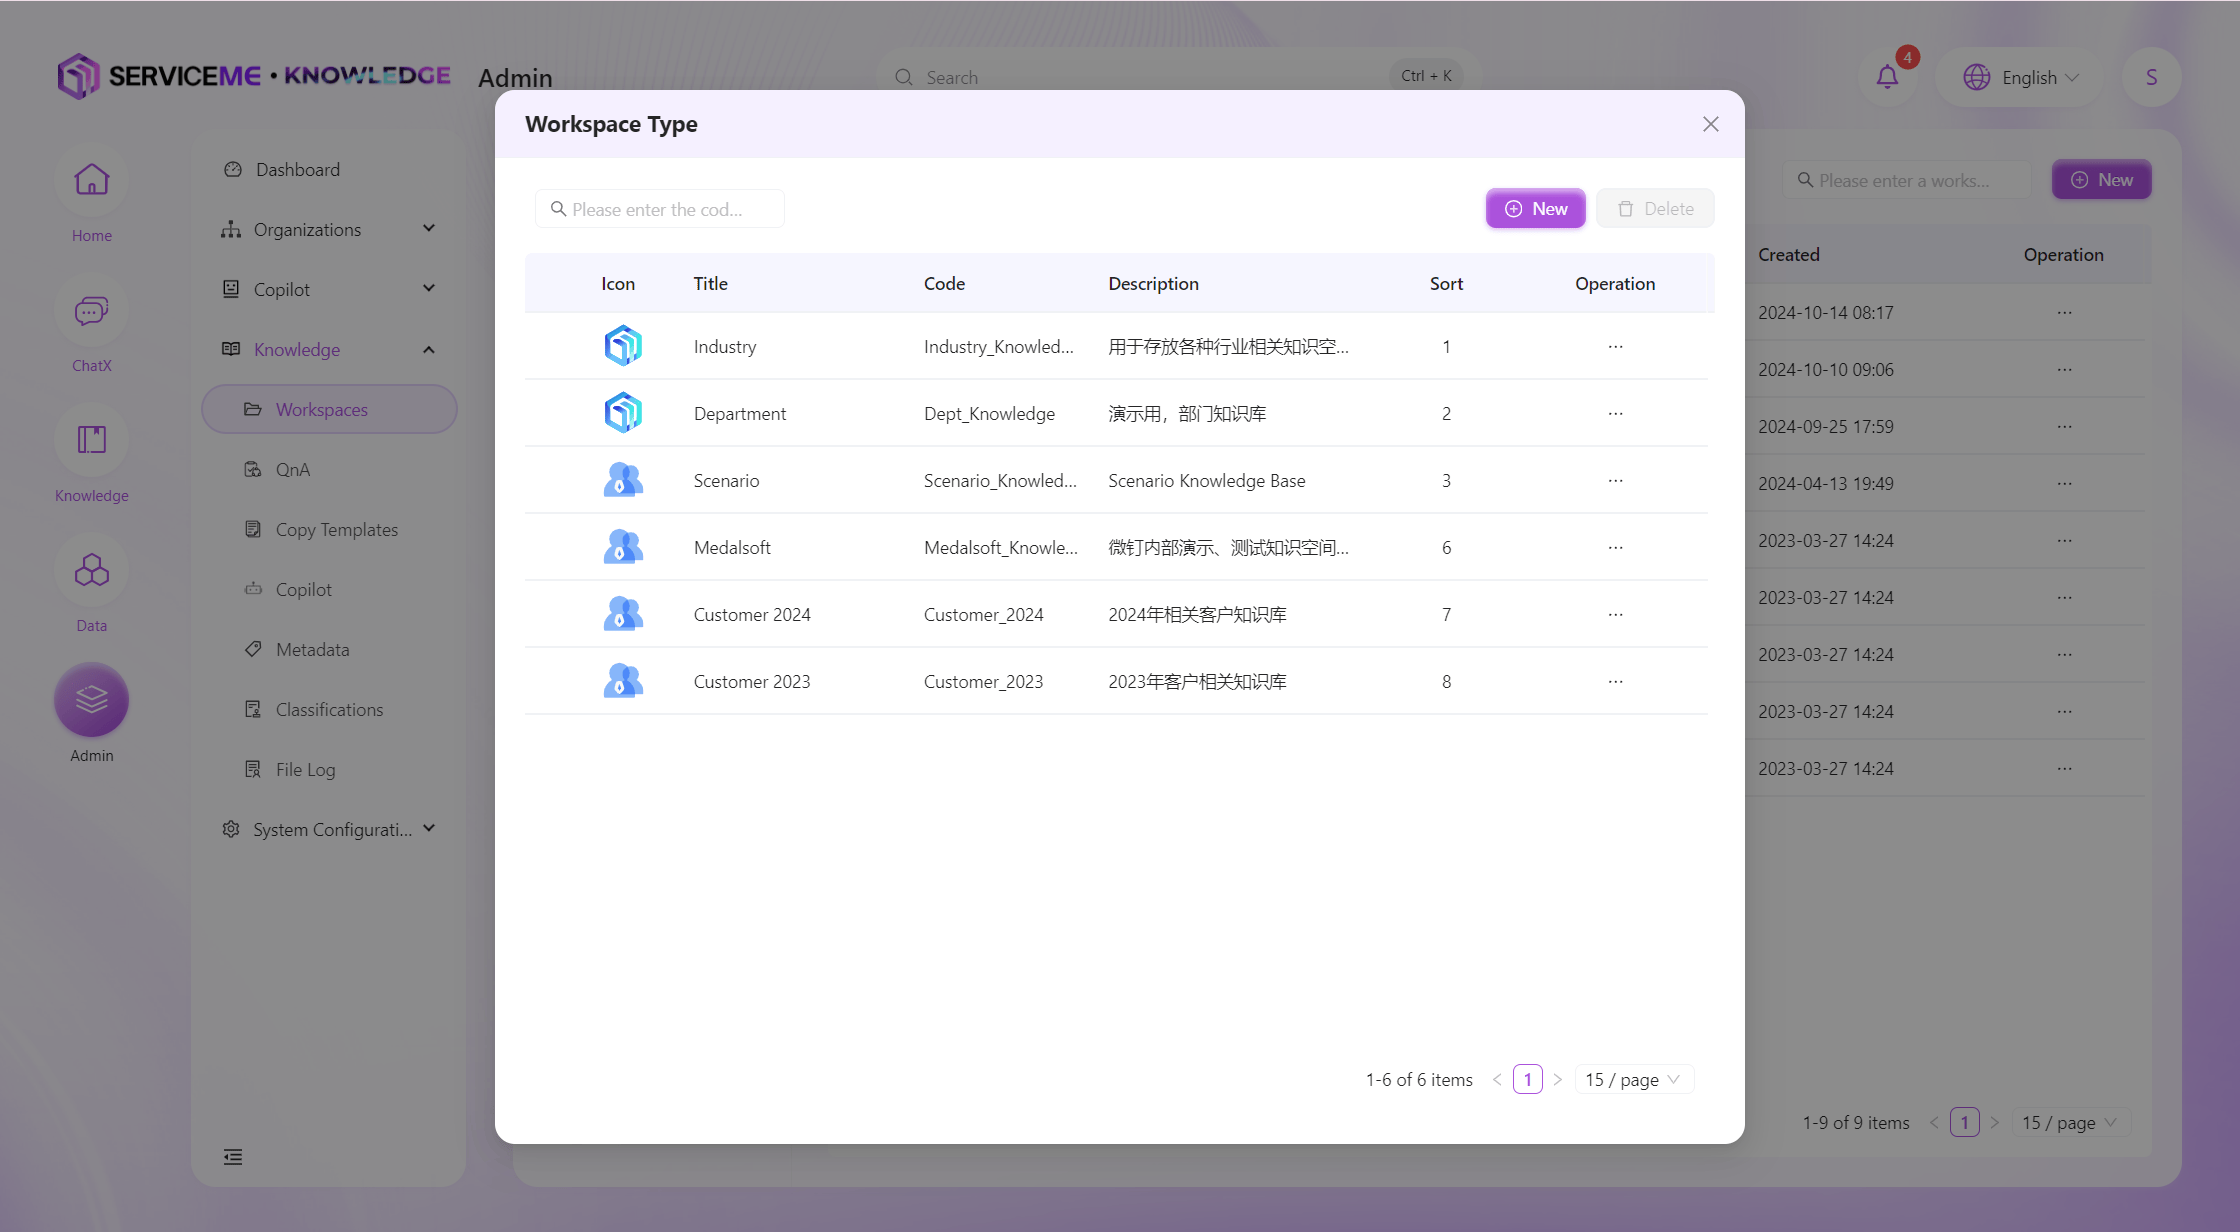
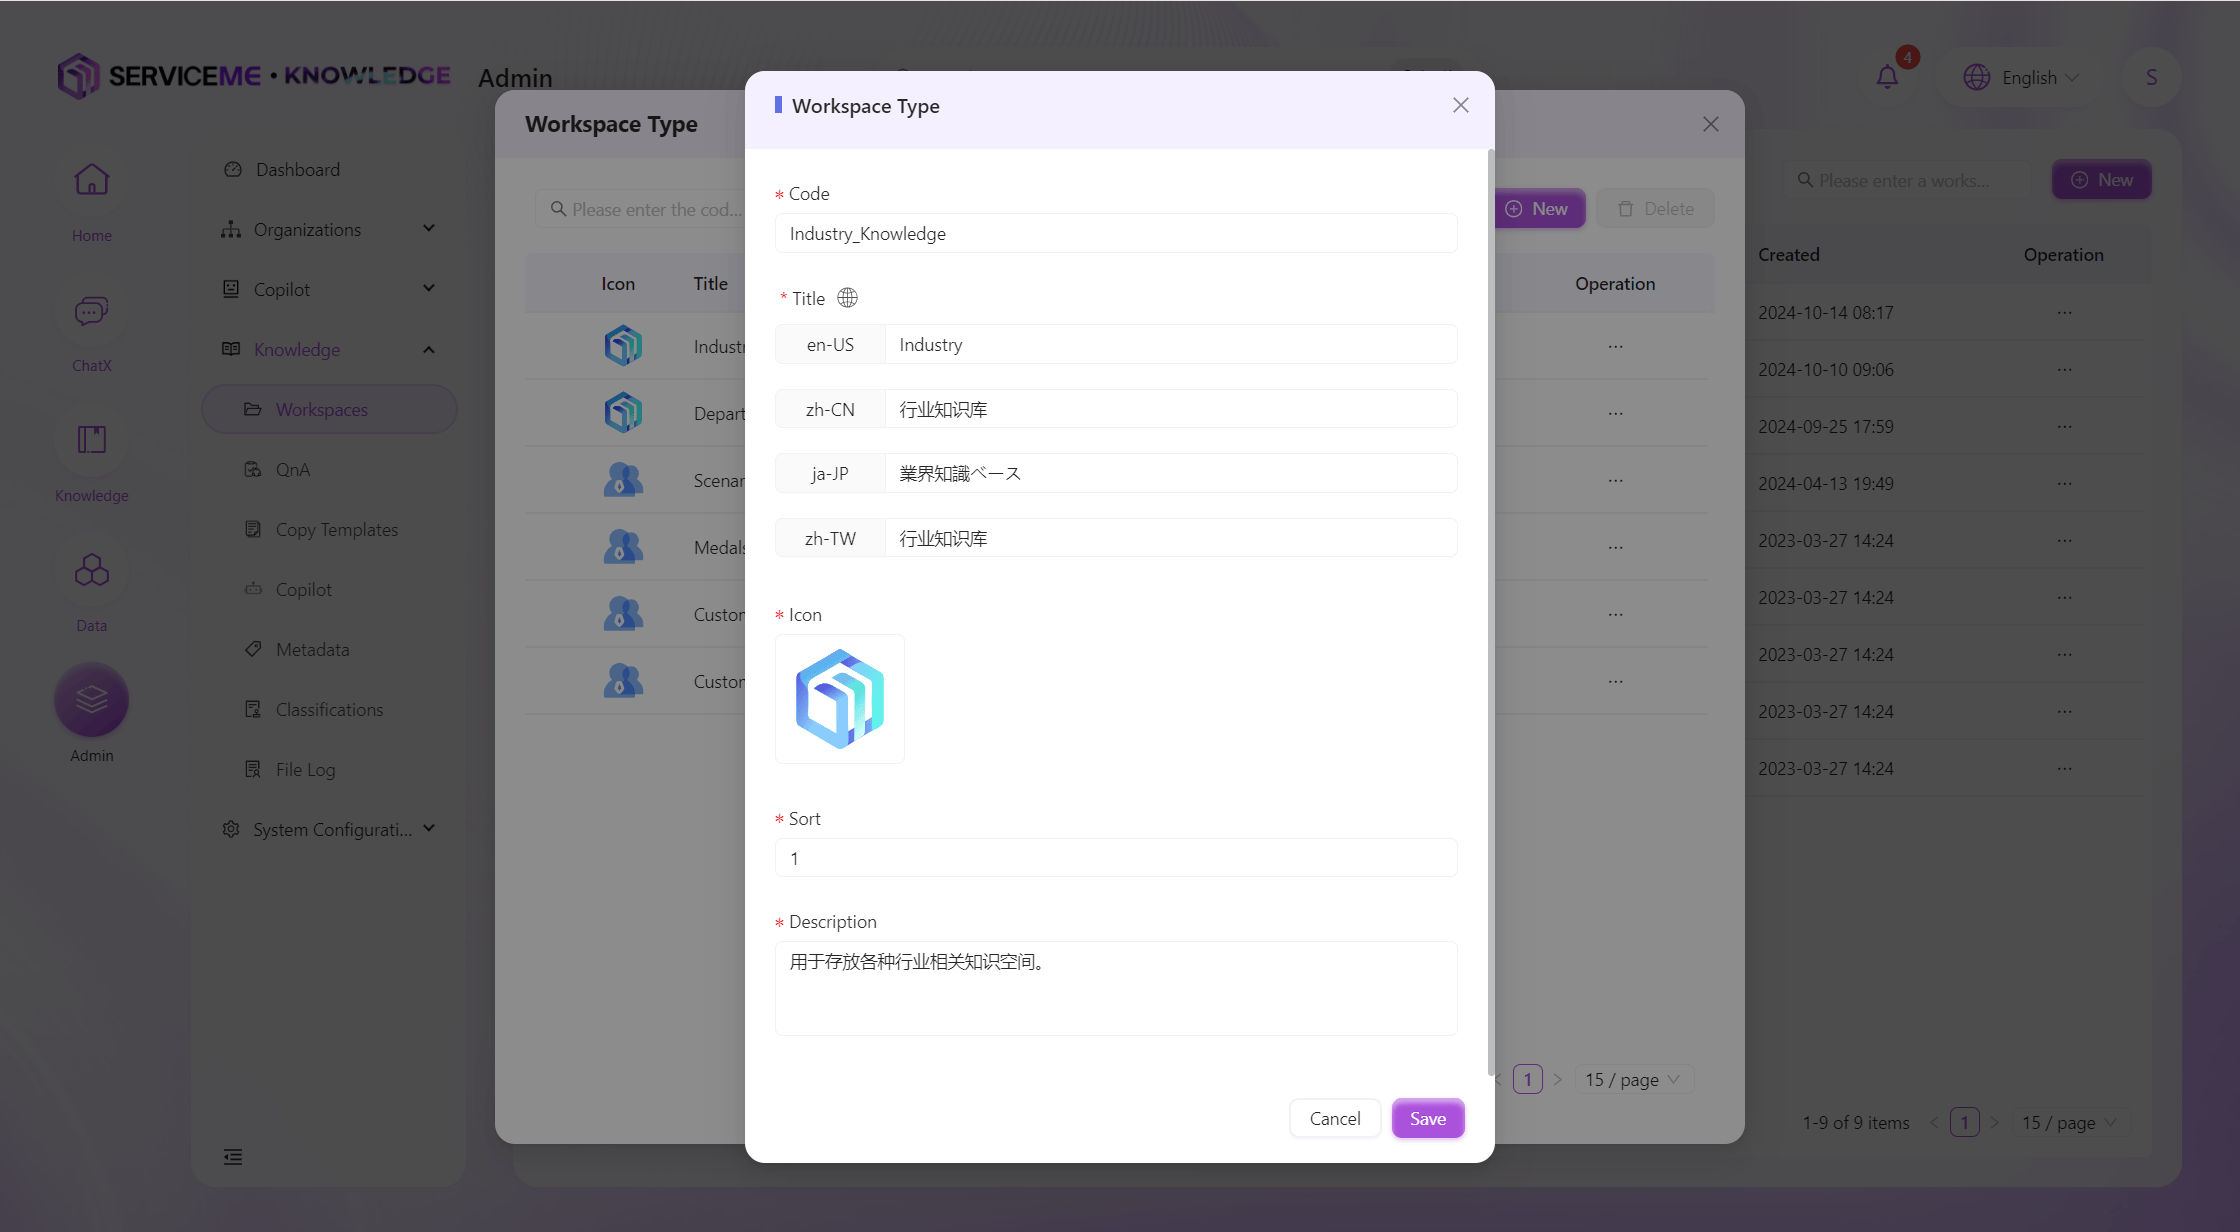
- Click the "Add" button in the upper right corner of the page to open the new file space type window;
Enter a custom file space type code in "Code", for example,Industry Standard Knowledge Base;
Enter a custom multilingual title in "Title";
Upload a custom icon in "Icon";
Enter a custom number in "Order" to control the order in the list, for example,1;
Enter a custom description in "Description", for example,Industry standard knowledge base, including national standards, international standards, etc.; - Click the "OK" button to successfully add the file type.
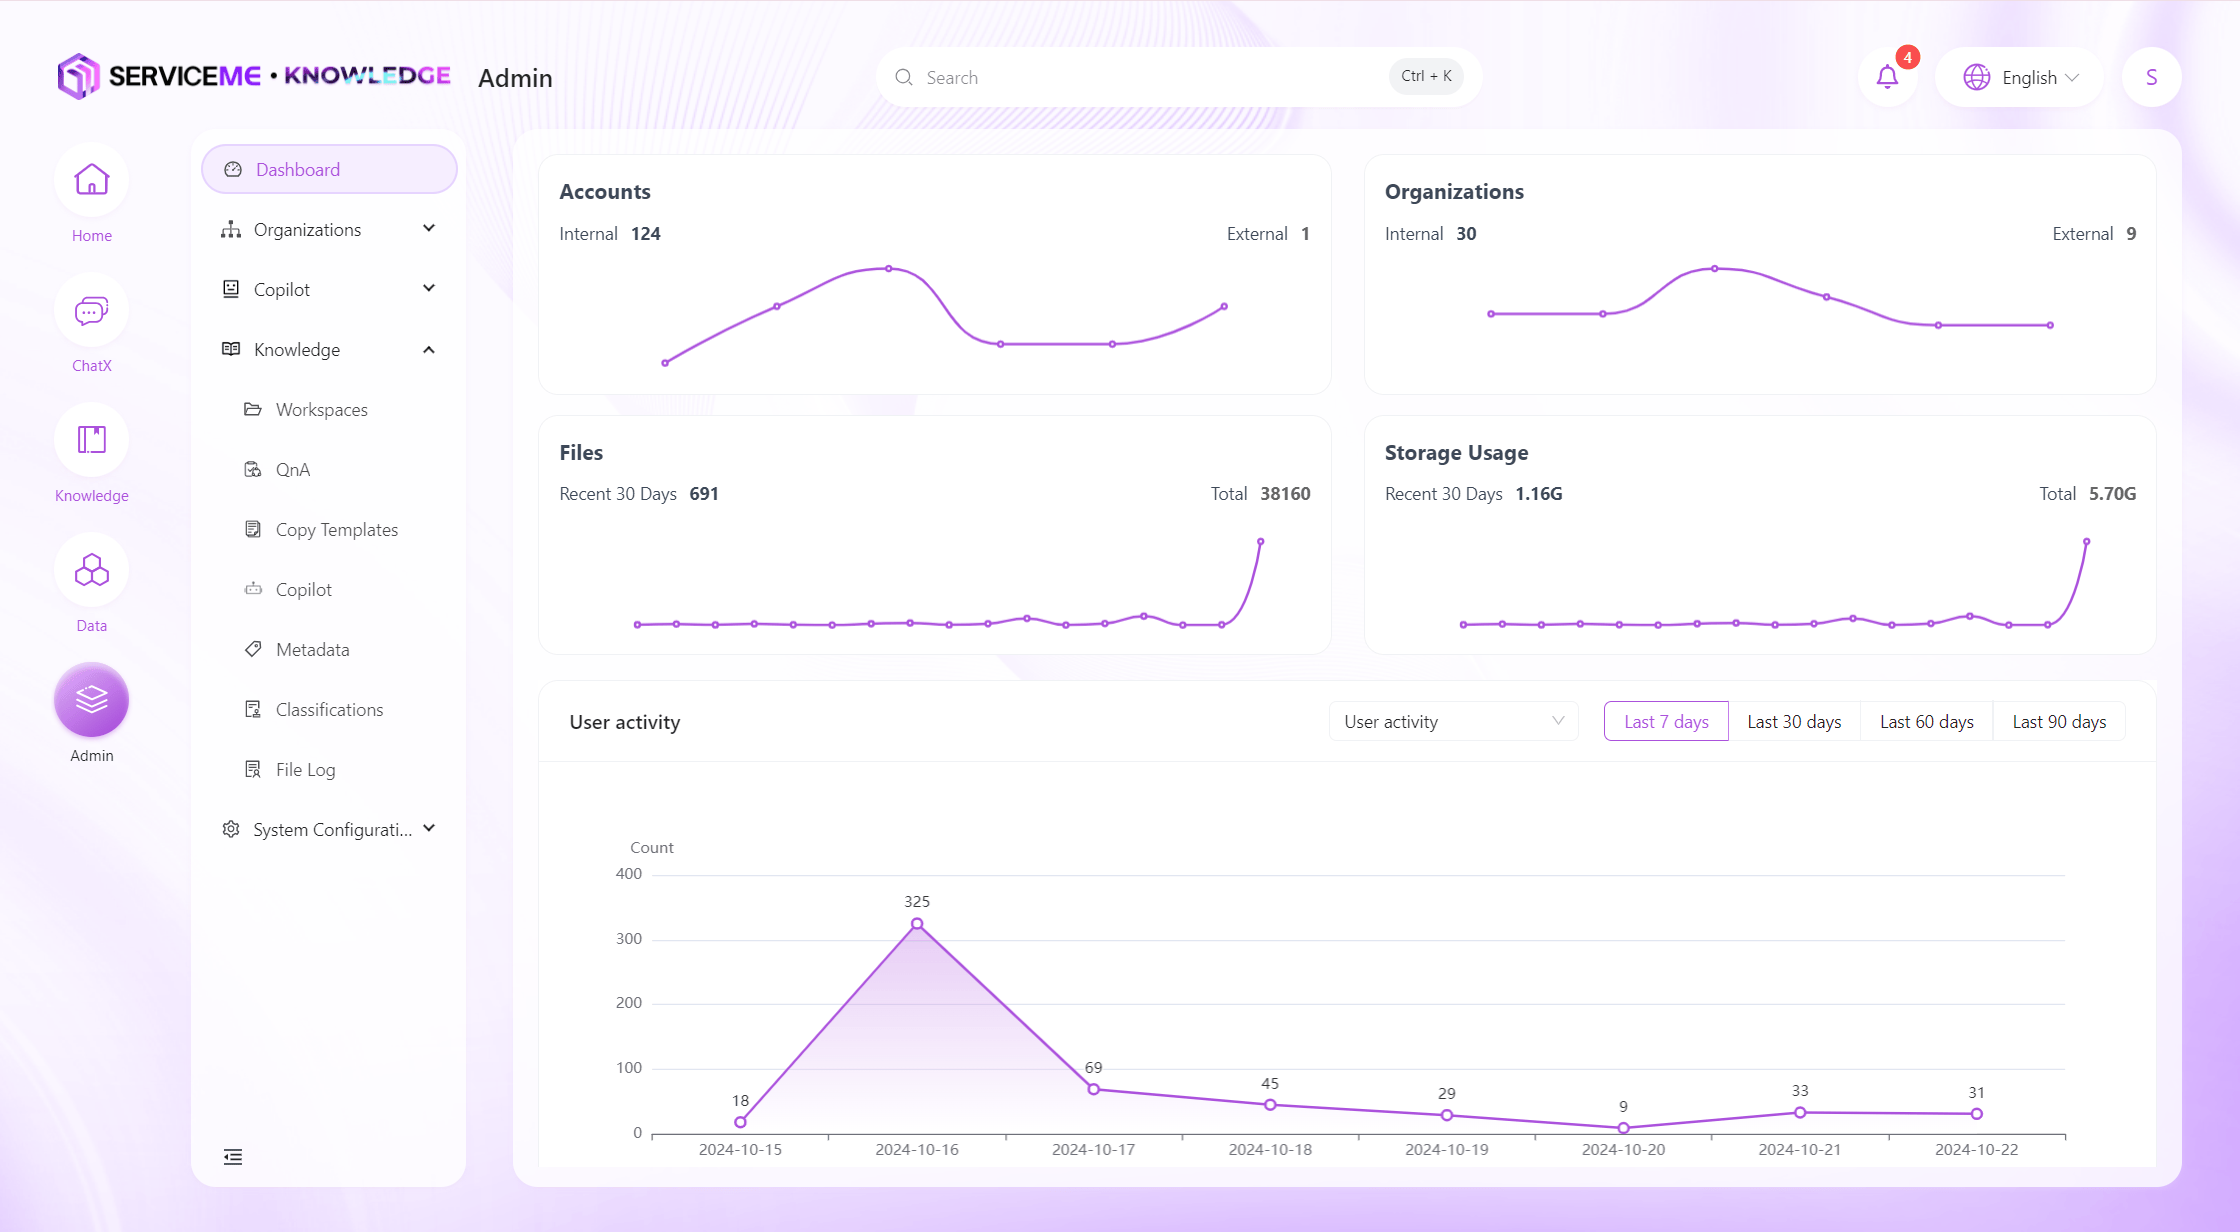
How to Quickly Understand the Usage of the Current Knowledge Module?
- Log in to the SERVICEME platform;
- Switch to the "Admin" platform;
- Go to "Dashboard";
- You can view the usage of the knowledge module.
How to Add QnA to Expand the Chatbot's Knowledge Base?
- Log in to the SERVICEME platform;
- Switch to the "Admin" platform;
- Go to "Knowledge Management > QnA";
- Select a file space, for example,
Product R&D Knowledge Base;

Add QnA
- Click the "Add" button in the upper right corner of the page to go to the new QnA page;
"Question": Add multiple custom questions, for example,Question 1: How to manage documents in the knowledge space?;
"Answer": Enter the answer, which can include text, images, and videos;
"Metadata": Not used for now, can be left empty;
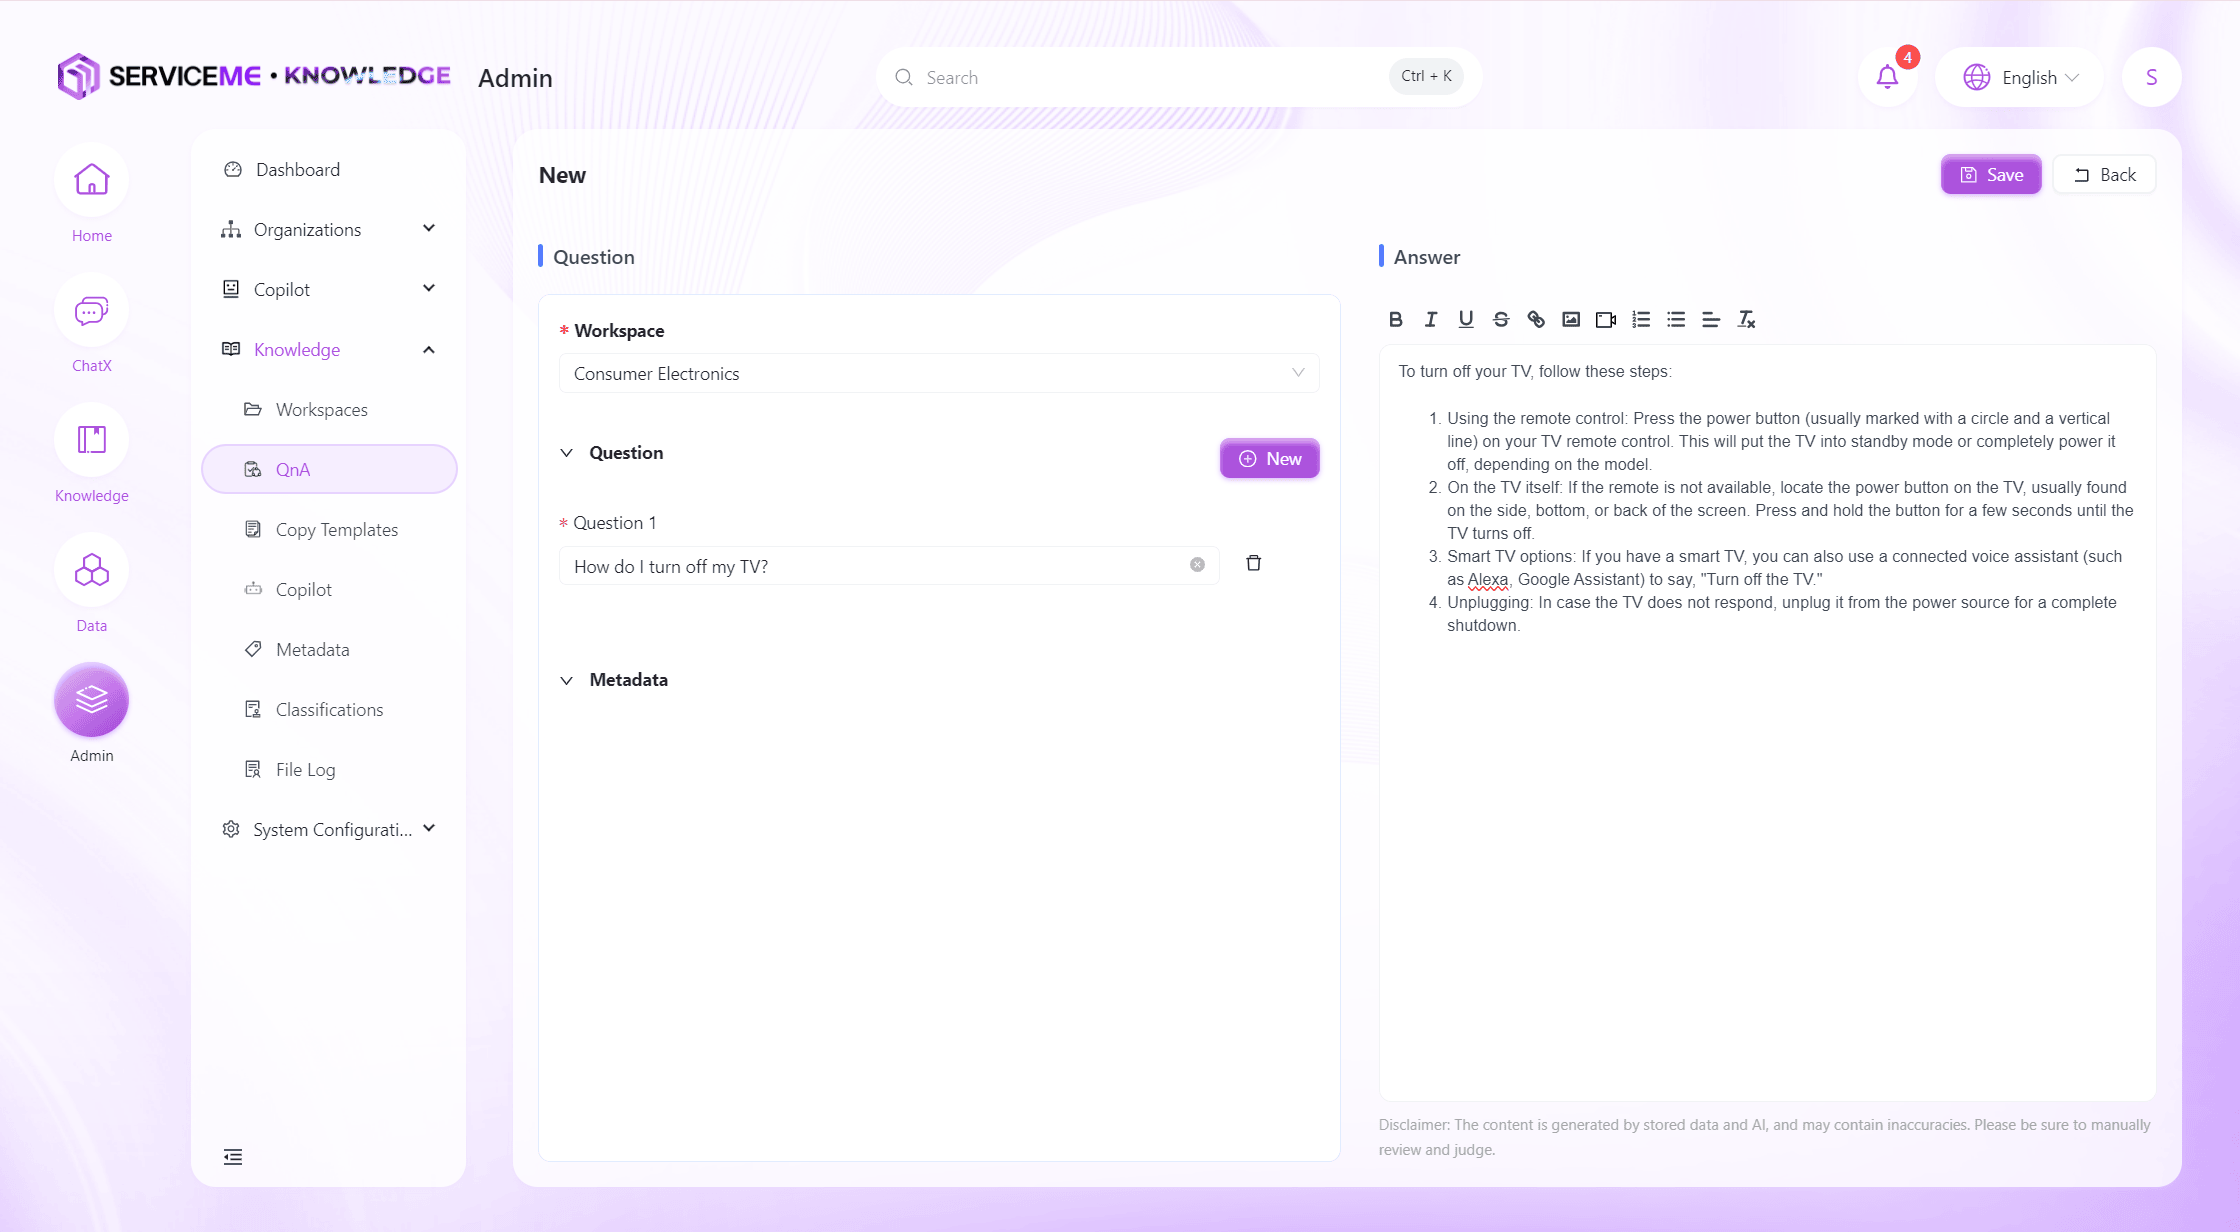
- Click "Save" to successfully add the FAQ record.
- "Answer" can contain rich text style tags. It is recommended to limit the content to within 2000 characters, which will help AI responses.
- To insert a video, use embedded code, for example:
<iframe src="//player.bilibili.com/player.html?aid=535563667&bvid=BV1jM411S74q&cid=1322473540&p=1" scrolling="no" border="0" frameborder="no" framespacing="0" allowfullscreen="true"> </iframe>.
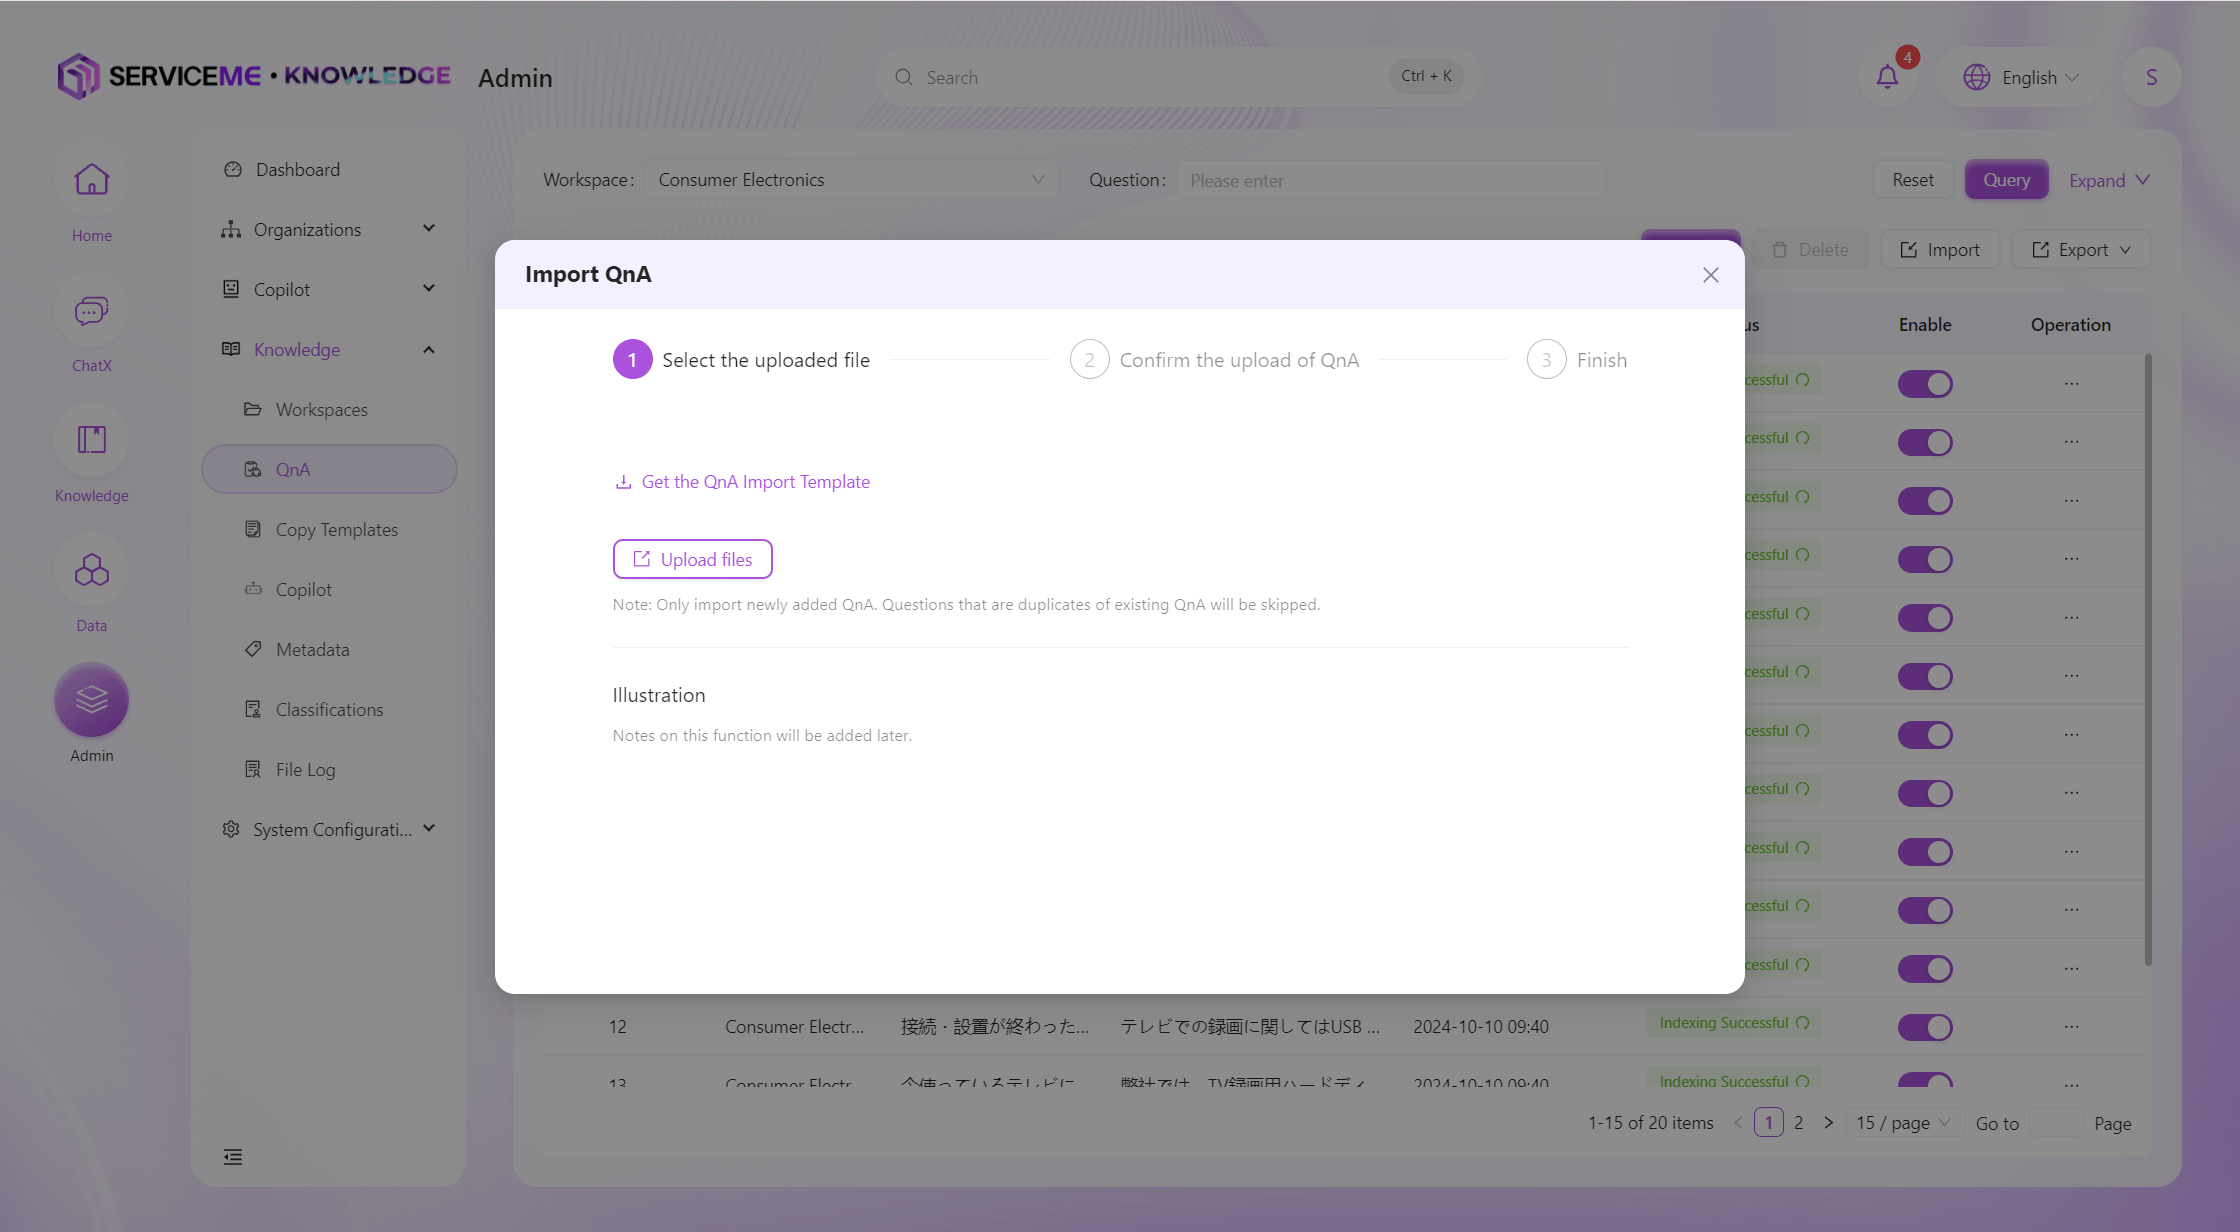
Batch Import
-
Click the "Import" button in the upper right corner of the page to open the import FAQ window;
-
Click "Download QA Import Template" to get the Excel template;
-
Enter batch information according to the Excel template and save;
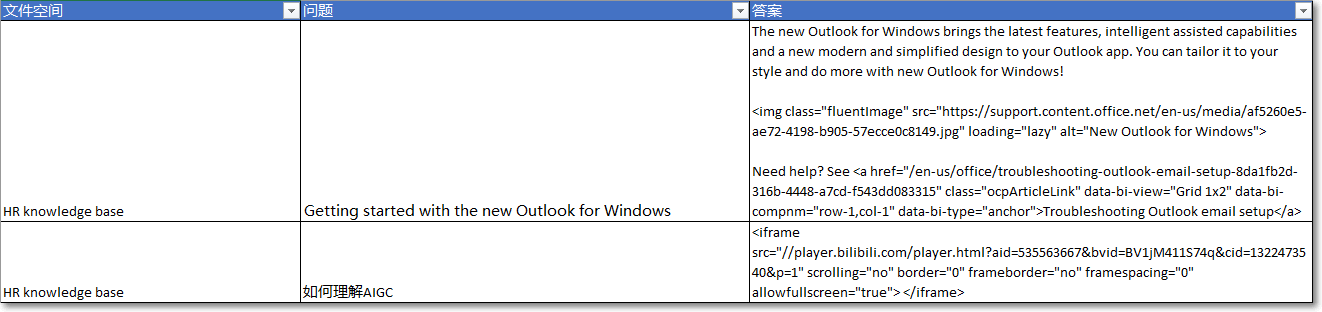 For "Text", enter directly in "Answer";
Insert "Image":
Format
<img src="url" alt="some_text" />
Example
<img class="fluentImage" src="https://support.content.office.net/en-us/media/af5260e5-ae72-4198-b905-57ecce0c8149.jpg" loading="lazy" alt="New Outlook for Windows" />
Insert "Video": You can use embedded code
Format
<iframe src="url" title="some_text"></iframe>
Example
<iframe src="//player.bilibili.com/player.html?aid=535563667&bvid=BV1jM411S74q&cid=1322473540&p=1" scrolling="no" border="0" frameborder="no" framespacing="0" allowfullscreen="true"></iframe>
Insert "Link":
Format
<a href="url">some_text</a>
Example
<a href="/en-us/office/troubleshooting-outlook-email-setup-8da1fb2d-316b-4448-a7cd-f543dd083315" class="ocpArticleLink" data-bi-view="Grid 1x2" data-bi-compnm="row-1,col-1" data-bi-type="anchor">
    Troubleshooting Outlook email setup
</a>
- Click "Upload File"
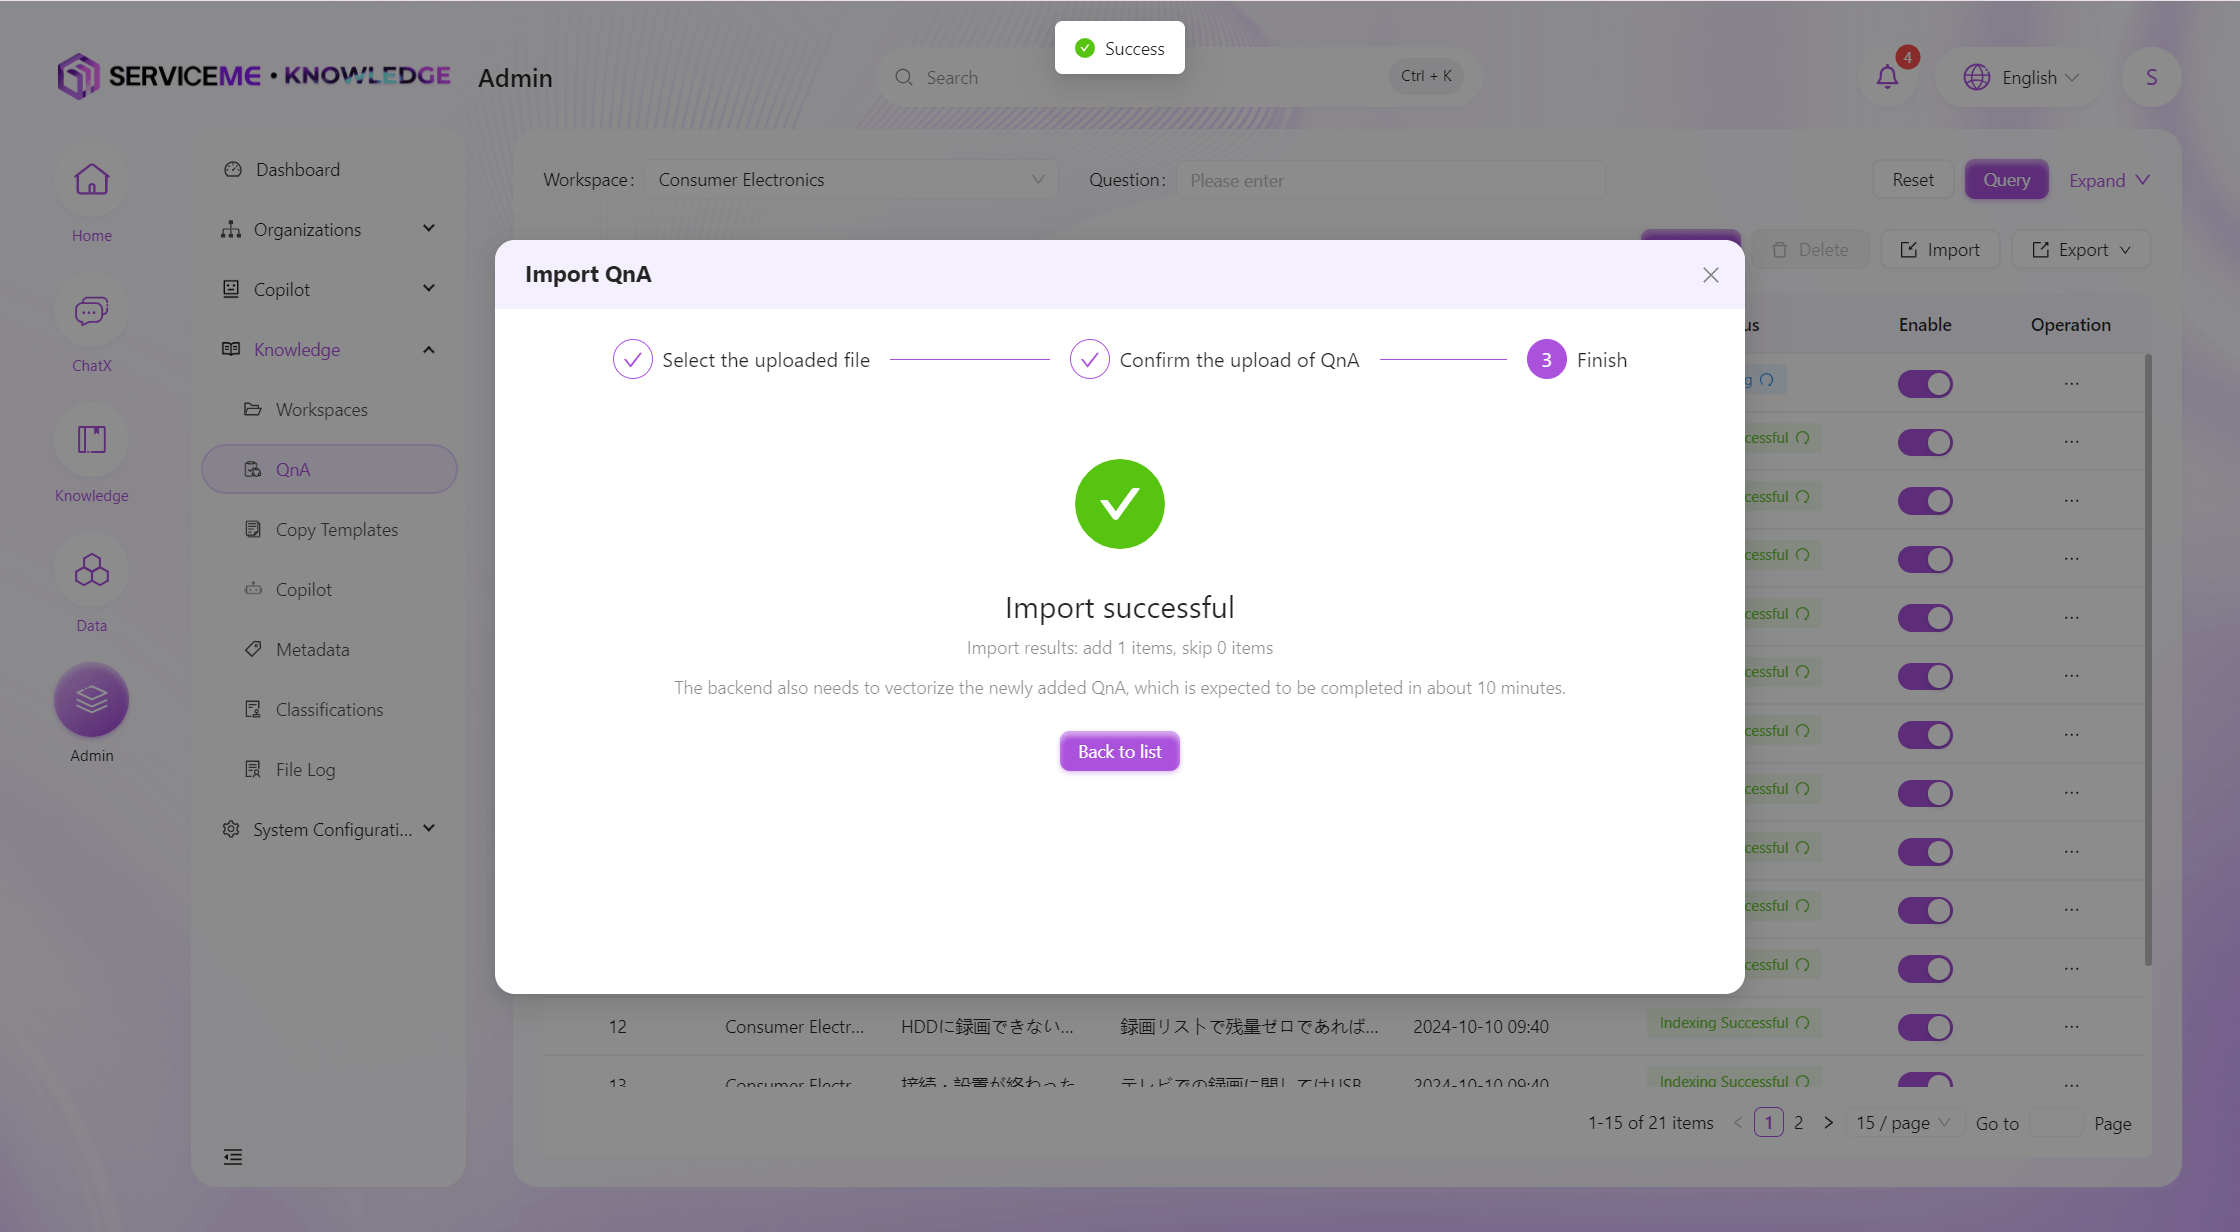
- After checking the content to be imported, click the "Start Import" button;
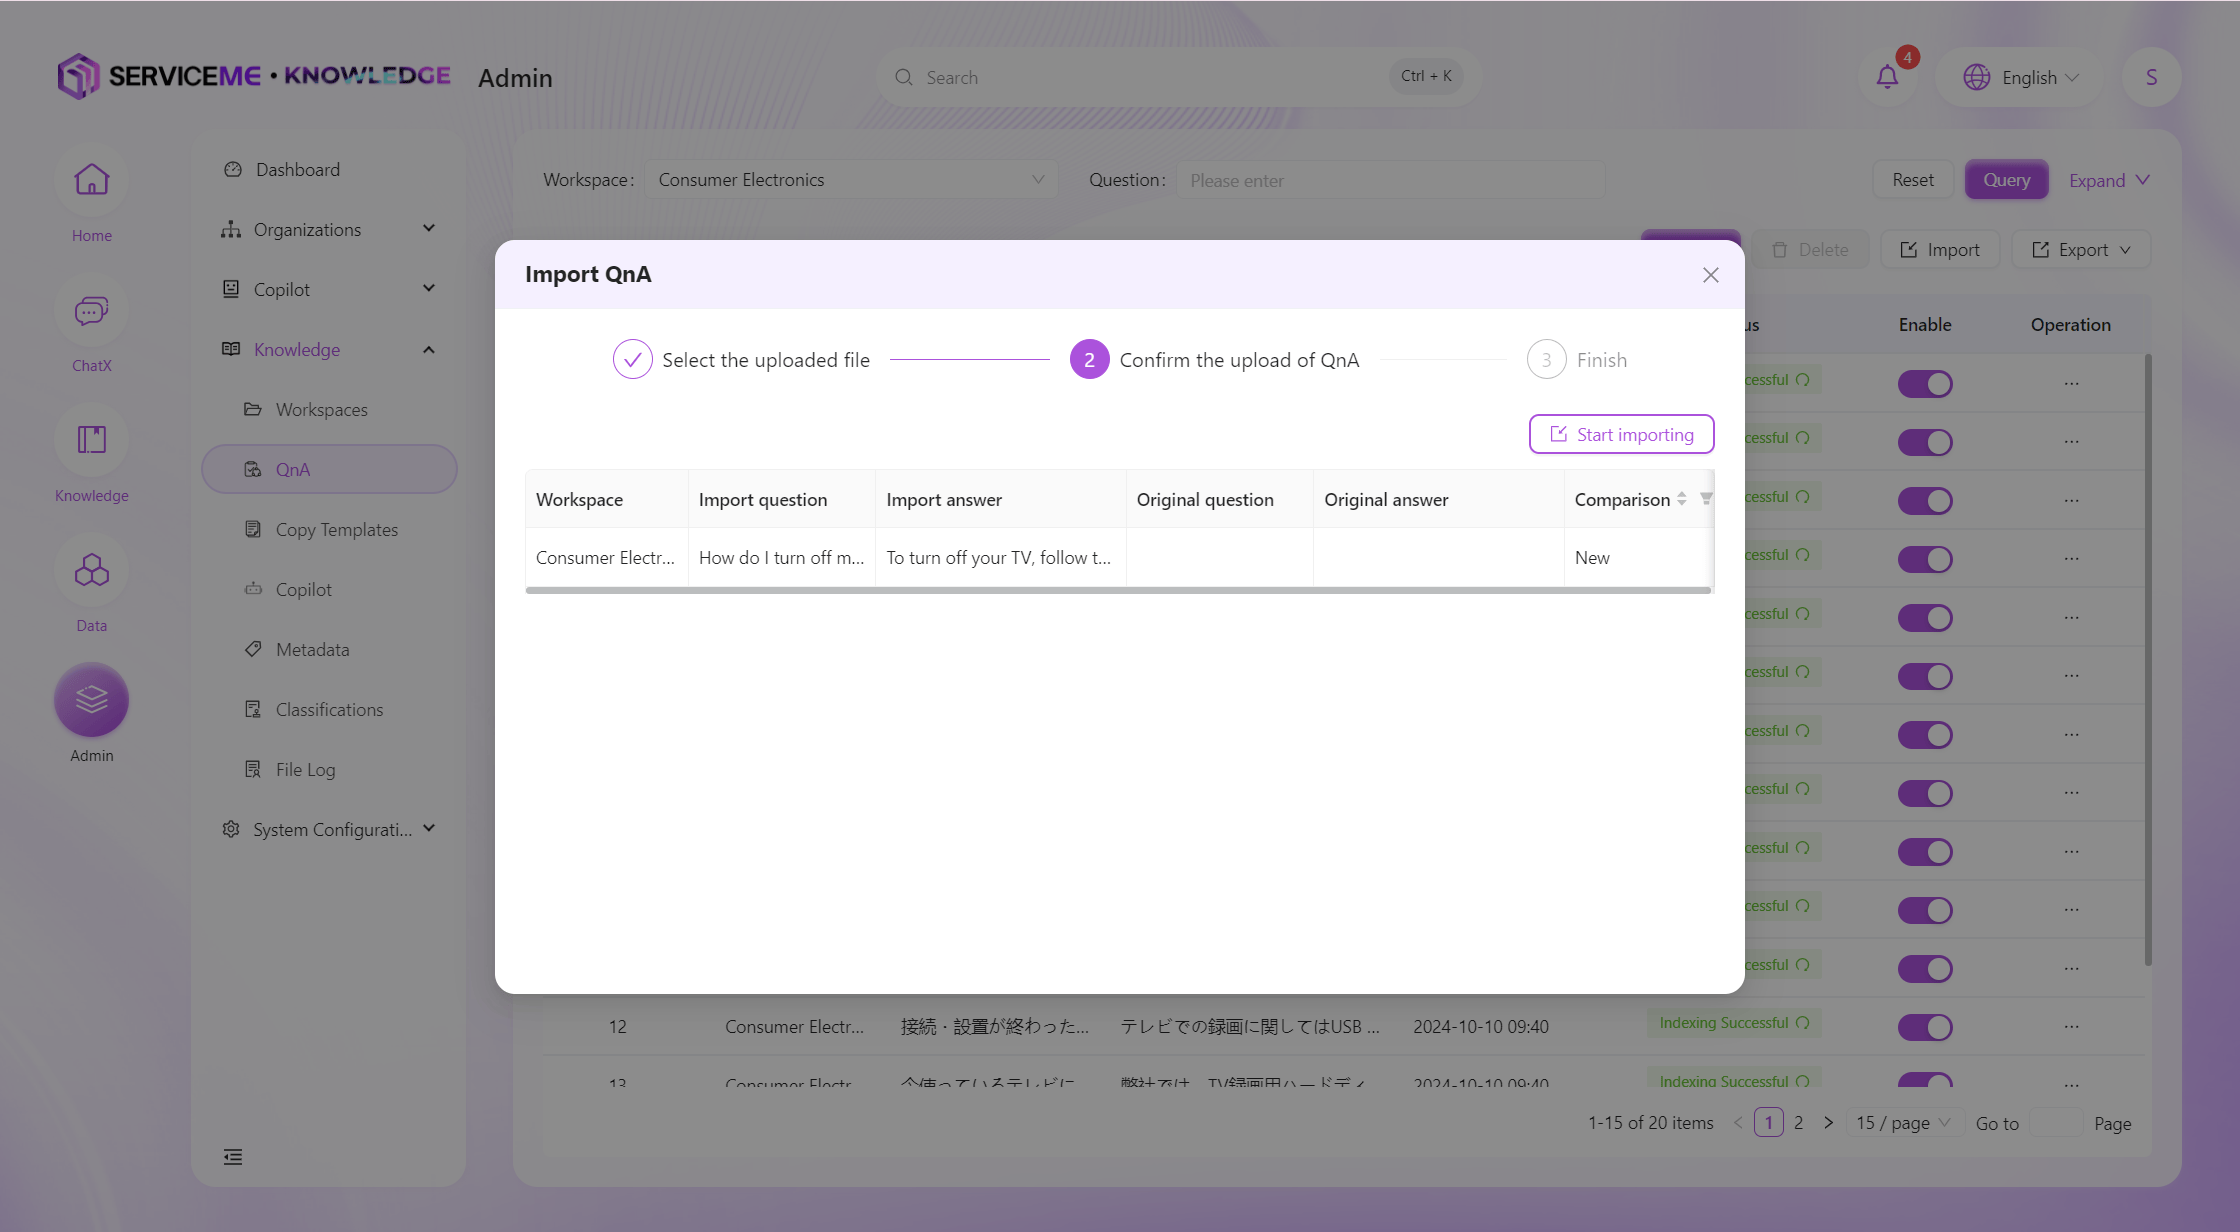
- The system will automatically detect duplicate questions and will not import them.
- Import successful.
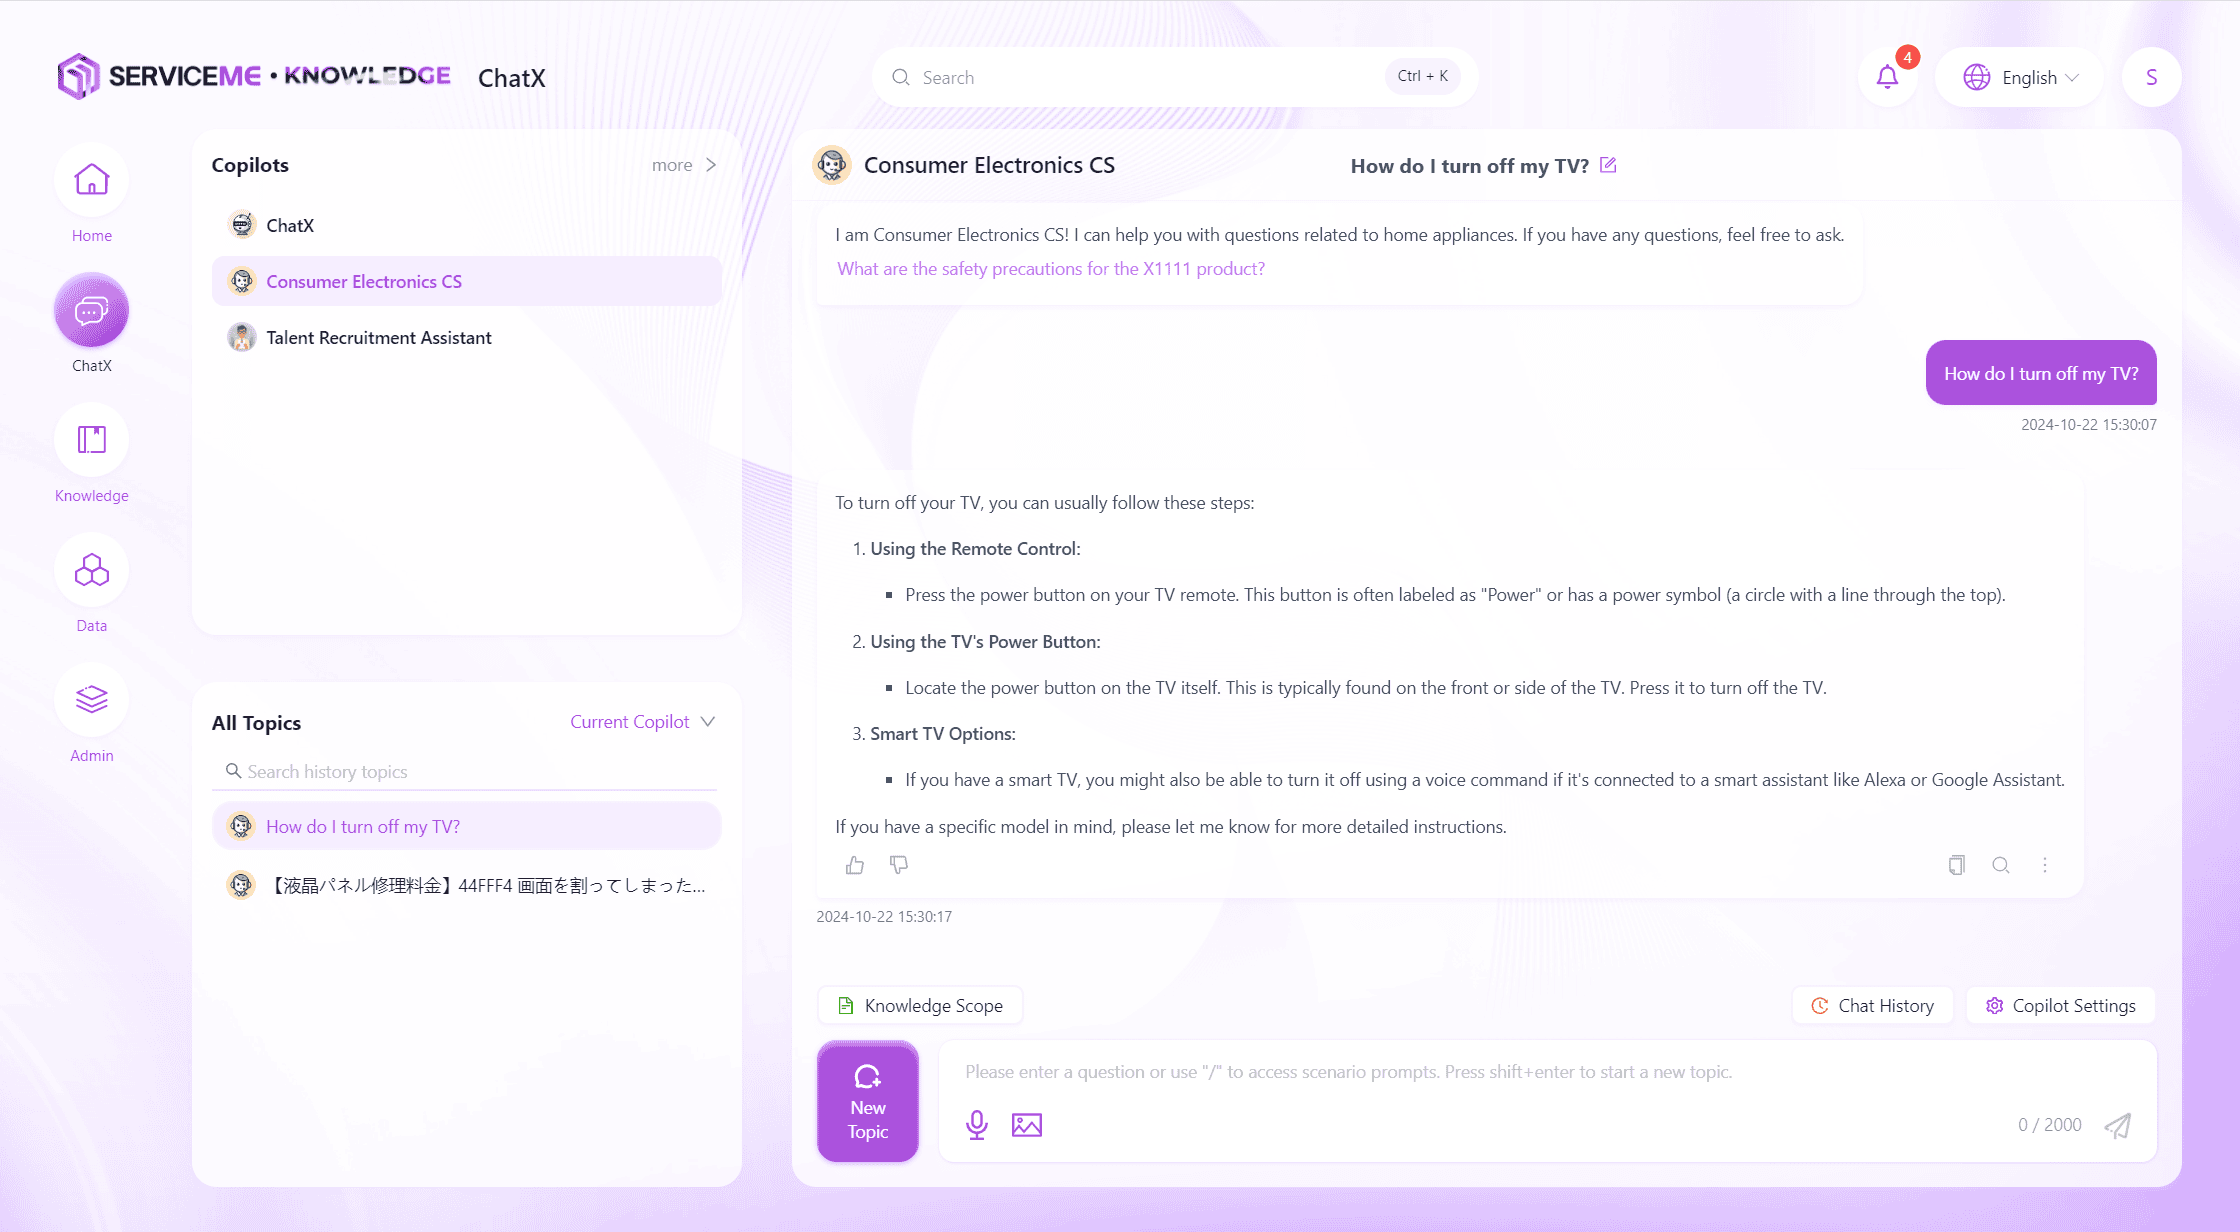
- When users interact with the chatbot and ask
How to manage documents in the knowledge space?, the AI can find the answer from the structured Q&A based on semantics.
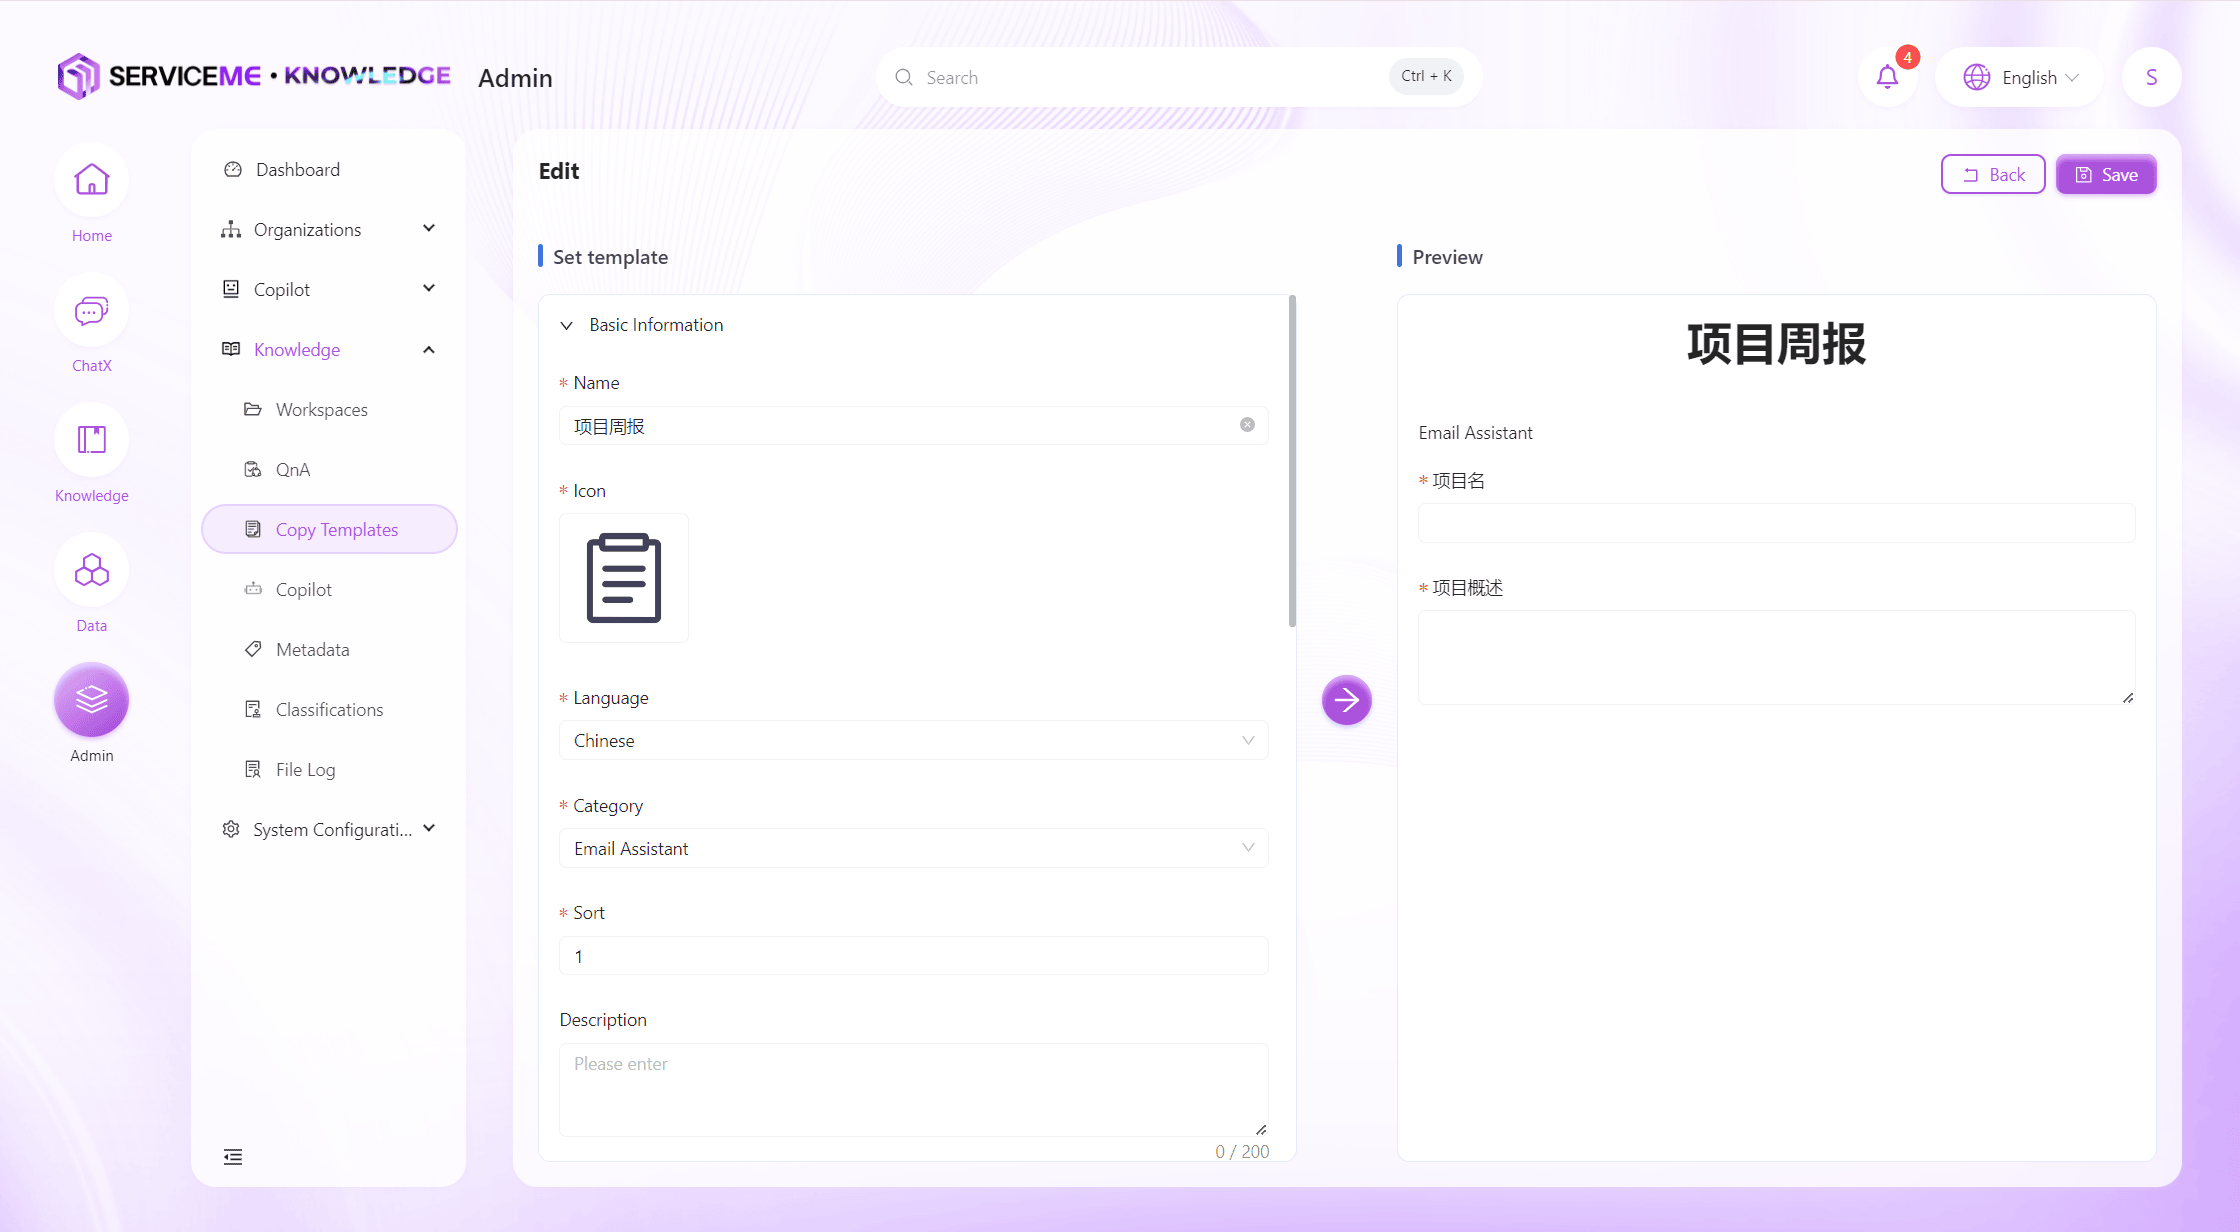
How to Create Copywriting Templates?
- Log in to the SERVICEME platform;
- Switch to the "Admin" platform;
- Go to "Knowledge Management > Copywriting Templates";
- Select a copywriting template category, for example,
Tool Copywriting Creation;
- Click the "Add" button in the upper right corner of the page to open the new template window;
- "Basic Information":
"Name": Enter a custom template name, for example,Xiaohongshu Hot-Selling Cream Comparison Copywriting Creation;
"Icon": Upload a custom icon;
"Language": Select the language from the dropdown list, for example,Simplified Chinese;
"Category": Select the template category, for example,New Media Creation;
"Order": Enter a custom number to control the order in the list, for example,1;
"Description": Enter a description of the template's scenario and function, for example,Automatically generate comparison copywriting for creams to be shared on Xiaohongshu;
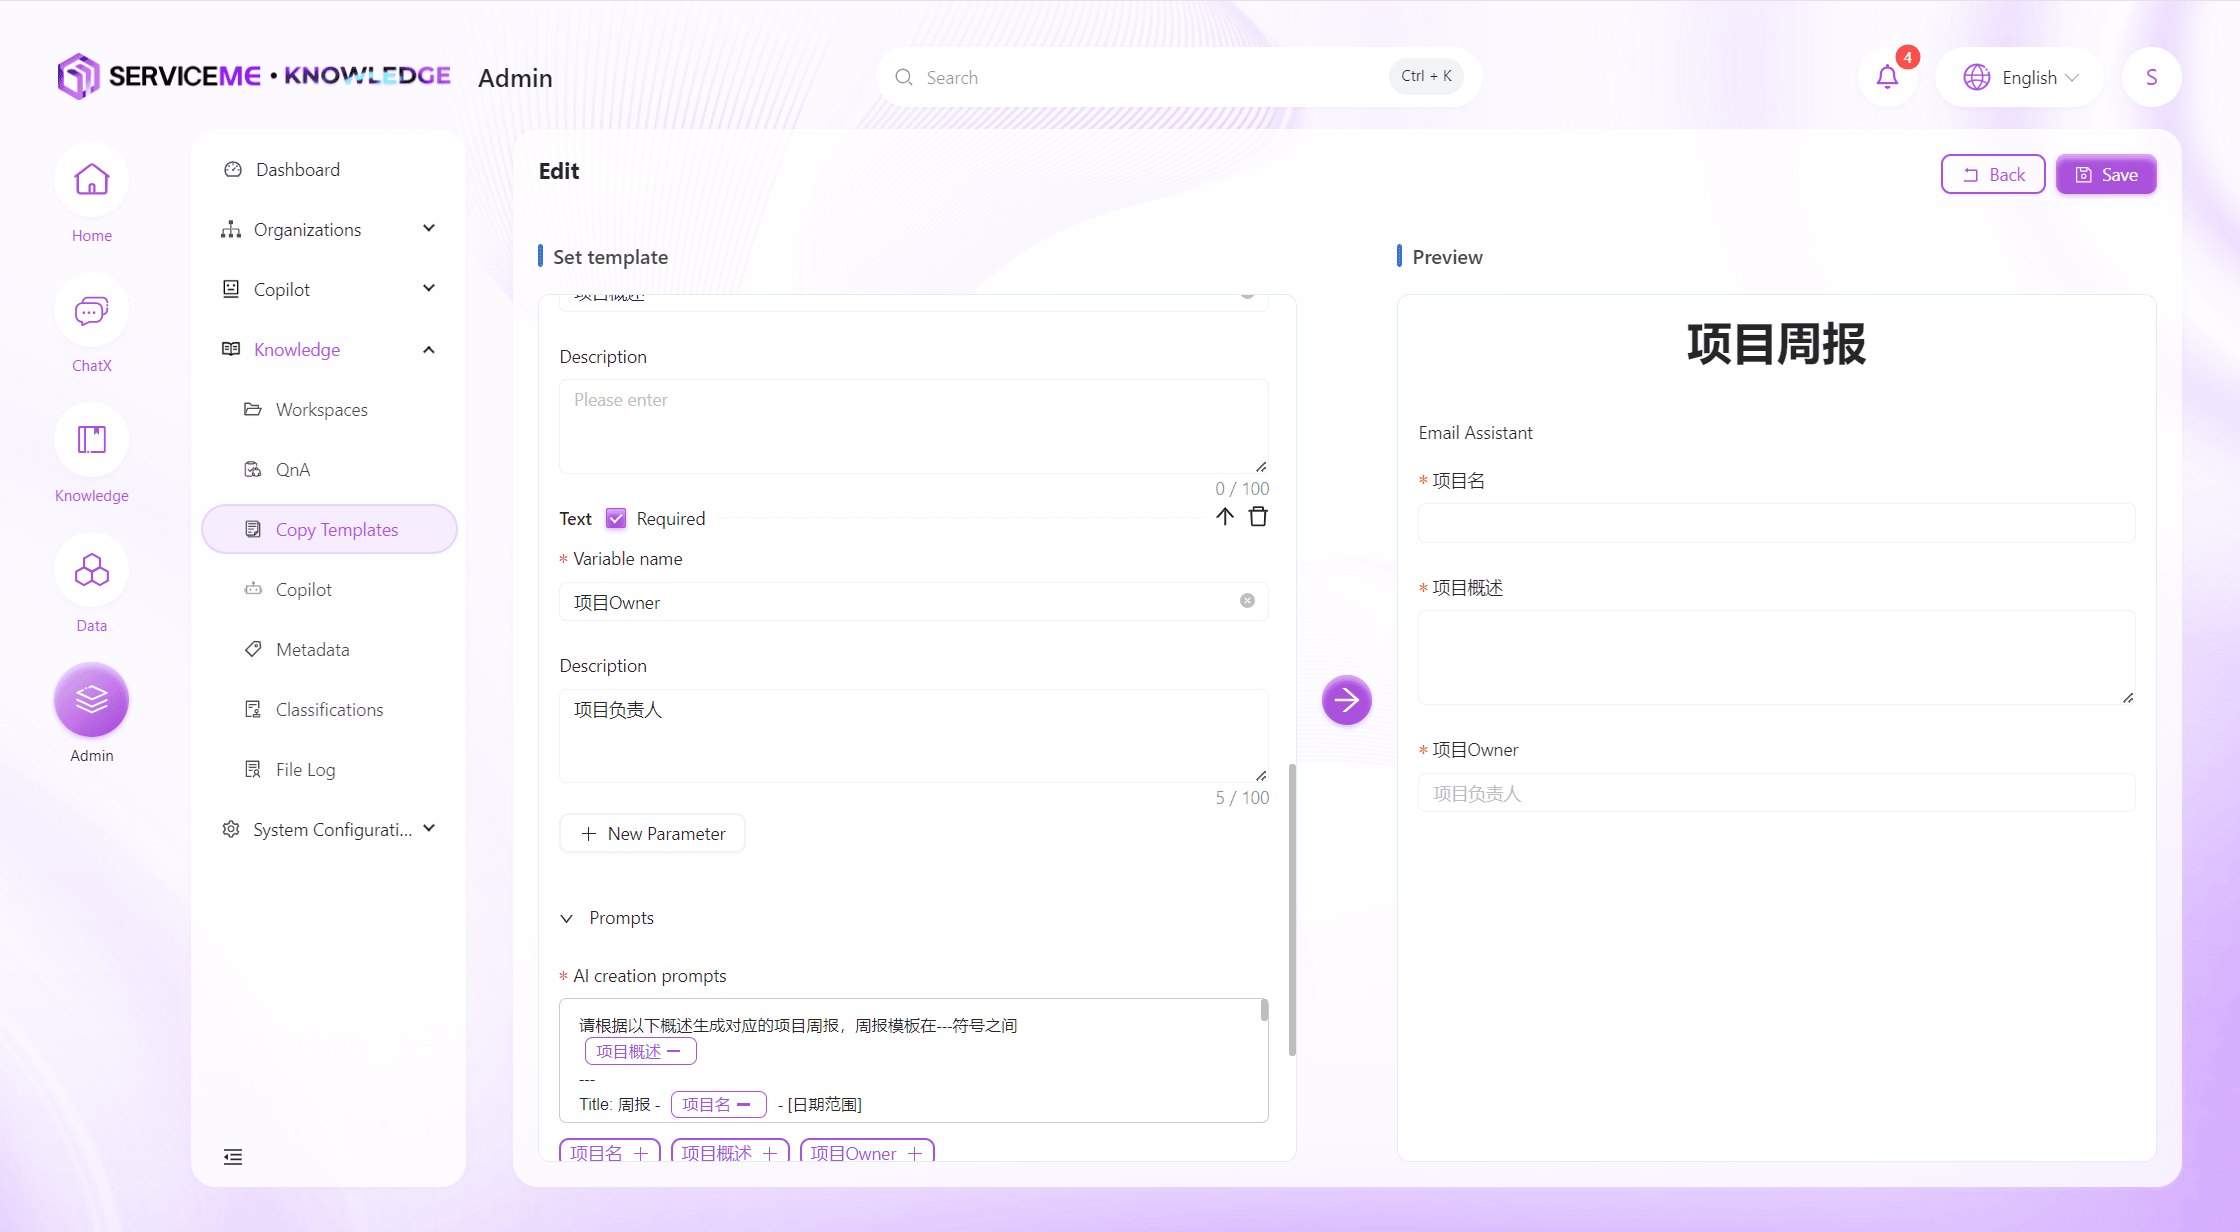
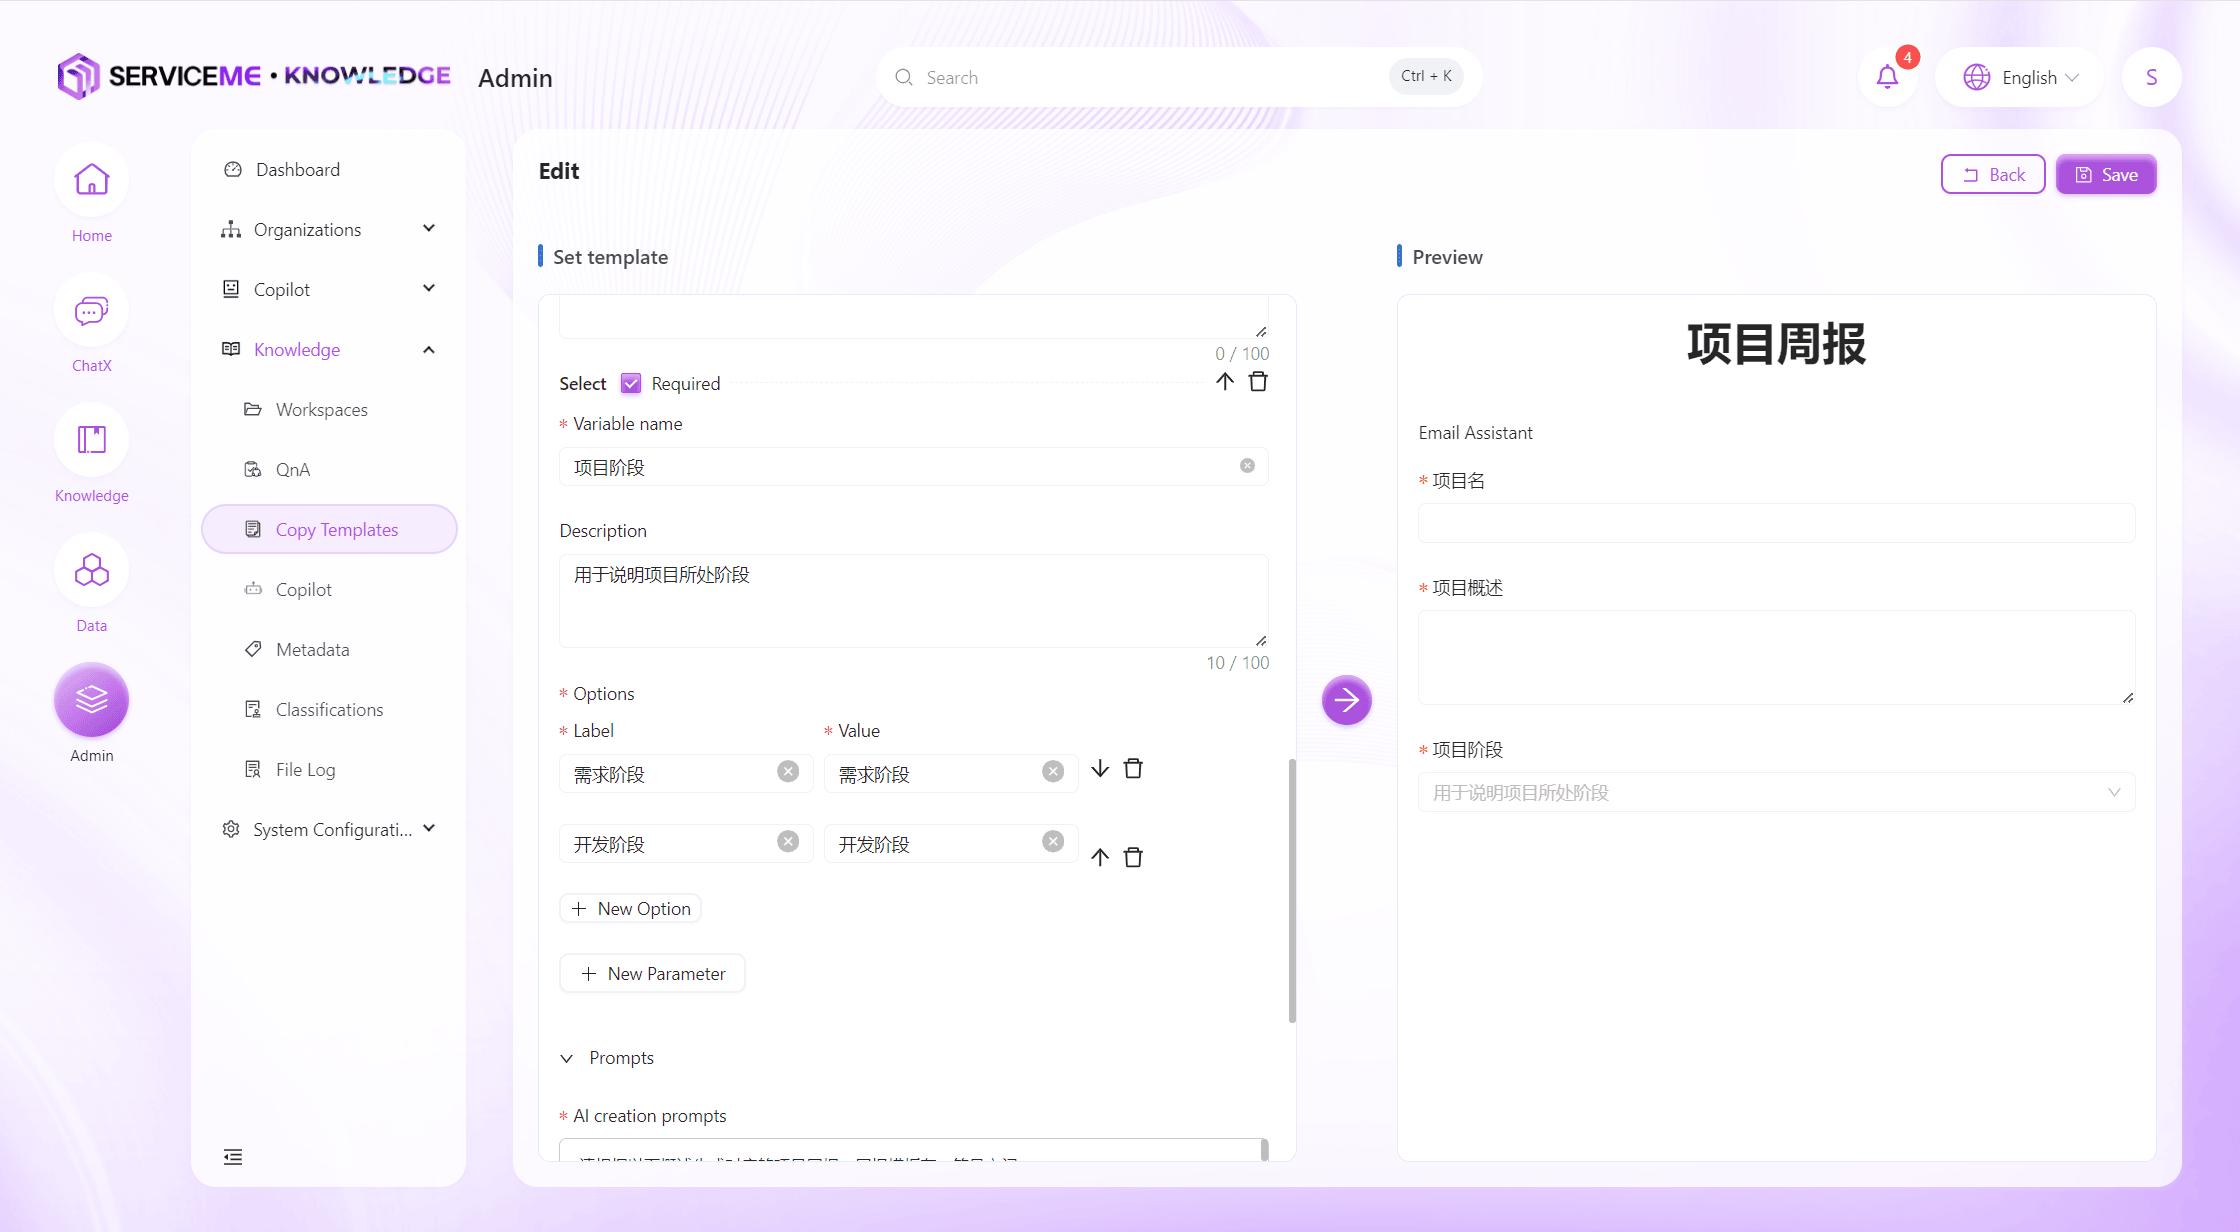
- "Copywriting Parameters":
Click the "+ Add Parameter" button to add up to five parameters of type text, textarea, or dropdown;
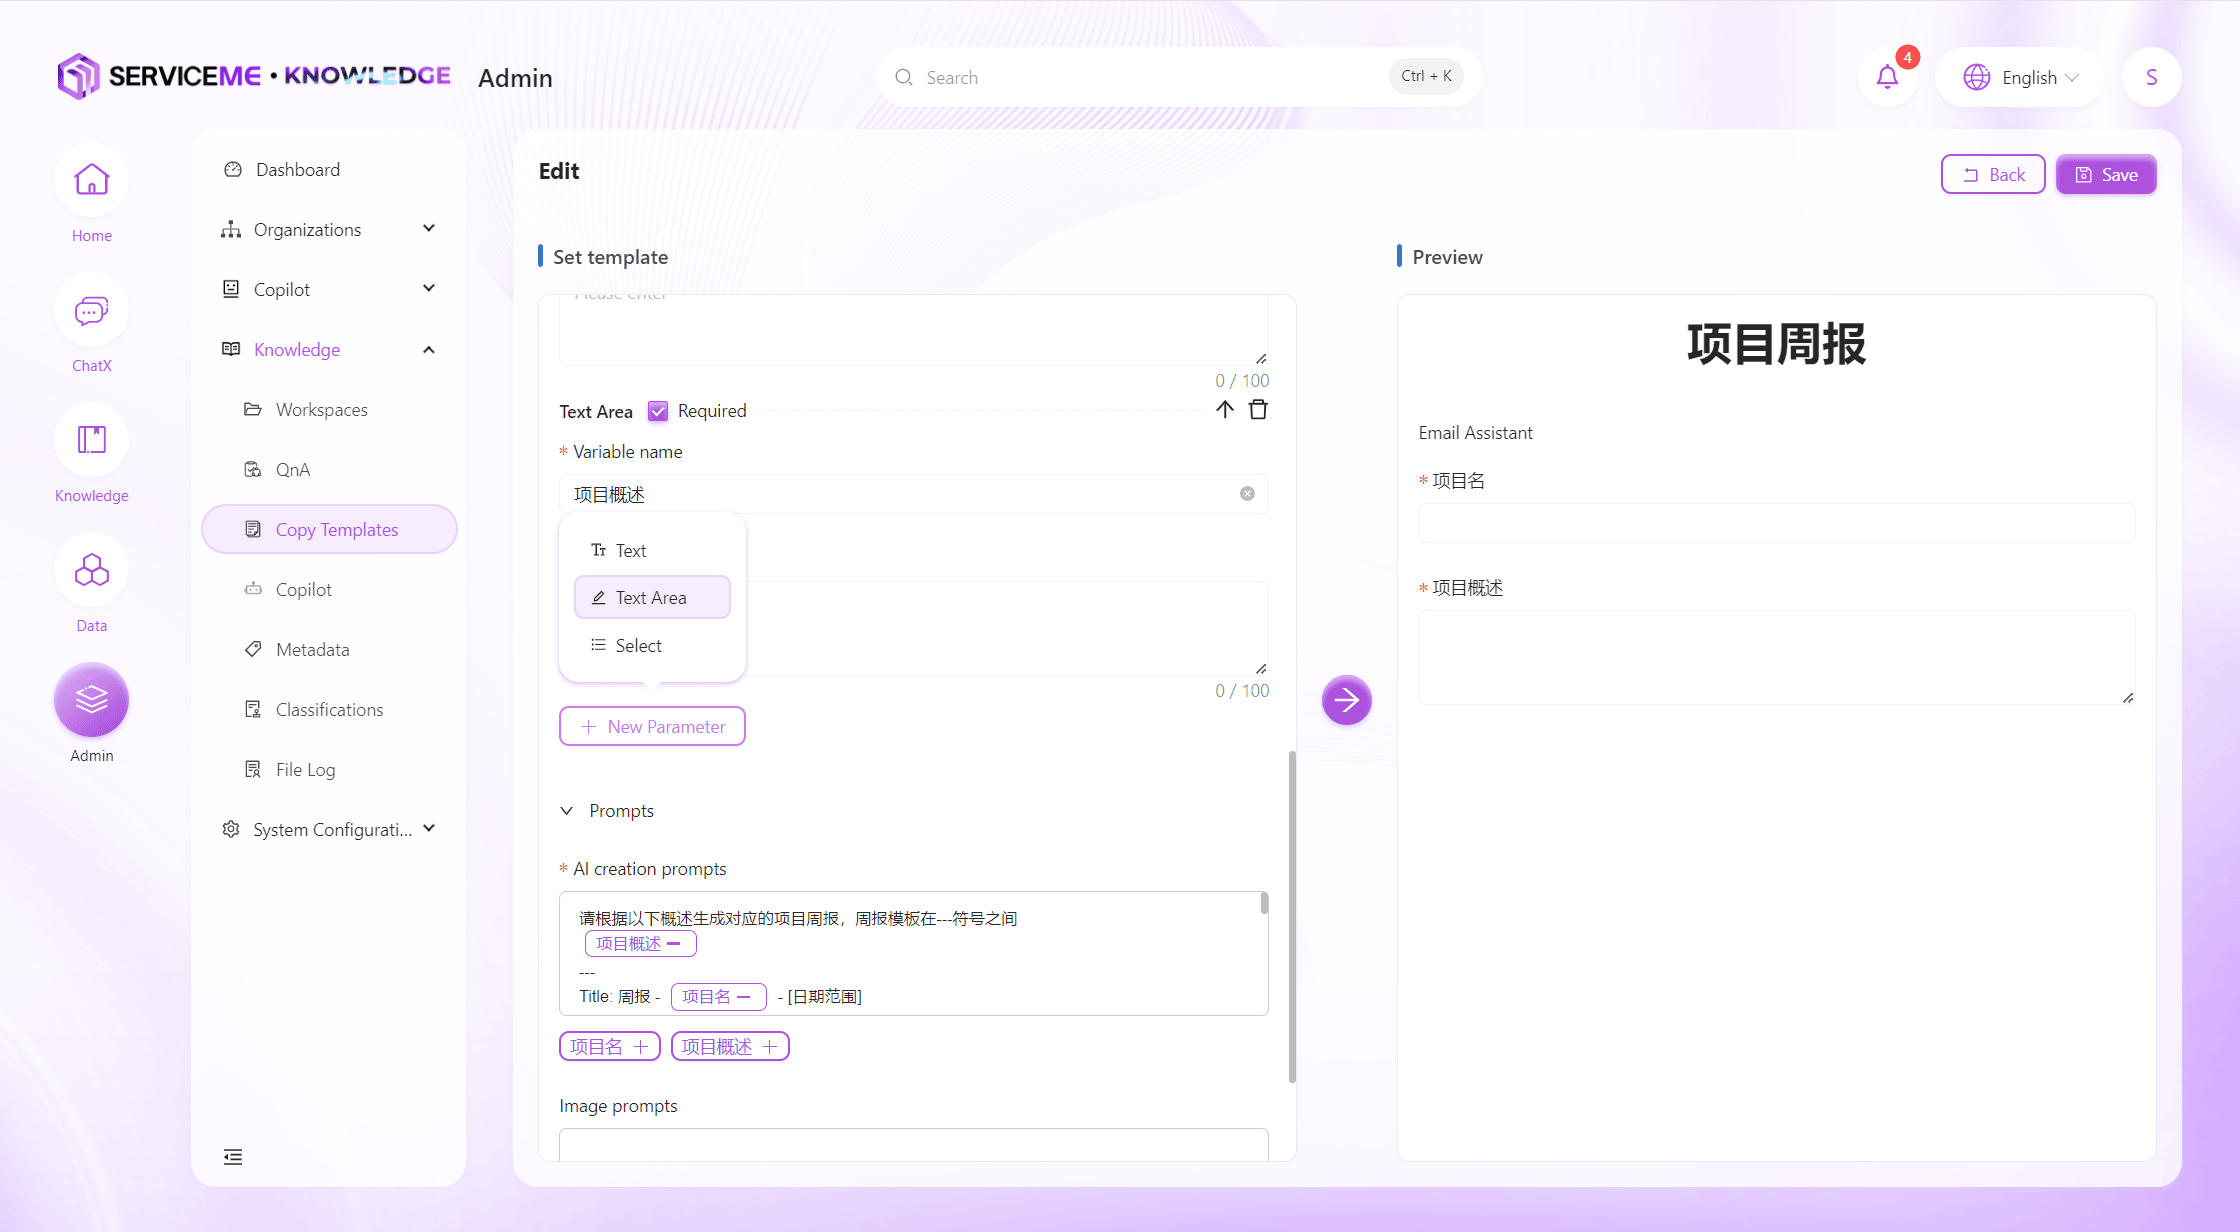
"Text/Textarea":
- "Variable Name": Enter the variable name required when generating copywriting; for example,
Cream Name 1, Cream Name 2, Cream Name 3; - "Description": Enter a description for the variable name required when generating copywriting, for example,
Names of creams for comparison;
"Dropdown"
- "Variable Name": Enter the variable name required when generating copywriting; for example,
Effect; - "Description": Enter a description for the variable name required when generating copywriting, for example,
Effect of the cream; - "Label": Enter the name of the dropdown option, for example,
Firming and Smoothing Fine Lines; - "Value": Enter the specific reference content for the display value, for example,
Firming and Smoothing Fine Lines;
"Prompt Words"
- "Copywriting Prompt": Enter the scenario, content specifications, and requirements for generating copywriting, for example,
You are a skincare reviewer on Xiaohongshu. Please follow these steps: first, generate 5 titles (with appropriate emoji), then generate a body (each paragraph with appropriate emoji, and suitable tag labels at the end); - "Image Prompt": Enter what kind of image to generate, for example,
Generate promotional packaging and usage images according to the name;
- "Prompt Words" can be described in natural language, and it is recommended to insert parameters at appropriate positions.
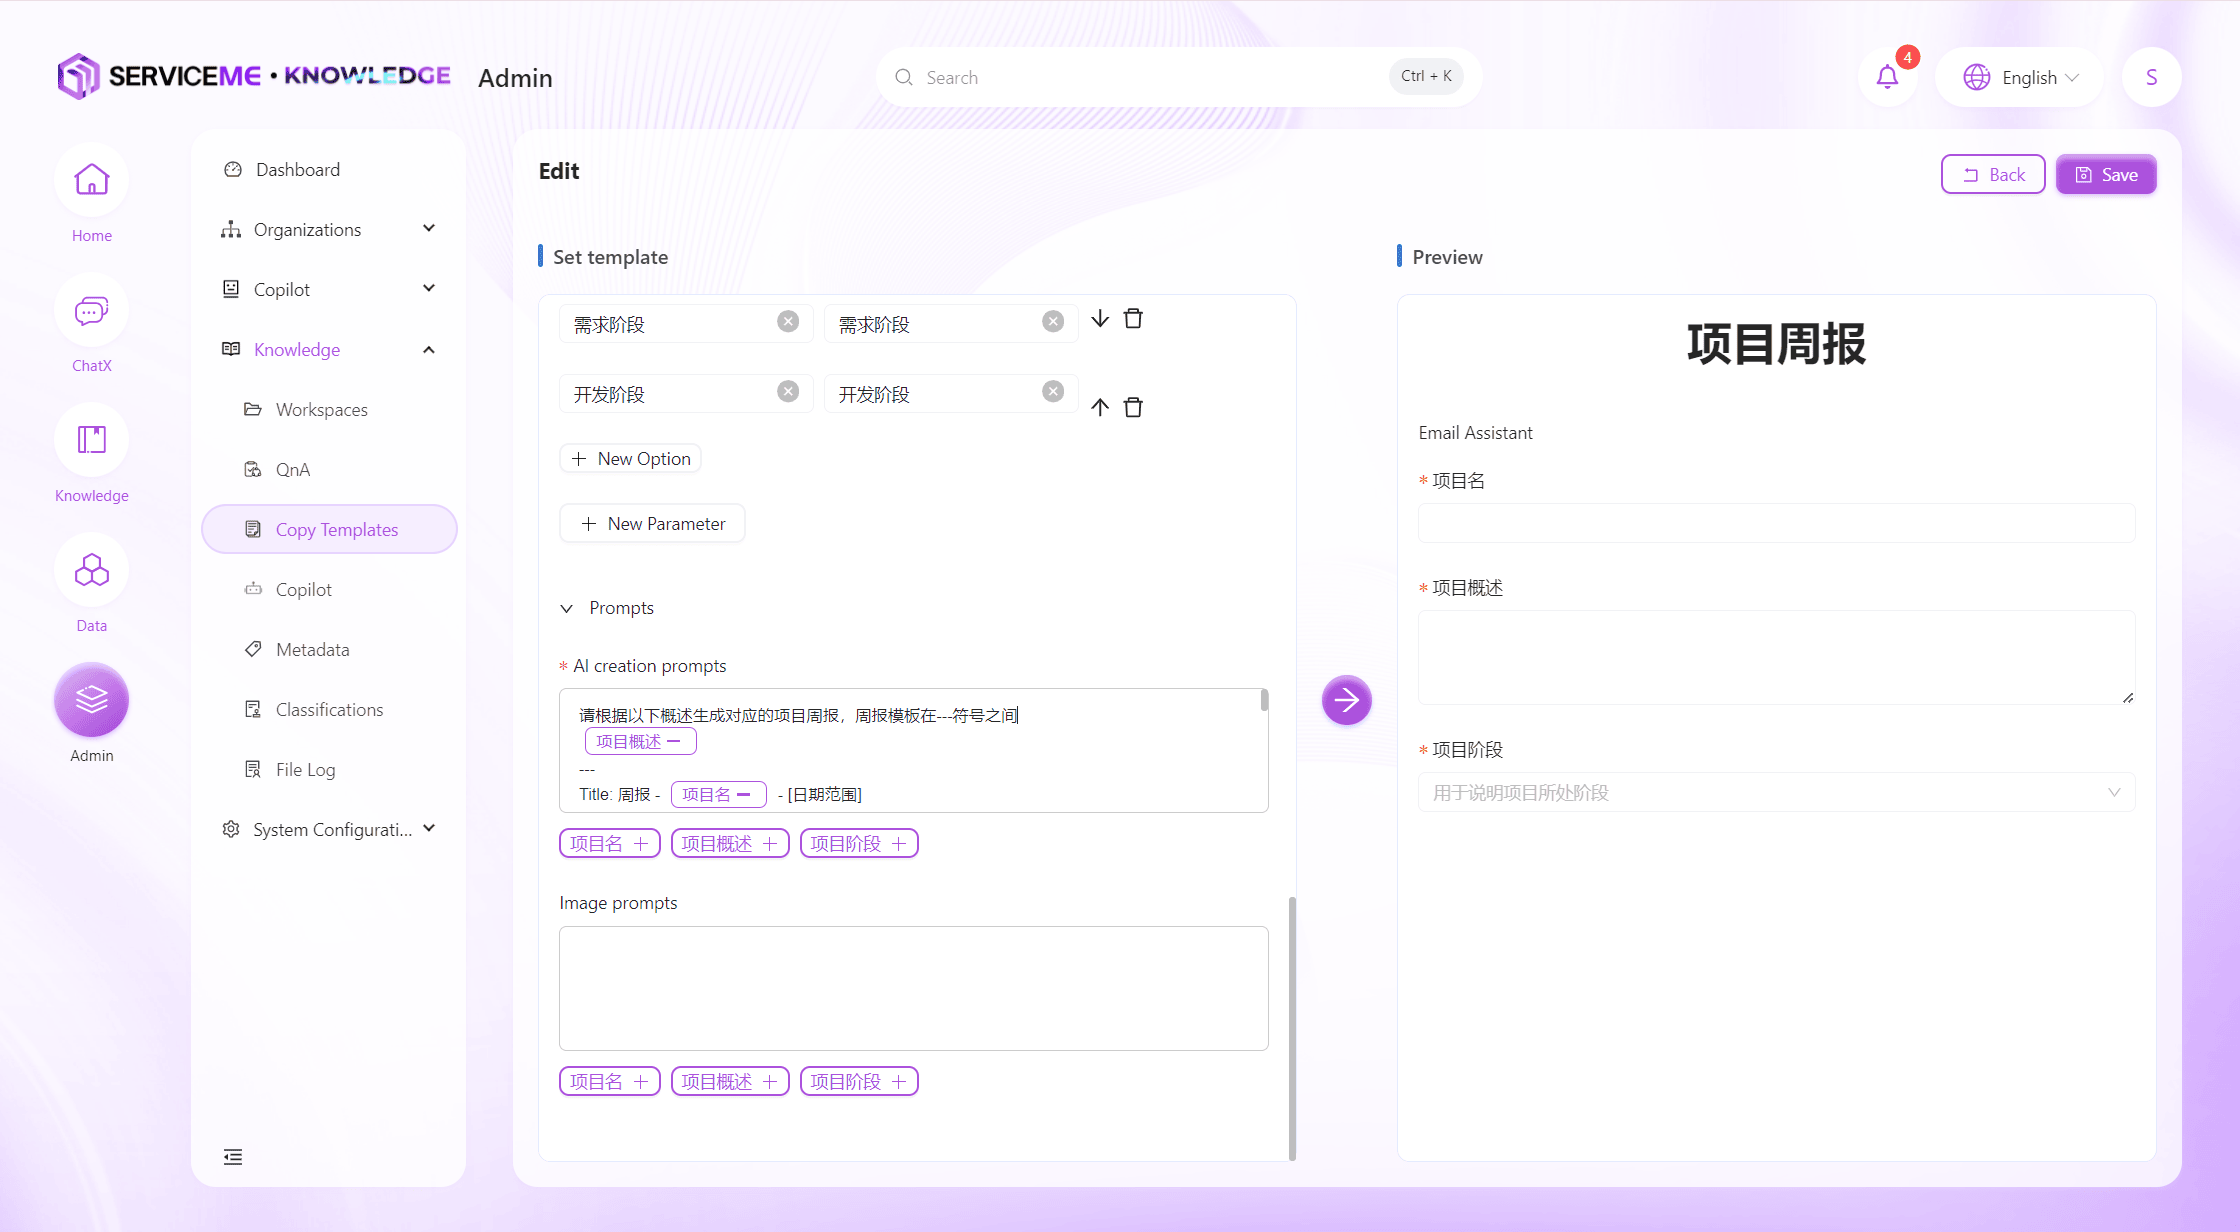
- Click the "Save" button to successfully add the copywriting template.