How to Manage Agents?
Create Your First Agent
- Log in to the SERVICEME platform;
- Switch to the "Management" module;
- Go to "Agent Management > Agent Settings" to enter the Agent settings list;
- Click Add to enter the Agent Settings page
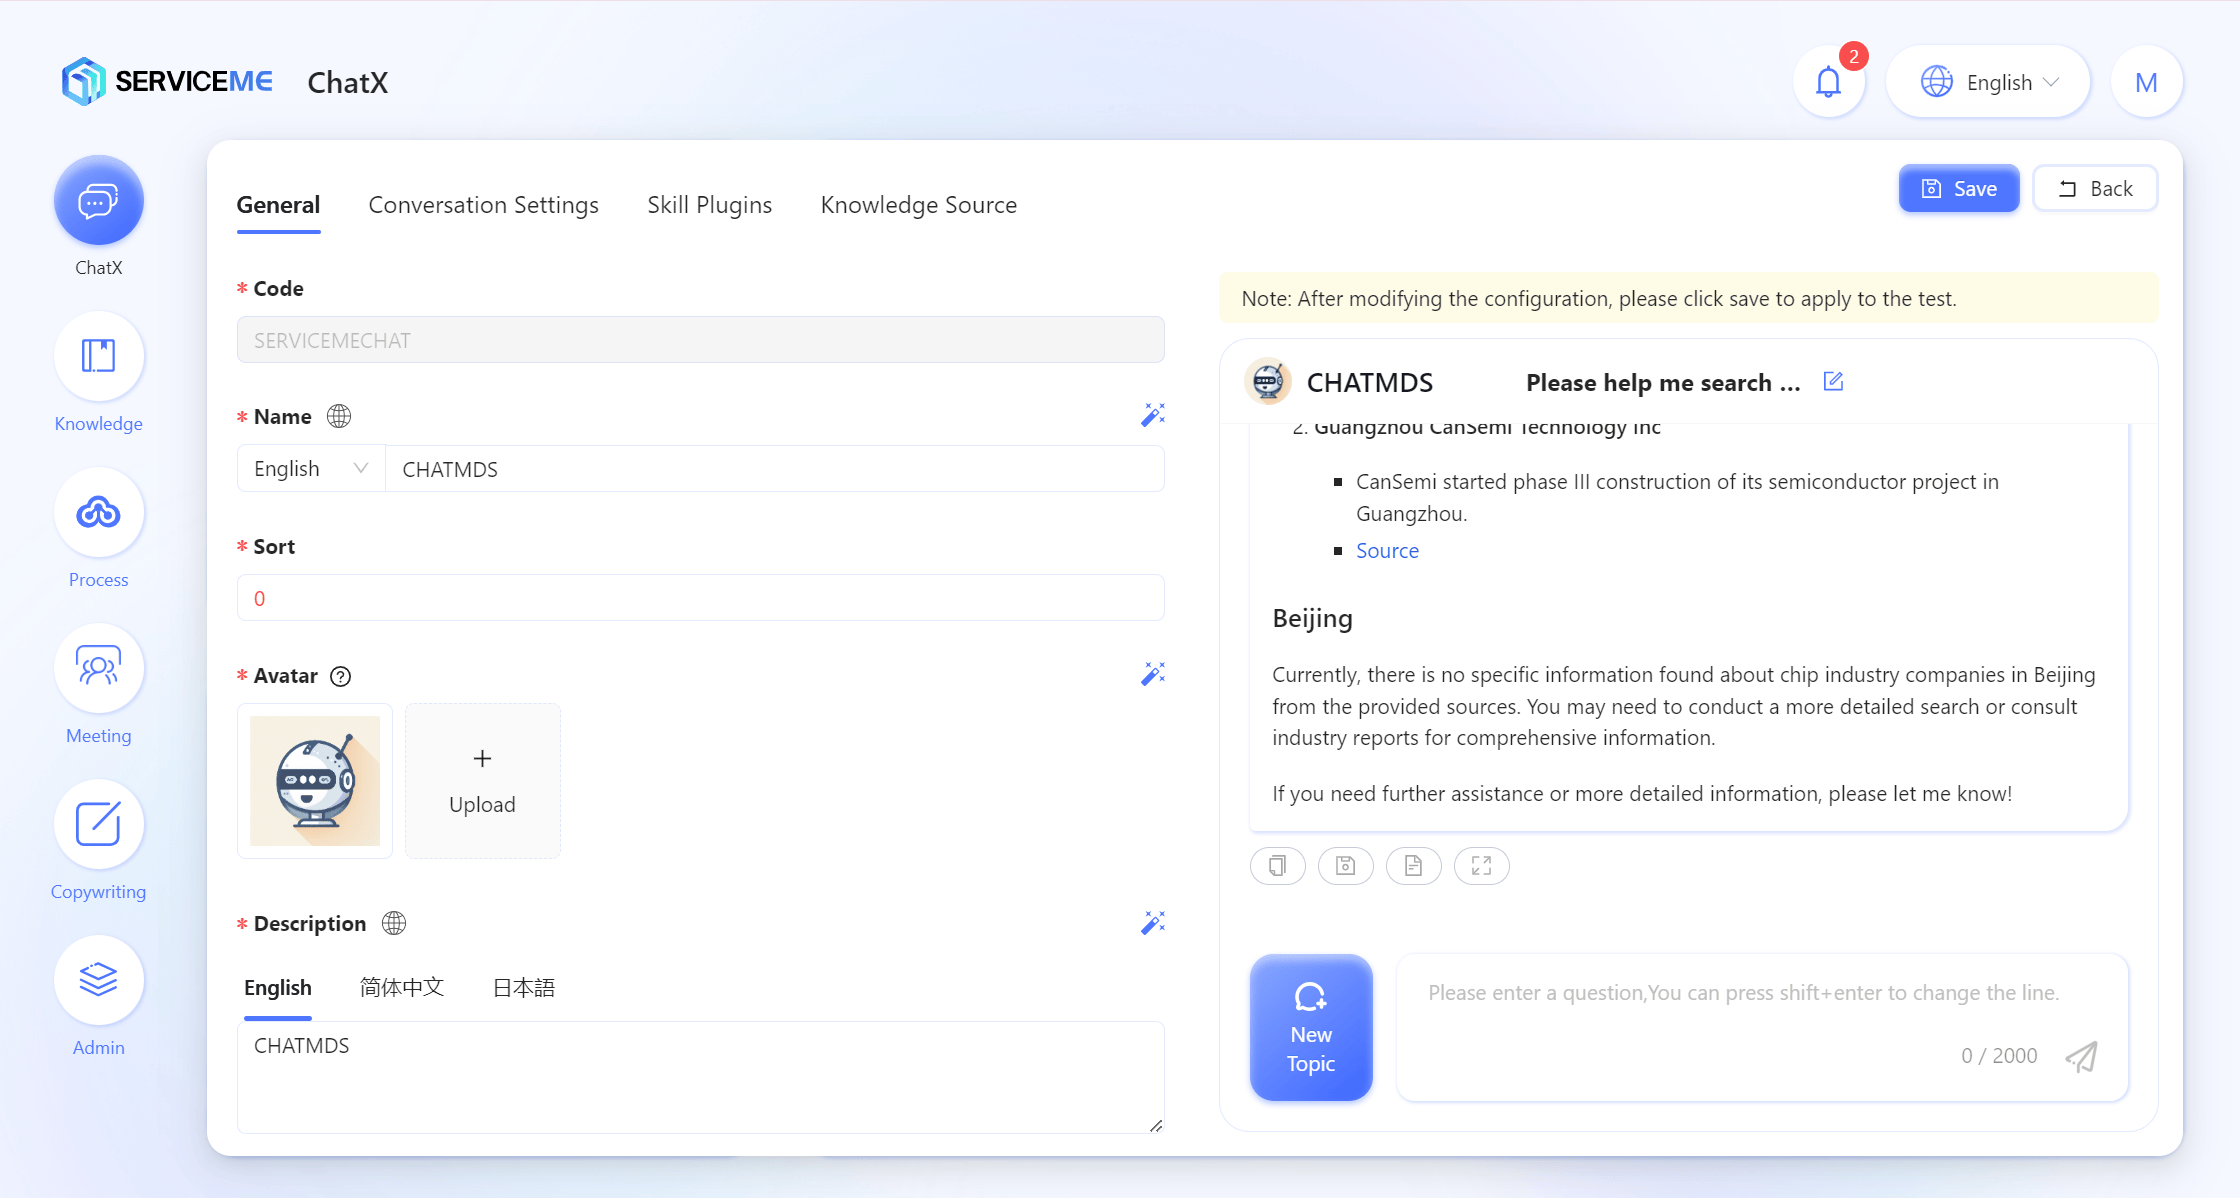
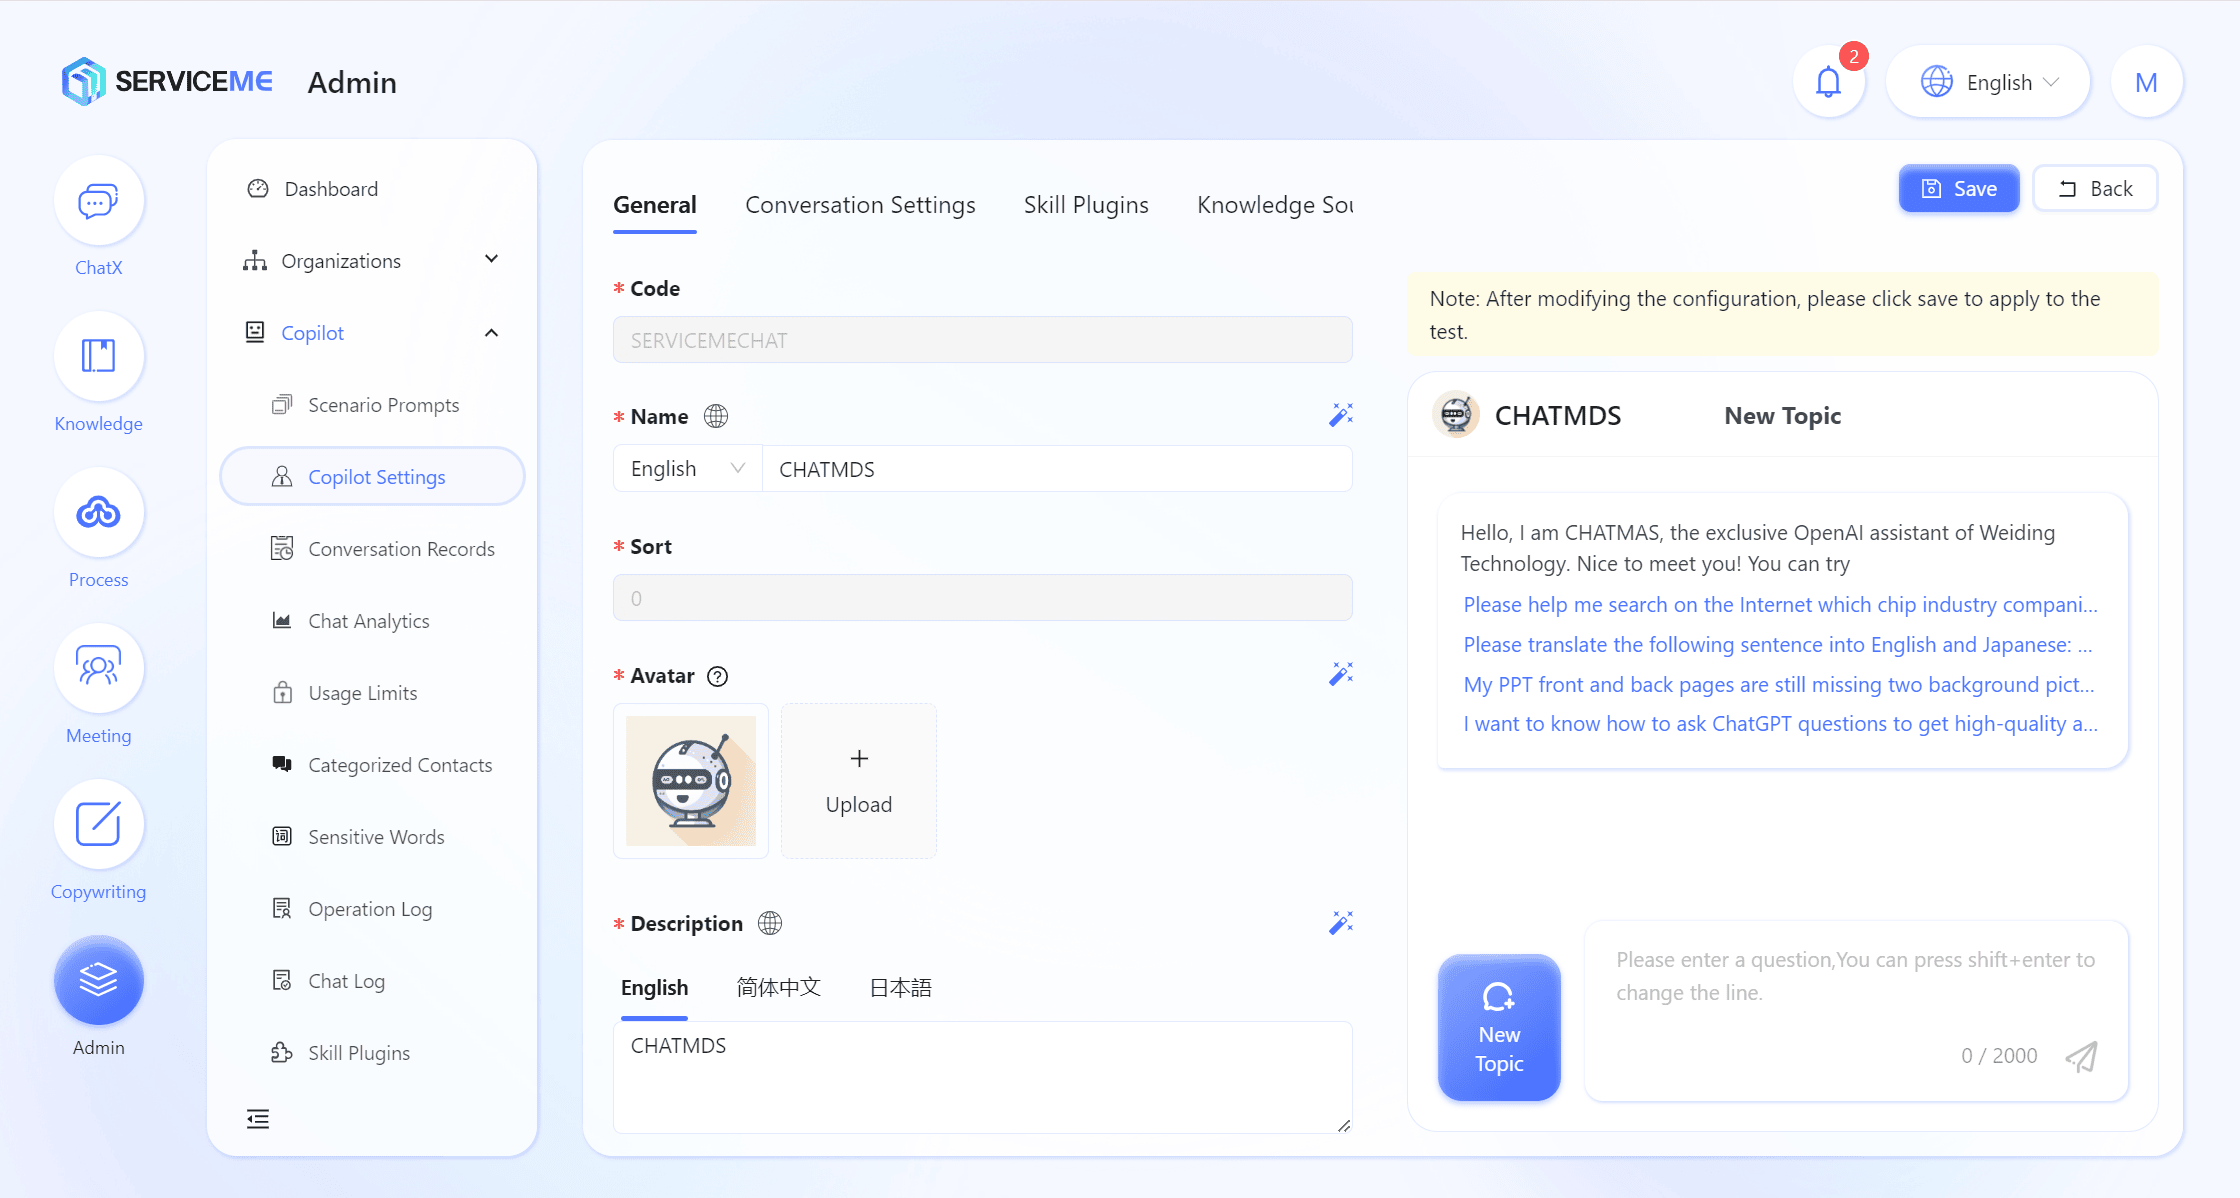
General Settings
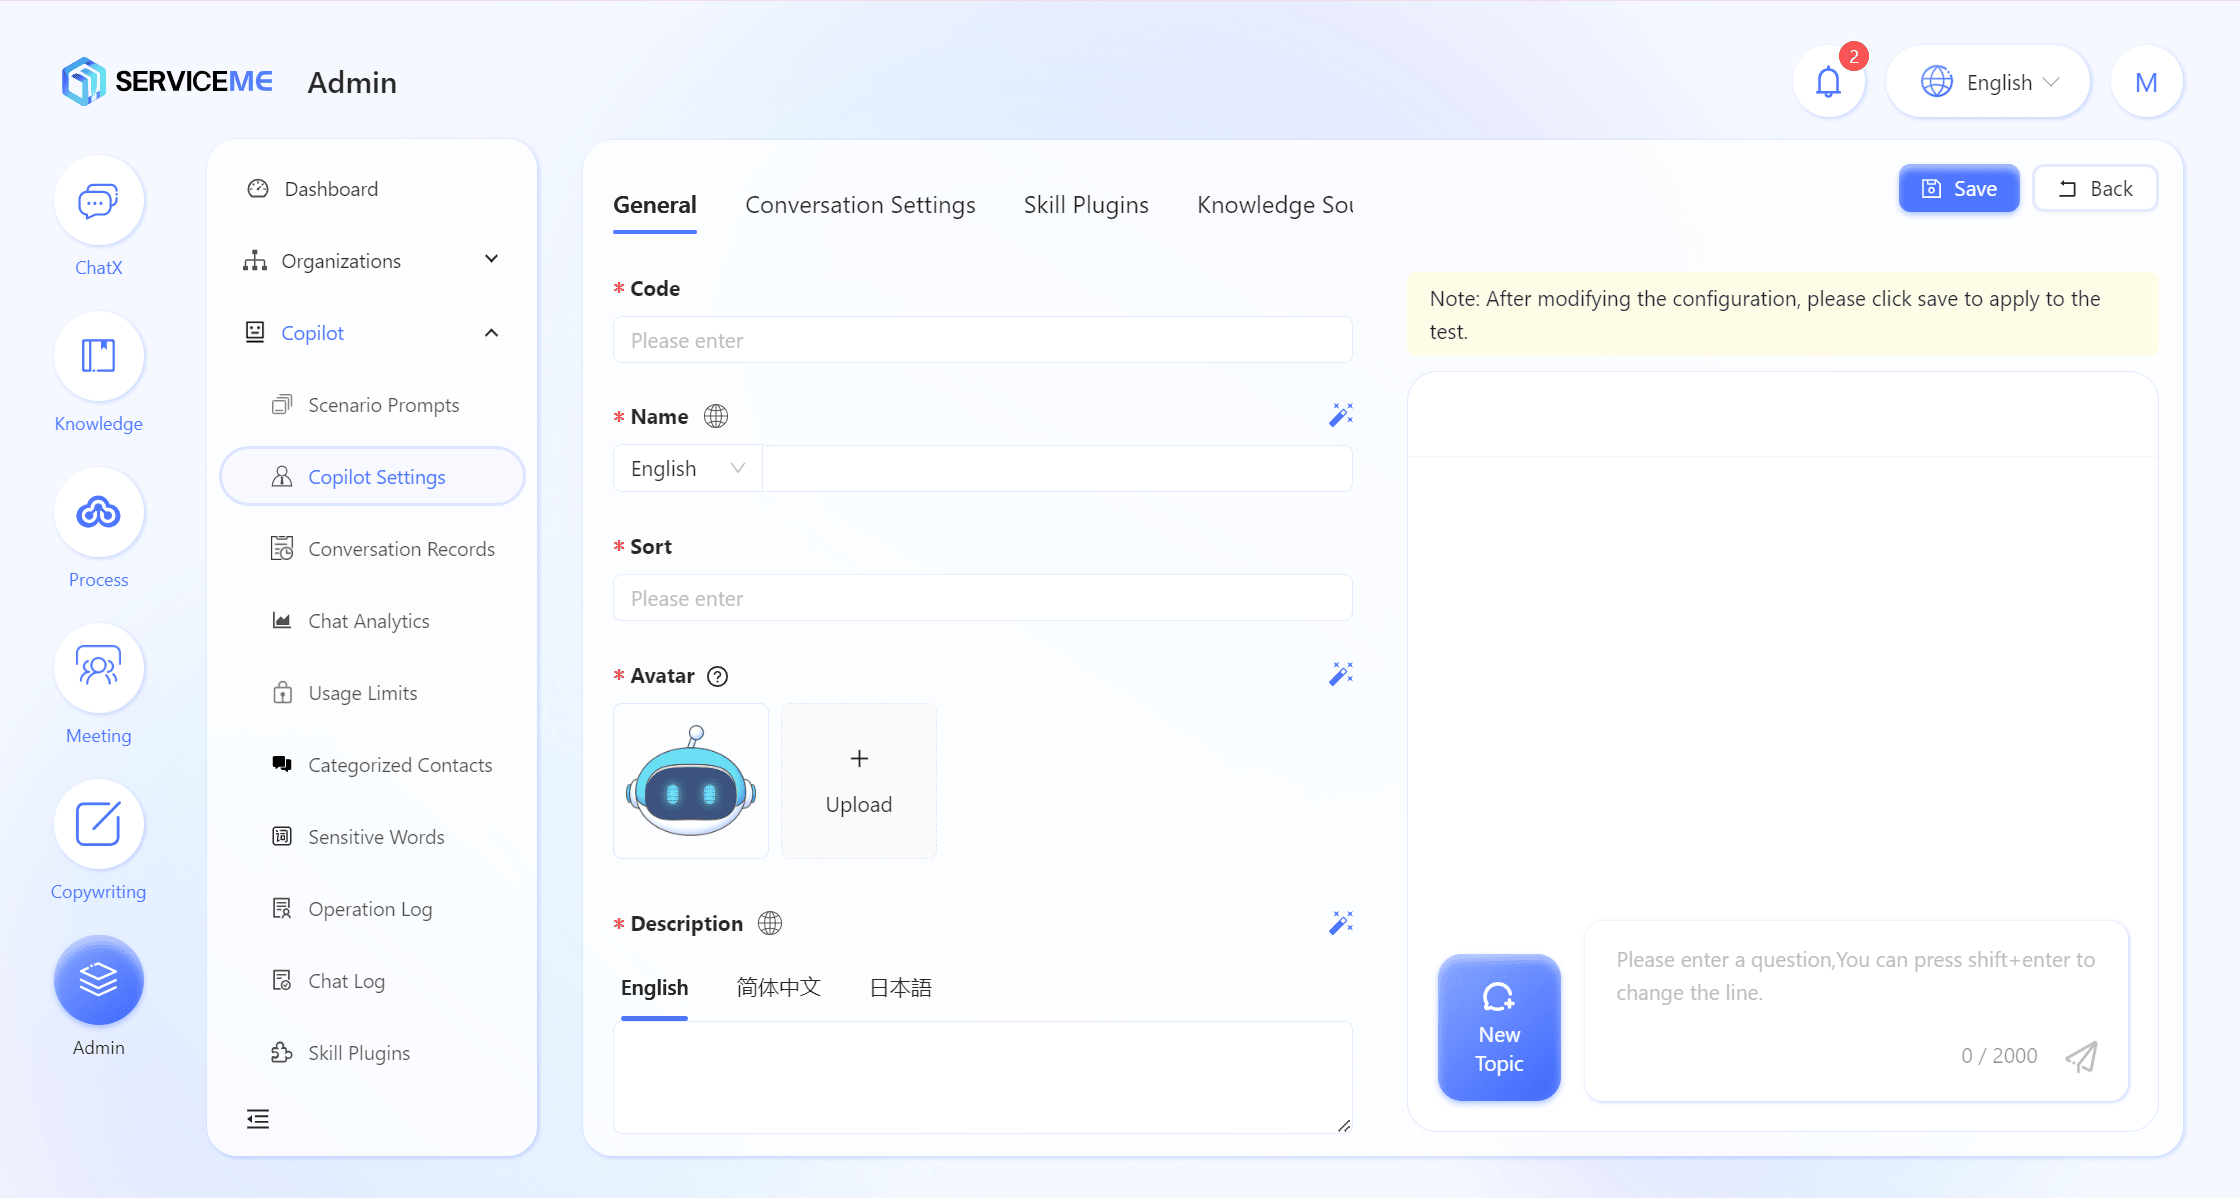
- ID: The unique identifier for the Agent, used for data and log association. Cannot be modified after saving. Example:
HR_Copilot - Name: The display name of the Agent, supports multiple languages and AI auto-translation (Magic Wand). Example:
HR Assistant - Order: Enter a number greater than 0 to control the order of this Agent in the list, e.g.,
1,2,3 - Avatar: Upload the chatbot's icon, or generate it automatically via AI (Magic Wand)
- Description: Description of the Agent, to help others understand its purpose. Supports multiple languages and AI auto-translation (Magic Wand)
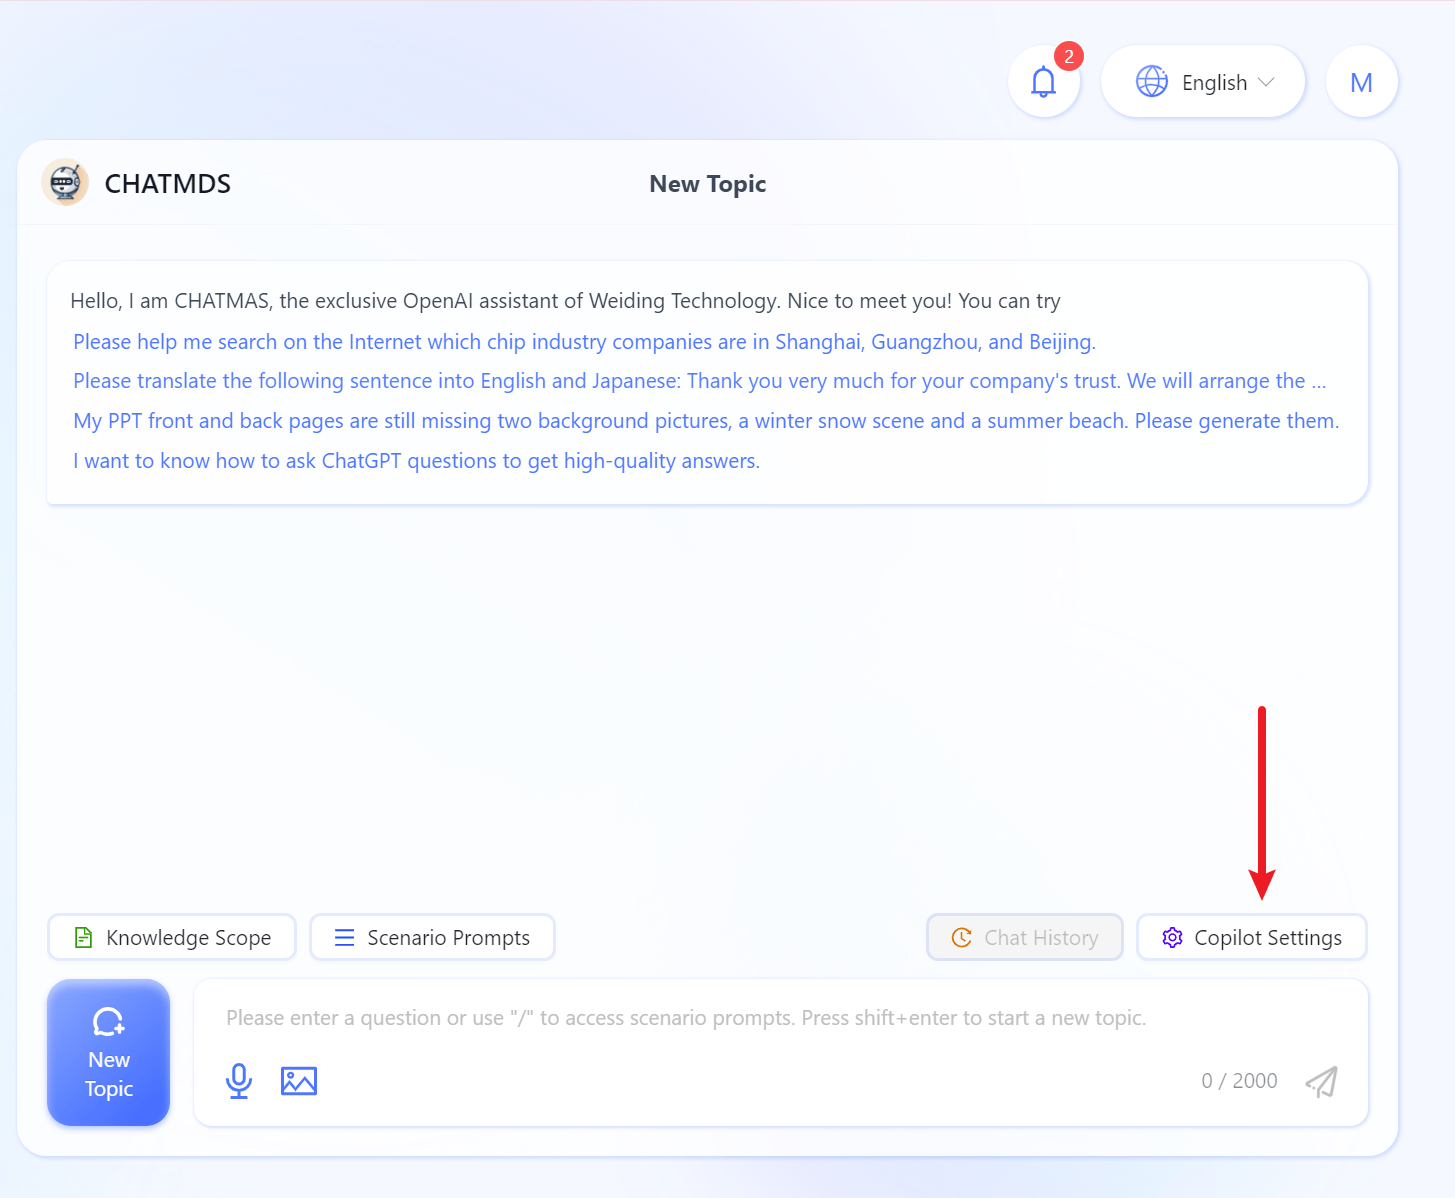
- Welcome Message: The welcome message displayed every time a new conversation with the Agent starts. Supports multiple languages and AI auto-translation (Magic Wand). Example:
Welcome to Medalsoft (SoftwareOne subsidiary) Assistant, how can I help you?
The welcome message supports defining Quick Questions using square brackets []. For example, [Please help me find biopharmaceutical companies in Guangzhou] will generate a convenient hyperlink for users to ask questions in the welcome message.
Conversation Settings

- Default Model: Configure the large language model used by the Agent. The more powerful the model, the smarter the Agent, but it may require longer response times and higher costs.
- Prompt: Set the Agent's role, communication style, and tasks it can perform via prompts. This is one of the most important settings for the Agent. Supports AI auto-optimization of prompts (Magic Wand)
- Context Turns: Controls the maximum number of context records. One question and one answer count as 2. If you want to include the last two Q&A in the context, set it to 4. If set to 0, each question is independent and not affected by previous Q&A, equivalent to starting a new session each time.
- Chat Logs: Controls whether the system records the Agent's chat logs.
- Temperature: The higher the temperature, the greater the randomness, enhancing the Agent's ability to generate more creative outputs.
- Top P: Increasing top P expands the Agent's vocabulary range, improving reply diversity. However, this may reduce semantic consistency. Conversely, lowering top P enhances logical consistency.
- Enable Suggested Questions: Whether to provide related suggested questions after the Agent's reply.
- Conversation Feedback: When enabled, if a user gives a thumbs down (dissatisfied) to the Agent's reply, a feedback form will pop up to collect opinions.
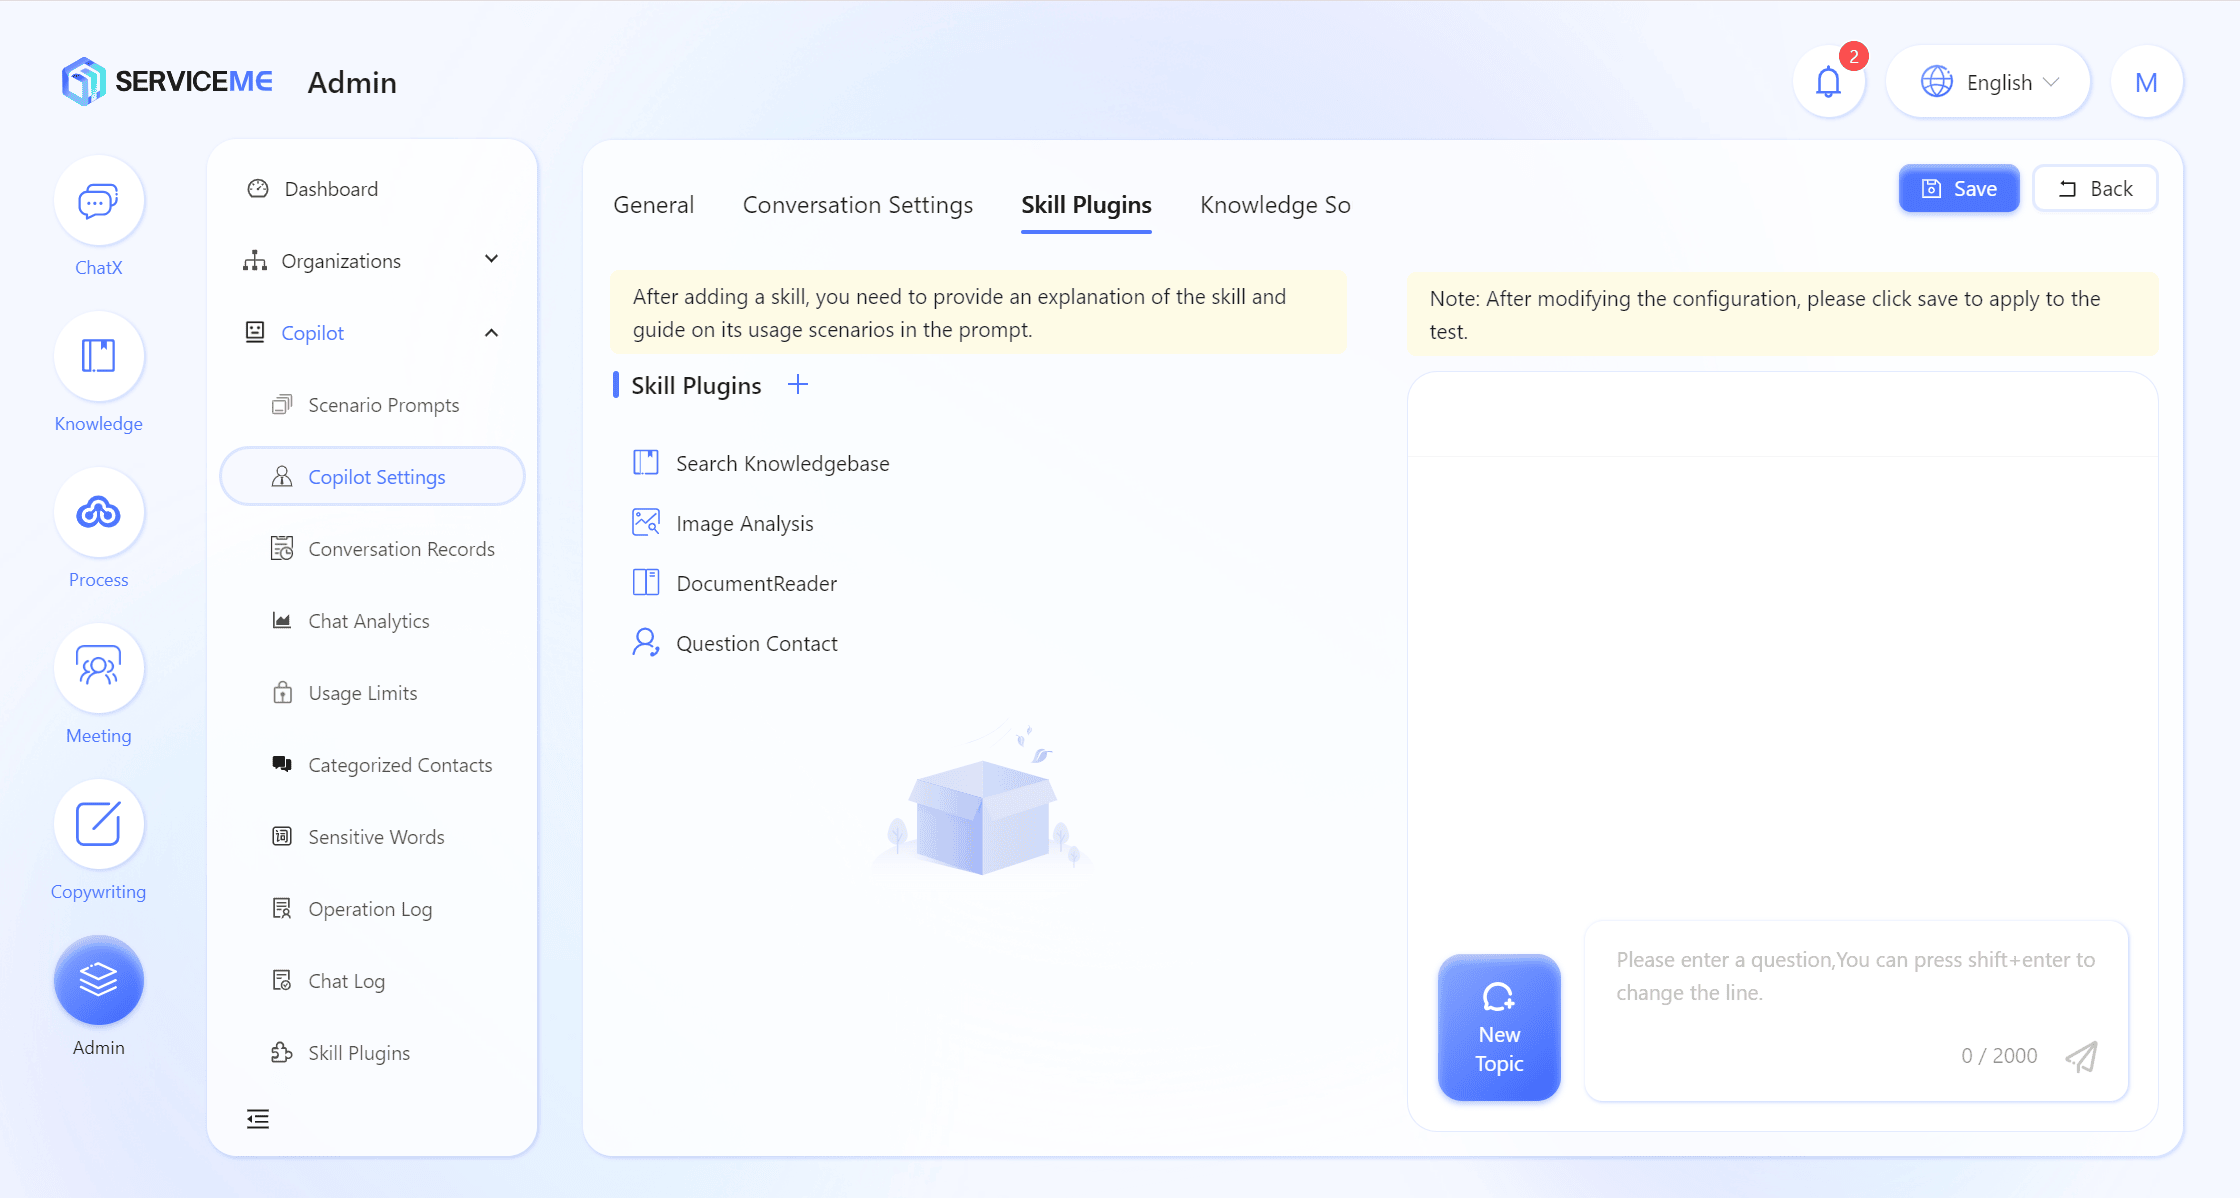
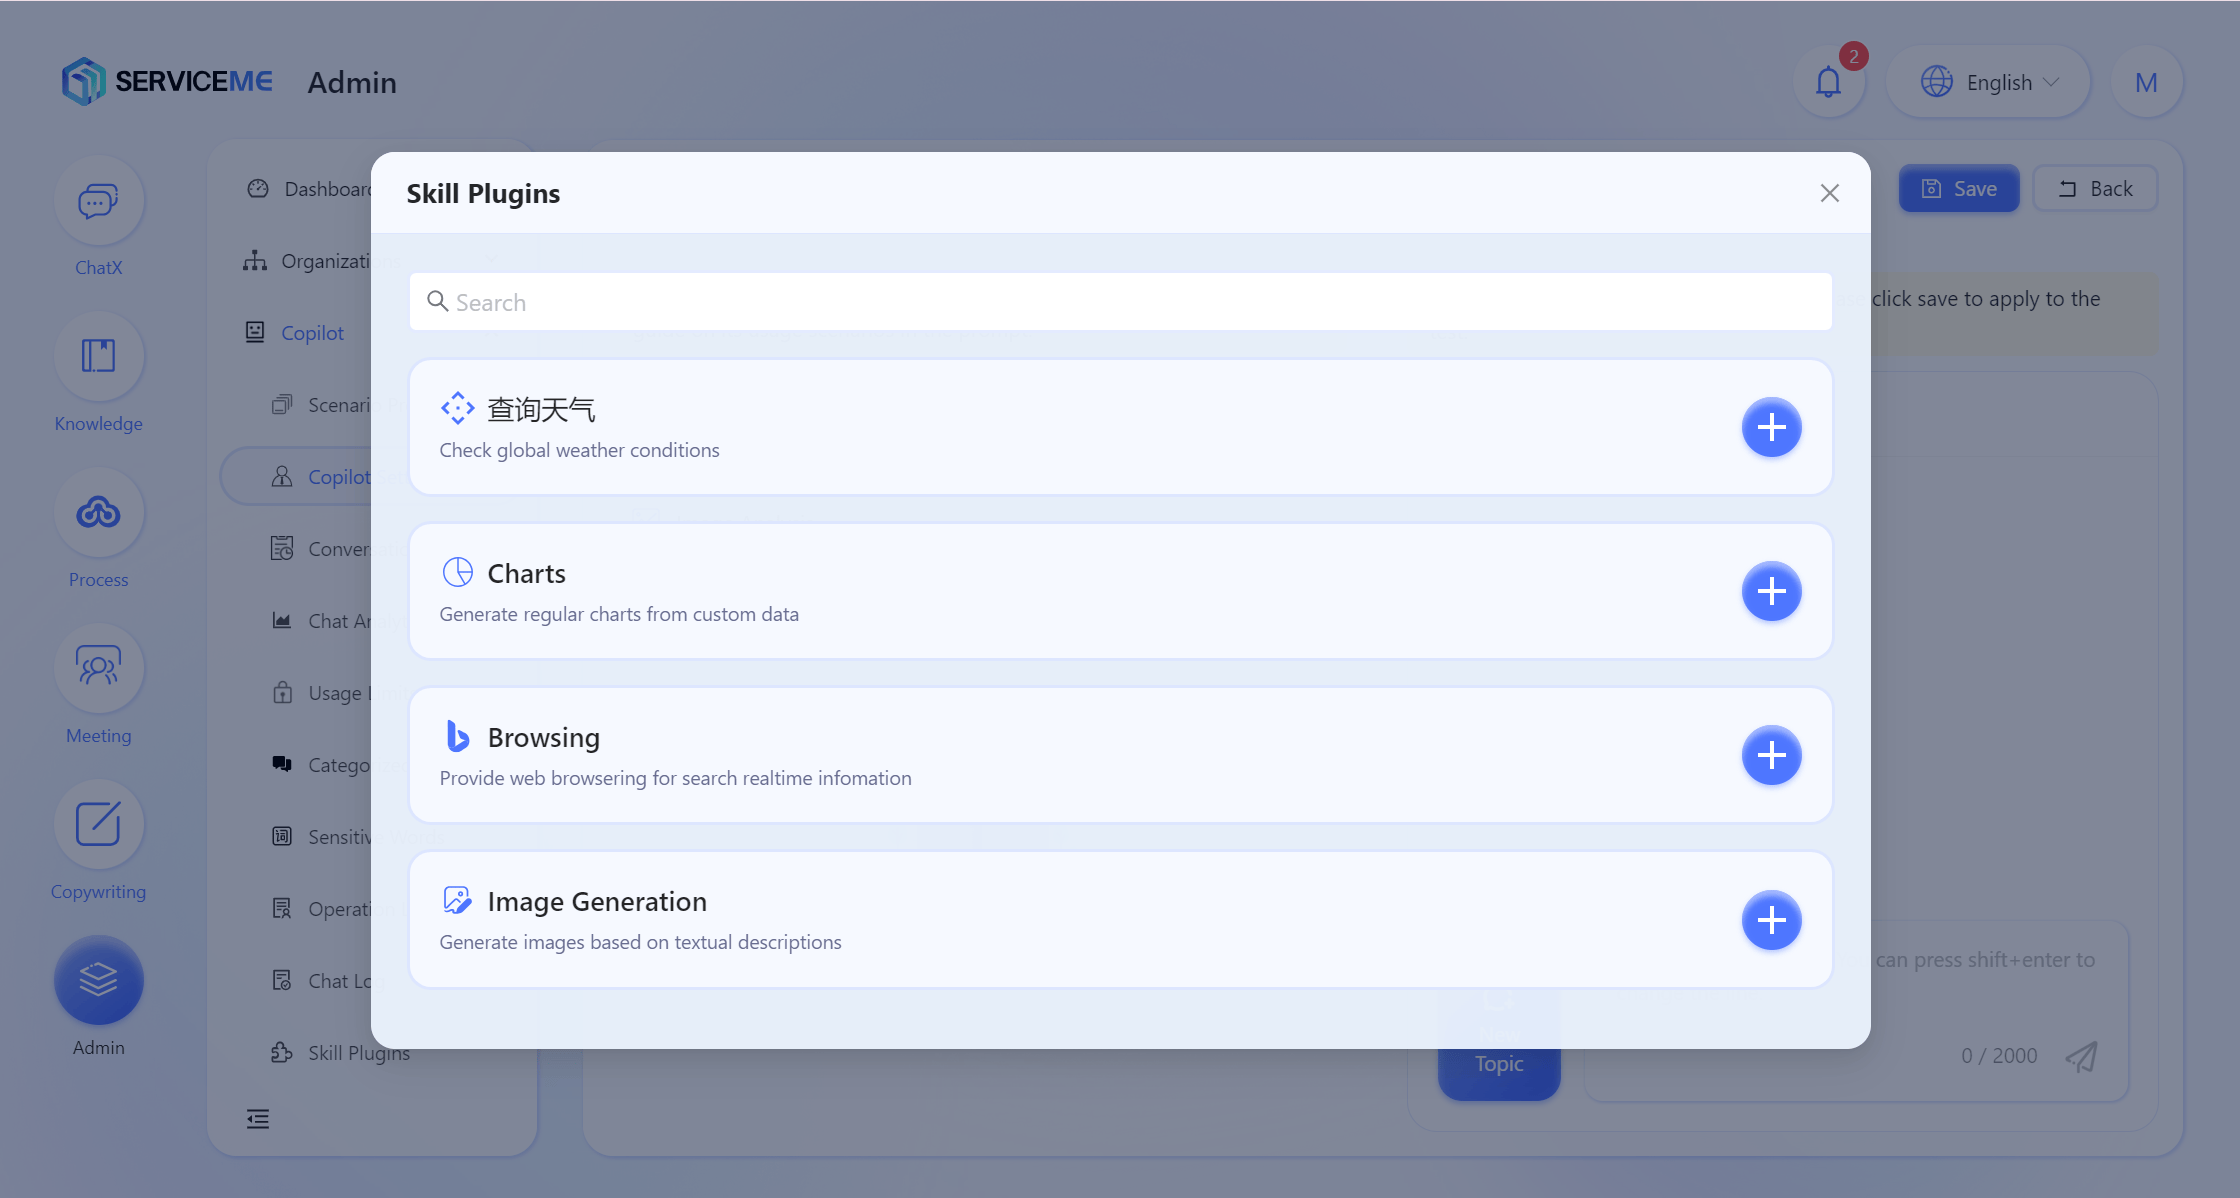
Configure Skill Plugins
Skill plugins define the tasks the Agent can perform. You need to guide their use in the prompt for better results.
- Optional skills, built-in plugins in the current version: Browse Web, Generate Images, Chart Generation
- Browse Web: Answers questions by searching the latest information via Bing. Example: Please help me find biopharmaceutical companies in Guangzhou.
- Generate Images: Generates images based on text descriptions. Example: Please generate a cover page for my PPT, origami style, sunlight shining through a glass window onto the floor.
- Chart Generation: Generates pie charts, line charts, and bar charts using available data. Example: Show the GDP trend in Guangzhou over the past three years as a line chart.
- Fixed skills: Search Knowledge Base, Image Analysis, Read Documents. These are used in specific scenarios and cannot be removed.
If you want to add custom skills, please configure them via Agent Management > Skill Plugins.
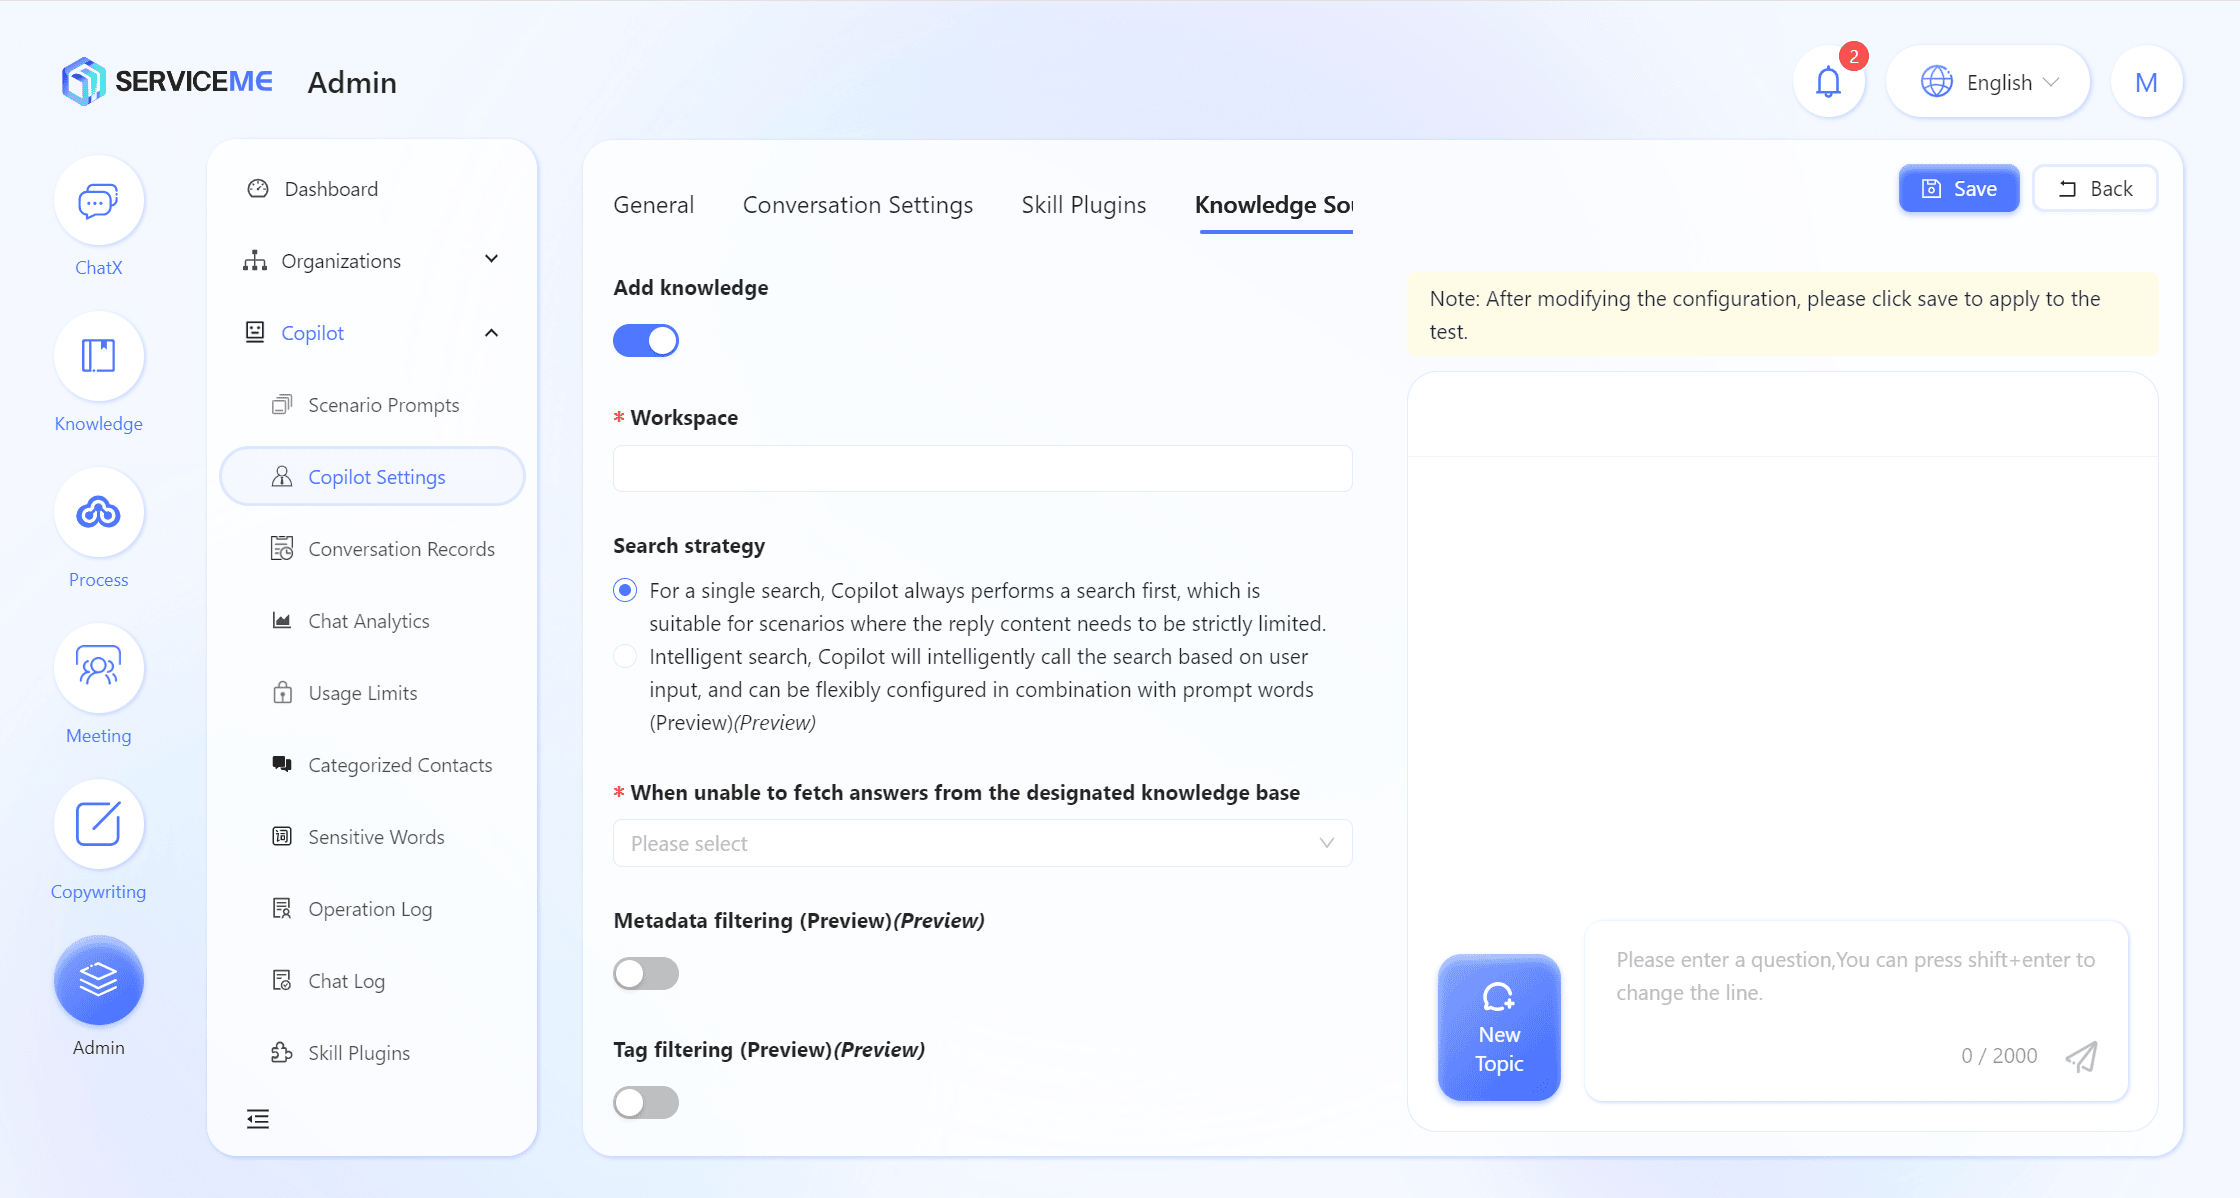
Knowledge Source Settings
Knowledge sources allow you to set the scope and retrieval parameters for the Agent's knowledge search.
- Knowledge Base Switch: Whether to enable knowledge retrieval. If disabled, the Search Knowledge Base skill will not be used during Q&A.
- File Space: Set the knowledge base associated with the Agent's knowledge source. The Agent can only answer questions using the associated knowledge base. For example,
Product Operations Space,Product R&D Space;- The special option All Spaces refers to all spaces the user asking the question has access to, used for global knowledge search scenarios.
- Personal Space refers to the user's personal space, used for personal knowledge search scenarios.
- Retrieval Strategy: Controls the Agent's behavior during knowledge retrieval.
- Single Retrieval: The Agent always performs one retrieval first, suitable for scenarios requiring strict content limitation.
- Smart Retrieval: The Agent intelligently calls retrieval based on user input, can be flexibly configured with prompts.
- When Unable to Find Answers in the Specified Knowledge Base: Specifies the Agent's behavior when no answer is found:
Reply that the answer cannot be found in the current knowledge base: The Agent will notify the user that no relevant information was found in the knowledge base.Ask the user to rephrase the question: The Agent will not answer the current question and will suggest the user ask in another way.Try using large language model capabilities: The Agent will directly use the large language model to attempt a reply.
- Metadata Filtering: When enabled, the Agent will try to extract document-related metadata from the user's question for more targeted knowledge retrieval.
- Retrieval Method: Controls the algorithm for knowledge retrieval.
- Hybrid Retrieval: Combines results from vector and full-text search, returning re-ranked results.
- Vector Retrieval: Finds segments by similarity, with some cross-language generalization ability.
- Full-Text Retrieval: Finds segments by keywords, suitable for retrievals with specific keywords or noun phrases.
- Number of Returned Segments: Controls the maximum number of segments returned in a single knowledge retrieval. More segments may provide more comprehensive answers, but the Agent will need more time and tokens to process. Recommended value: 3-5.
- Document Match Similarity: Adjusts the Agent's accuracy when searching for references in the knowledge base. Increasing similarity makes the Agent's references more relevant to the user's question, but may make it harder to find highly relevant documents. Recommended value: around 80%.
- QnA Match Similarity: Adjusts the Agent's accuracy when searching for QnA in the knowledge base. Higher similarity means only QnA with a relevance above the set value will be retained. The higher the similarity, the more relevant the QnA used in the Agent's answer, but it may be harder to find QnA. Recommended value: around 90%.
- Show References: Controls whether the Agent displays the references cited in the current answer.
Testing the Agent
After completing all necessary settings for the Agent, you can test the current Agent in the conversation panel on the right.
You need to save before running a simulation test.
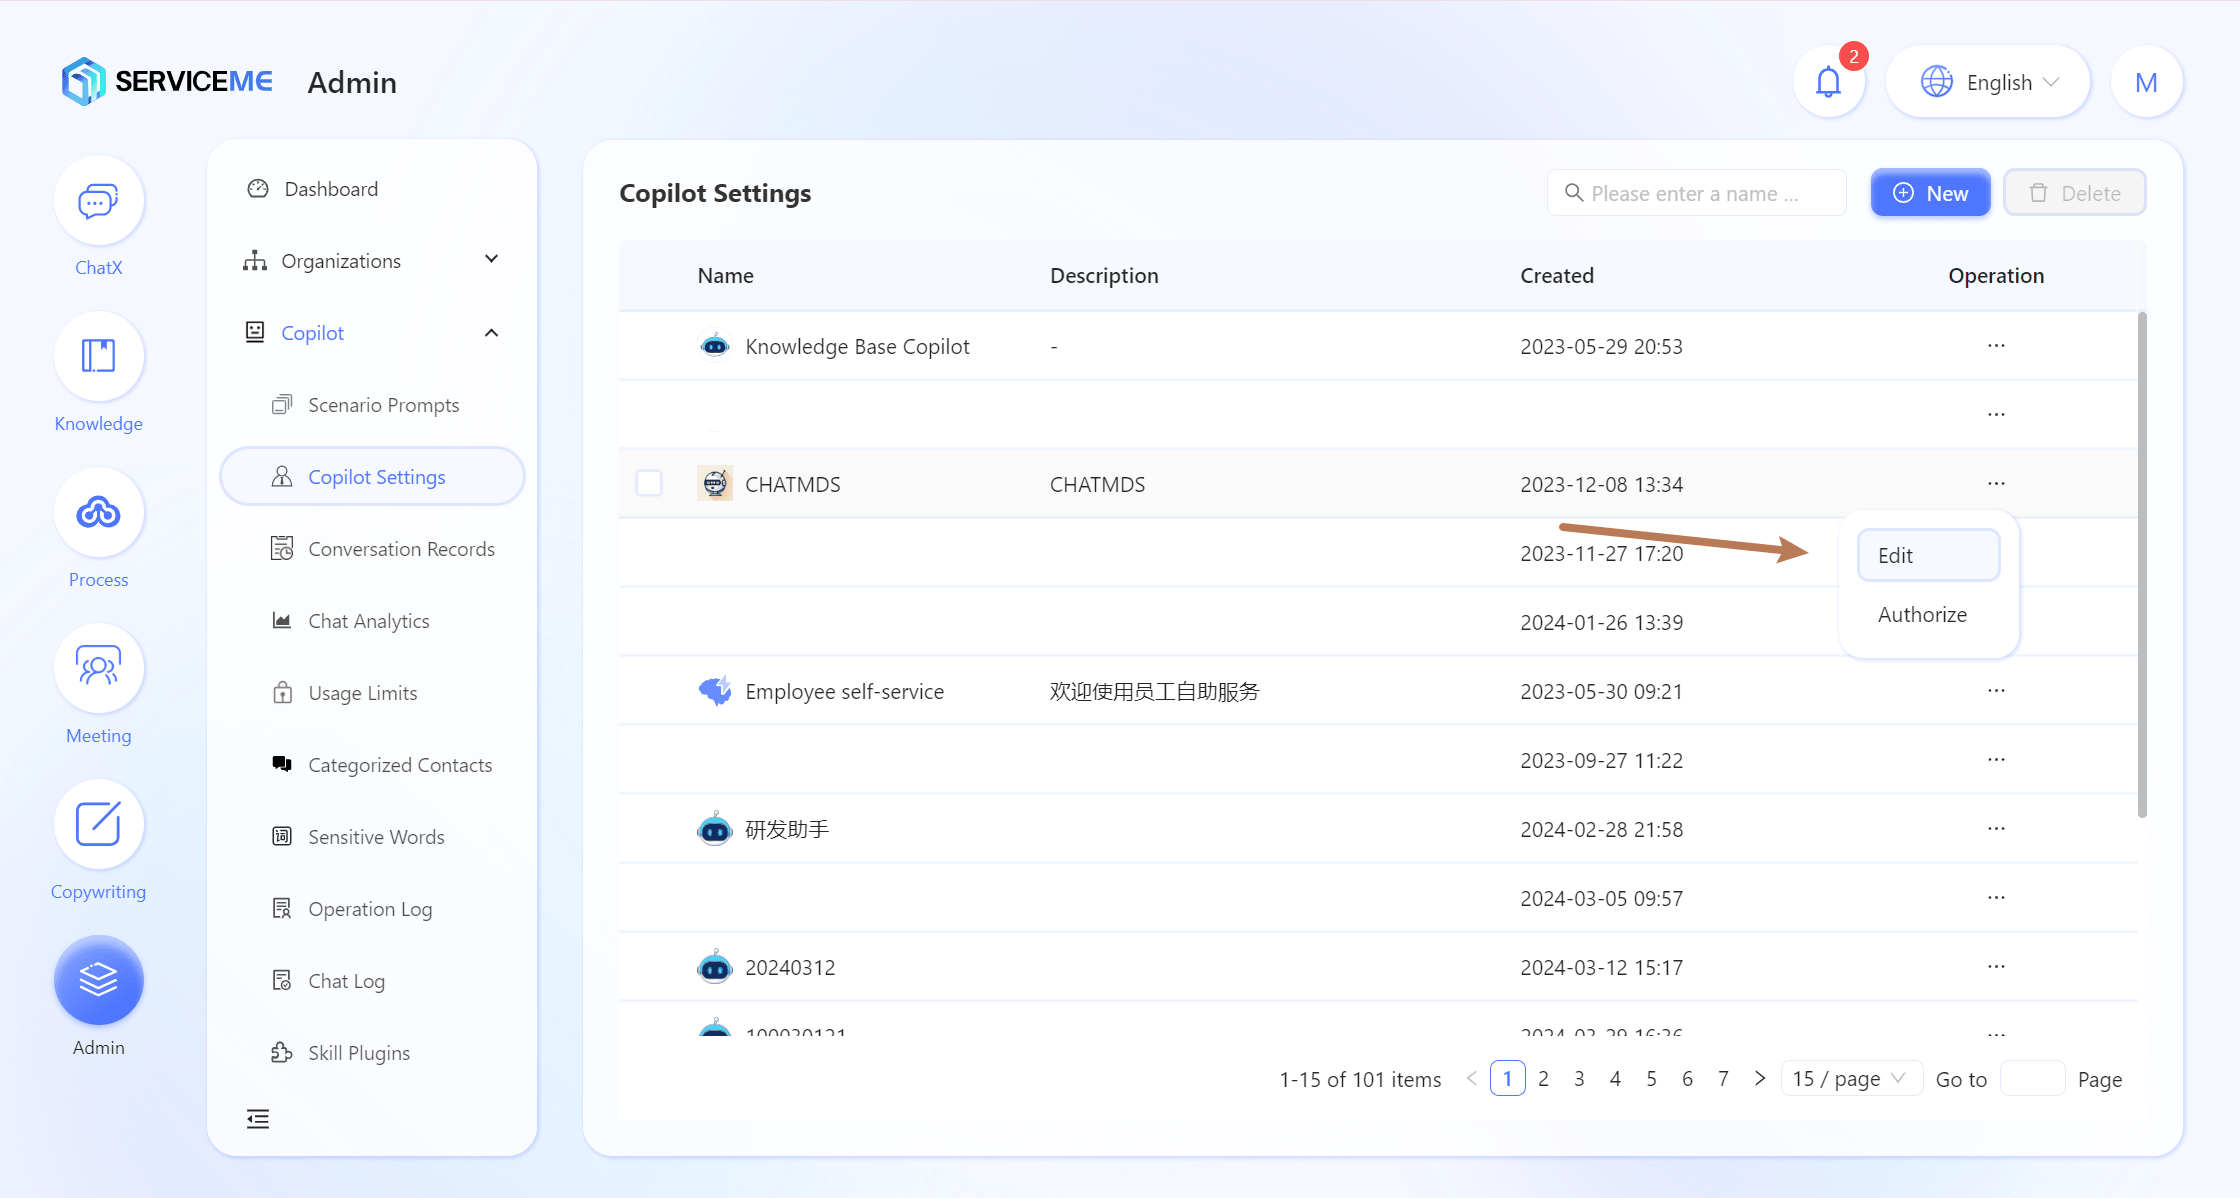
How to Edit Agent Settings
Method 1
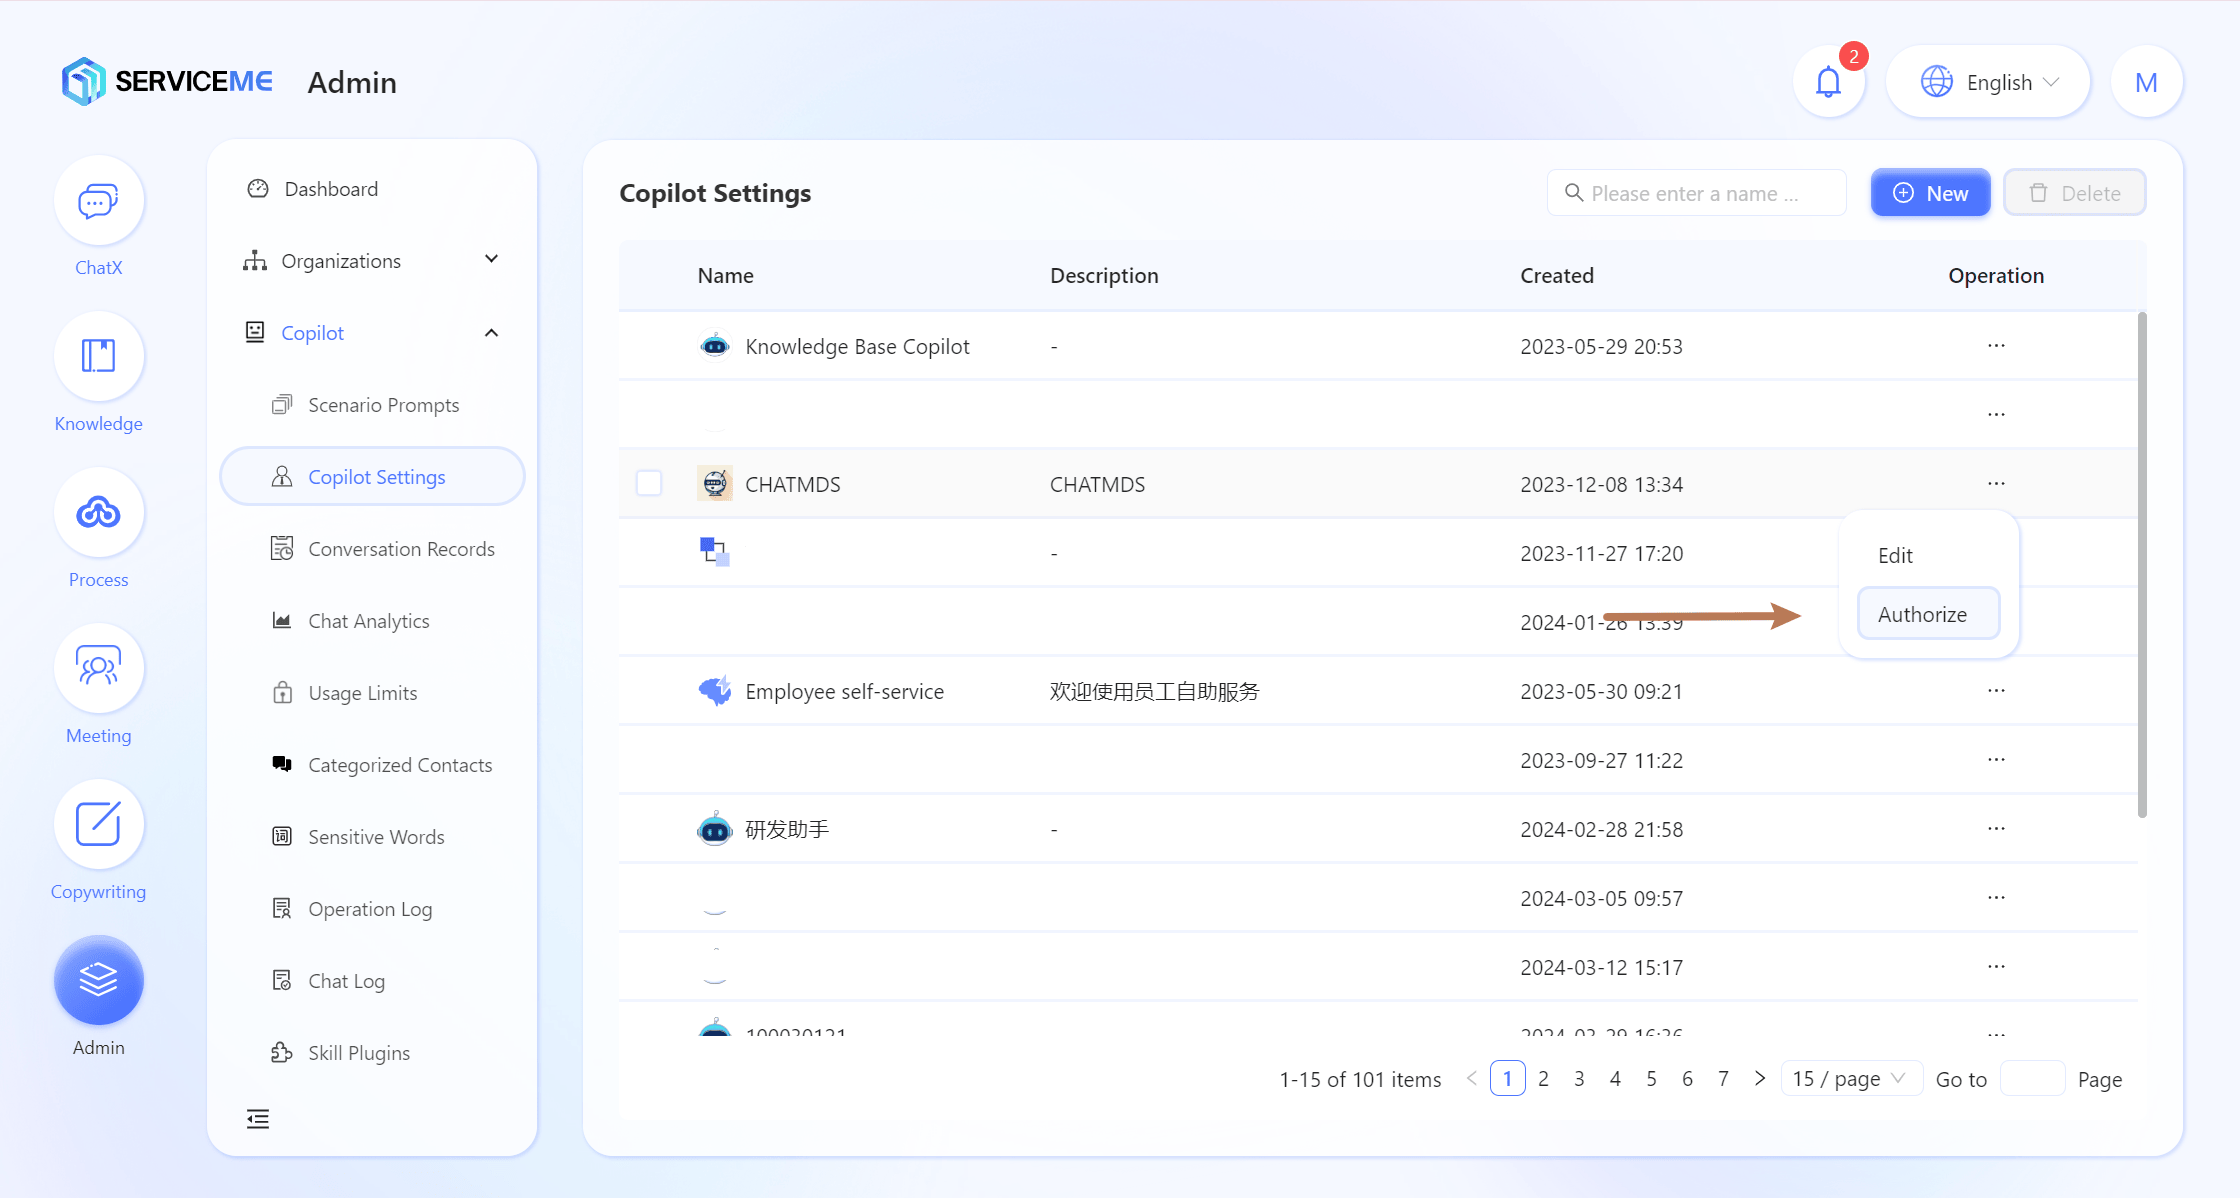
- Log in to the SERVICEME platform;
- Switch to the "Management" module;
- Go to "Agent Management > Agent Settings" to enter the Agent settings list;
- Click ... > Edit for the corresponding Agent to enter the settings page
Method 2
- Use an account with Agent management permissions to open the Agent chat window
- Click "Agent Settings" in the lower right corner to enter the settings
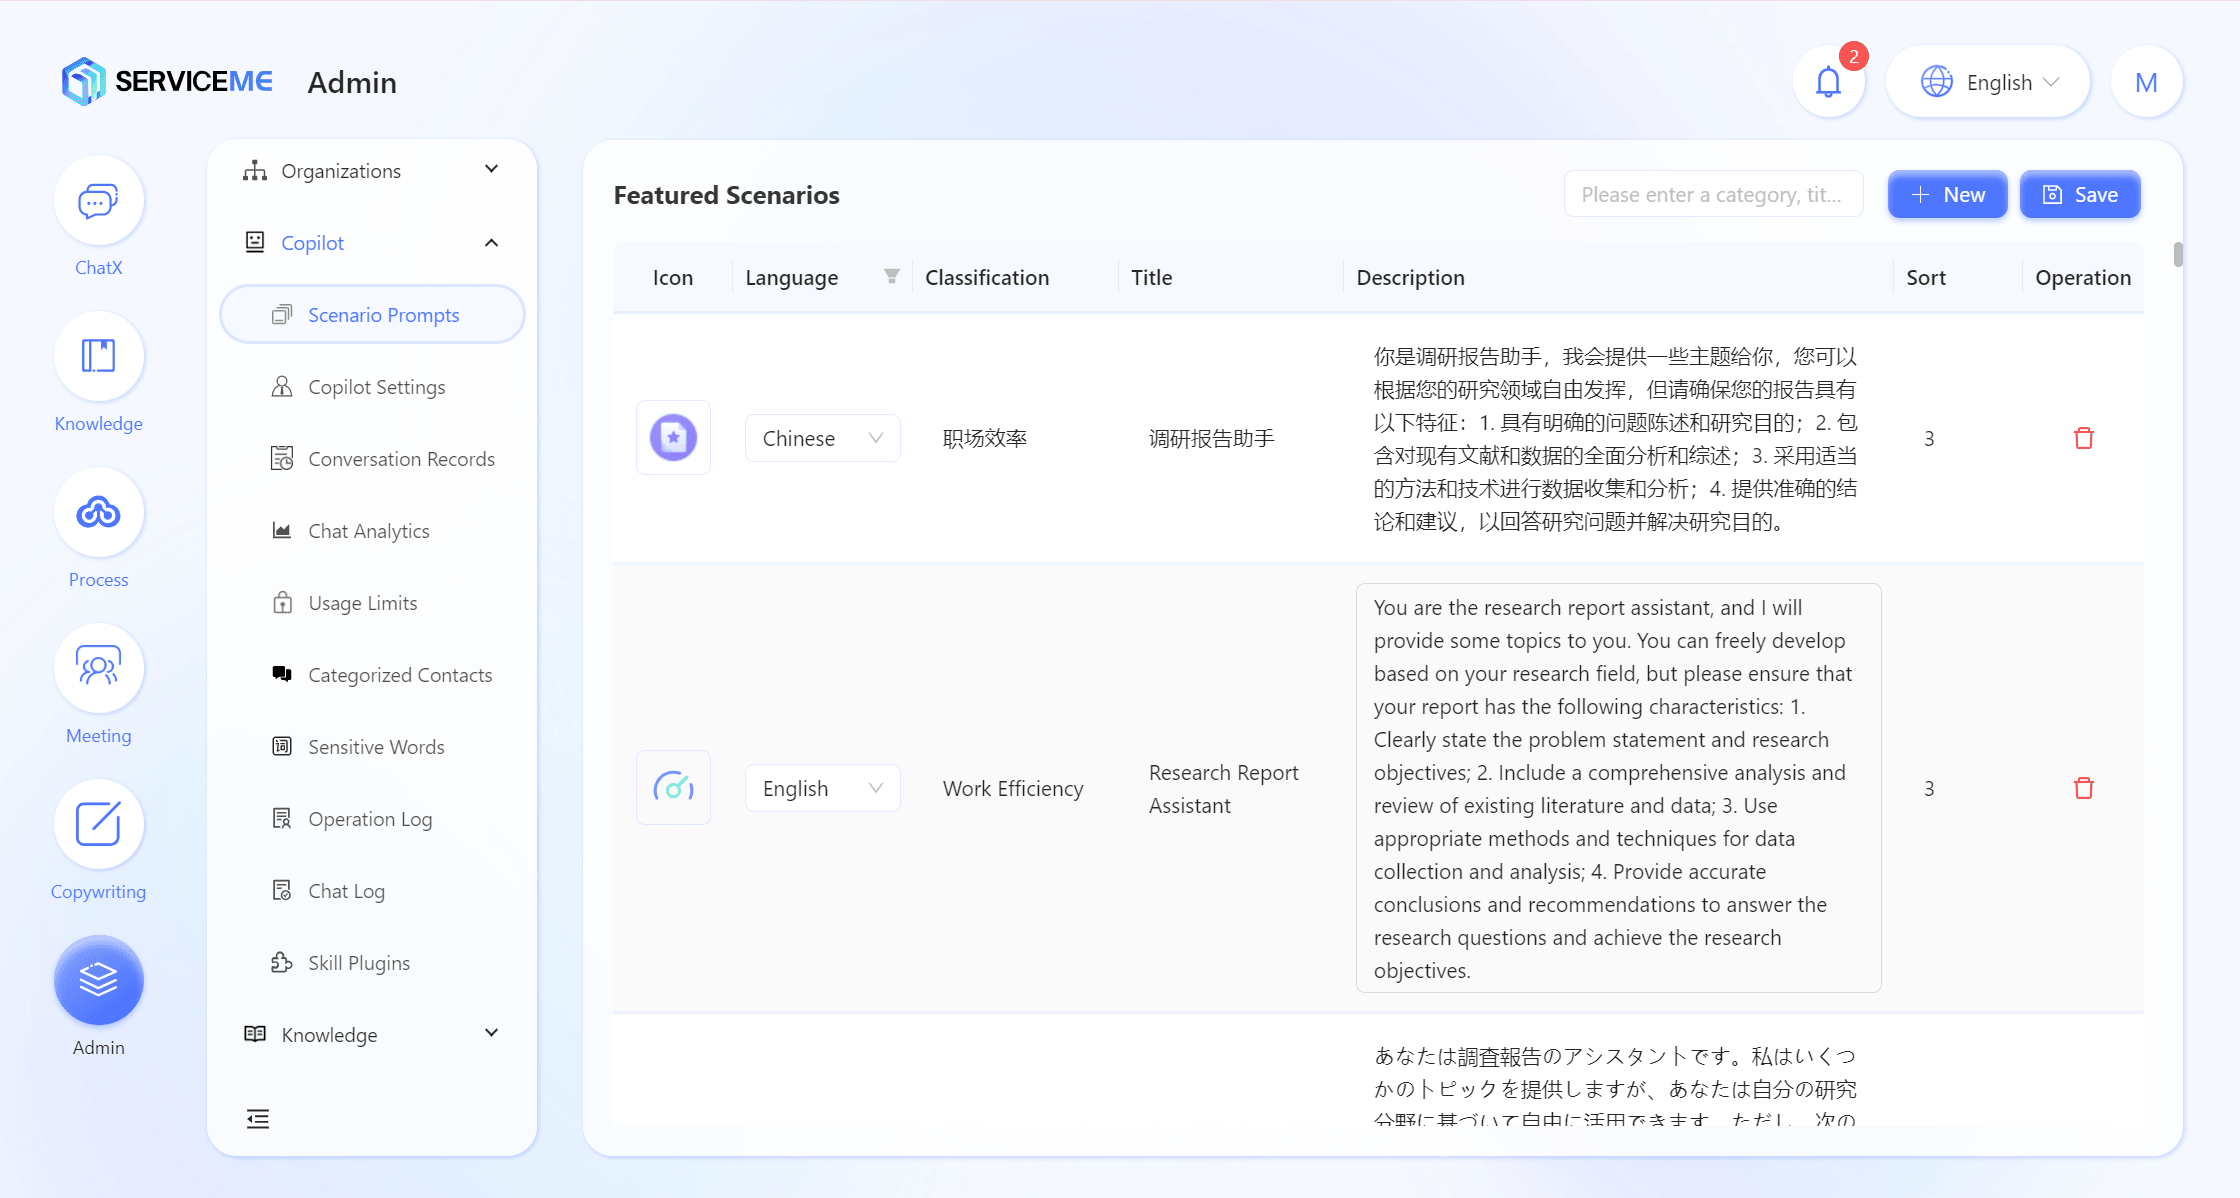
Maintaining Scenario-Based Prompts
Scenario-based prompts need to be set for different languages. When users switch the interface language, only the corresponding language version of the scenario-based prompt will be displayed.
Field Description
- Icon: Upload a scenario icon
- Language: Select the language for this scenario description, e.g.,
Simplified Chinese - Category: Enter the category for this scenario, e.g.,
Workplace Efficiency - Title: Enter the title for this scenario, e.g.,
Research Report Assistant - Description: Enter the scenario description. The description will be used as the prompt for the enterprise Chat in this scenario, controlling the bot's role and behavior. For example:
You are a research report assistant. I will provide you with some topics, and you can elaborate based on your research field, but please ensure your report has the following features: 1. A clear problem statement and research objective; 2. A comprehensive analysis and review of existing literature and data; 3. Use appropriate methods and techniques for data collection and analysis; 4. Provide accurate conclusions and recommendations to answer the research question and address the research objective. - "Order": Enter a custom number to control the order of this scenario in the list, e.g.,
3
How to Grant Users Access to an Agent?
- Log in to the SERVICEME platform;
- Switch to the "Management" platform;
- Go to "Agent Management > Agent Settings";
- Select the Agent to authorize and click the "Authorize" button to open the authorization page;
- Select the authorization target, which can be one or more organizations or users, e.g.,
Operations Center,qa-test01; - Click the "Confirm" button to authorize successfully.
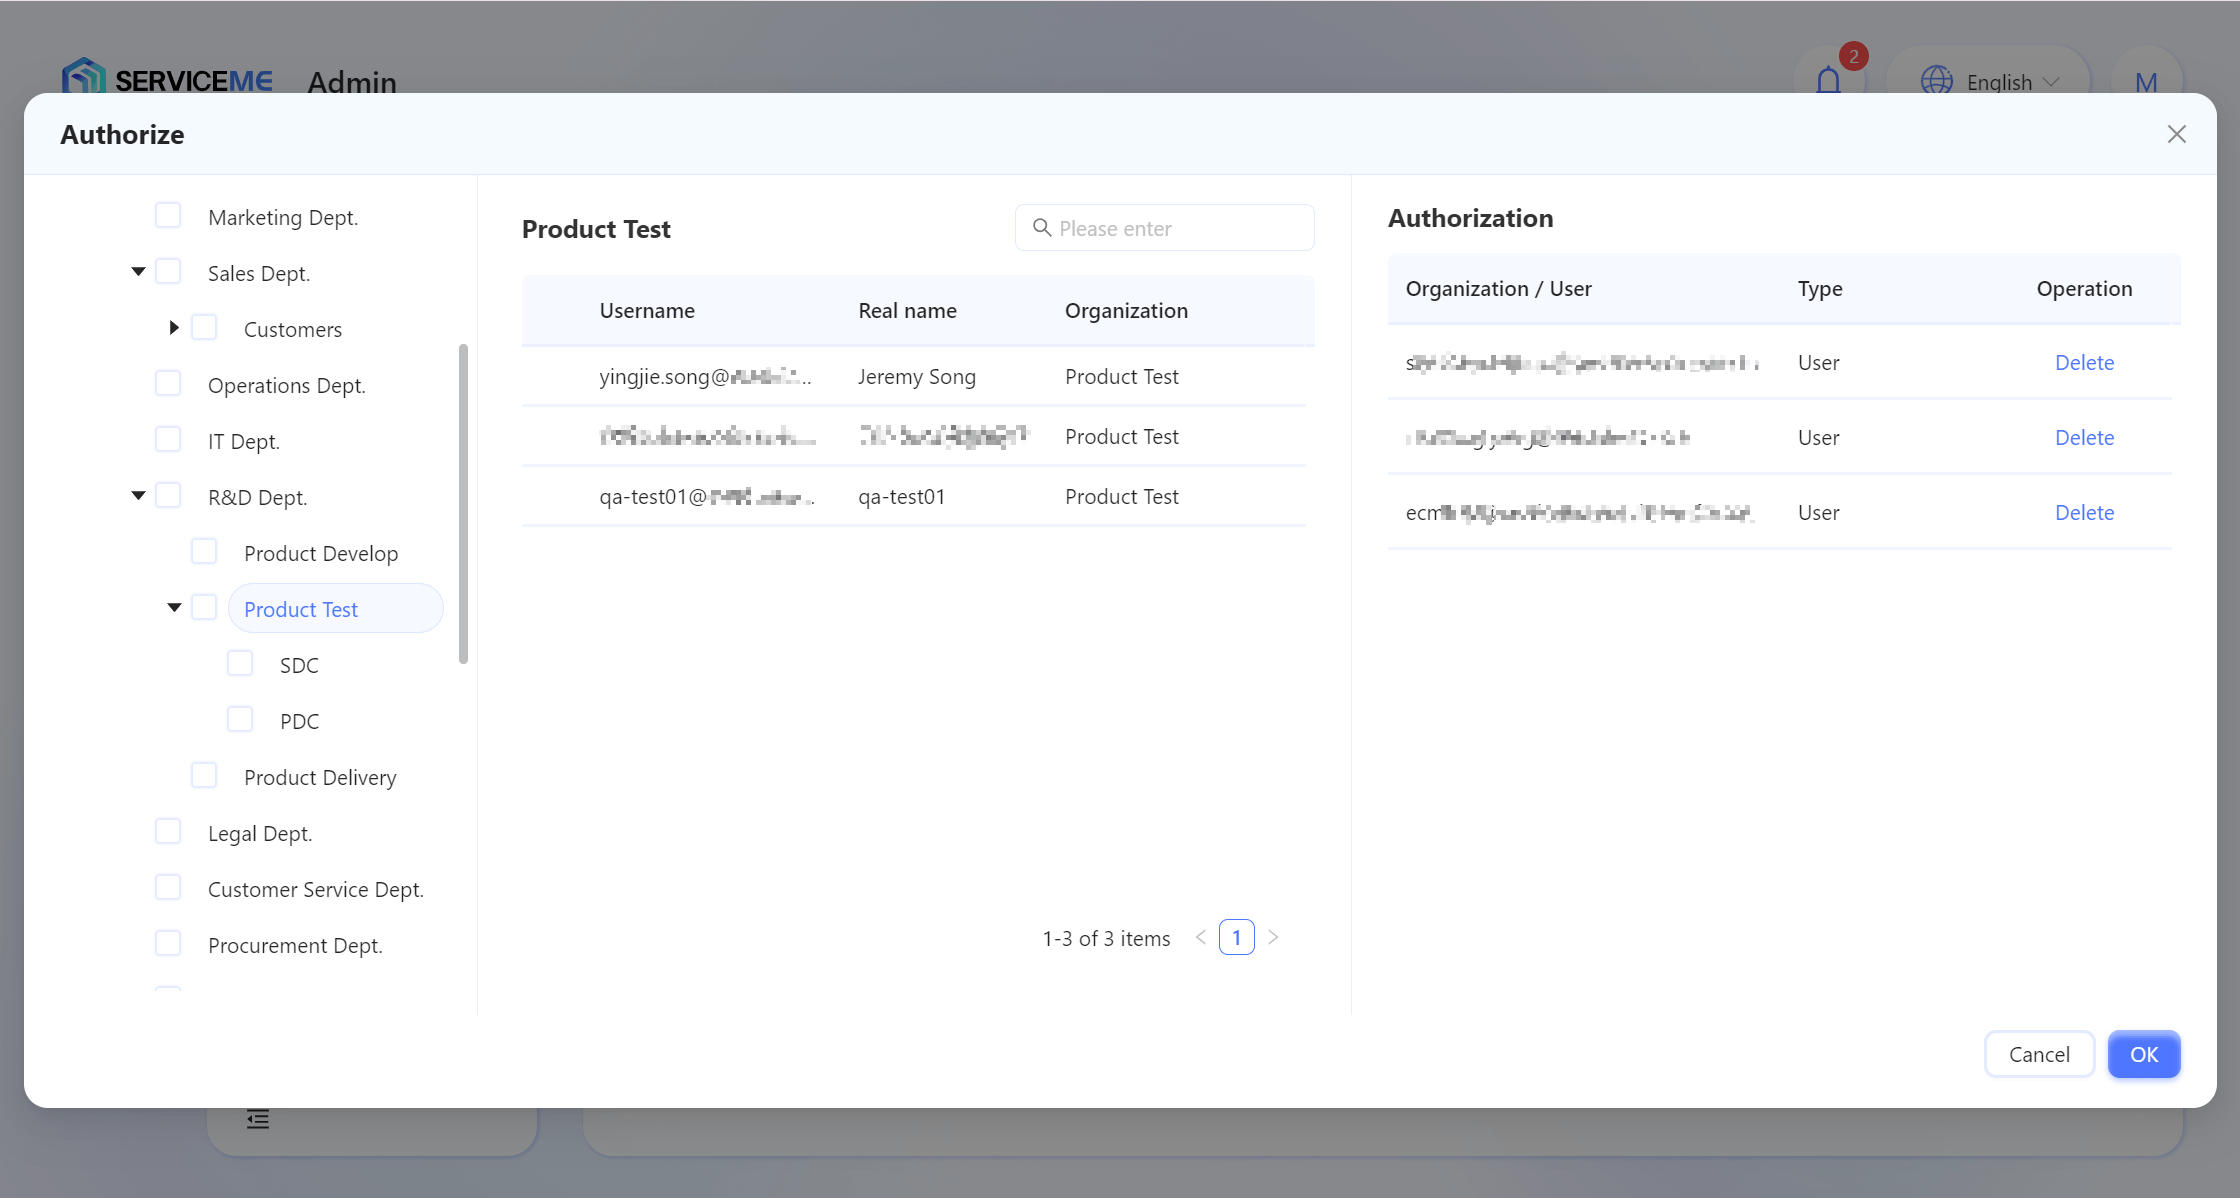
- Authorized users will be able to use the Agent via Chat.
Note: Agent authorization is independent of the corresponding knowledge space authorization. If you want users to search the knowledge in the corresponding space, make sure they also have access to that space. (See: How to Set Up Knowledge Spaces)
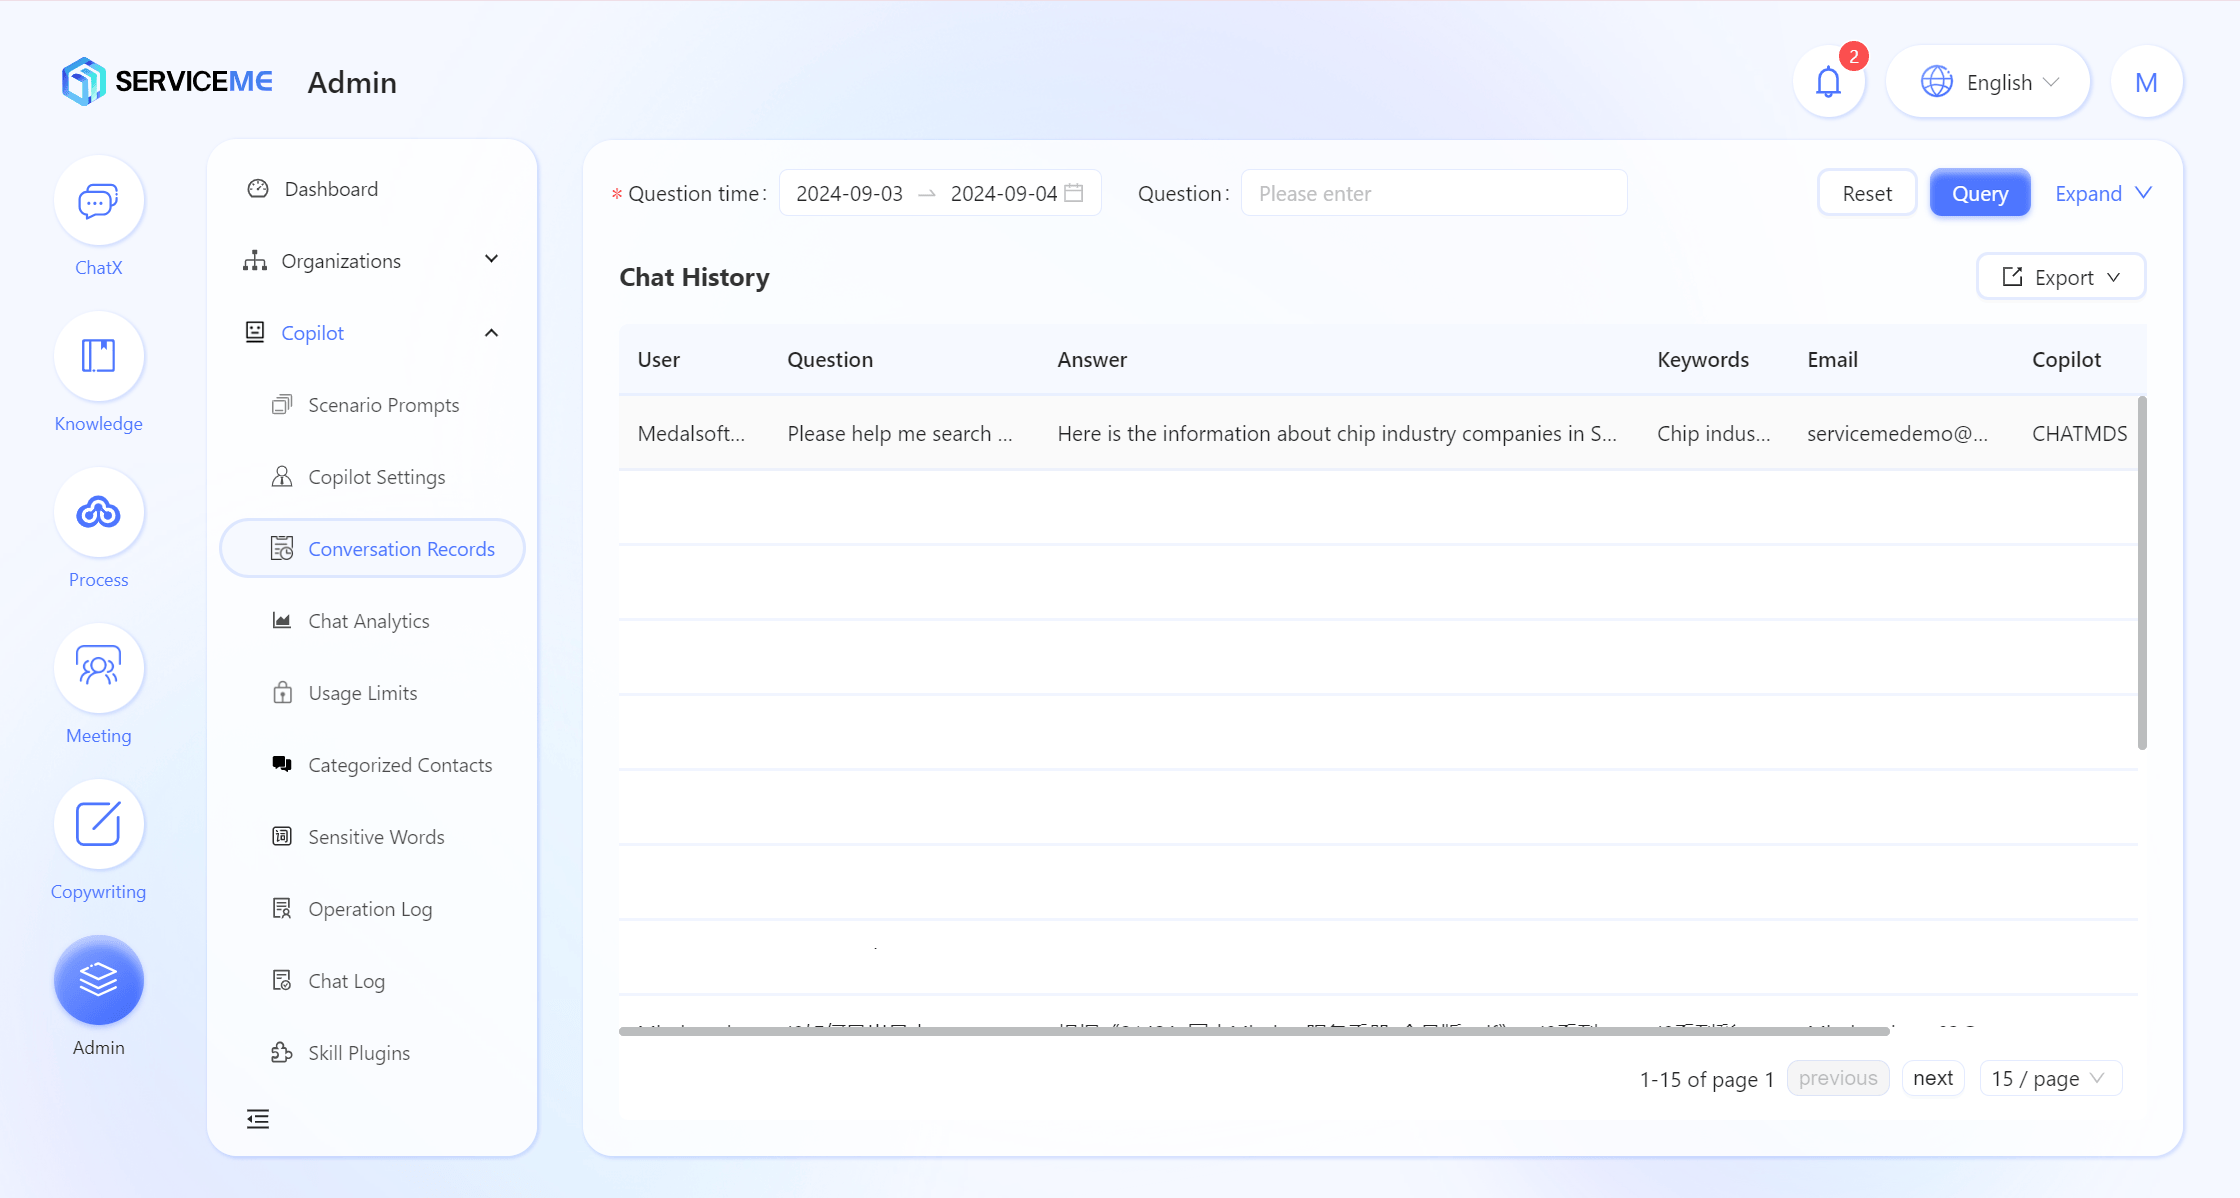
How to View All Agents' Conversation Records?
- Log in to the SERVICEME platform;
- Switch to the "Management" platform;
- Go to "Agent Management > Conversation Records";
- You can view the conversation records of the Agent.
How to View Recent User Satisfaction with Conversations?
- Log in to the SERVICEME platform;
- Switch to the "Management" platform;
- Go to "Agent Management > Chat Analysis";
- You can view recent Agent report analysis.

How to Ensure the Security of Bot Conversations?
- Log in to the SERVICEME platform;
- Switch to the "Management" platform;
- Go to "Agent Management > Sensitive Words Management";
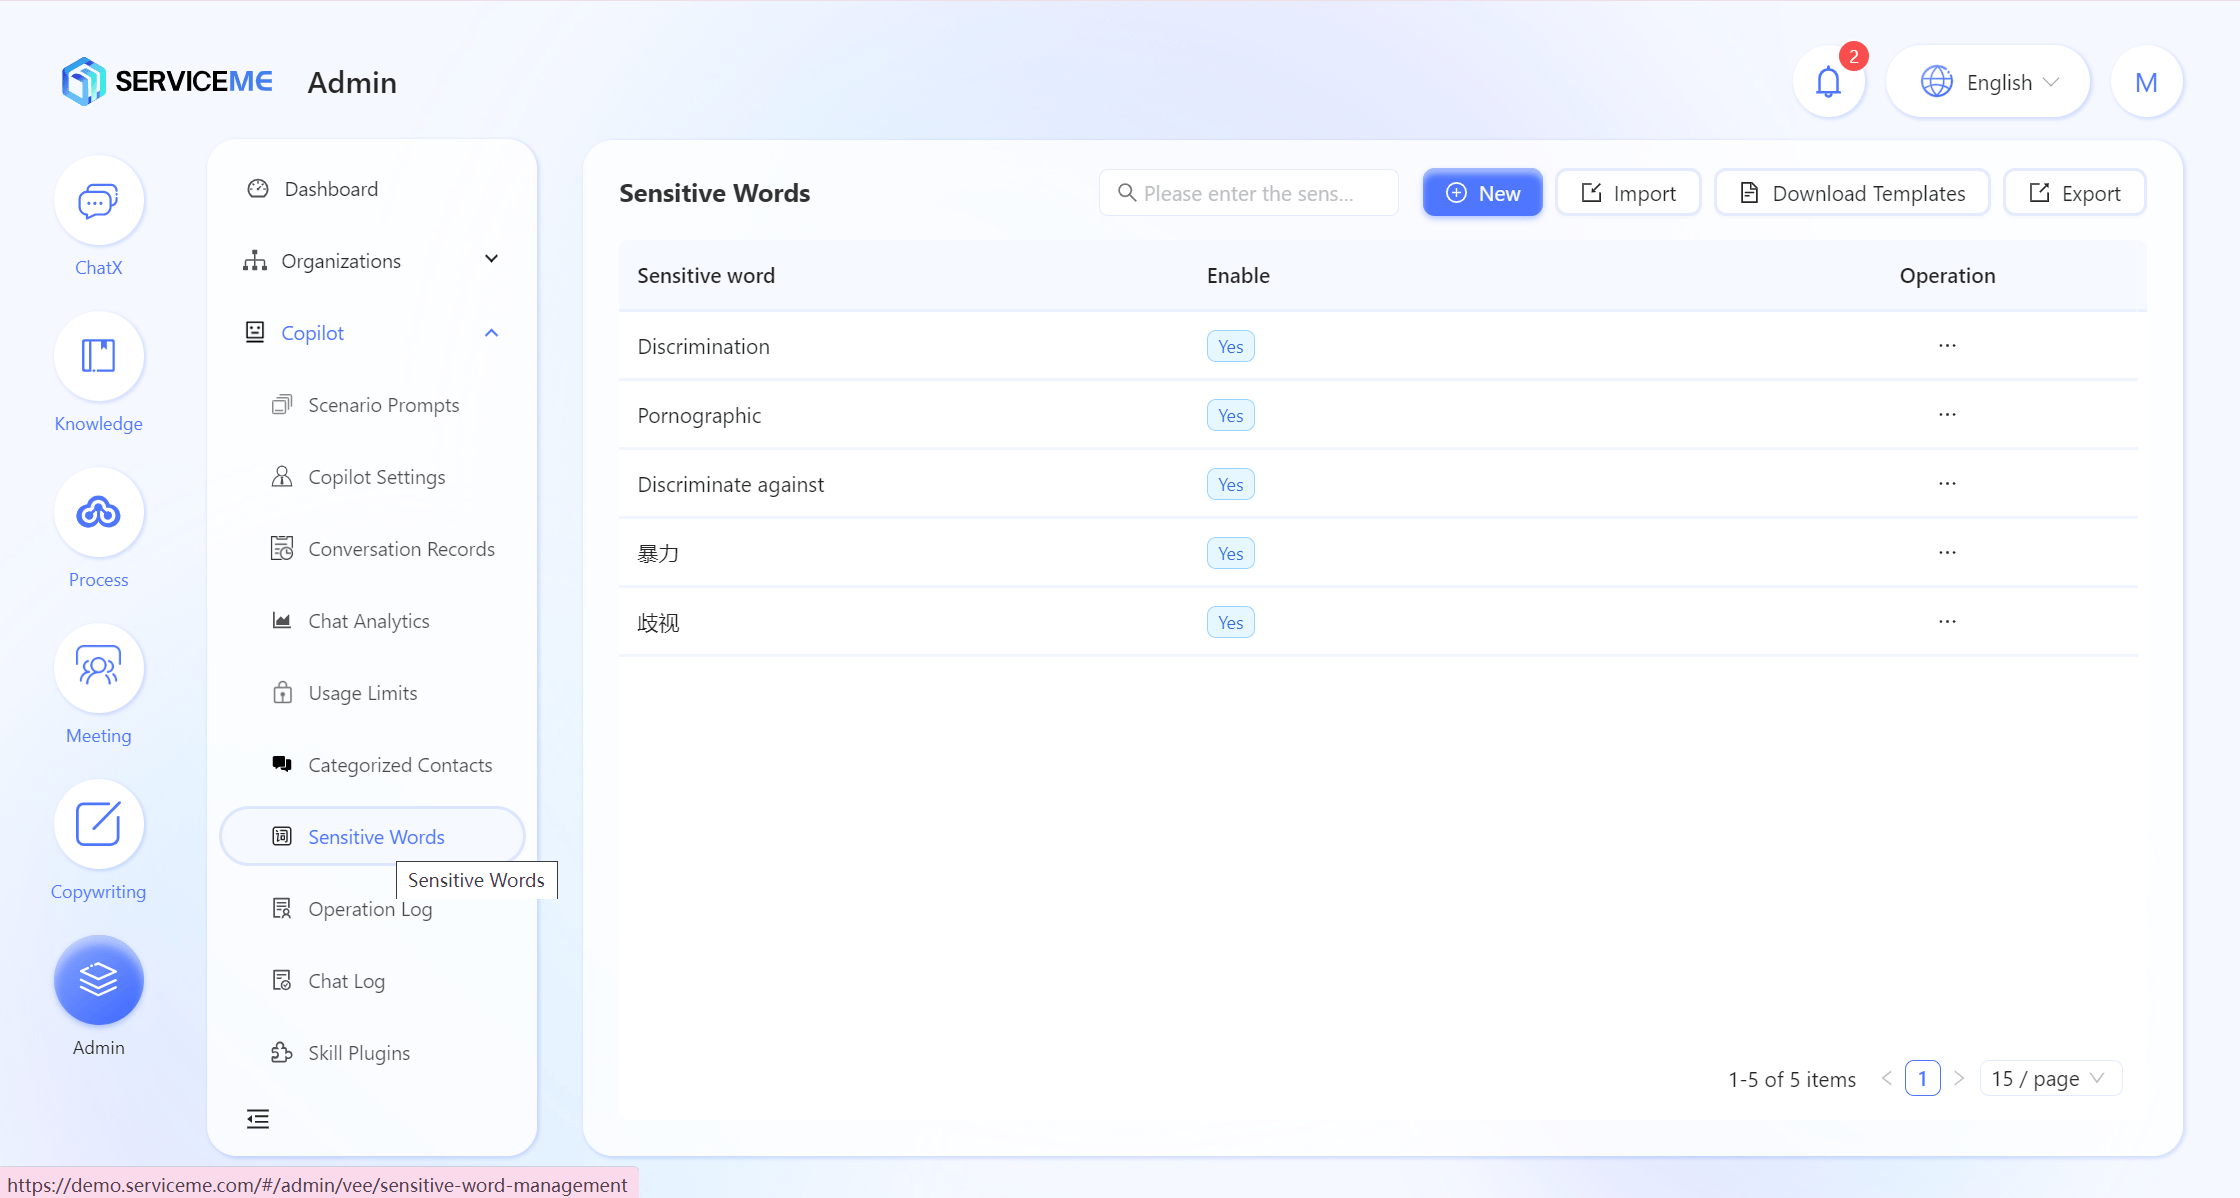
Add Sensitive Words
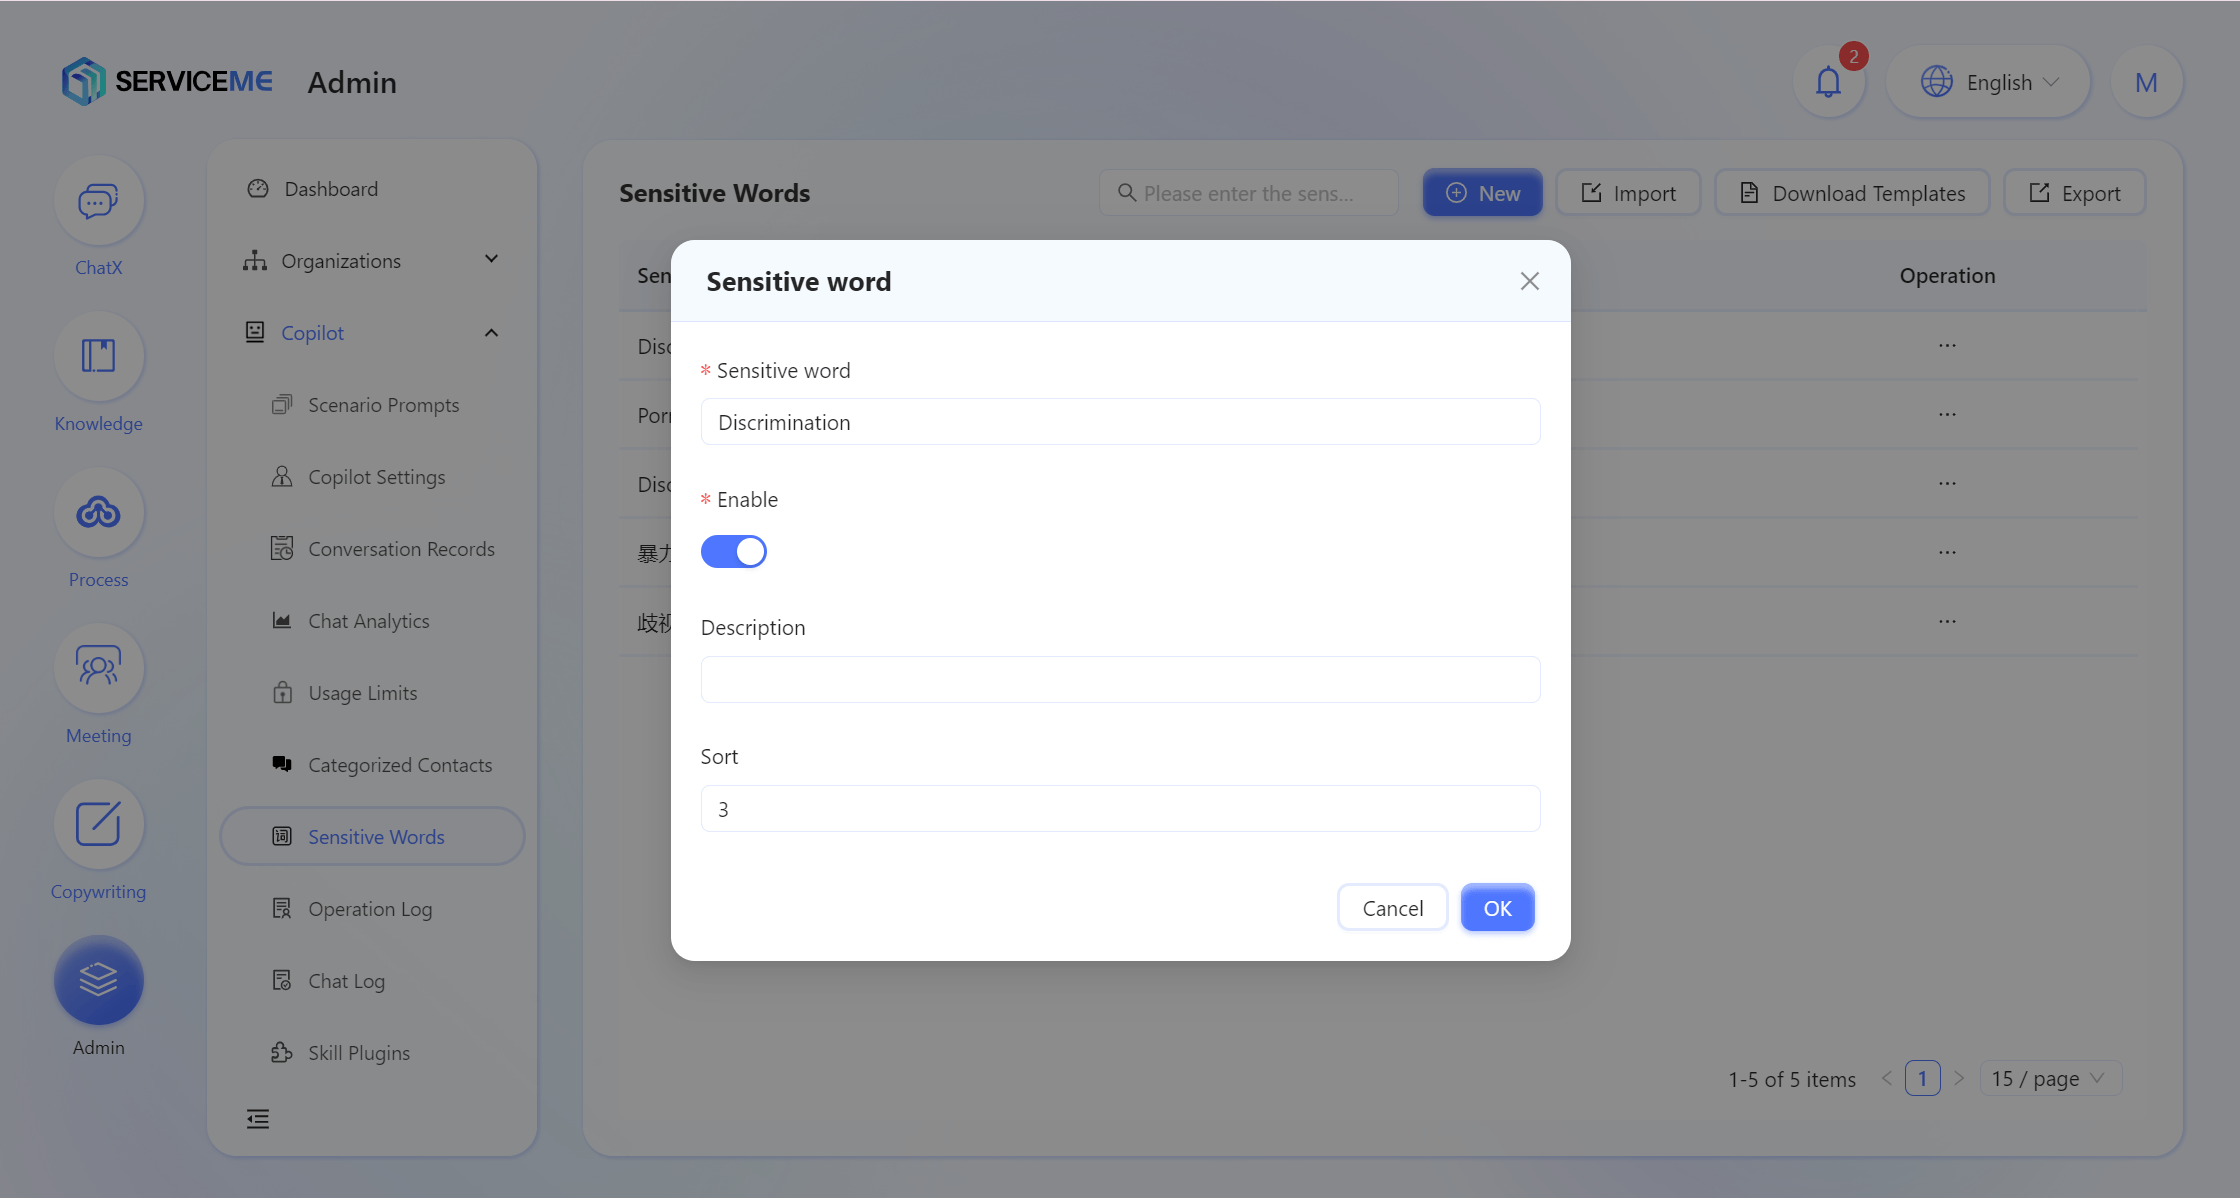
- Click the "Add" button in the upper right corner to open the Add Sensitive Word window.
- Enter the sensitive word to restrict in "Sensitive Word", e.g.,
Zero Risk;
Turn on "Enable";
Enter a custom description in "Description";
Enter a custom number in "Order" to control the order of this sensitive word in the list, e.g.,1; - Click the "Confirm" button to add the sensitive word successfully.
Batch Maintain Sensitive Words
- Click the "Download Template" button to get the Excel template;
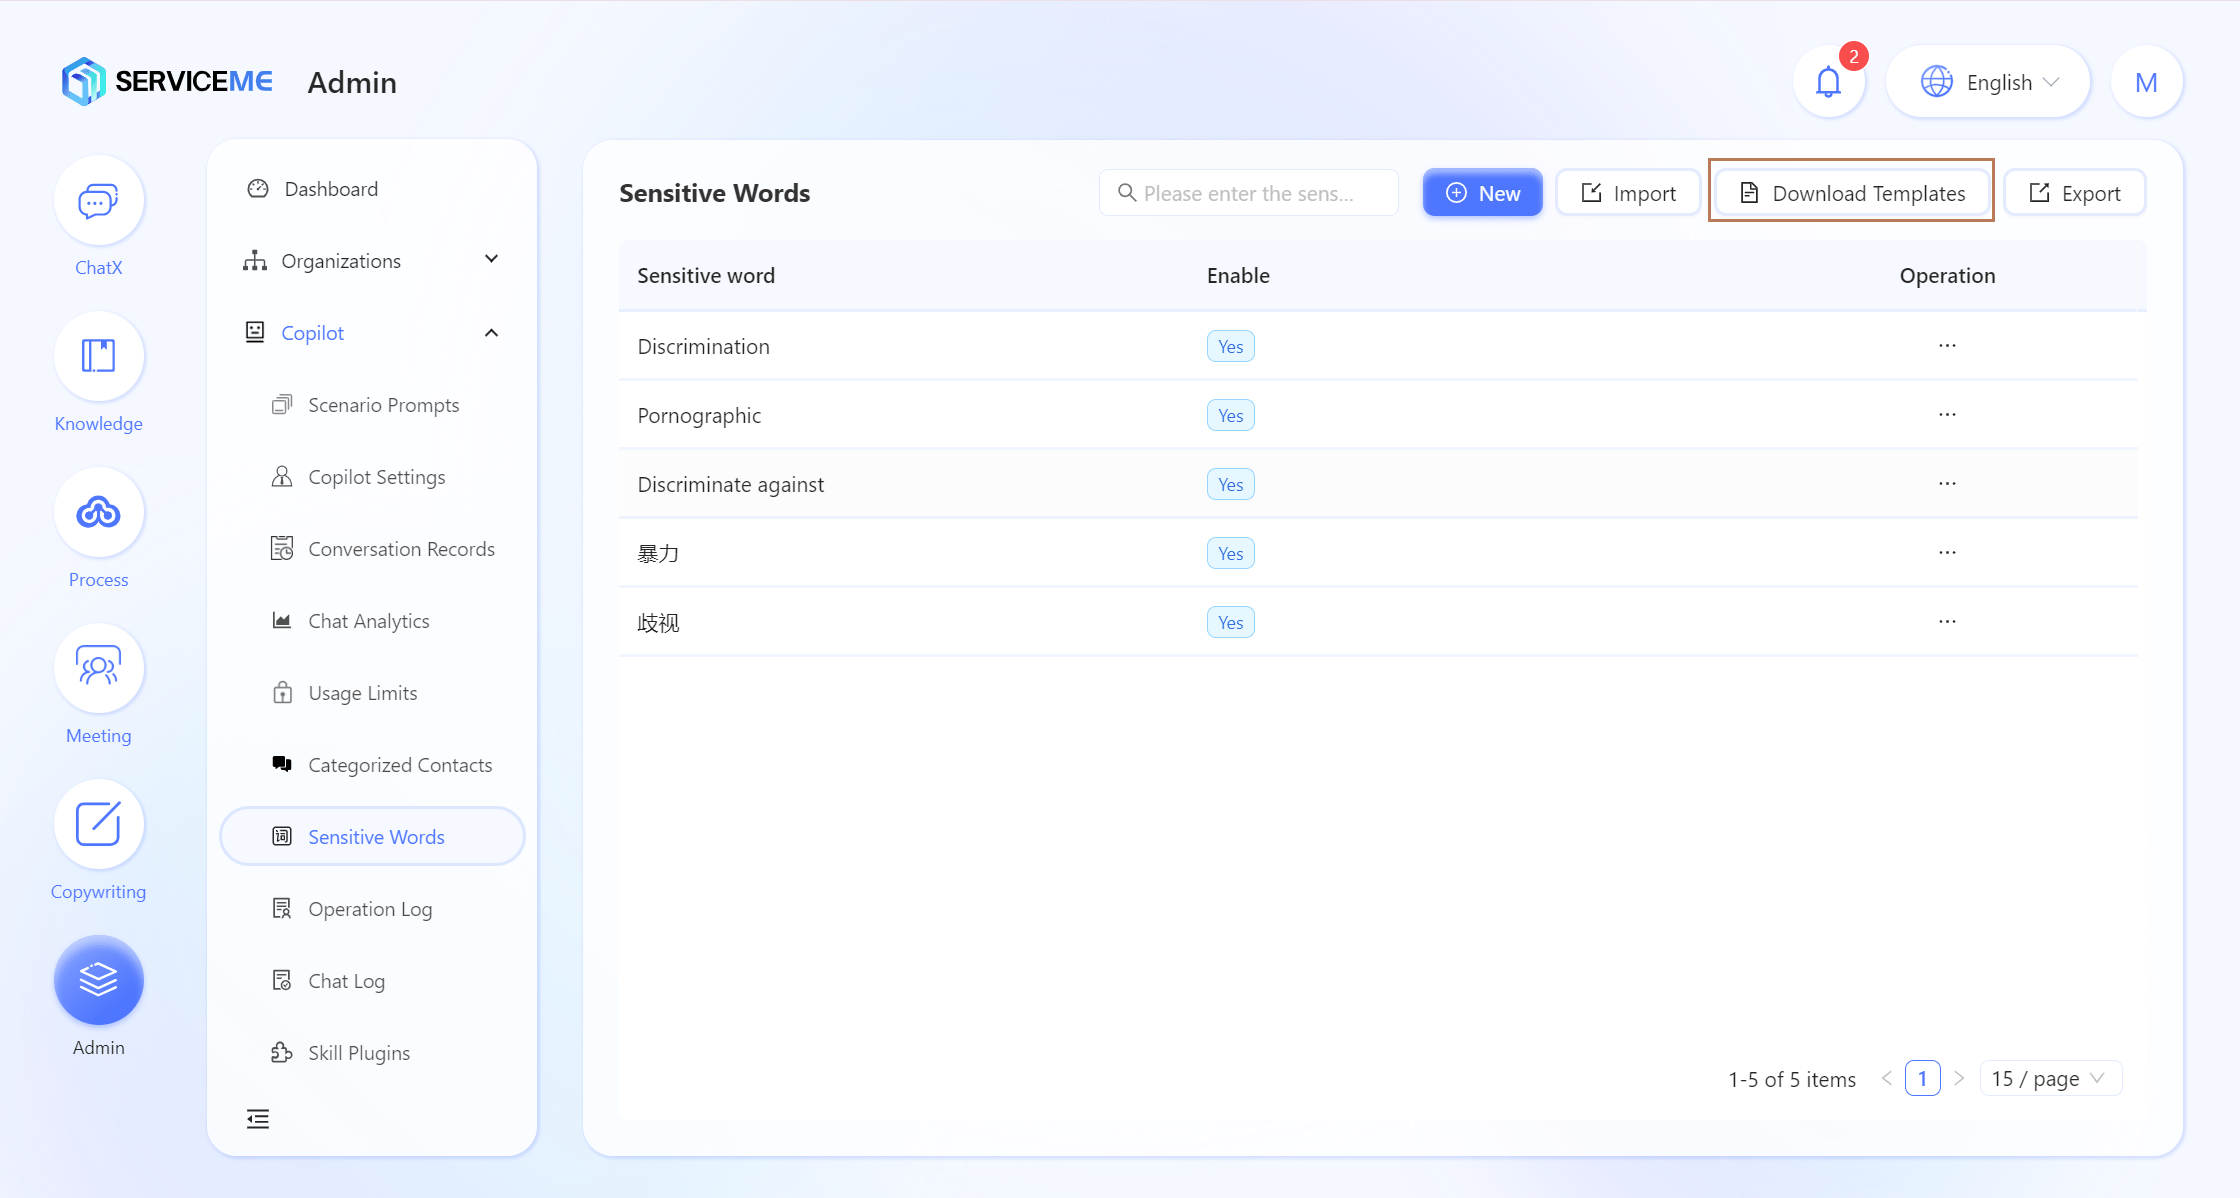
- Enter batch information according to the import template and save;
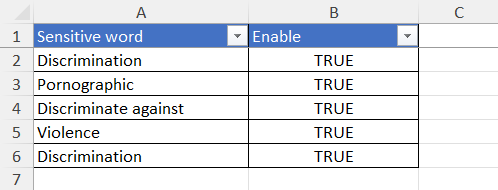
- Click the "Import" button, select the import file, and confirm;
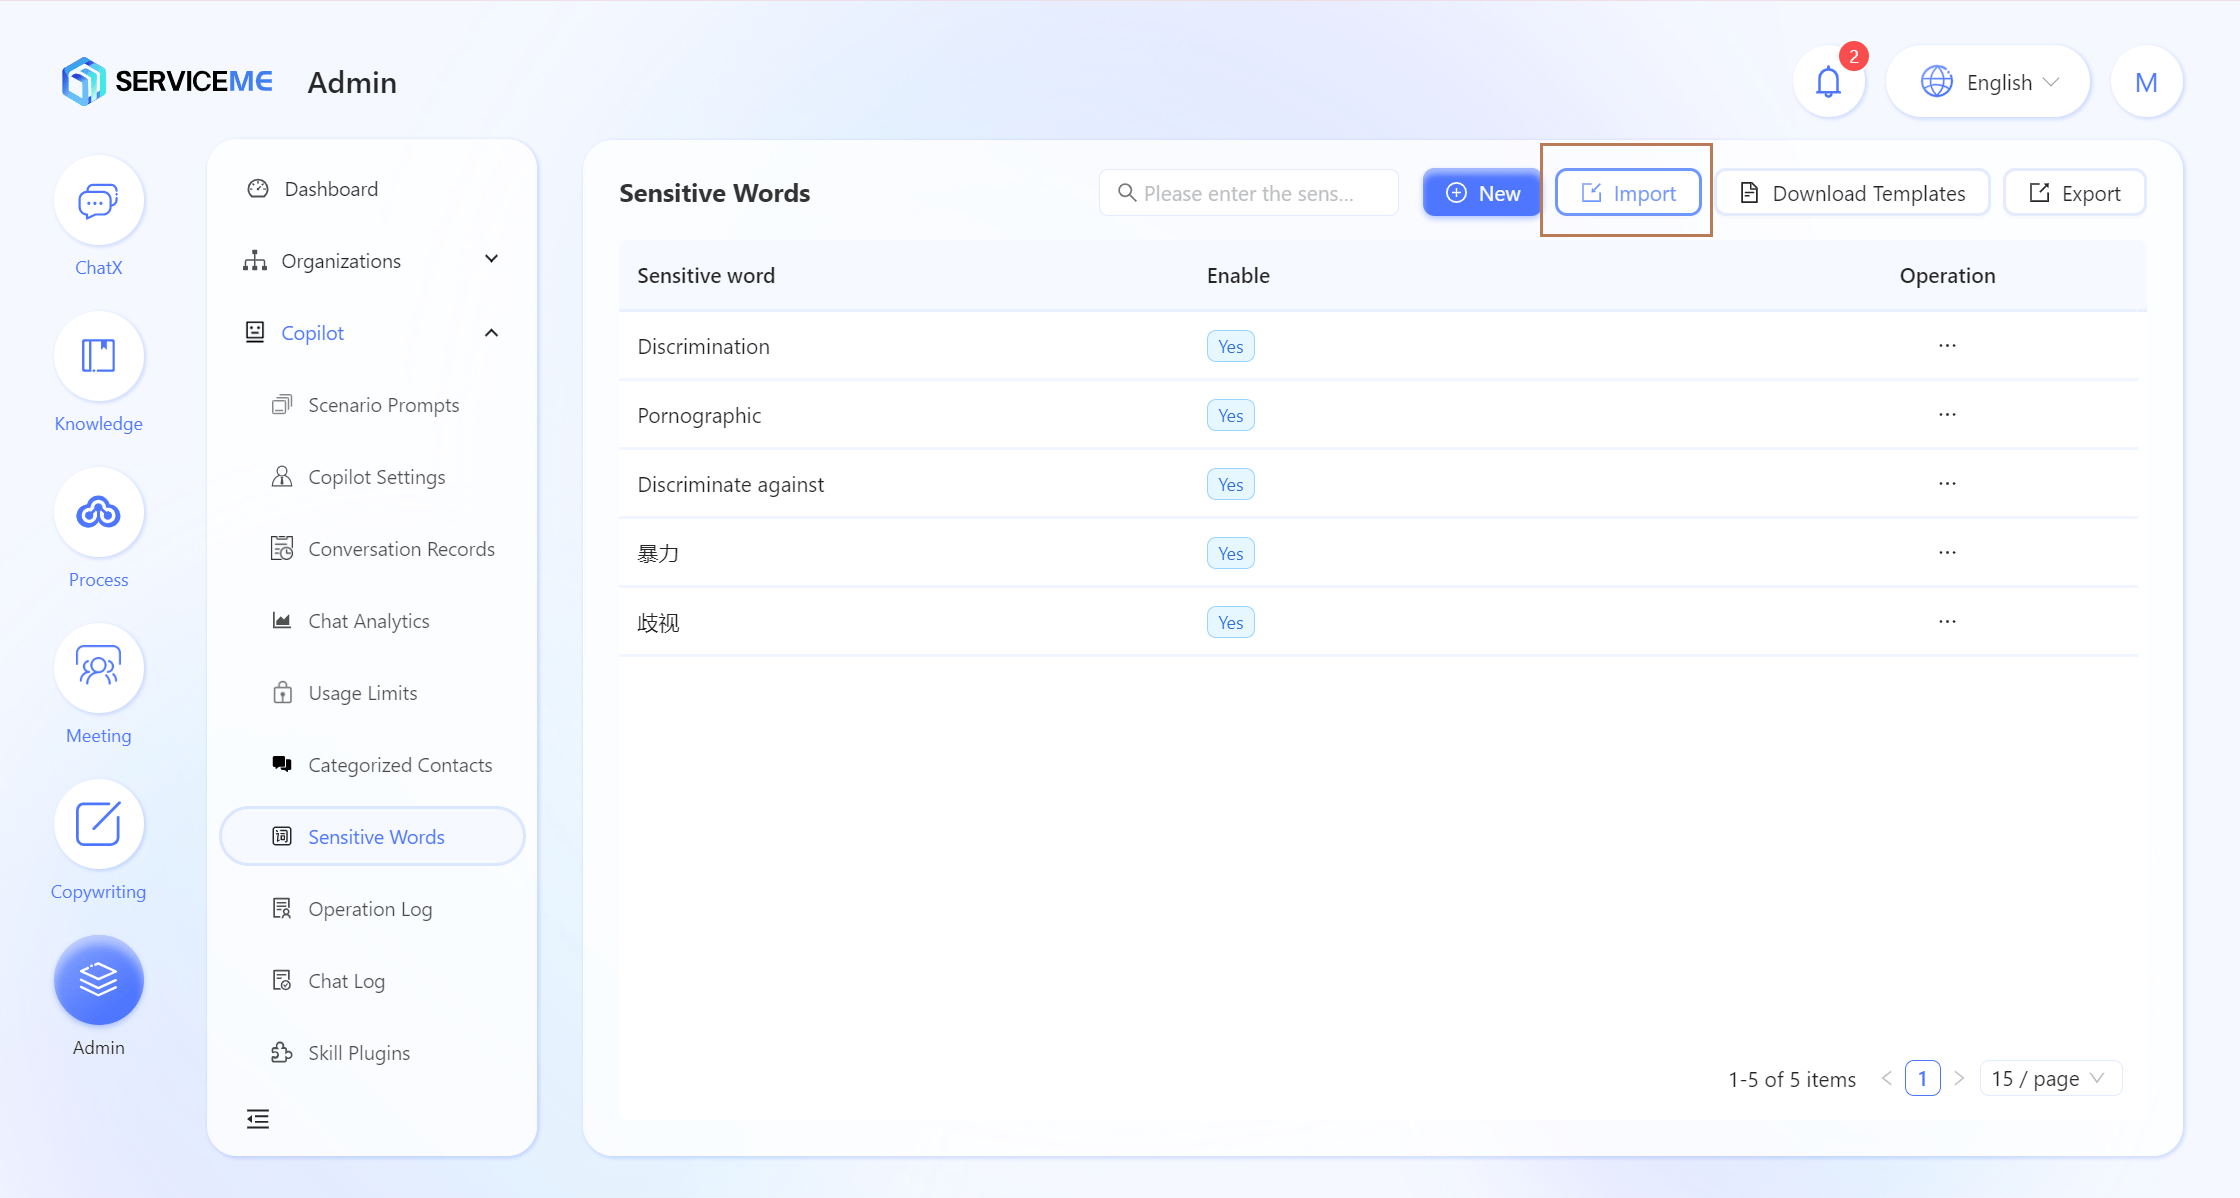
- Batch import of sensitive words is successful.
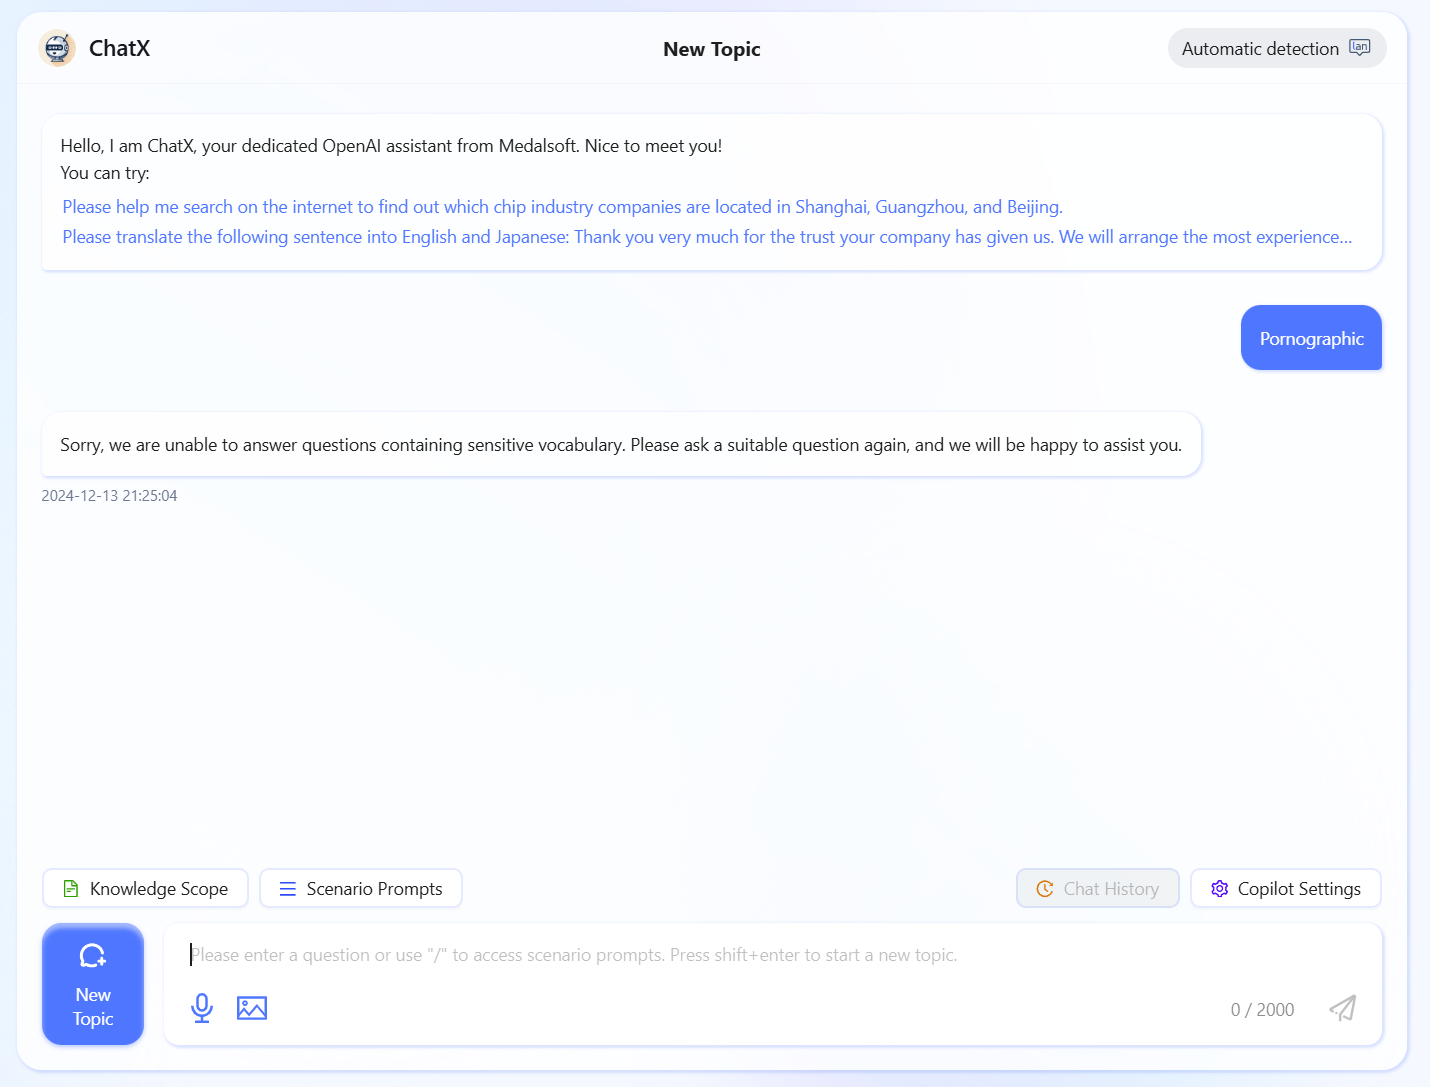
- When the system detects a user using a sensitive word in a question, a prompt will be given.
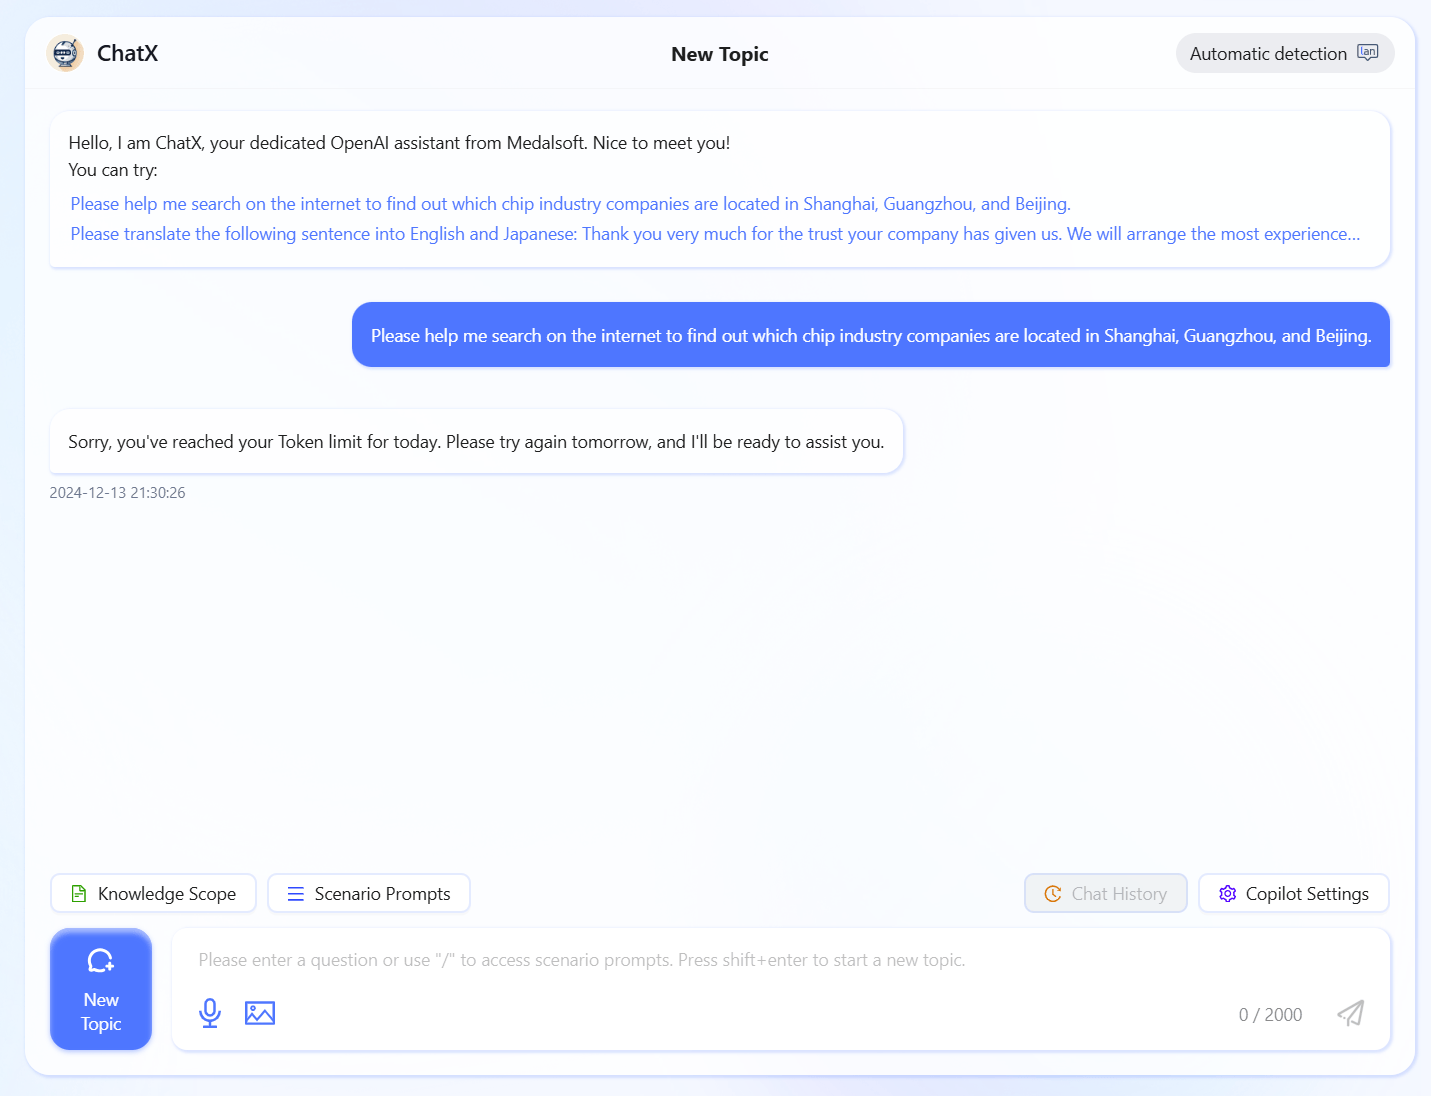
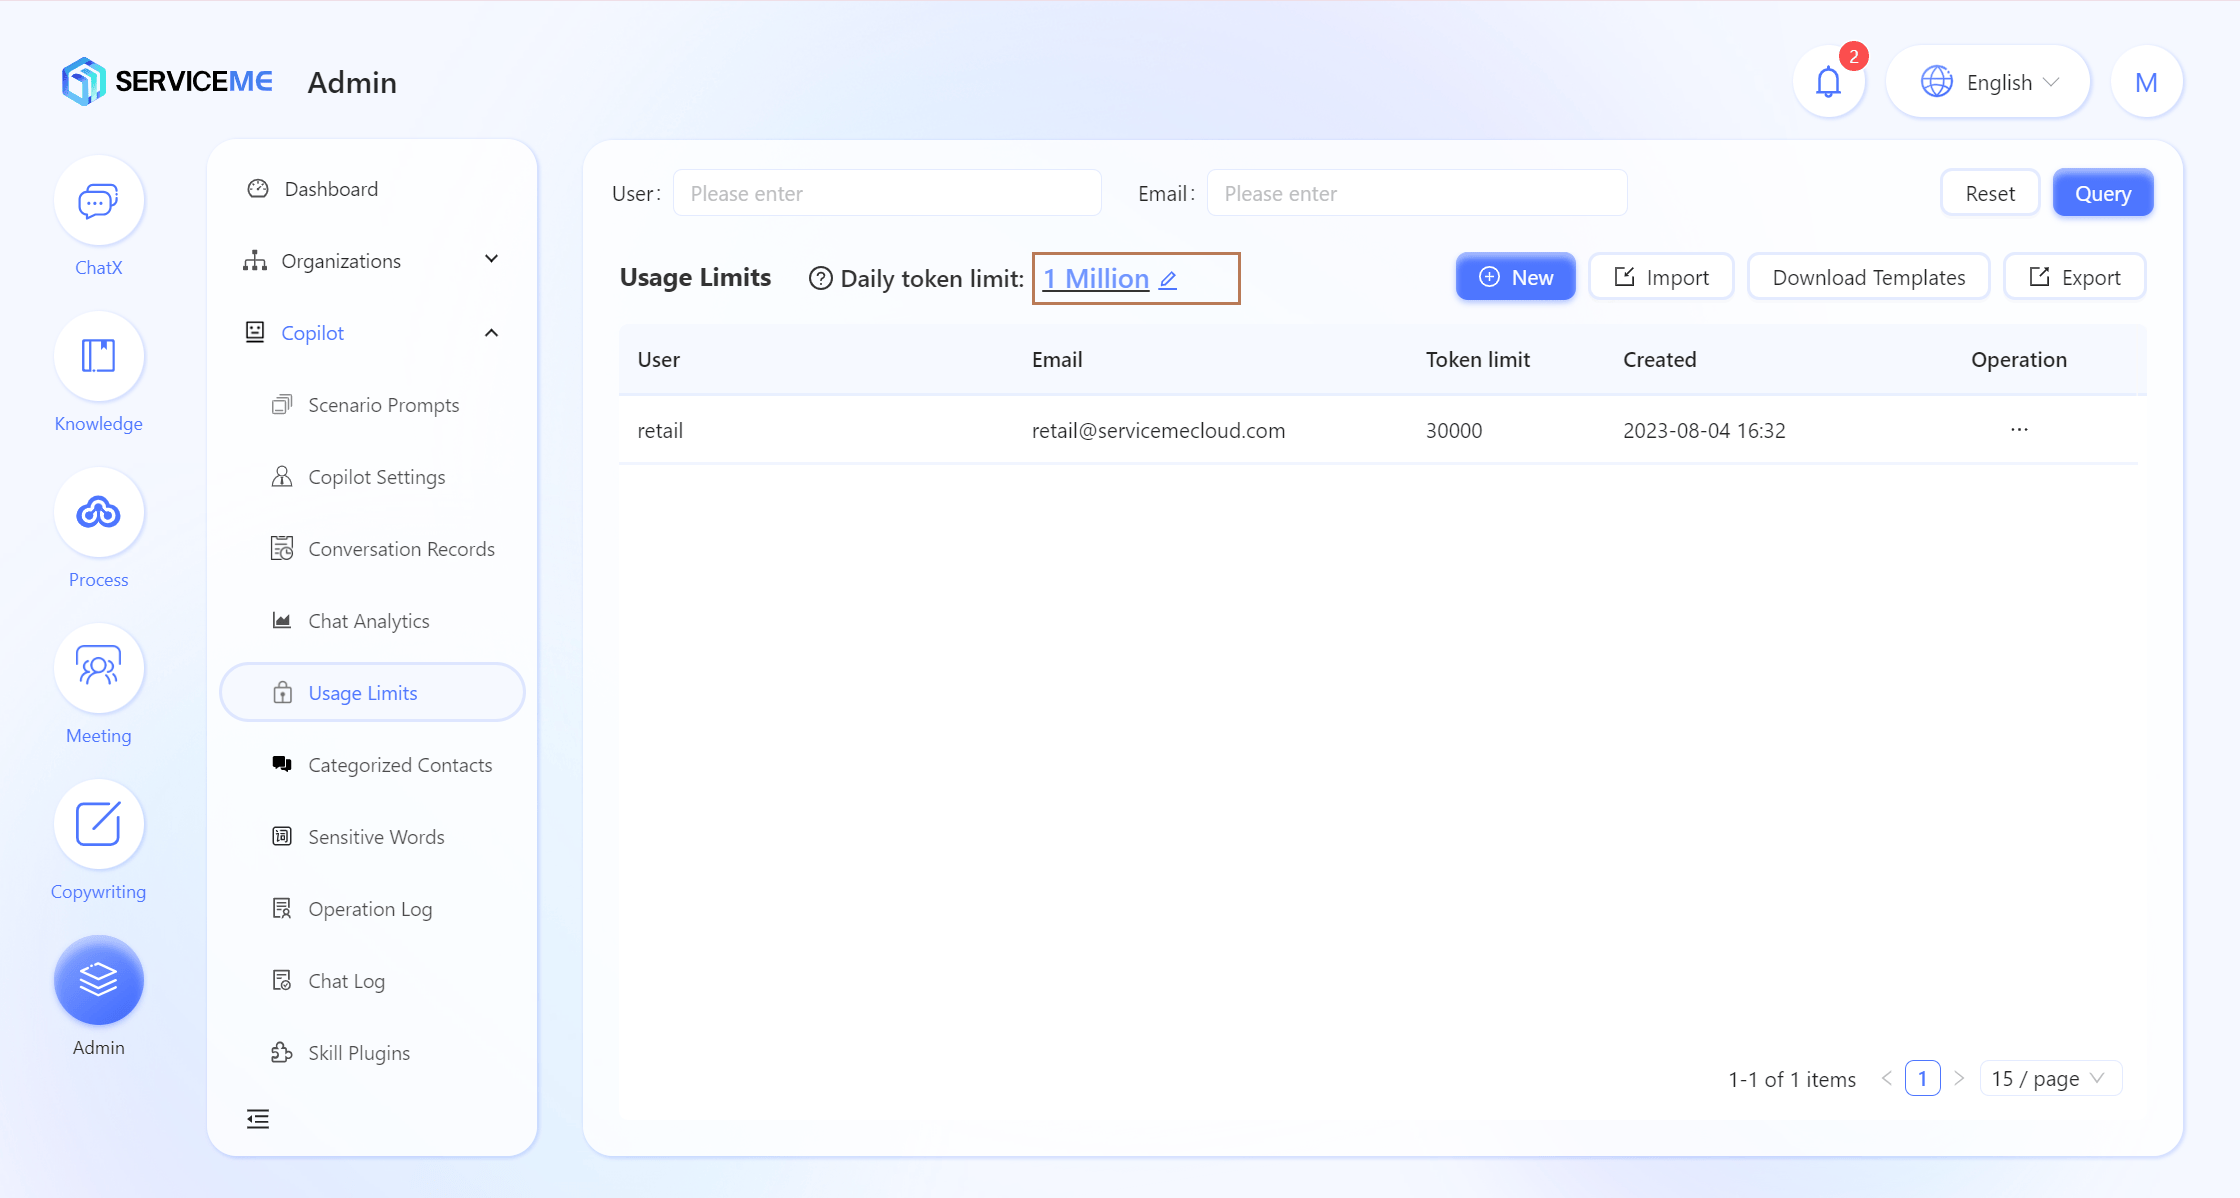
How to Limit Users' Daily Usage Quota?
- The system checks Token limits in the following order: User Token Limit -> Global Token Limit.
- Log in to the SERVICEME platform;
- Switch to the "Management" platform;
- Go to "Agent Management > Usage Quota";
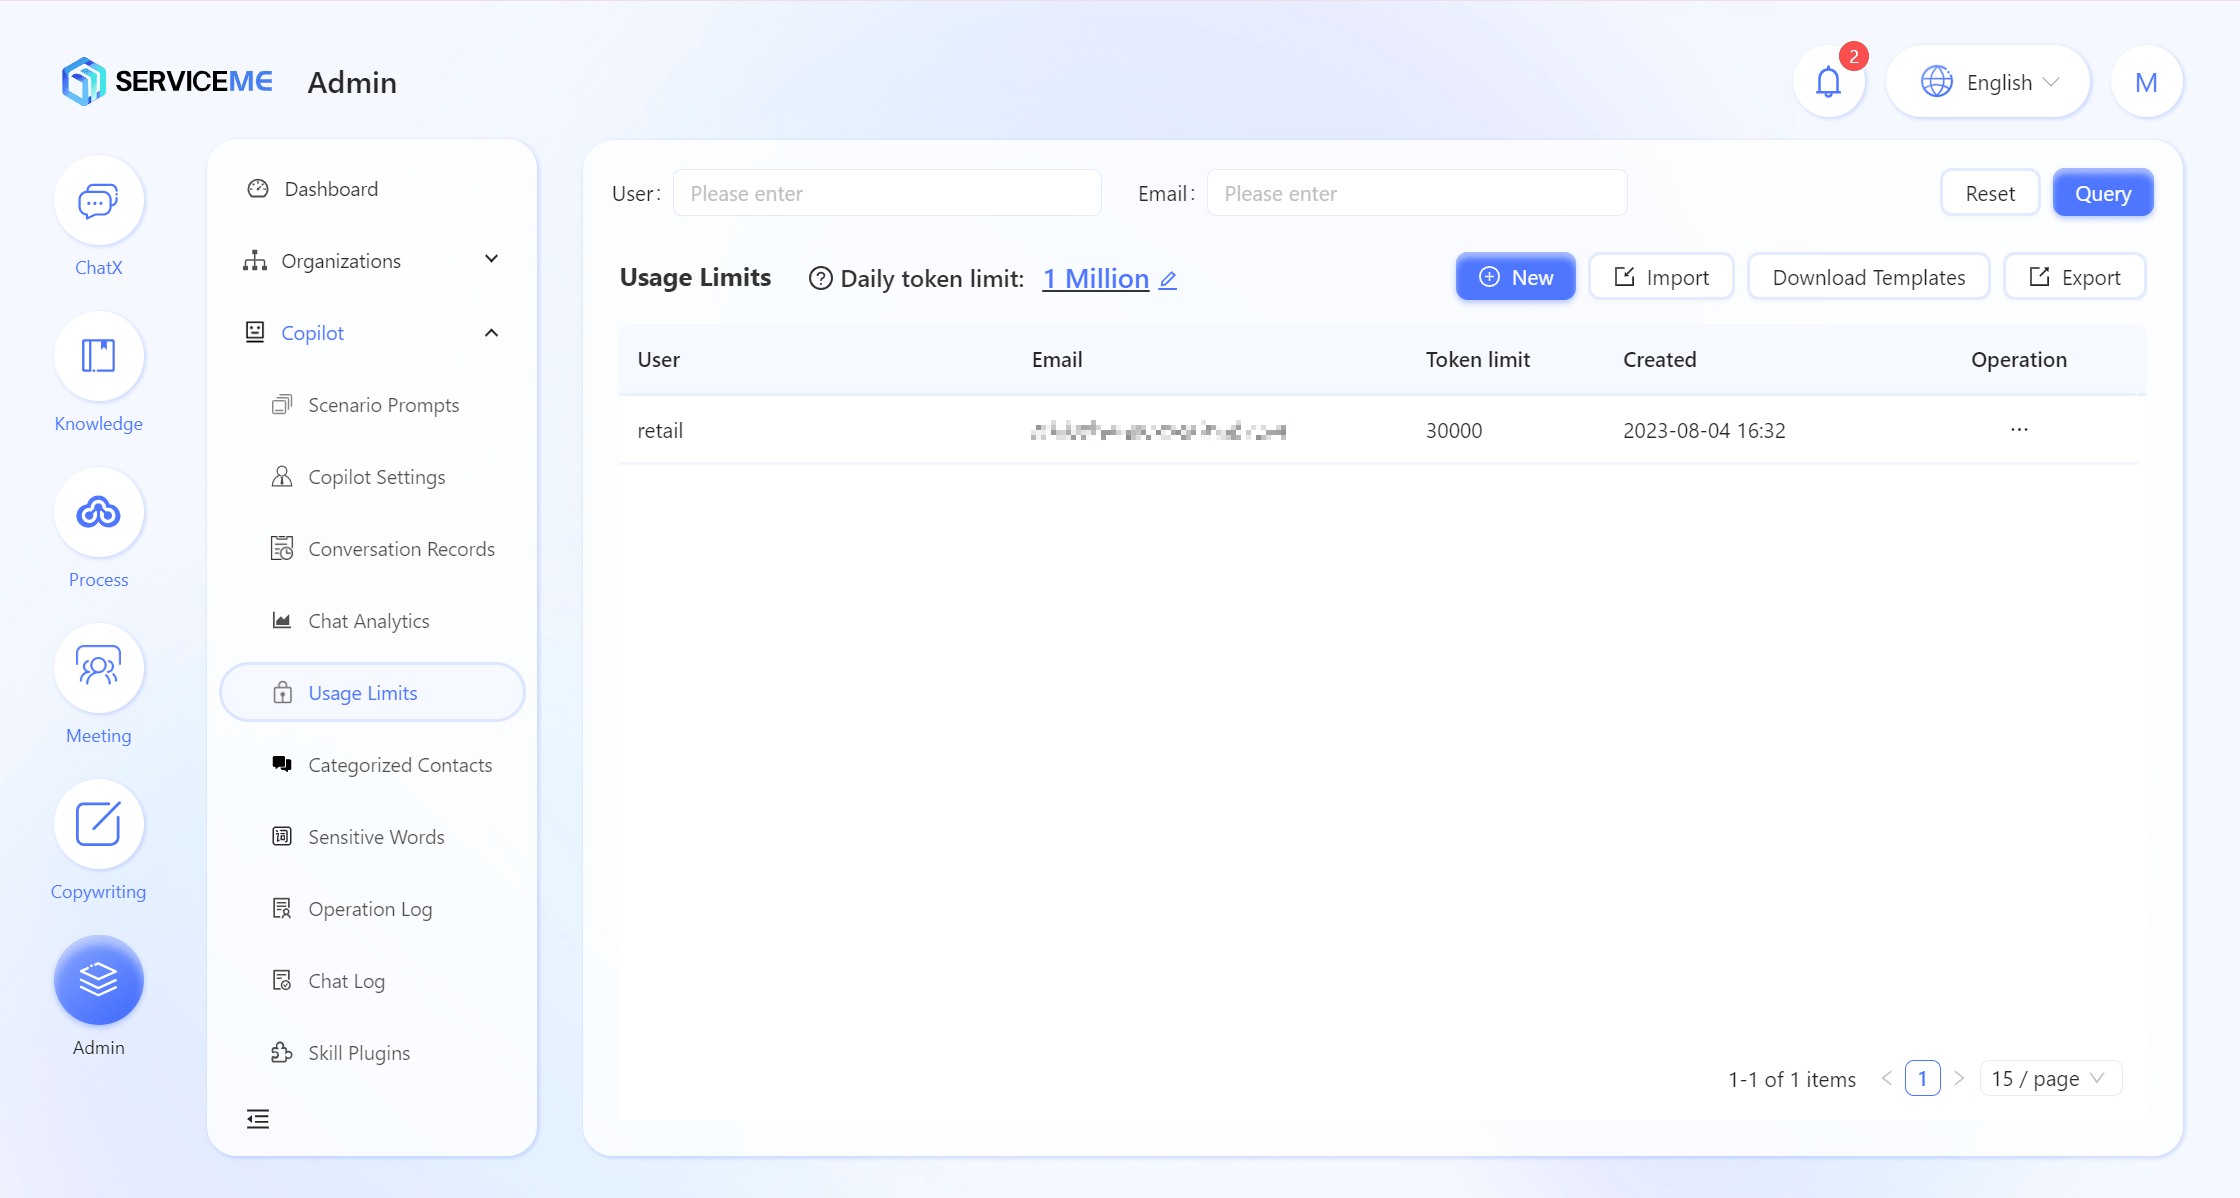
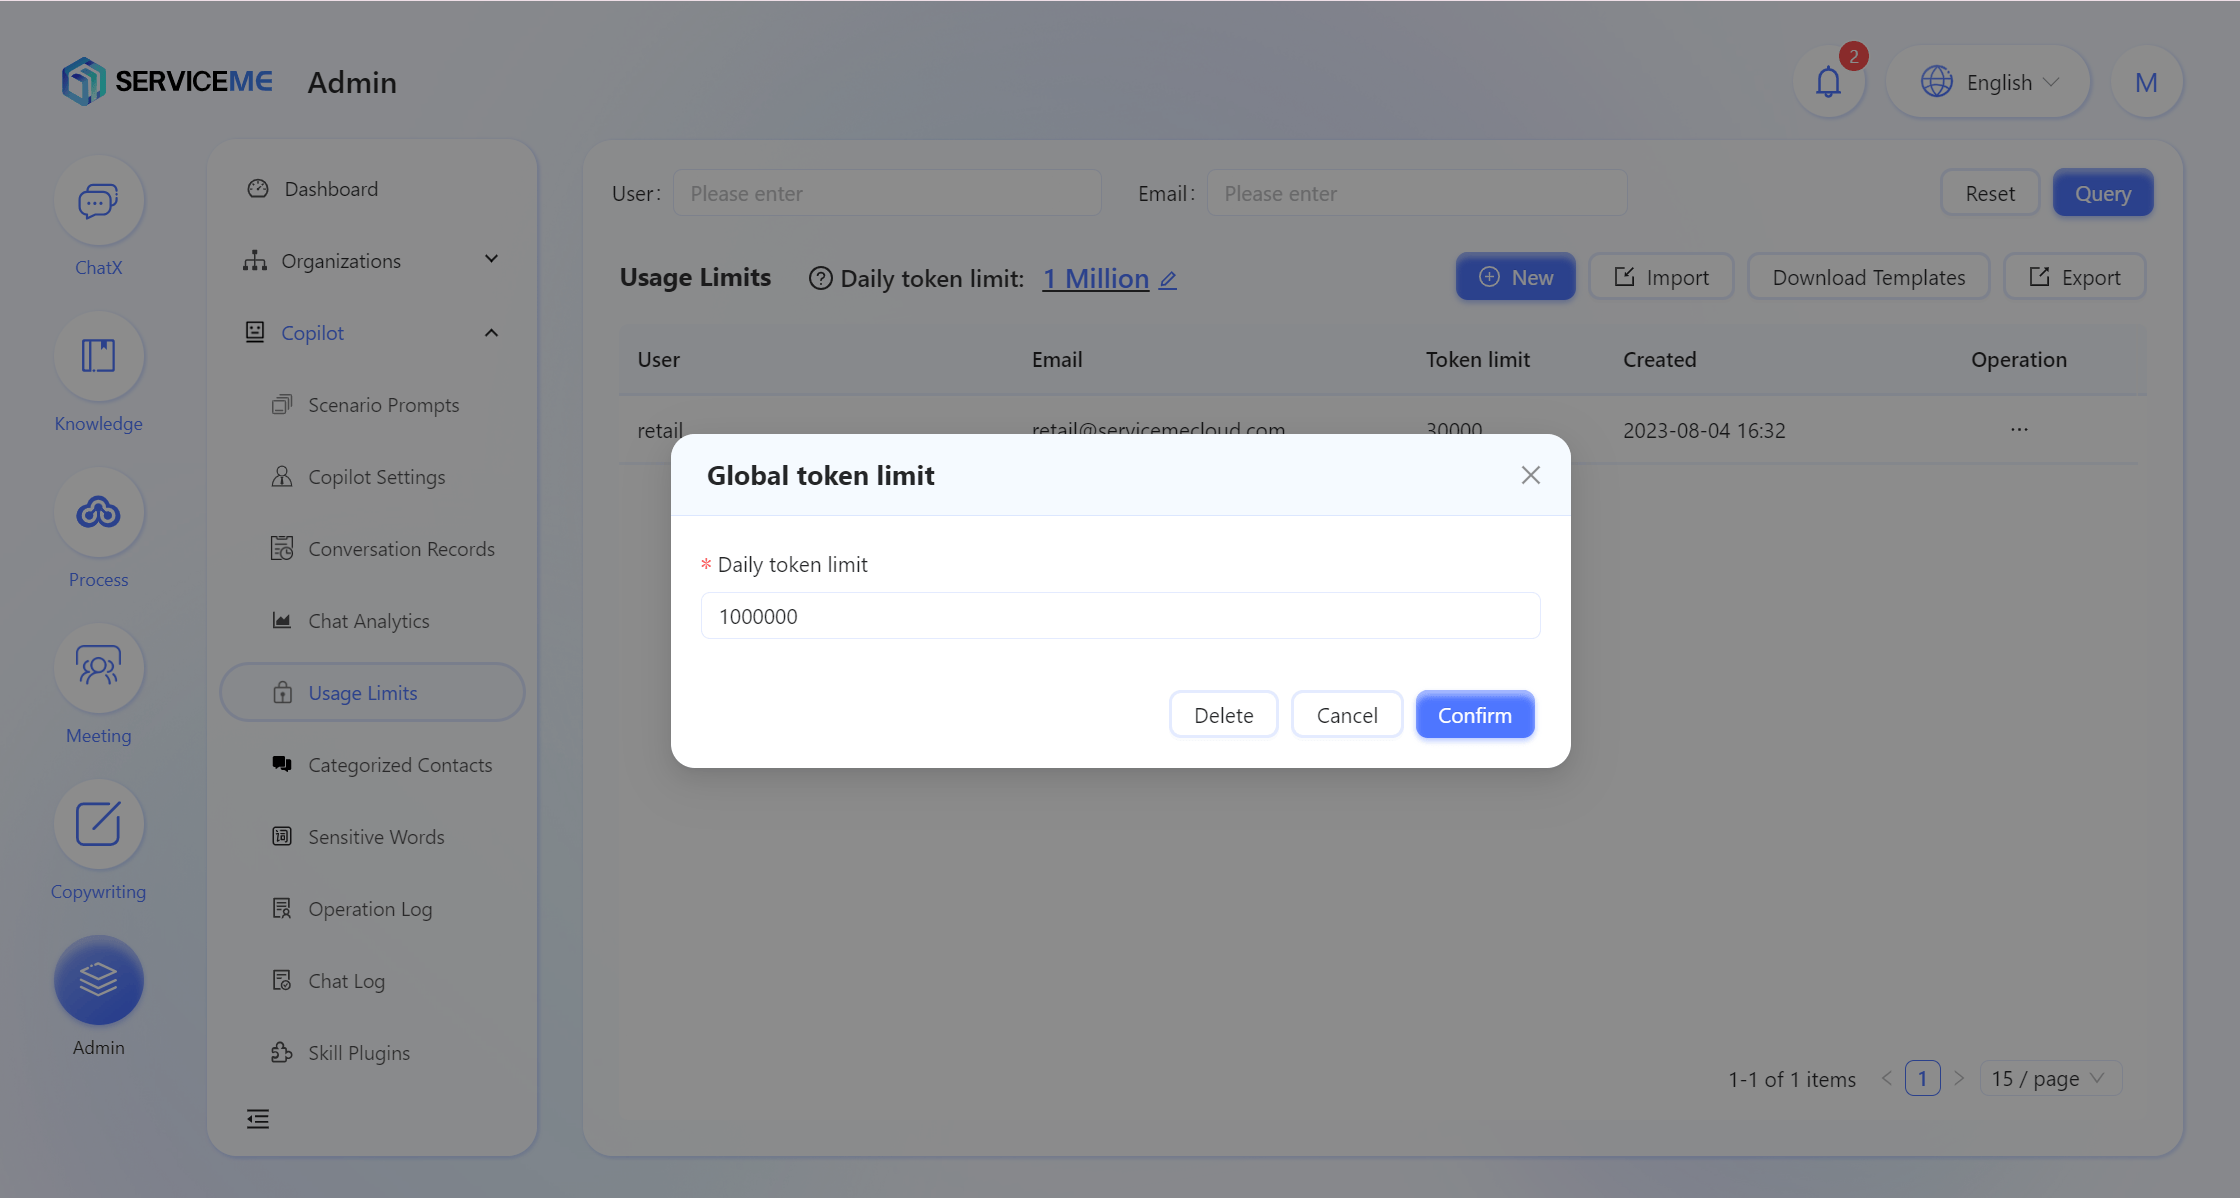
Set Global Token Quota
- Click the
 button to open the global Token limit configuration window;
 - Enter a custom number in "User Daily Quota", e.g.,
999999; - Click the "Confirm" button to configure the global Token successfully.
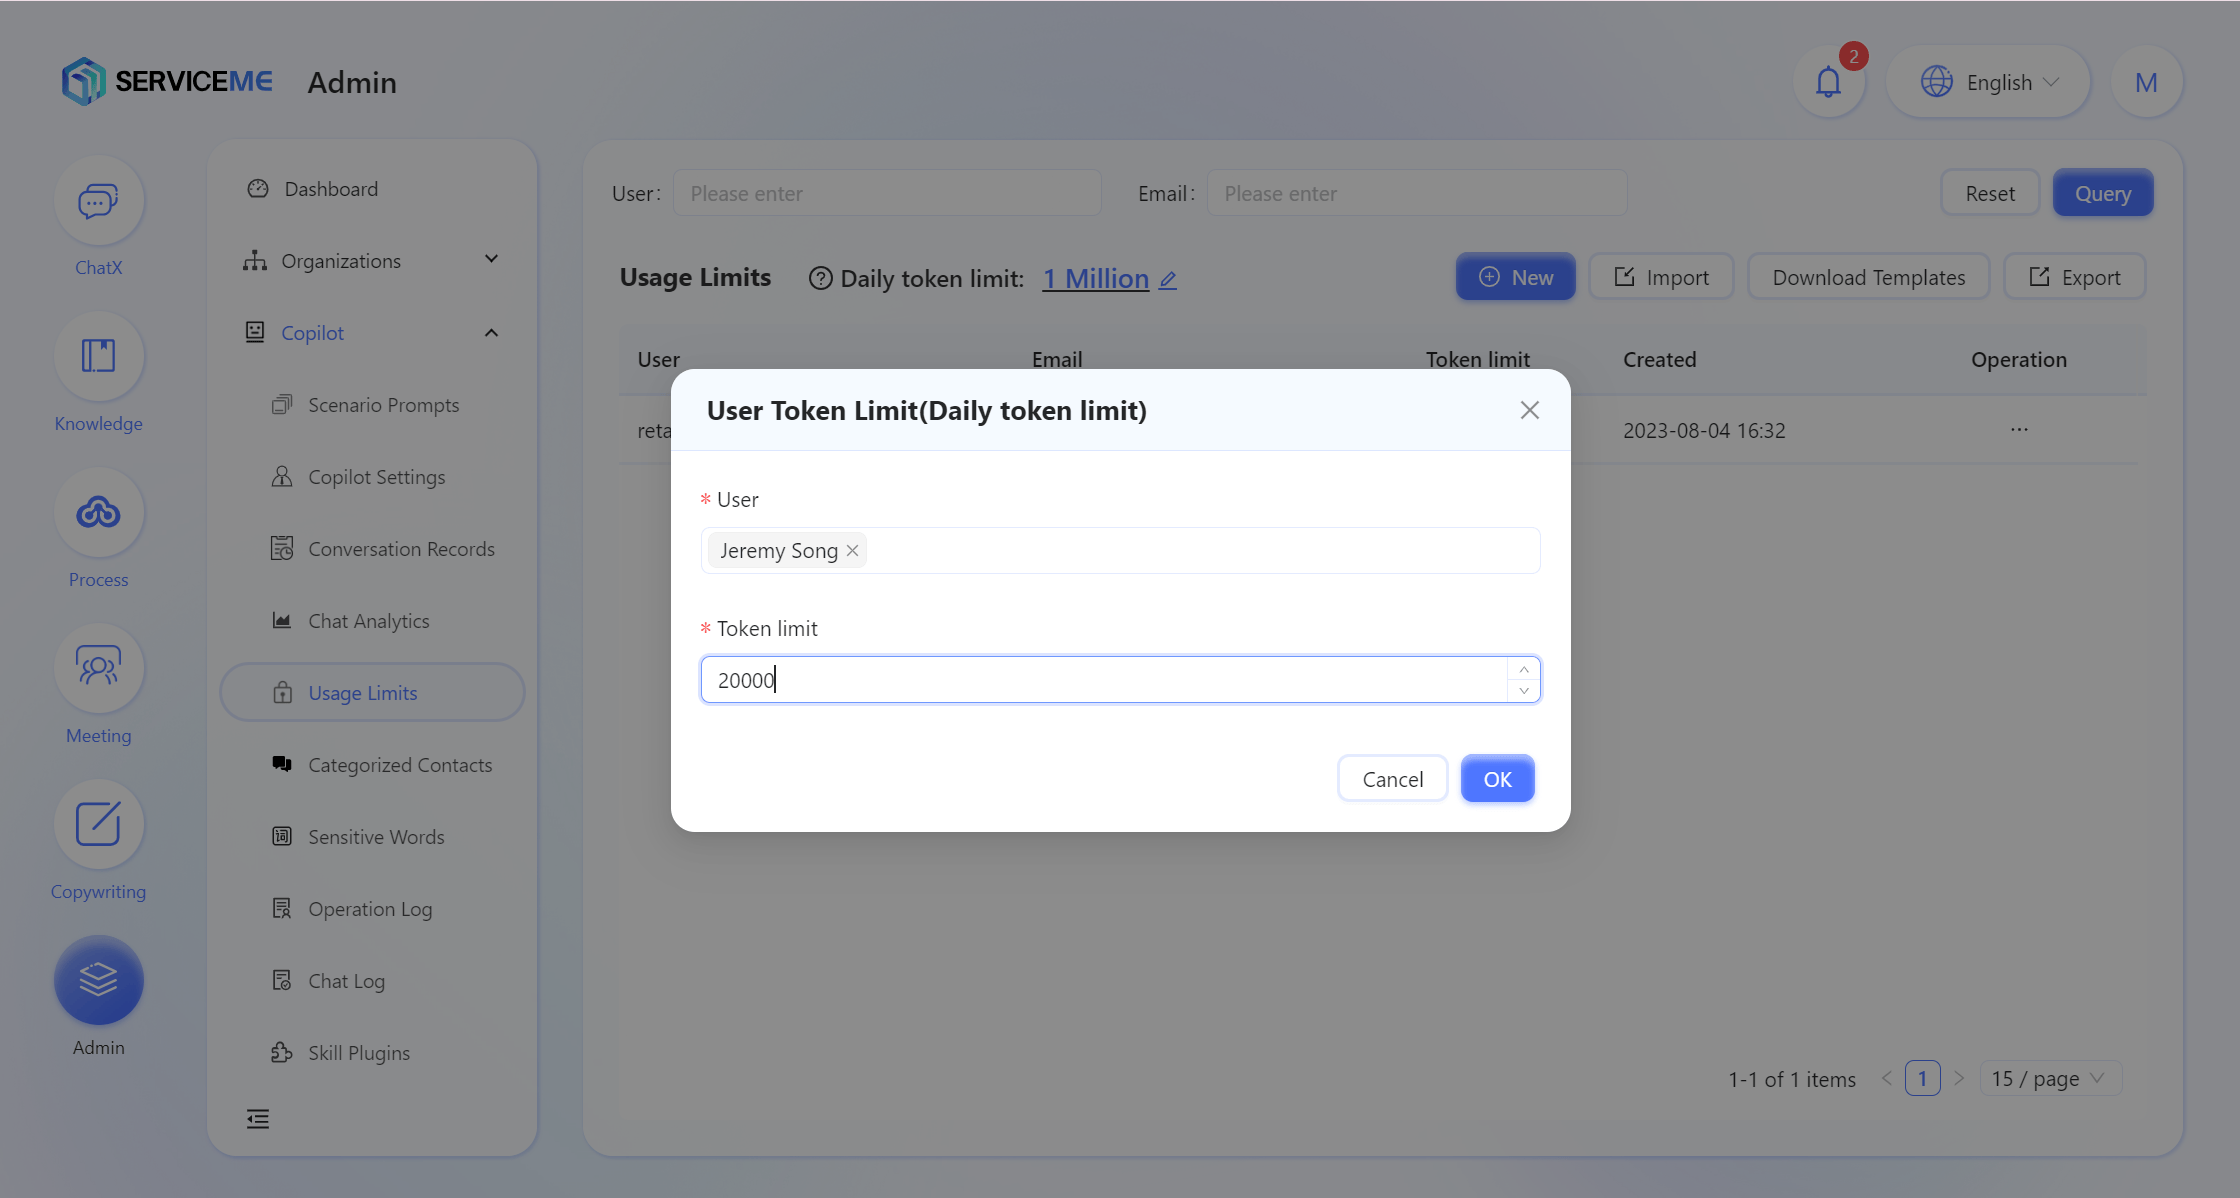
Set User Token Quota
Add Individually
- Click the "Add" button to open the Add User Token Limit window;
- Click "Username" to open the user selector and select users, e.g.,
QA Test01,QA Test04;
Enter a custom number in "Token Quota", e.g.,9999; - Click the "Confirm" button to add the user limit successfully.
Batch Import
- Click the "Download Template" button to get the Excel template;
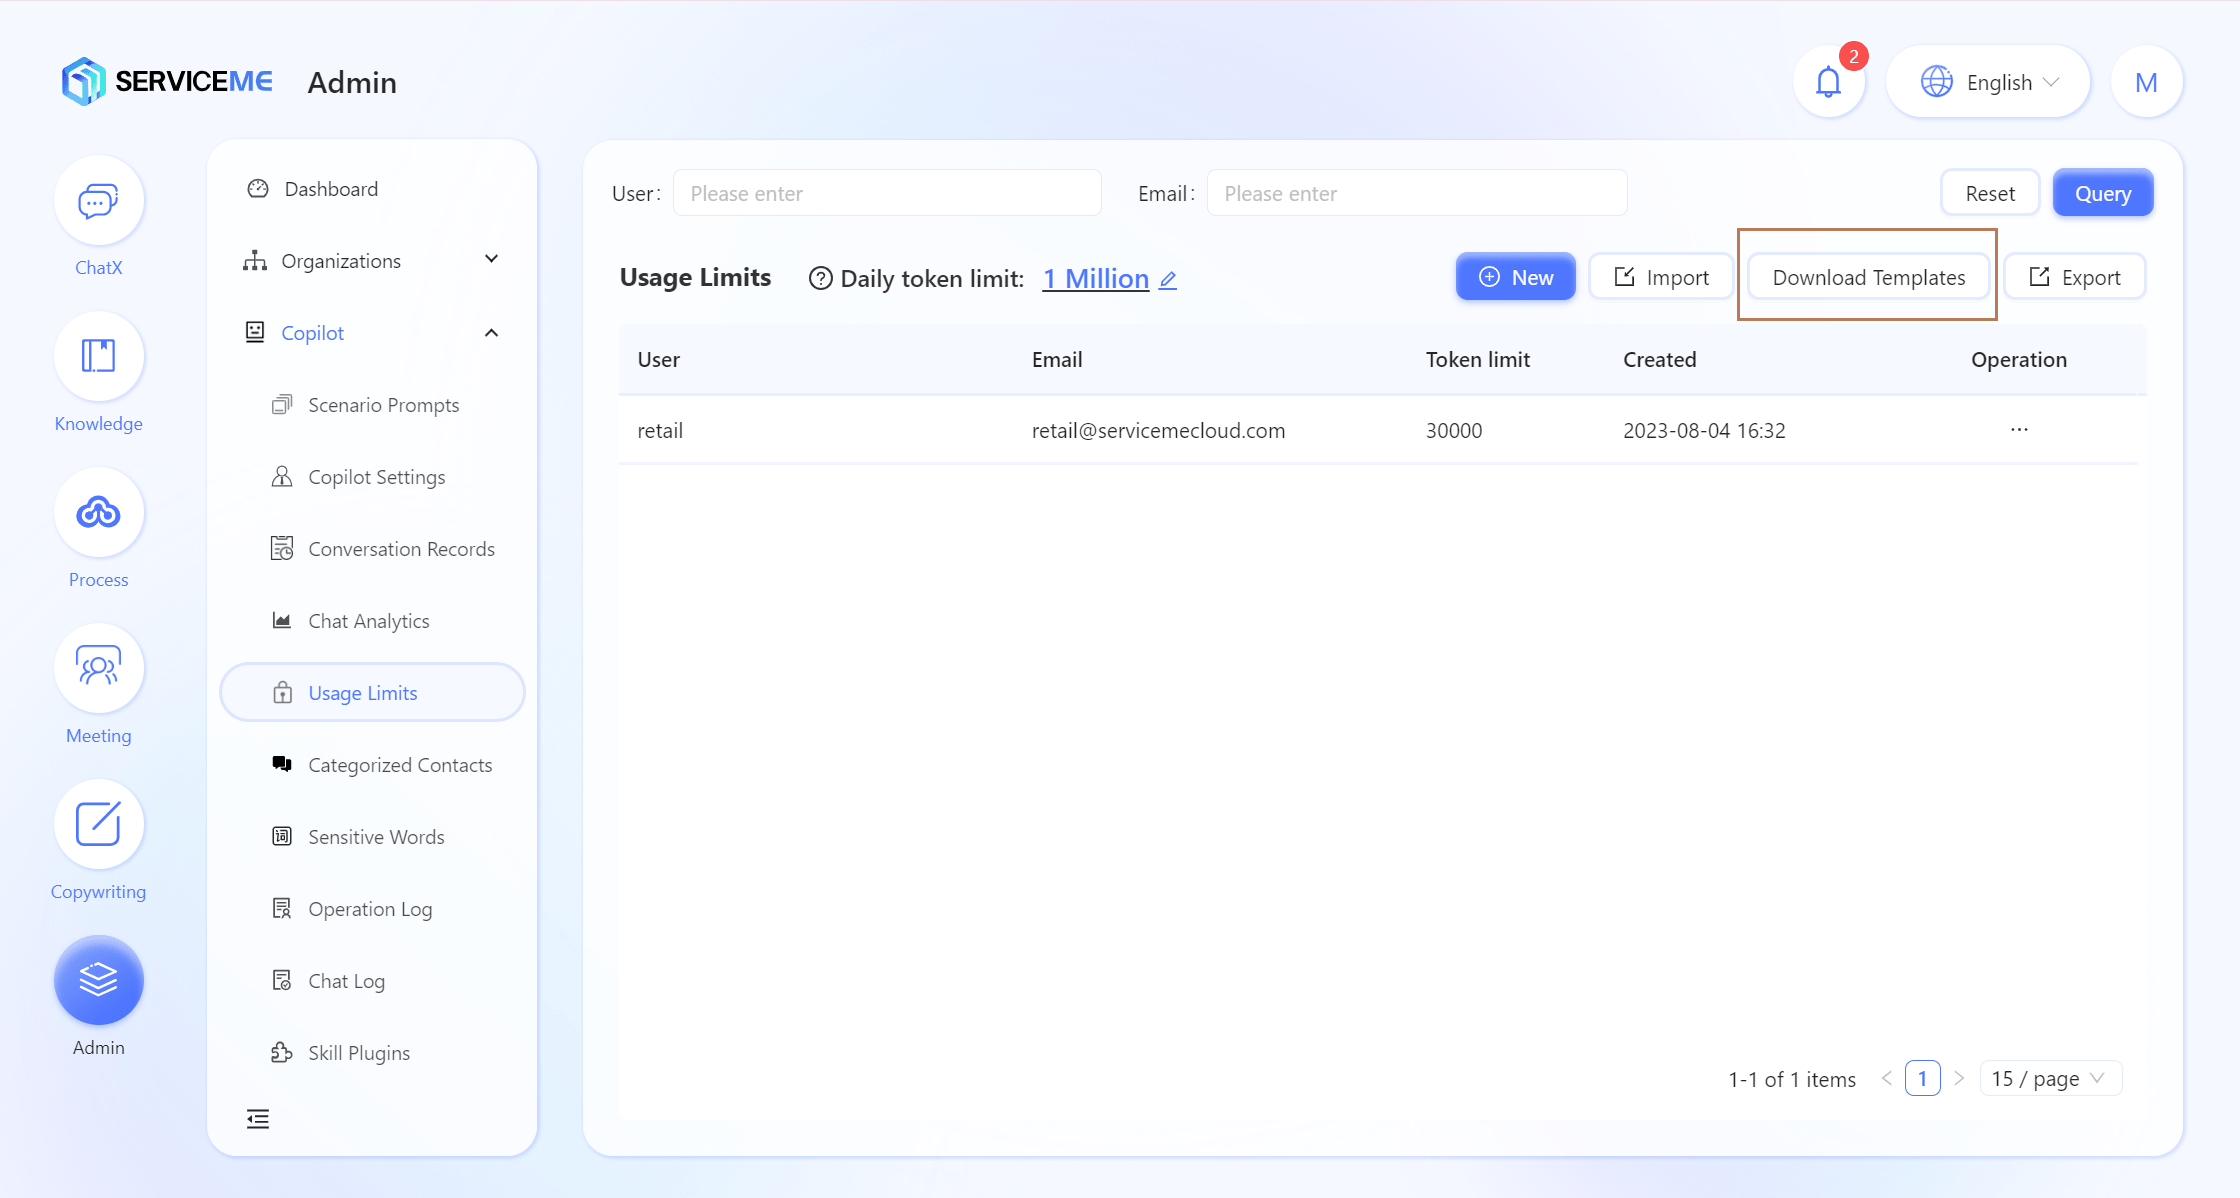
- Enter batch information according to the import template and save;
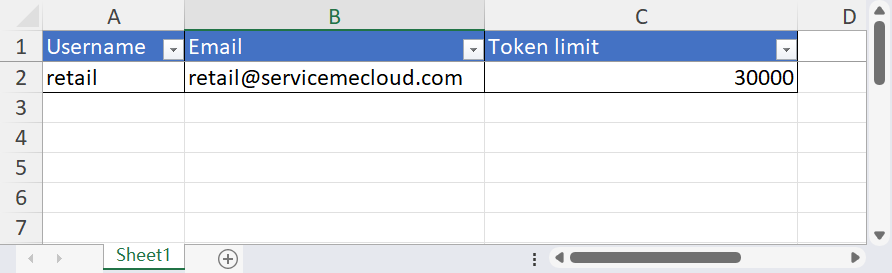
- Click the "Import" button, select the import file, and confirm;
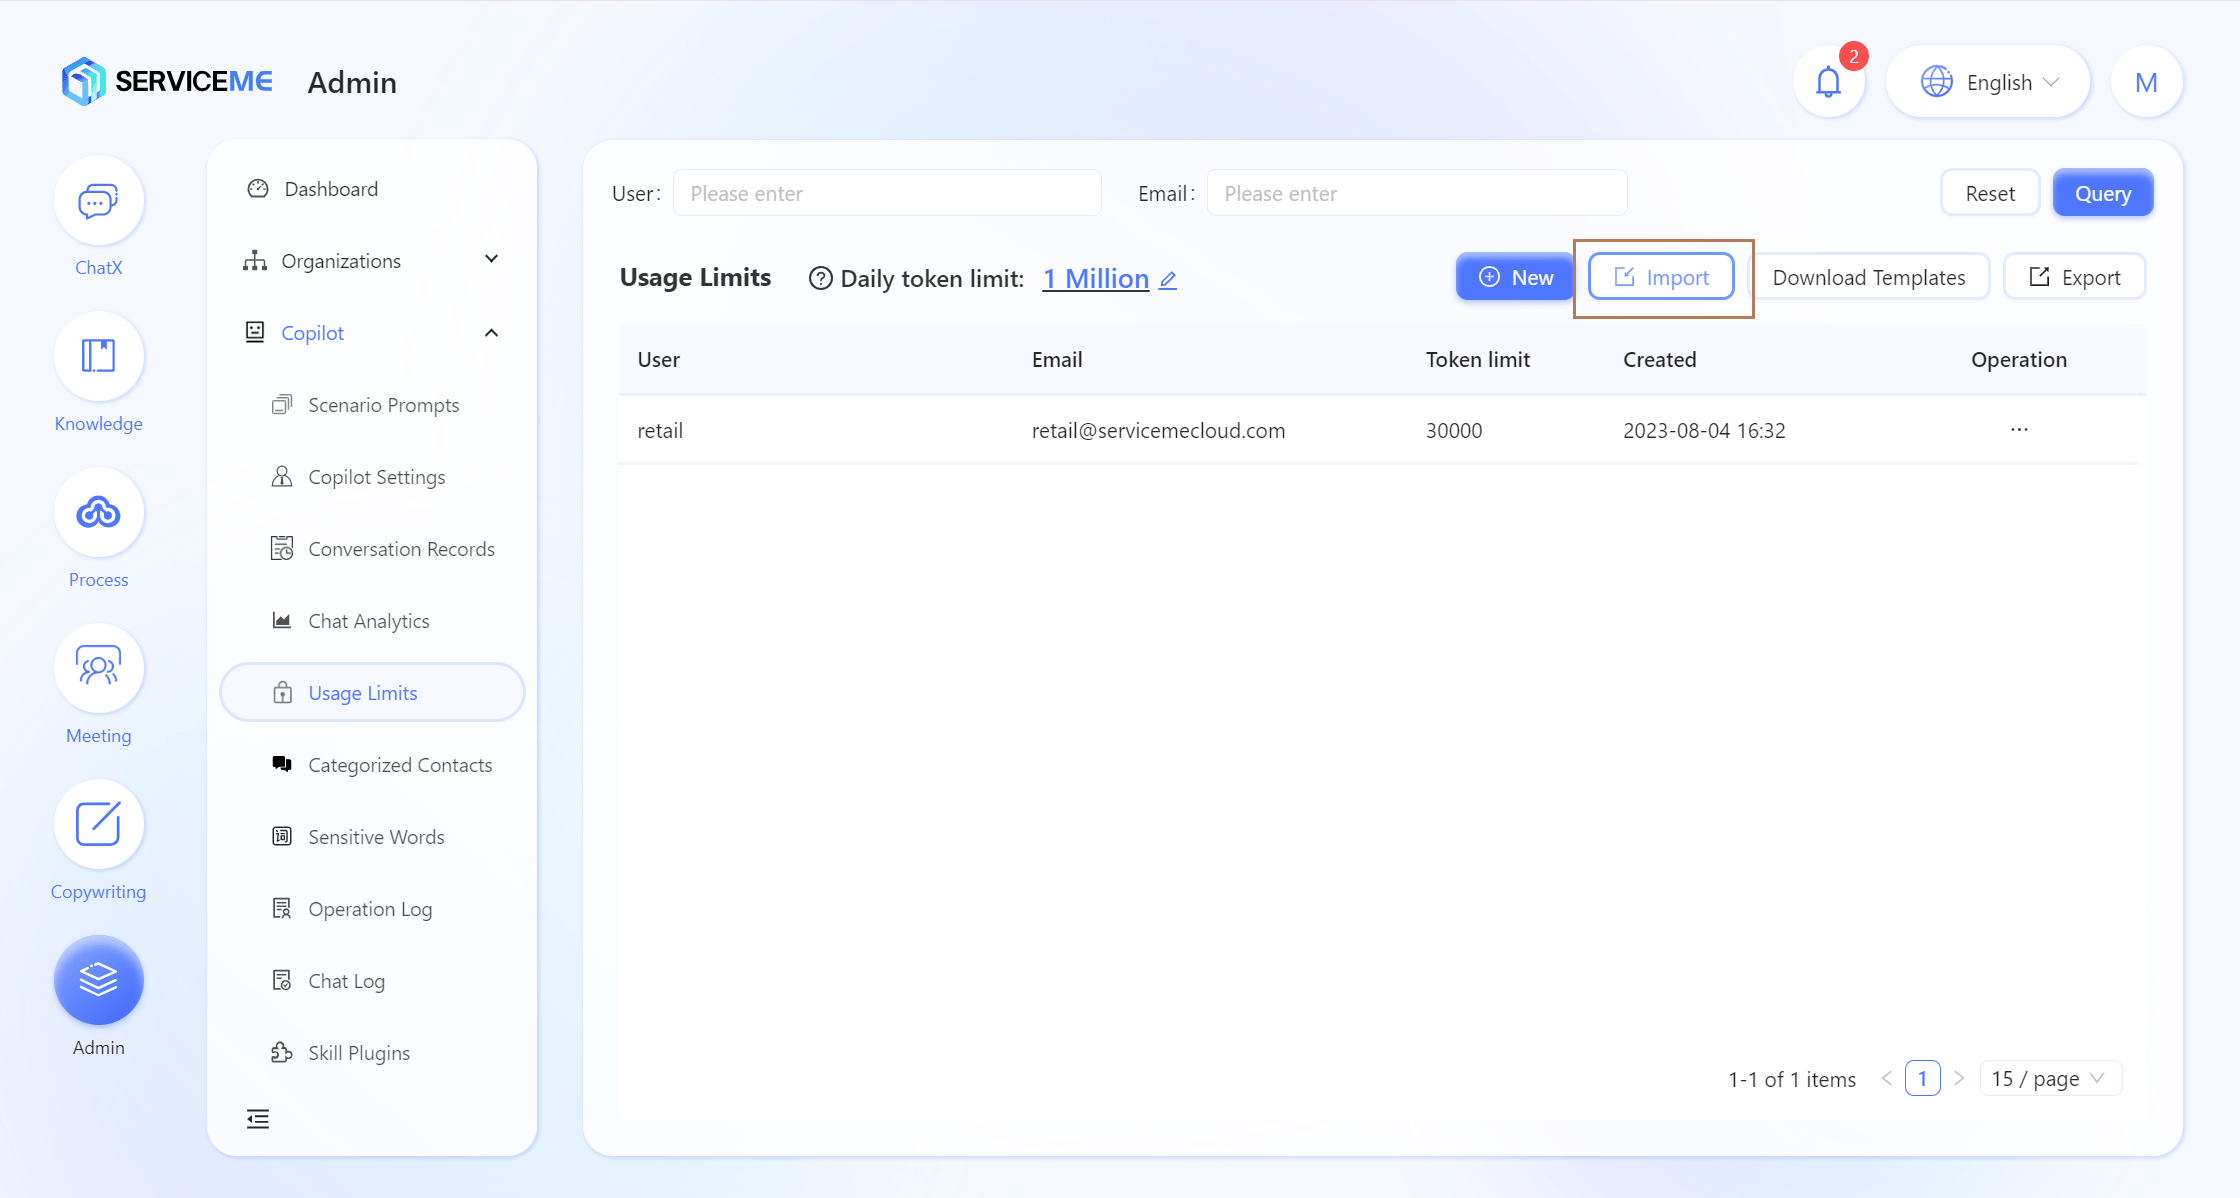
-
Batch import of user Token limits is successful.
-
When the system detects a user exceeding the Token limit, a prompt will be given.