Basic Agent Creation
Selecting Agent Type
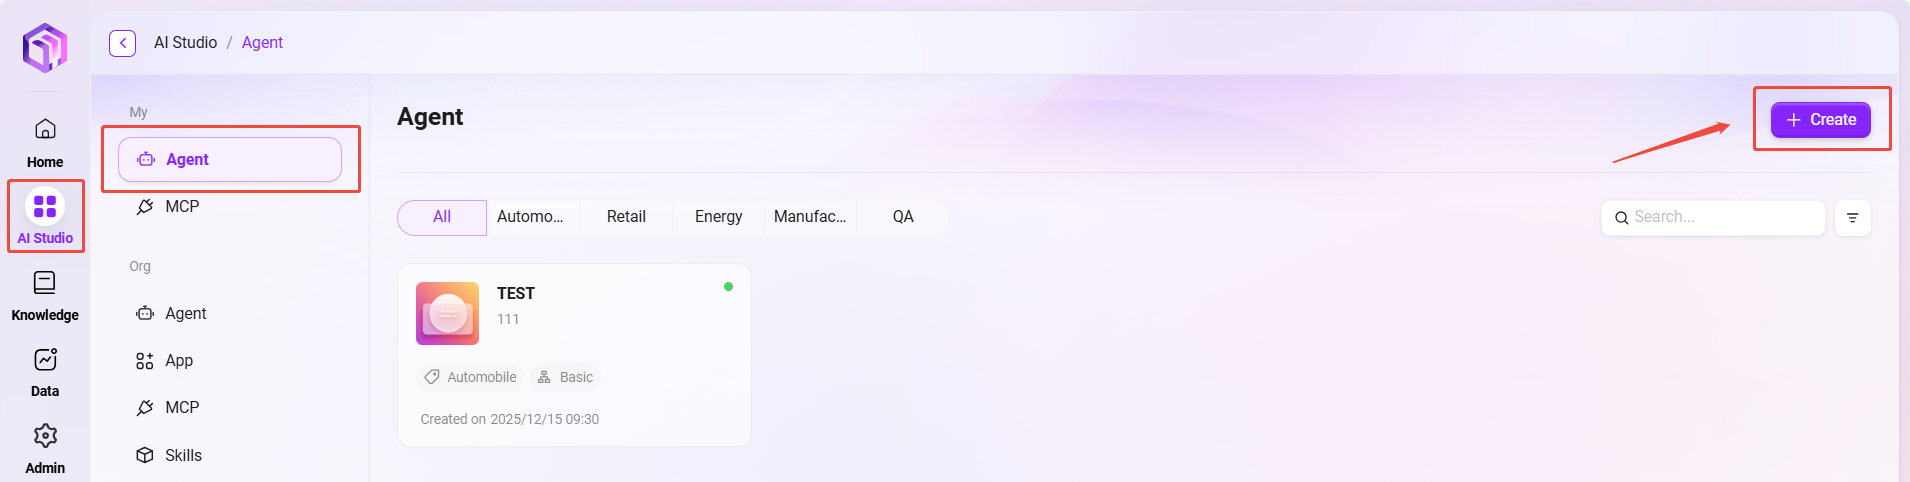
In the AI Studio page, click "Create" in the upper right corner to create a basic intelligent agent.
Creation Steps
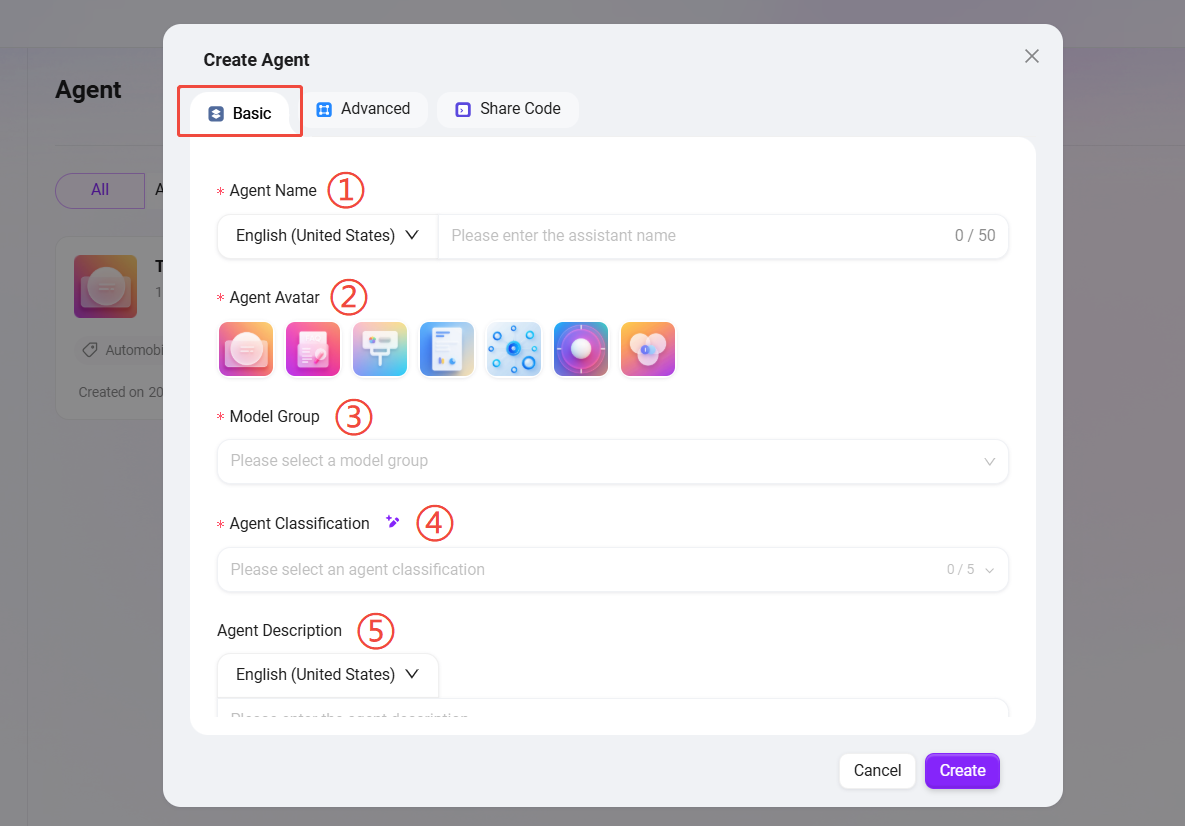
In the creation pop-up, fill in the following basic information:
① Agent Name: Enter the name of the agent as its identifier (within 50 characters).
② Agent Avatar: Select an avatar from the system default avatars (custom avatar upload is not currently supported).
③ Model Group: Configure a suitable model group for the agent.
④ Agent Classification: Select the group where the new agent belongs (up to 5 can be selected).
⑤ Agent Description: Enter a brief description explaining the agent's function and purpose (within 200 characters).
- Click "Create". After the agent is created, you will enter the basic orchestration agent configuration page. Configure and publish it to put it into use.
💡 Tip: The system interface supports the following languages: Simplified Chinese, Traditional Chinese, Japanese, English.
Agent Configuration
Entering the Configuration Page
You can enter the detailed configuration page of an intelligent agent in the following two ways:
- Method One: After creating a new agent in AI Studio, the system will automatically enter its configuration page.
- Method Two: In the agent list, hover over the target agent card and click the "✏️" icon that appears to enter the configuration page.
Core Configuration Items Explanation
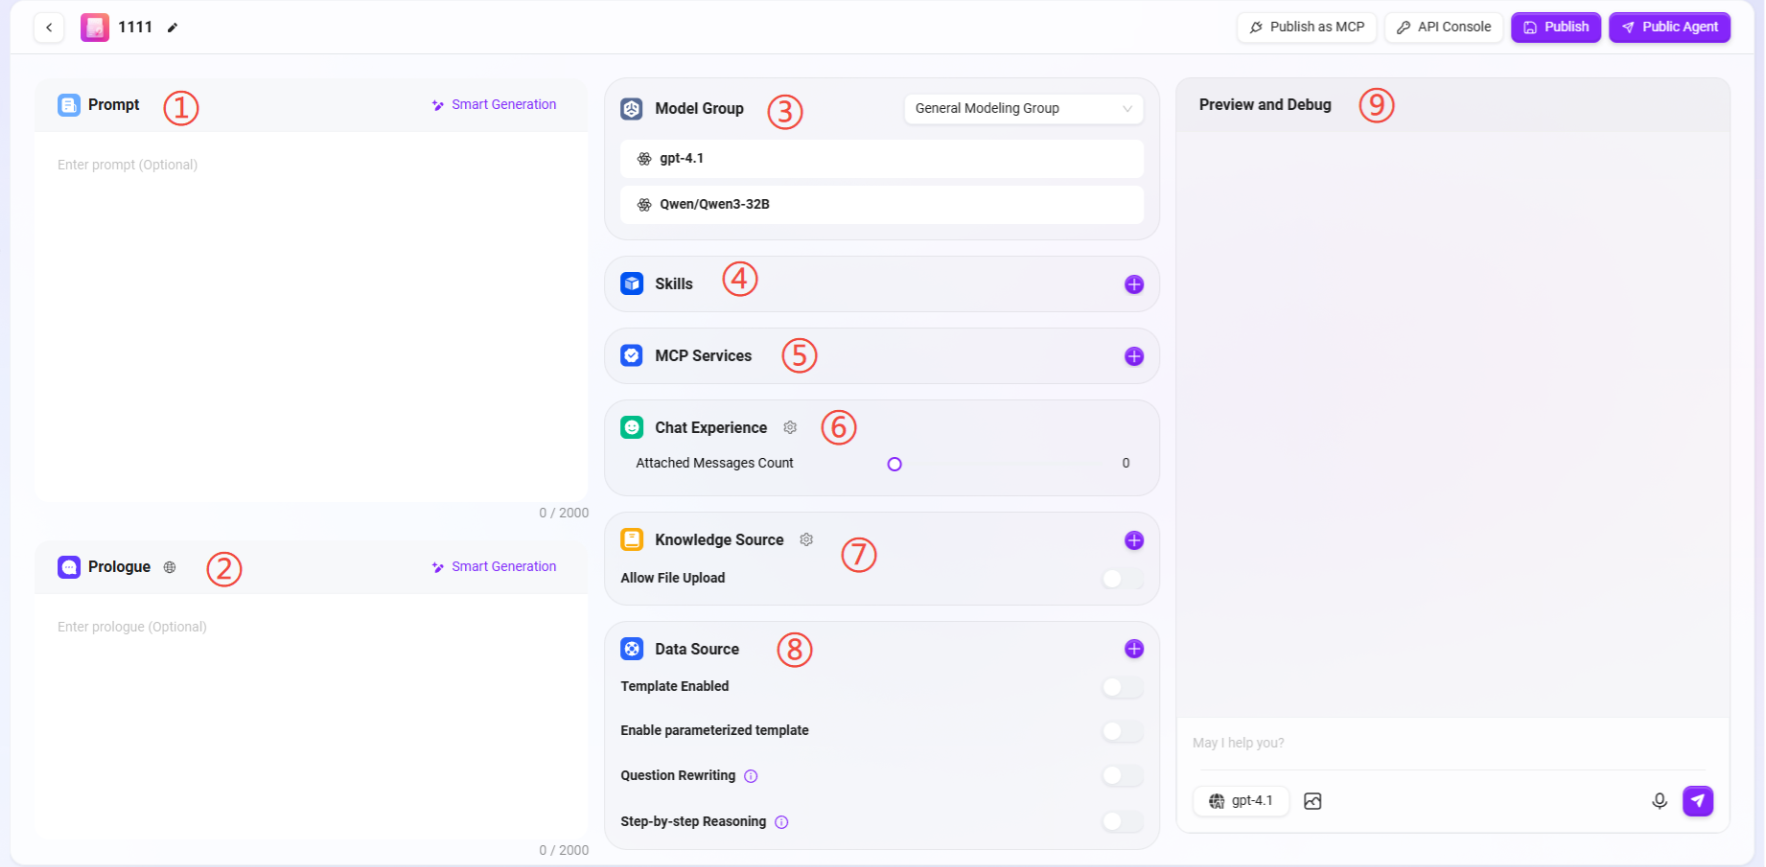
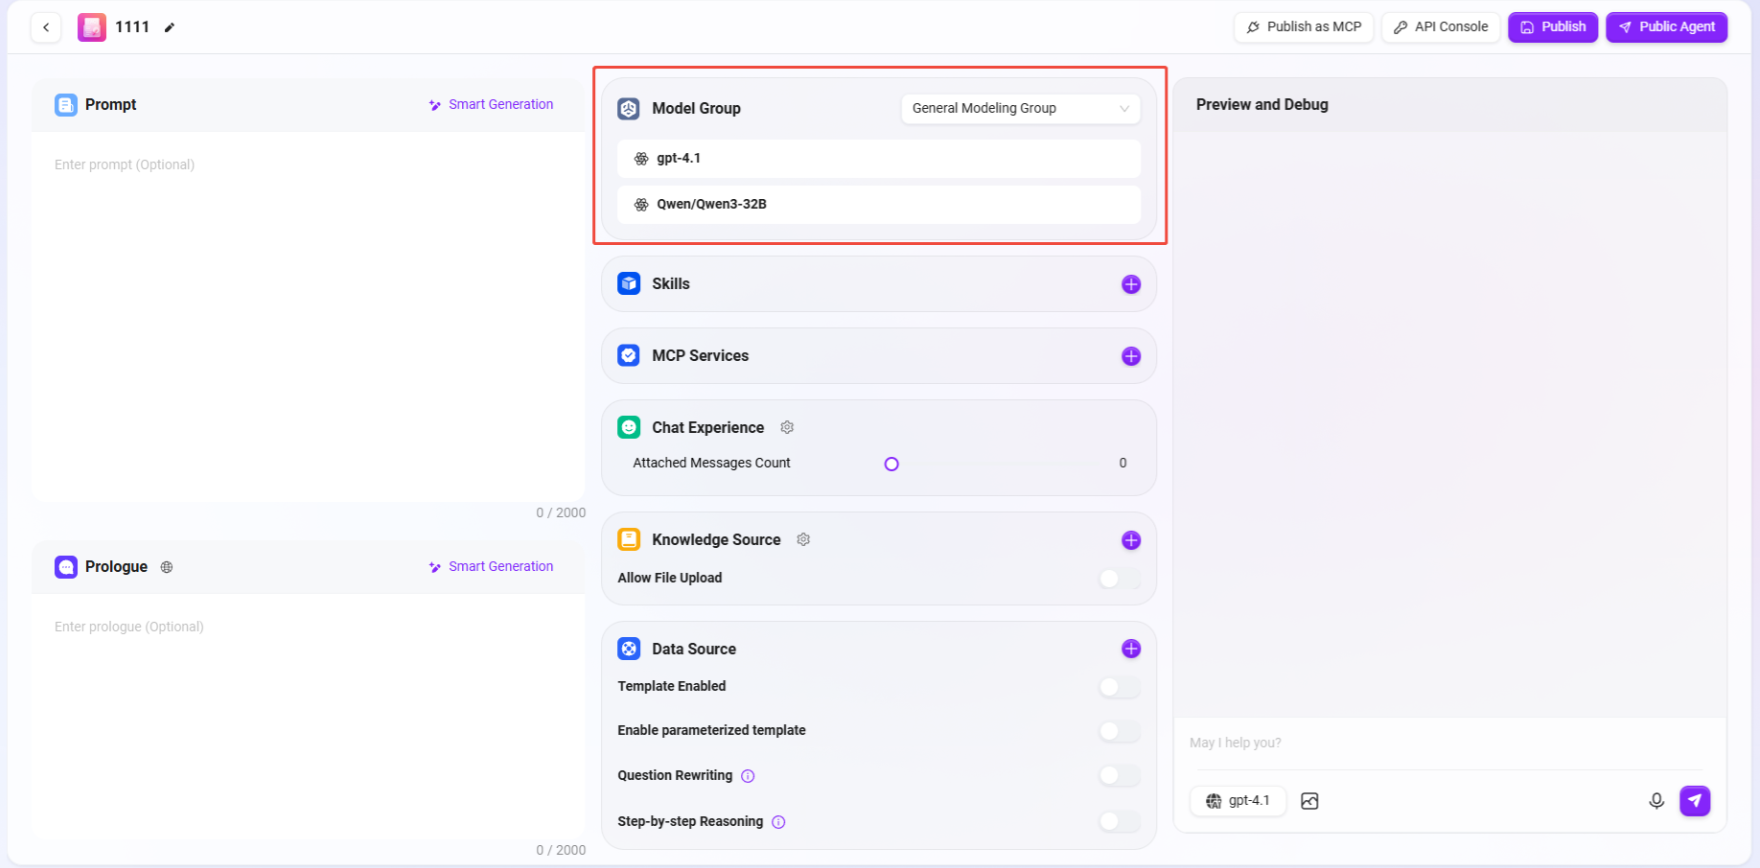
The configuration page includes the following core modules:
① Prompt: Input the agent prompt. Also supports intelligently generating prompts based on existing ones.
② Prologue: Input the agent's opening message. Also supports intelligently generating based on the prompt or existing opening message.
Note: When the input for prompt and opening message exceeds about 2000 characters, the system will prompt "Input content is too long, may affect performance", but will not prevent further input. It is recommended to keep the content concise for optimal performance.
③ Model Group: Click "+" to add a model group, supporting multiple optional models.
- Function: Click "+" to add or switch a configured model group for the agent. A model group can contain multiple different AI models.
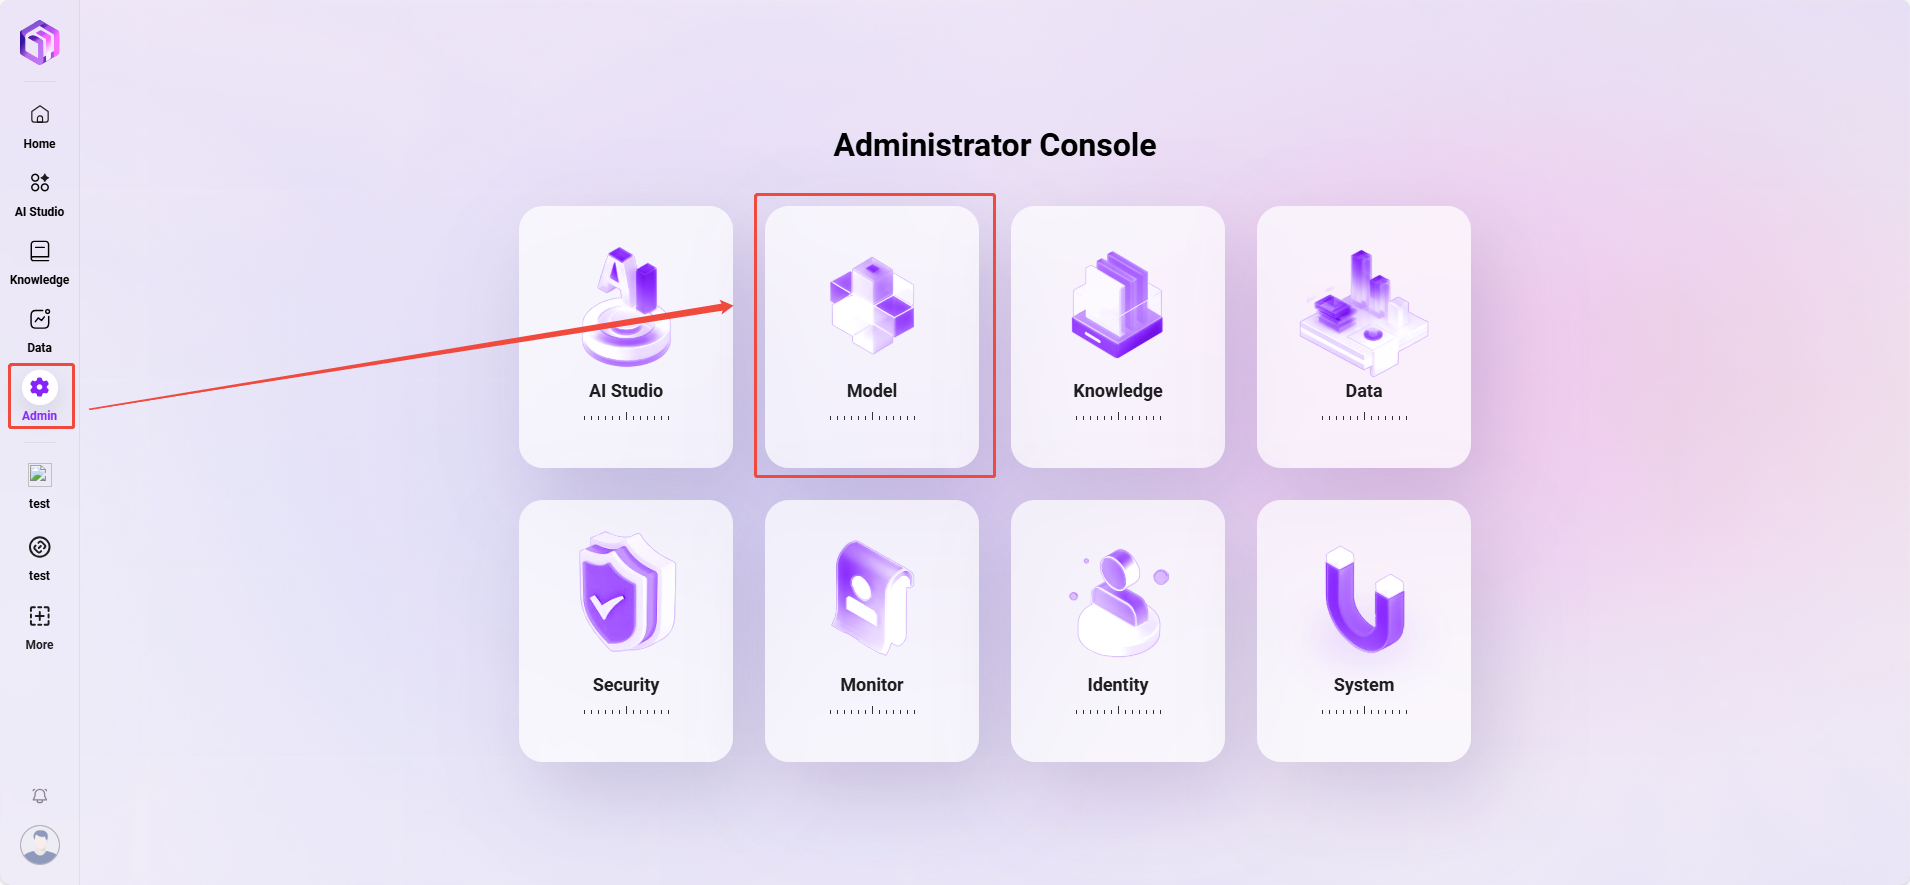
- Management Note: Model groups need to be created and configured first by the administrator in "Admin > Model Management > Model Groups". Multiple models can be added to the same model group before they can be assigned to agents here.
Steps for Admin to Add Model Group:
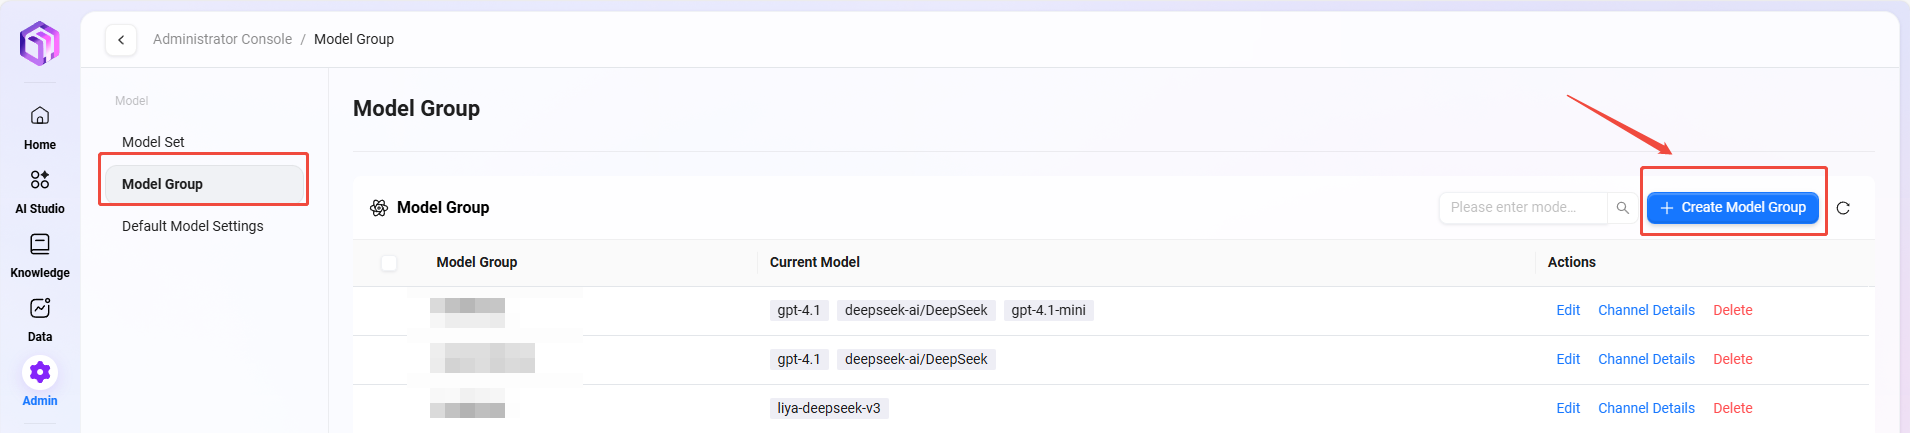
- Access path: Admin → Model Management → Model Groups.
- Click "New Model Group".
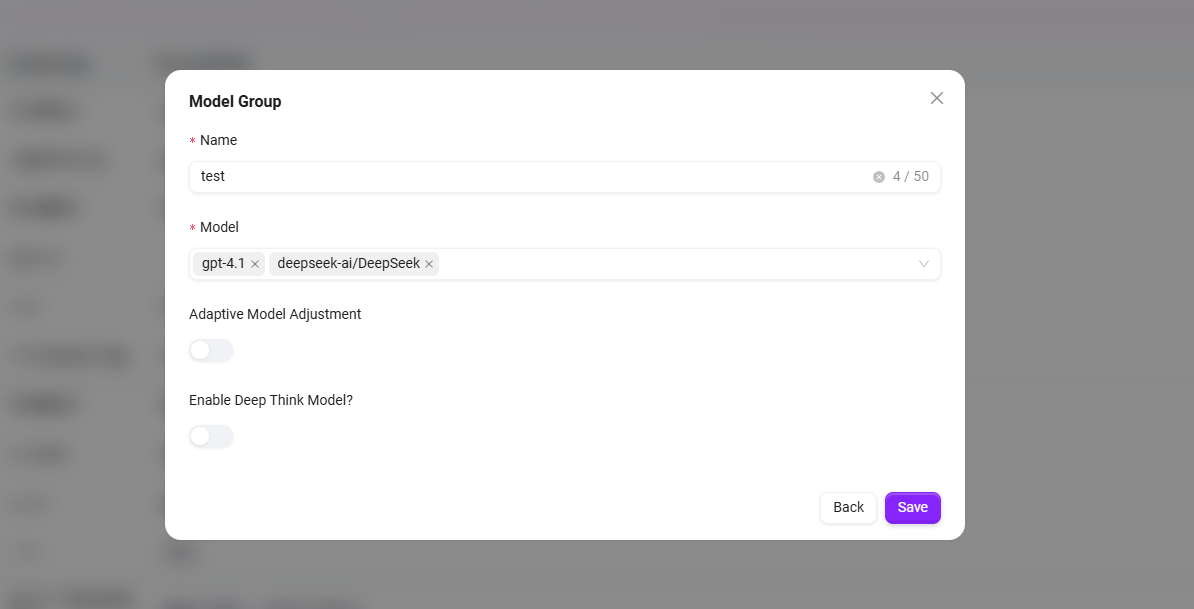
- Complete the following configuration:
- Enter the model group name.
- Check the models to be added to this group (multiple selections allowed).
- Choose whether to enable "Adaptive Model Deployment", which can automatically adjust computing resources based on traffic to ensure stable and smooth service.
- Choose whether to enable "Deep Think Model", which intelligently invokes more powerful AI for complex problems, significantly improving answer quality.
- Click "Save".
④ Skills
Click "+" to add one or more skills, or add recommended skills (up to 20 skills can be added).
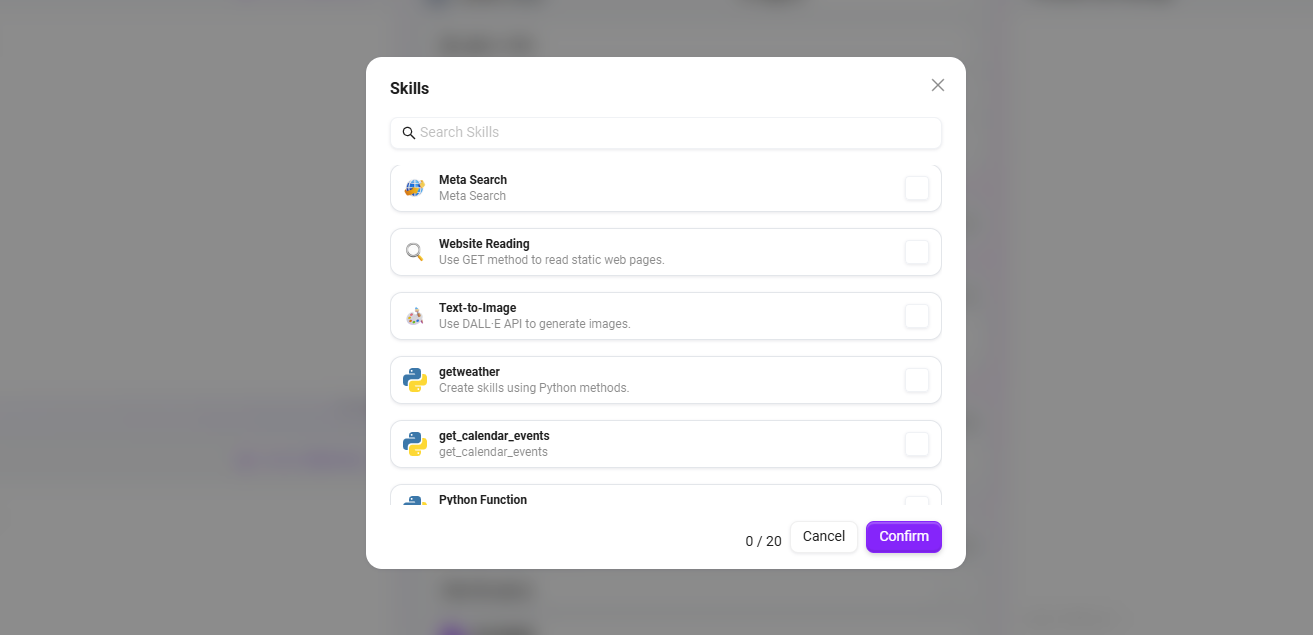
The system provides 7 default skills: Google Search, Tencent Search, G-Bing Search, Mita Search, Text-to-Image, News Query Tool, Web Page Reading.
- Google Search: Obtains real-time, accurate web information via the Google search engine, supporting content retrieval from the global web.
- Tencent Search: Provides search services for the Chinese internet environment based on Tencent search technology, specially optimized for Chinese content retrieval.
- G-Bing Search: Provides comprehensive web search capabilities, balancing broad retrieval and result precision.
- Mita Search: Provides efficient, precise search services, quickly locating and returning key information needed by users.
- Text-to-Image: Automatically generates corresponding image content based on text descriptions, turning text creativity into visual presentation.
- News Query Tool: A dedicated tool for searching and obtaining various news and information.
- Web Page Reading: Extracts web page text, data, and other content; a function for parsing web page information.
Note: Supports adding other skills, which need to be operated and configured by the administrator in the backend.
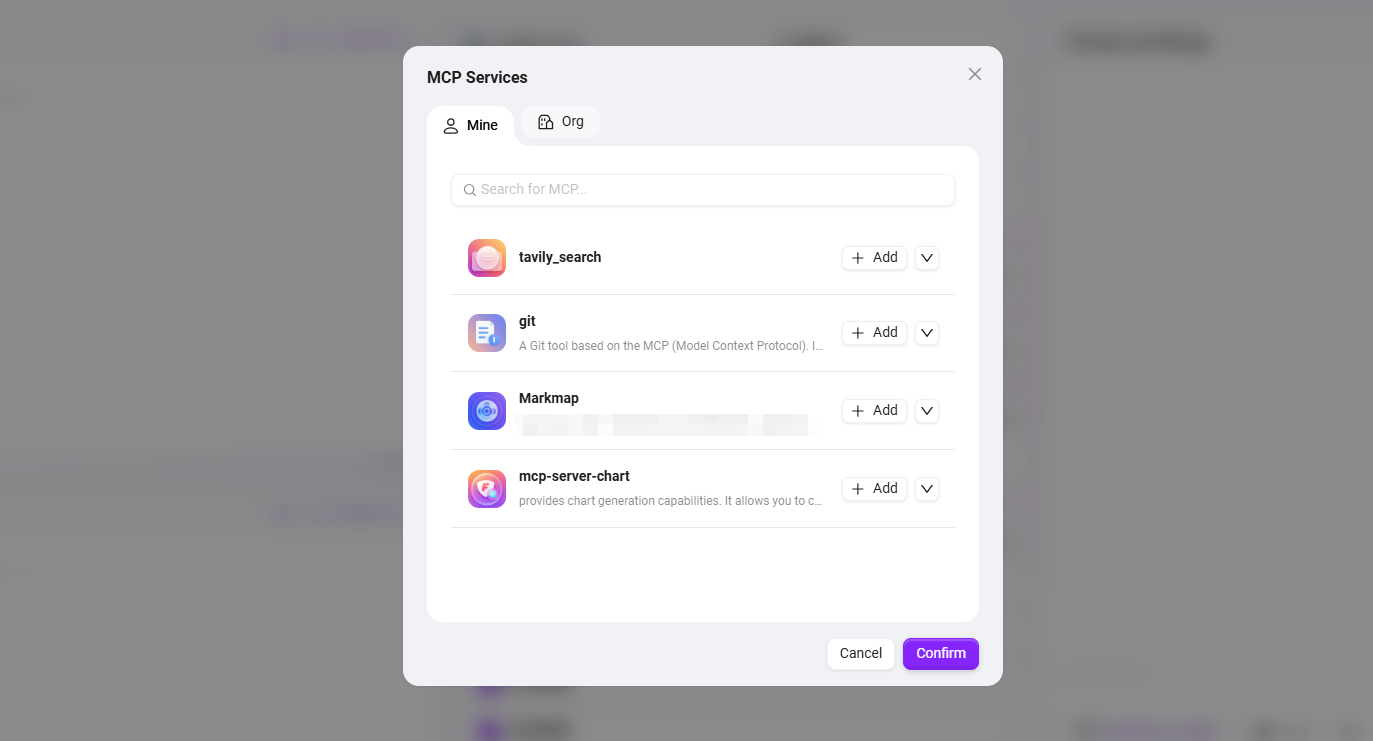
⑤ MCP Service
MCP Service manages the connection permissions between AI agents within the system and external tools/data sources.
- Purpose:
- Capability Extension: Grants agents external capabilities such as search, calculation, and visualization.
- Ecosystem Integration: Continuously integrates various tools and services to meet diverse needs.
- Internal Integration: Integrates internal system resources through personal MCP.
- Configuration Suggestion: When the number of configured MCP tools reaches or exceeds 5, the system will issue a prompt. Too many tools may cause the prompt to become too long, exceeding the model's context limit and affecting performance.
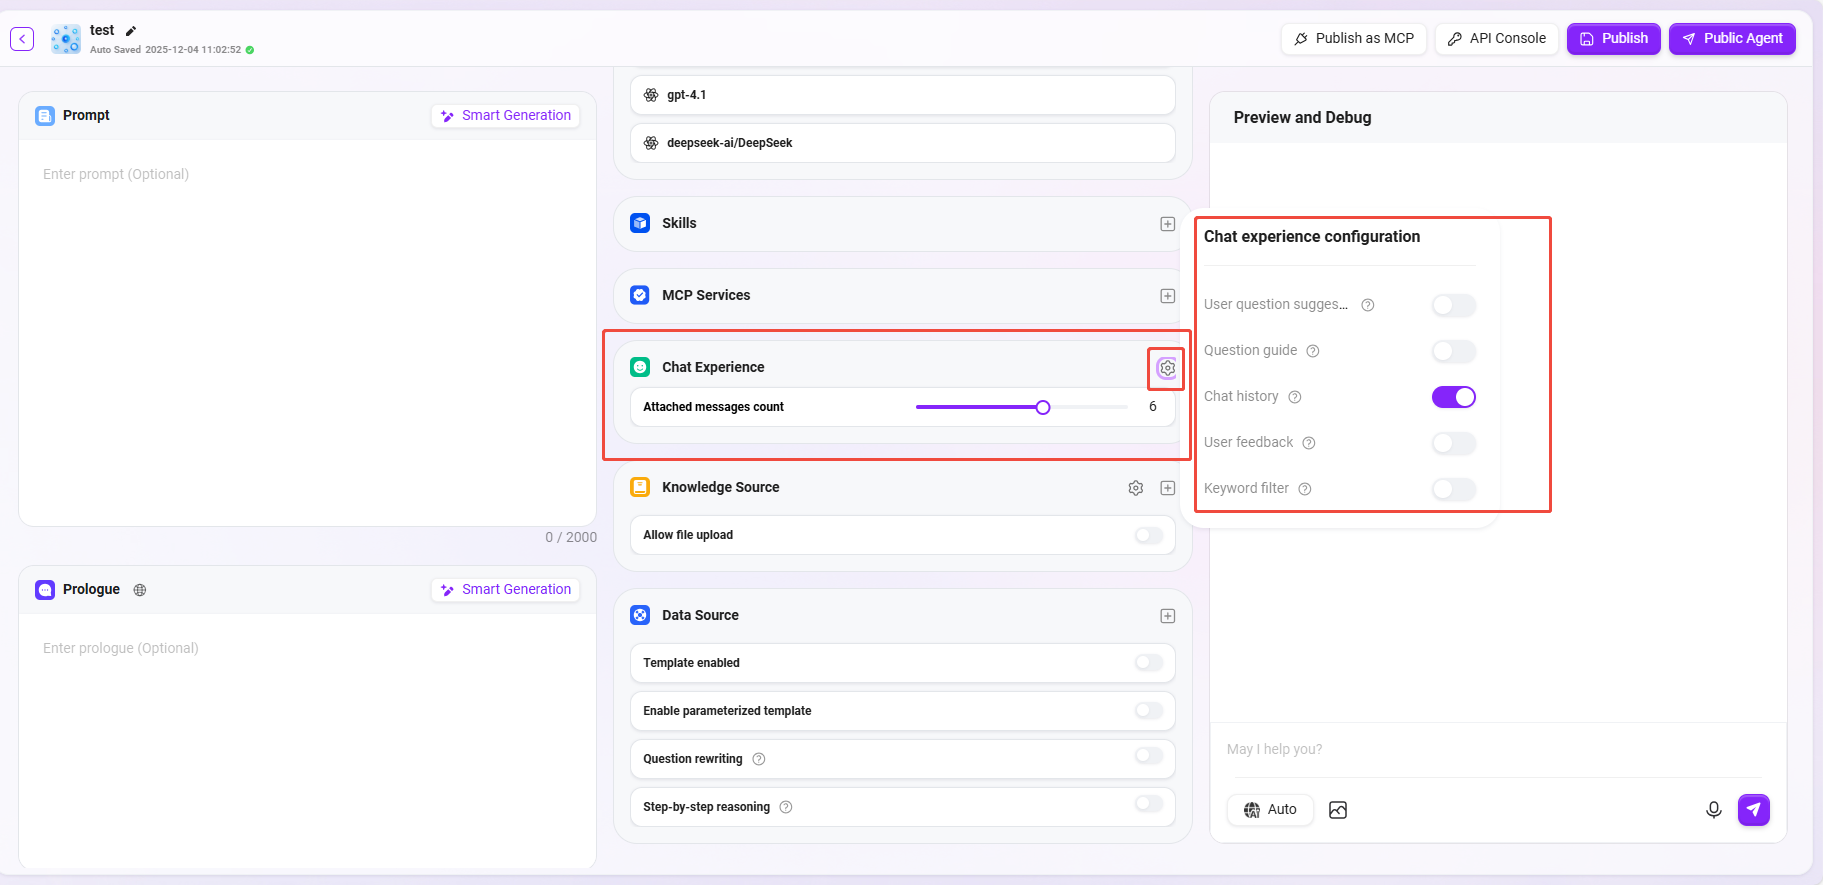
⑥ Conversation Experience
-
Context Memory Rounds: Set the number of historical conversation rounds the agent can remember (1-10 rounds). It is recommended to set it to 5 to balance conversation coherence and performance.
-
Conversation Settings: You can enable settings such as "User Question Suggestions, Question Guidance, Chat History, Conversation Feedback, Keyword Review", etc.
- User Question Suggestions: After the agent answers, provides the user with some question suggestions based on the previous context.
- Question Guidance: During user-agent conversations, provides relevant question guidance, using model capabilities to predict questions the user might ask and to complete user questions.
- Chat History: Whether to retain the agent's chat history. If turned off, the agent's chat history will be unavailable for viewing.
- Conversation Feedback: Allows interactive operations like liking or disliking the agent's answers to optimize agent responses.
- Enable Keyword Review: At least one of "Review Input Content" and "Review Output Content" must be enabled. Once enabled, both prompts and AI feedback results will be subjected to sensitive word detection. Sensitive words can be maintained in advance.
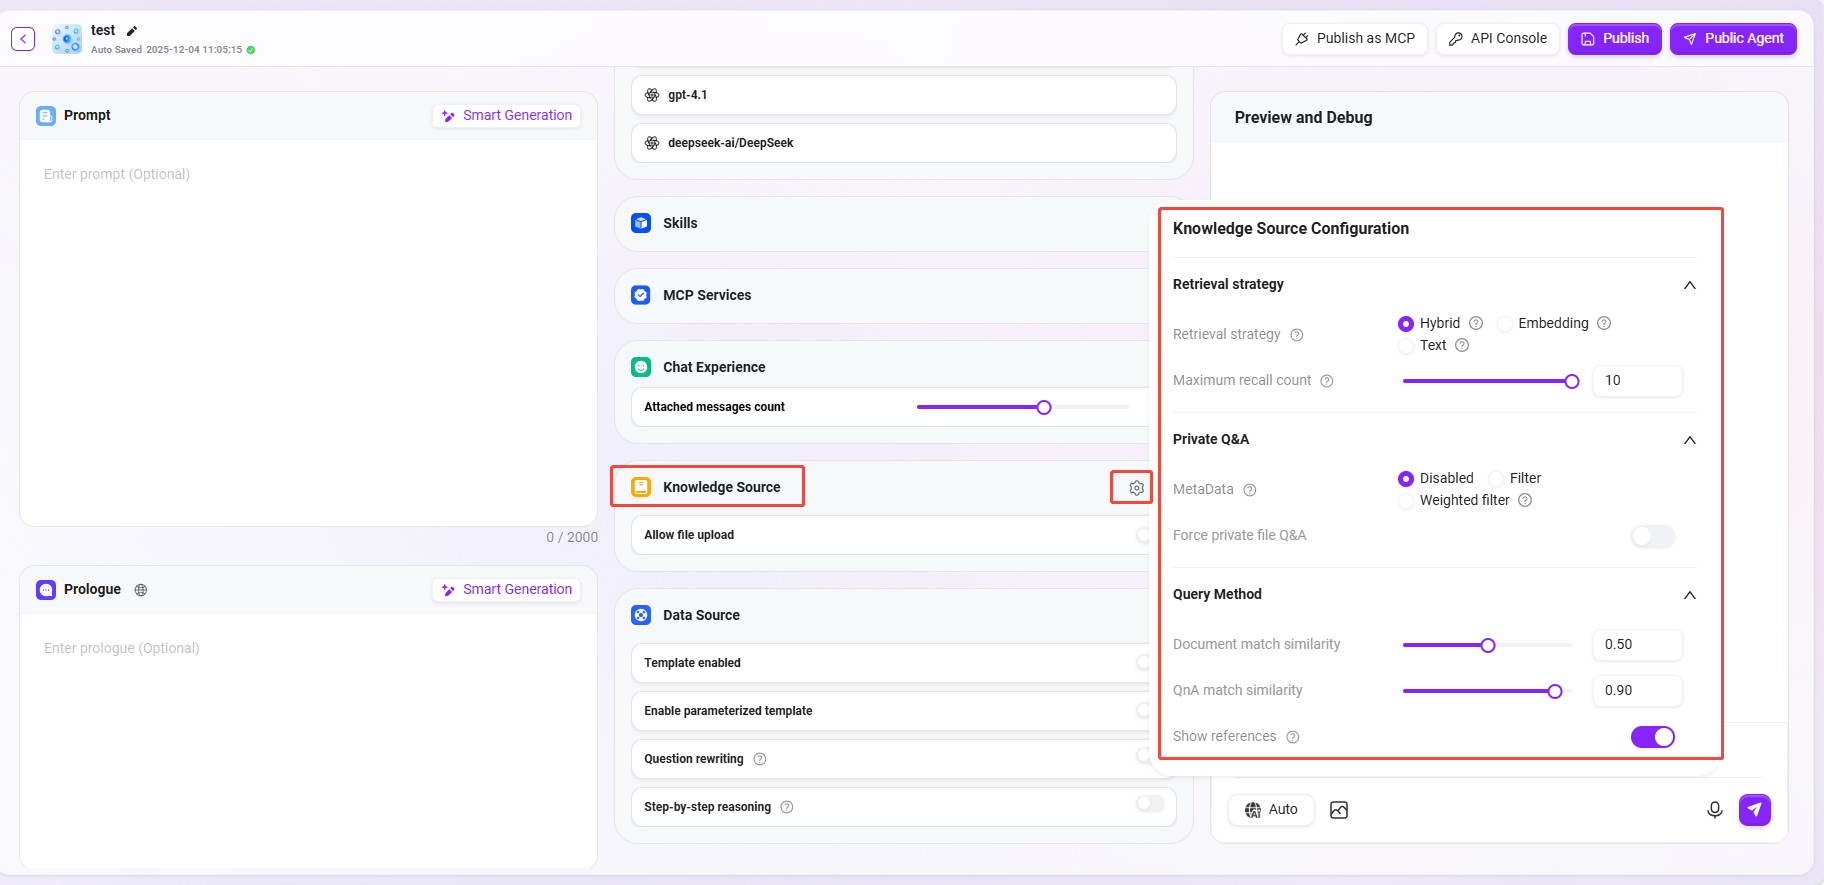
⑦ Knowledge Base
-
Knowledge Base: Click "+" to add a knowledge base (up to 5 knowledge bases can be added as knowledge sources).
-
Allow File Upload:
- When "Allow File Upload" is turned ON, you CANNOT add content from knowledge bases as knowledge sources.
- When "Allow File Upload" is turned OFF, you can selectively add knowledge bases from personal or org workspaces as knowledge sources.
-
Knowledge Base Configuration: You can modify detailed settings such as "Retrieval Strategy, Private Q&A, Retrieval Method", etc., for the knowledge base.
- Retrieval Strategy: Hybrid Search, Embedding Search, Text Search.
- Hybrid Search: Combines results from vector retrieval and full-text search, returning re-ranked results.
- Embedding Search: Finds segments via similarity, with some cross-language generalization capability.
- Text Search: Finds segments via keywords, suitable for retrieval containing specific keywords or noun segments.
-
Maximum Recall Count: Range 1–10. Not recommended to set too high or too low. Suggested value is 3–5.
-
MetaData: None, Filter, Weight.
-
Force Private File Q&A: When turned ON, the agent will not use web search or other skills; answers will be based solely on knowledge base content.
-
Document match similarity: Range 0–1. Higher similarity means the recalled document content is more similar. Suggested value is about 0.8 (i.e., 80%).
-
QnA match similarity: Range 0–1. Similar to document content matching similarity. Suggested value is about 0.9 (i.e., 90%).
-
Show references: When turned ON, the agent will list referenced sources when answering, improving answer credibility.
💡 Tip: Whether it's maximum recall count, document matching similarity, or QnA matching similarity, higher or lower is not necessarily better. It is recommended to set them according to actual needs. If there are no special requirements, it is recommended to keep the default values.
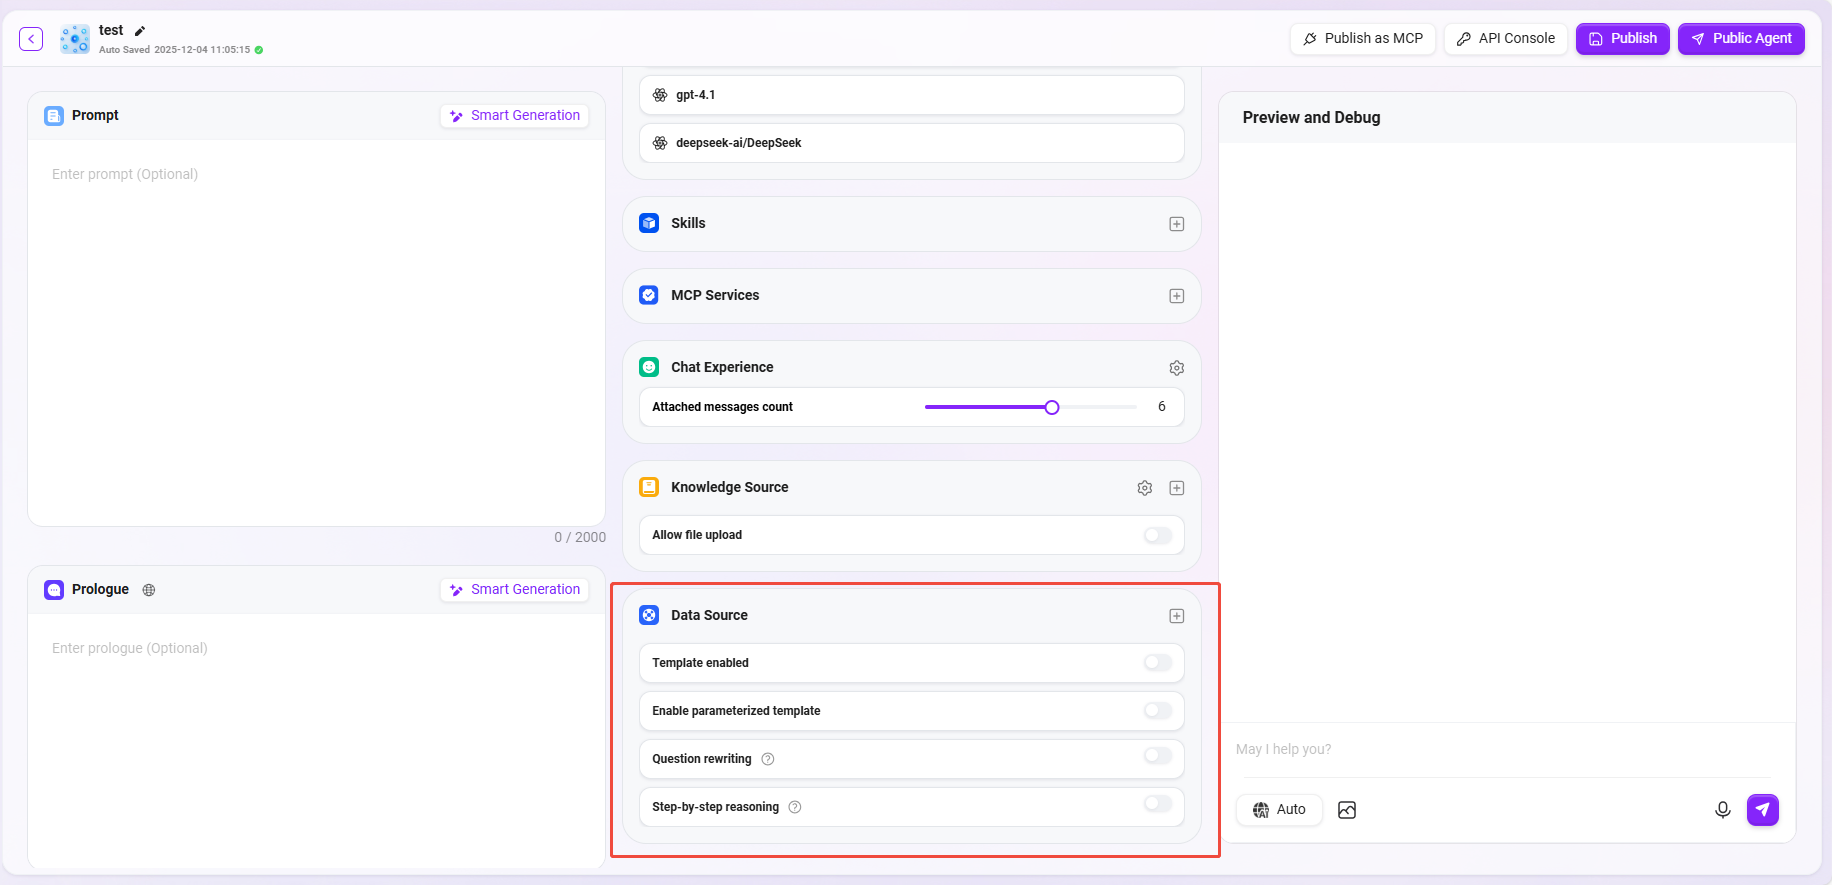
⑧ Data Source
-
Data Source: Click "+" to add a data source as the agent's Q&A data source (up to 5 data sources can be added).
-
Enable Templates: Whether to enable preset mapping templates between natural language and SQL.
- When a user inputs a natural language question (e.g., "
What was last month's sales?"), the system first tries to match a preset template. - If a matching template is found (e.g., a generic question like "
Query sales for a certain period"), it uses the existing SQL structure in the template as a reference, combined with specific fields/table names, to generate the final SQL statement.
- When a user inputs a natural language question (e.g., "
-
Enable Parameterized Templates: When turned ON, parameterized queries are enabled on top of templates, enhancing query flexibility and security.
-
Question Rewriting: When turned ON, the user's input question will be automatically optimized to ensure accurate data query.
- User's original question:
Check sales(incomplete information). - After rewriting:
Query total sales of all products in July 2024(supplements time and scope).
- User's original question:
-
Step-by-Step Reasoning: When this function is turned ON, before generating the final query result, the system will output detailed reasoning steps, explaining how it analyzed the problem and constructed the SQL query statement.
- Step 1: Identify keywords "
July 2024", "sales". - Step 2: Determine data table
Orders, fieldsorder_dateandsales_amount. - Step 3: Construct date range condition
2024-07-01to2024-07-31. - Step 4: Generate SQL.
- Step 1: Identify keywords "
-
Double Check: When turned ON, the model performs an accuracy check on the generated SQL. Temporarily not compatible with Claude series models.
⑨ Preview & Debug
- Function: Before publishing, you can conduct conversation tests with the agent here.
- Operation: Users can directly input questions in the preview conversation window to interact in real-time with the agent configured in the settings, verifying whether its prompt, knowledge base, skills, and other configurations meet expectations.
- Purpose: Ensure the agent's behavior is accurate before publishing, avoiding configuration errors that affect user experience.
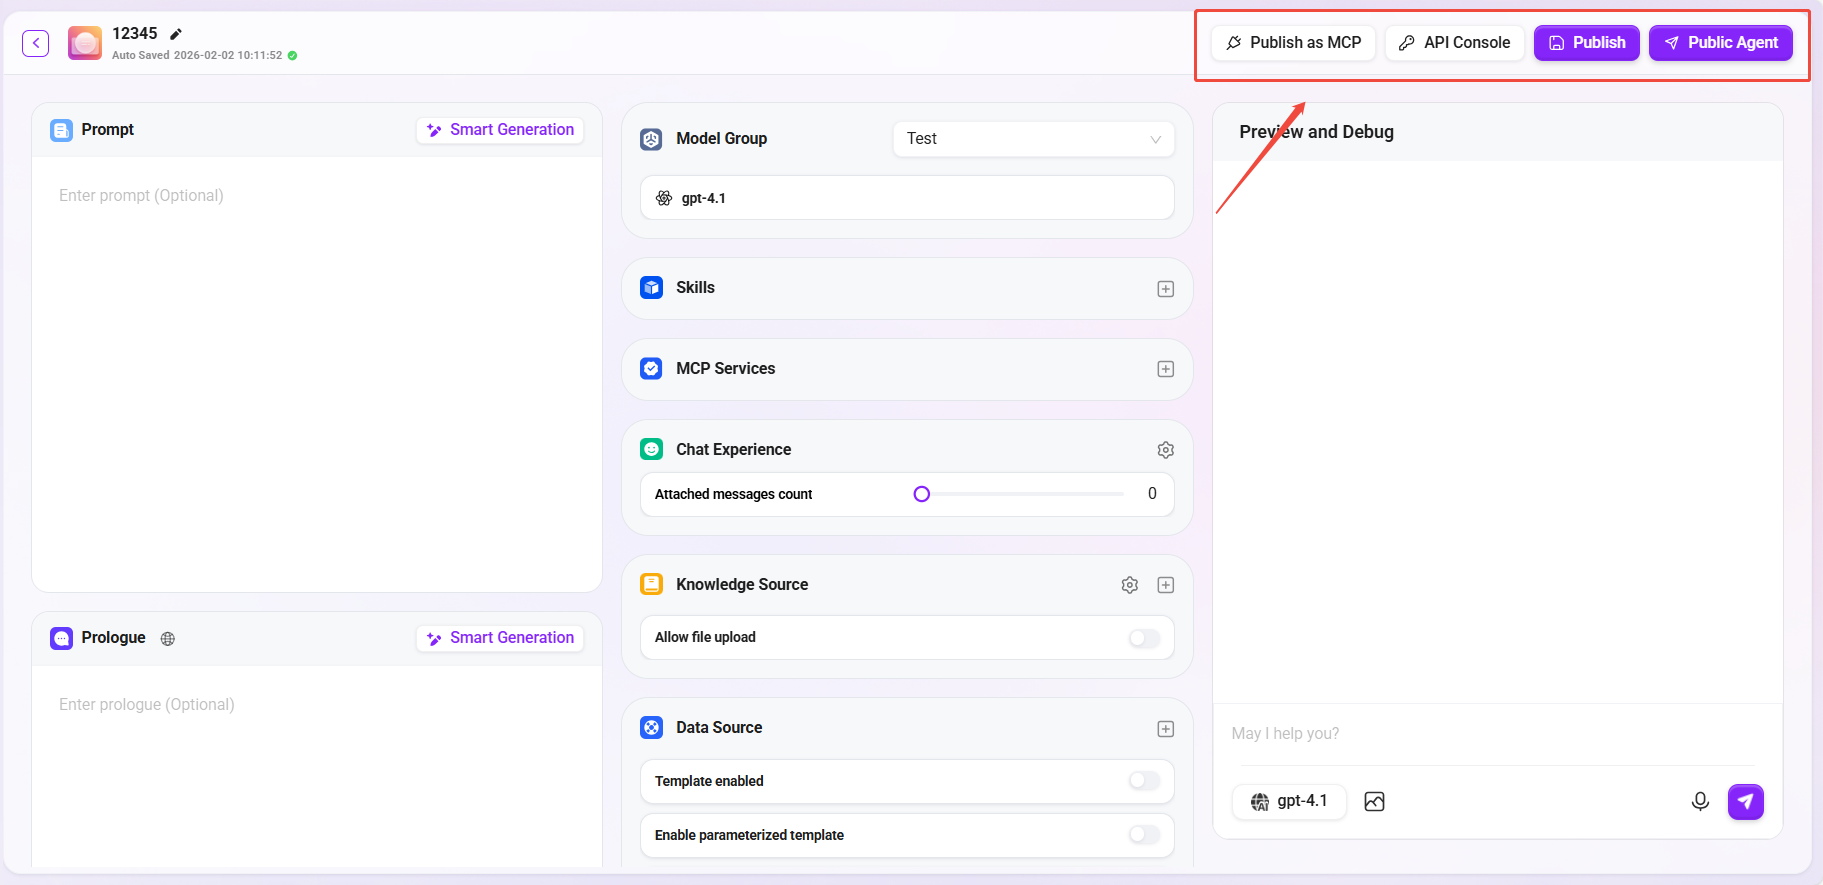
Publishing and Usage
After configuration is complete, you can choose to publish and complete the agent creation. "Publish to Agent" means publishing to the organization's agent library. You can also choose to publish as MCP, which can be accessed by another agent. In the API Console, you can view existing API channel names and API Key counts, and you can also add new channels.
After completing all configurations and passing preview debugging, you can publish the agent:
- Publish as MCP: The agent can be published as an MCP service so that it can be accessed and called by other agents.
- API Console: In the "API Console", you can view existing API channel names and API Key counts, and perform management operations such as adding new channels.
- Publish: After configuration and preview are correct, click Publish to save the configuration, and the agent can be officially put into use.
- Publish Agent: The agent can be published to the organization's agent library for team members to use.