MCP Connection Guide
This document provides a getting-started guide for connecting to and using MCP (Model Control Plane) on the SERVICEME platform. Whether you are a business user or a technical user, this guide will help you quickly get started with MCP.
Table of Contents
- What is MCP
- MCP Connection Types
- Method 1: Use an MCP Published by Your Organization
- Method 2: Create and Connect an External MCP Service
- Method 3: Publish an Agent as MCP
What is MCP
MCP (Model Control Plane) is the central module in AI Studio used to connect AI models with external systems. It enables Agents to:
- 🔌 Connect to external services: call third-party APIs and enterprise system interfaces
- 🛠️ Extend capabilities: add computing, search, data analysis, and other capabilities
- 🤝 Cross-system collaboration: enable data interaction across multiple systems
- 🔒 Security governance: centrally manage permissions and access control
Simply put, MCP is the key component that turns AI from "able to talk" into "able to act".
Typical MCP Application Scenarios
- Computing services: provide Agents with mathematical capabilities (addition, subtraction, multiplication, division, scientific computing, etc.)
- Search services: connect to web search engines, academic paper retrieval, and enterprise knowledge base search
- Data analysis: generate charts, execute data queries, and produce analytical reports
- Tool integration: integrate map services, translation services, file processing tools, etc.
- Business systems: connect to internal enterprise systems such as CRM, ERP, and databases
MCP Connection Types
Depending on the source of the MCP and how it is configured, the following connection types are available:
| Connection Type | Applicable Scenario | Difficulty | Configuration Requirement | Recommended Users |
|---|---|---|---|---|
| Organization MCP | Use services already configured by the team | ⭐ Easy | No configuration required, just select directly | All users |
| External Service MCP | Connect to third-party APIs or self-built systems | ⭐⭐⭐ Medium | JSON configuration required | Technical users |
| Agent to MCP | Publish an existing Agent as MCP | ⭐⭐ Easy | Publishing permission required | Authorized users |
Selection recommendations:
- If this is your first time using MCP, it is recommended to start with Organization MCP
- If you need to connect to a specific external service, choose External Service MCP
- If you want to share a mature Agent with your team, use Agent to MCP
Method 1: Use an MCP Published by Your Organization
This is the simplest method and is suitable for all users to get started quickly.
Applicable Scenarios
- Your team has already configured commonly used MCP services
- You only need to use ready-made capabilities without configuring them yourself
- Quickly add specific capabilities to an Agent
Steps
1. Go to the Agent configuration page
- In AI Studio, open the Agent to which you want to add MCP capabilities
- Click the "Configure" or "Edit" button in the upper-right corner
- Find the "MCP Services" section on the configuration page
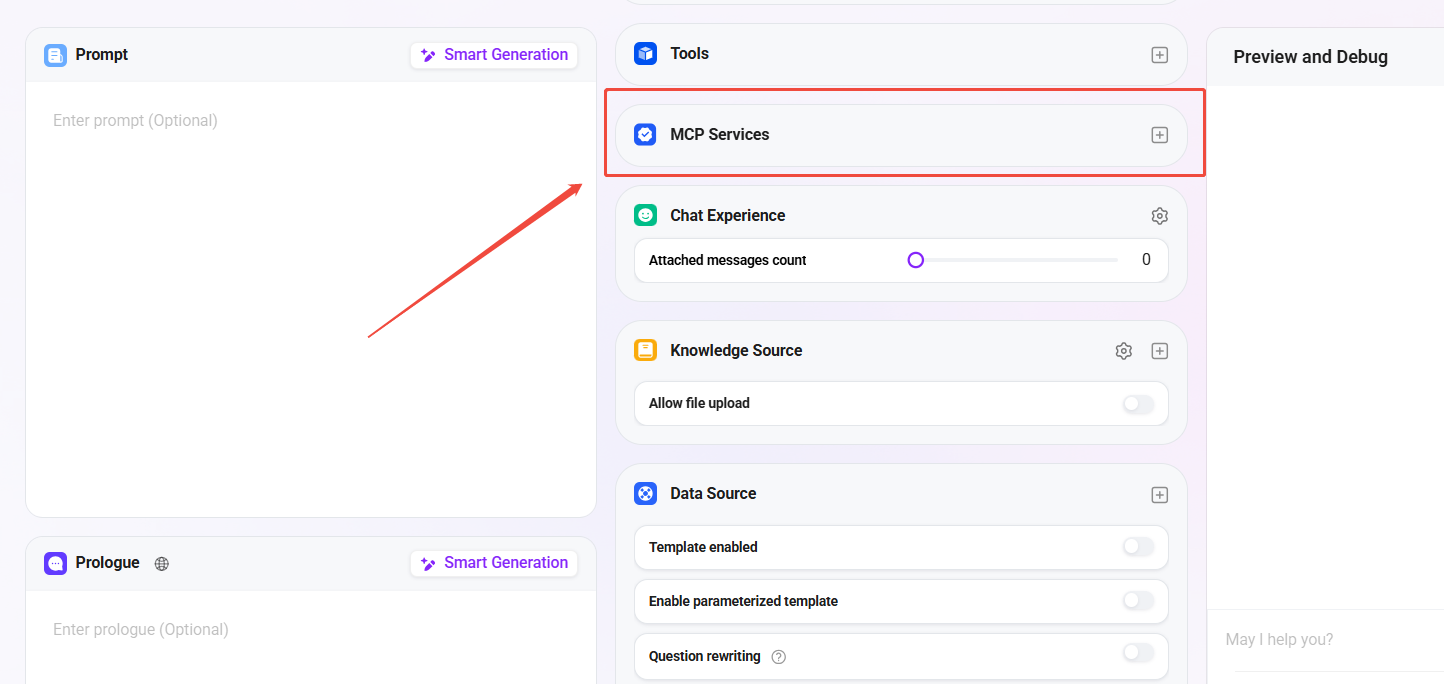
2. Select an MCP service
- Click the "Add MCP" or "Select MCP" button
- Browse the list of MCPs published within the organization
- You can filter and search in the following ways:
- By category: computing services, search services, data analysis, tool integration, etc.
- By name: search for a specific MCP name
- By function: view the specific tools provided by the MCP
Search tips:
- Use the search box to quickly locate a specific MCP
- Check the MCP description to understand its functions and use cases
- Review the list of tools provided by the MCP to confirm whether it meets your needs
3. Enable MCP tools
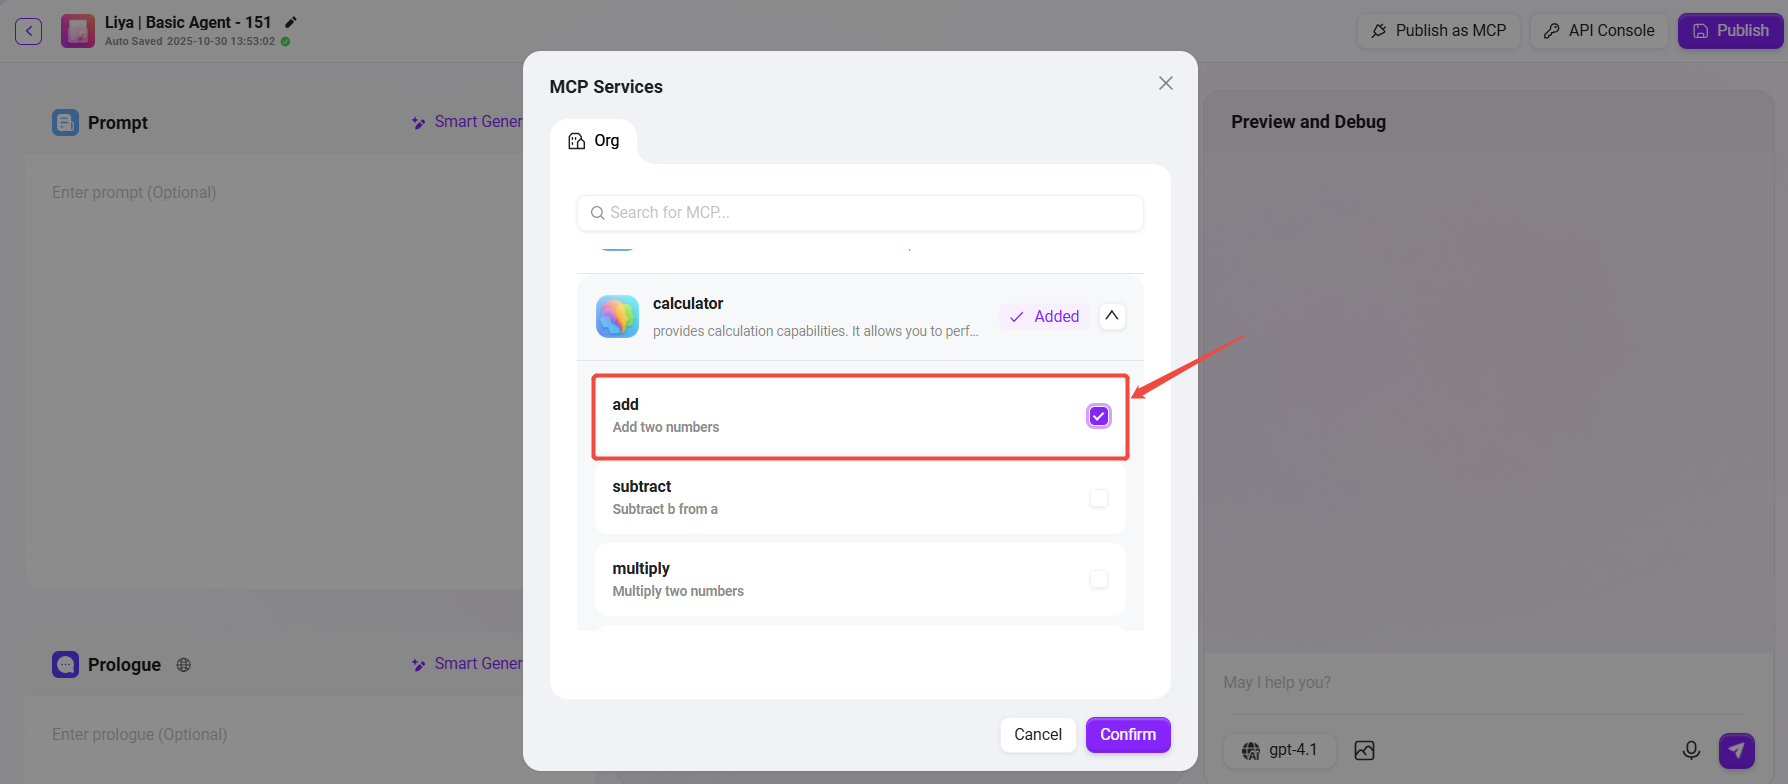
- After selecting the required MCP, the system will display all tools provided by that MCP (Tools)
- Check the specific tools you want to enable
- For example, in the calculator MCP, you can choose:
add(addition)subtract(subtraction)multiply(multiplication)divide(division)
- For example, in the calculator MCP, you can choose:
- Click "Confirm" to add
Notes:
- Enable only the tools you need to avoid adding too many unnecessary capabilities to the Agent
- Some MCPs may require administrator authorization before they can be used
- Review the parameter requirements of the tools to understand how to use them correctly
4. Save and publish
- After completing the MCP configuration, click the "Save" button in the upper-right corner
- Click "Publish" to make the changes take effect
- The Agent can now use the capabilities of the selected MCP
Usage Examples
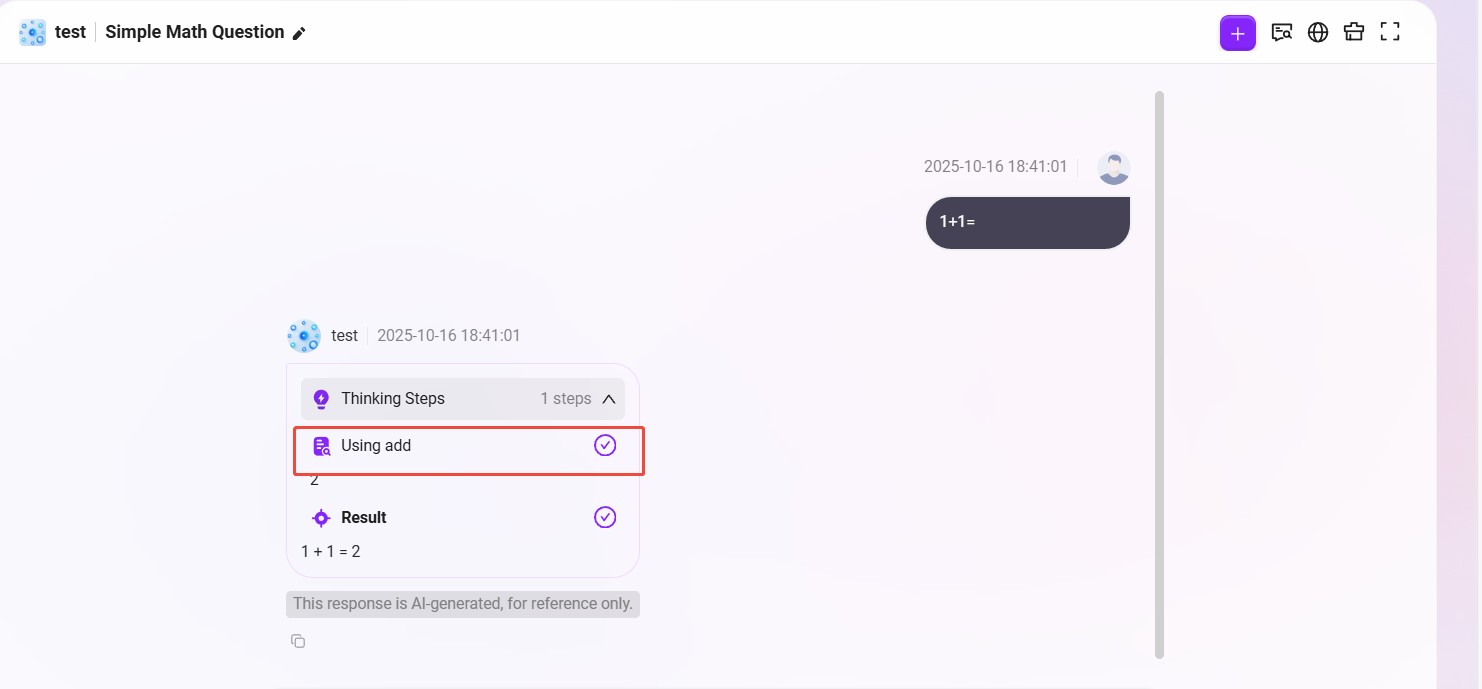
After configuration is complete, when chatting with the Agent, the Agent will automatically call the corresponding MCP tools:
Example 1: Using the calculator MCP
User: Help me calculate 1234 + 5678
Agent: [Calls the add tool of the calculator MCP]
       1234 + 5678 = 6912
Example 2: Using the search MCP
User: Search for the latest artificial intelligence news
Agent: [Calls the search tool of the search MCP]
       Based on the search results, here is the latest artificial intelligence news...
Example 3: Using the weather MCP
User: What's the weather like in Beijing today?
Agent: [Calls the getCurrentWeather tool of the weather MCP]
       Beijing is cloudy today, with a temperature of 15-25°C and good air quality.
The system will display an MCP invocation indicator, showing that the Agent used external tools to complete the task.
Frequently Asked Questions
Q: How do I know which MCPs are available in the organization?
A: You can browse all MCPs published by the organization in the MCP selection interface. It is recommended to ask your team administrator or check internal documentation.
Q: Why can't I see some MCPs?
A: It may be due to permission restrictions. Please contact the administrator to assign the appropriate access permissions.
Q: Can multiple MCPs be used at the same time?
A: Yes. An Agent can use multiple MCPs simultaneously to achieve more complex functional combinations.
Q: How do I remove an MCP that has already been added?
A: Go to the Agent configuration page, find the corresponding MCP in the MCP Services section, and click "Remove" or uncheck it.
Method 2: Create and Connect an External MCP Service
This is suitable for users with a technical background and allows connection to custom external services or third-party APIs.
Applicable Scenarios
- You need to connect to internally built systems within the organization
- You want to use a specific third-party API service
- Existing MCPs cannot meet special requirements
Prerequisites
Before you begin, please make sure you have:
✅ Basic technical knowledge
- Understand basic JSON format and syntax
- Be familiar with basic command-line concepts (such as commands like node and python)
✅ Service information
- Have the API documentation for the service you want to connect to
- Know the service access address and port
- Understand the service invocation method and parameter requirements
✅ Authentication credentials
- Have access permission to the service
- Possess an API Key, Token, or other authentication information
- Confirm the authentication method (such as OAuth, API Key, etc.)
Steps
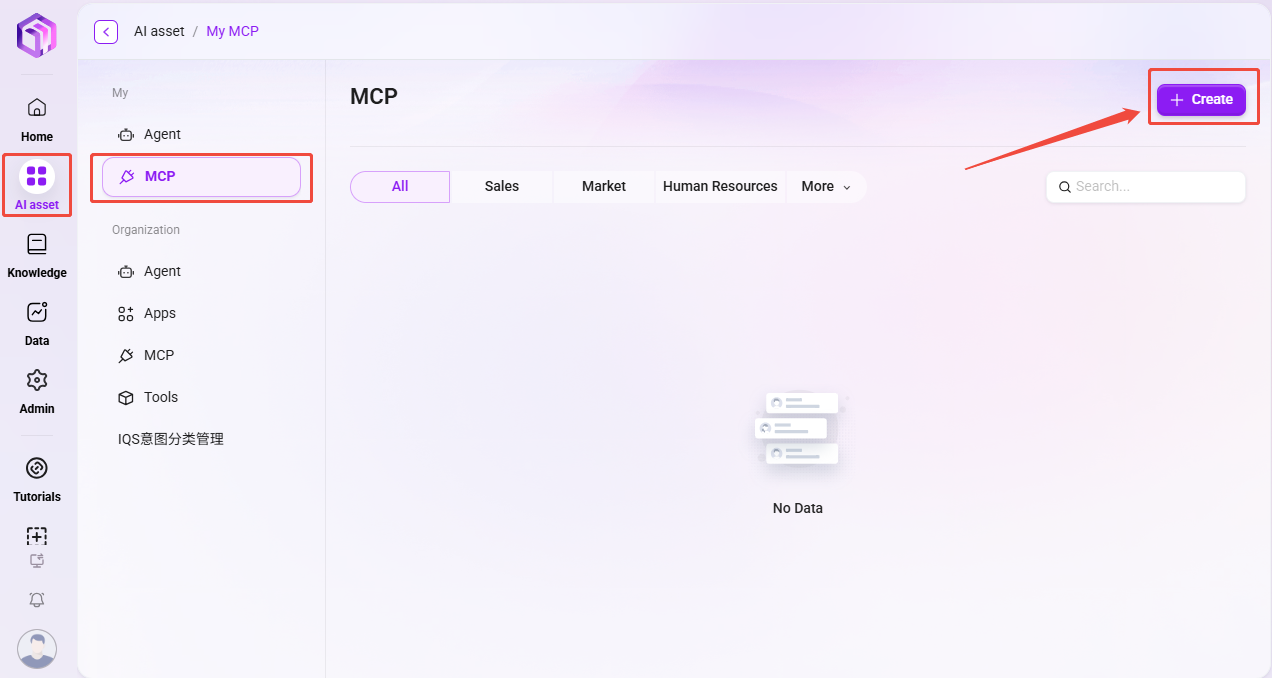
1. Create a new MCP
- In the left navigation bar of AI Studio, click "MCP"
- Click the "Create" button in the upper-right corner
- Enter the MCP creation interface
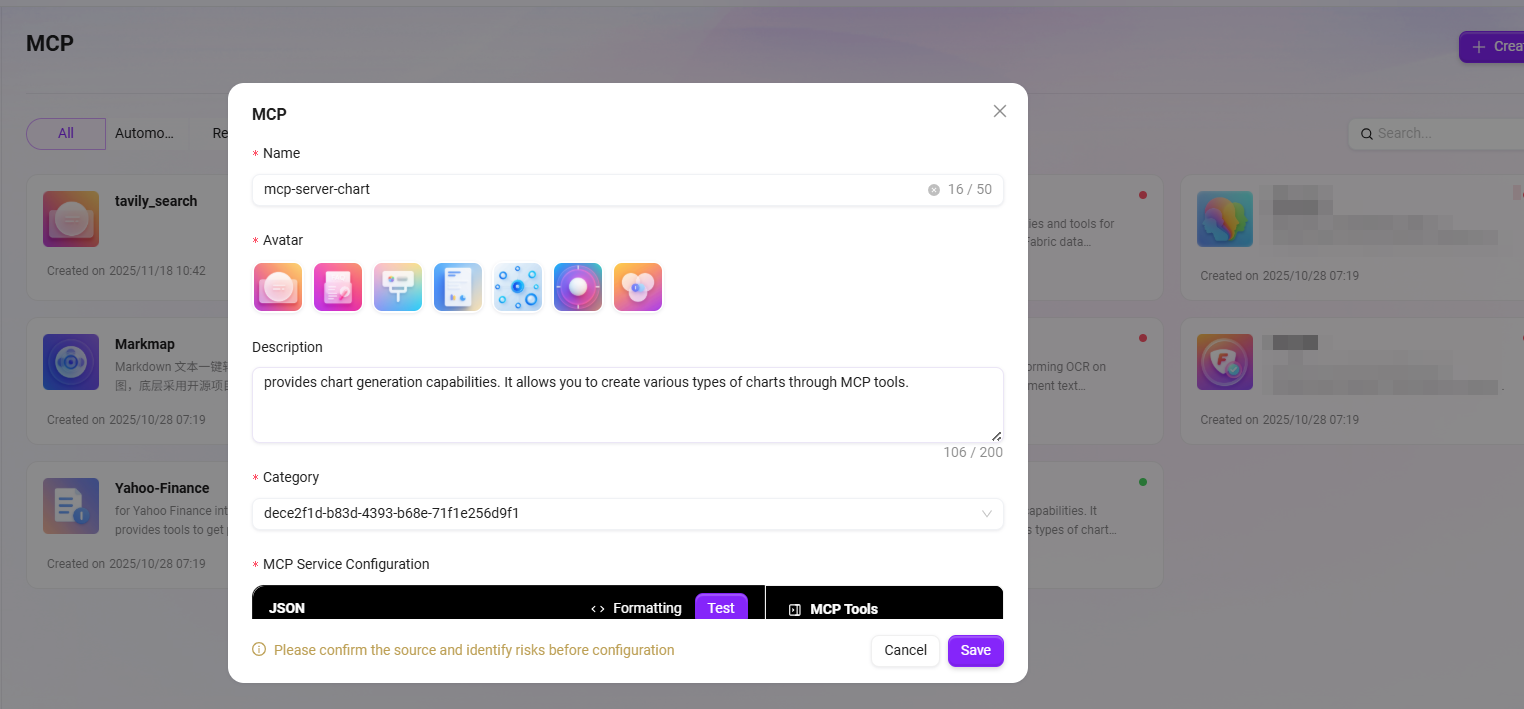
2. Fill in the basic information
MCP Name (Required)
- Set a clear and recognizable name for the MCP
- Recommended format:
[service-type]-[function-description] - Examples:
weather-api- weather query servicecrm-system- CRM system integrationtranslation-service- translation servicedatabase-query- database query tool
- Limit: within 50 characters
MCP Avatar (Optional)
- Select one from the default avatars provided by the system
- Choosing an icon related to the service type helps with identification
- Custom upload is not supported at this time
MCP Description (Required)
- Describe in detail the functions, purpose, and application scenarios of the MCP
- Explain what service it connects to and what capabilities it provides
- Help other users understand when to use this MCP
- Example:
Connects to a weather query API and provides real-time weather queries,
weather forecasts, air quality queries, and other functions. Supports major cities worldwide.
Suitable for scenarios such as customer service and travel planning that require weather information. - Limit: within 200 characters
MCP Category (Required)
- Select the most appropriate category for easier management and search later
- Available categories:
- Computing services: mathematical computation, data processing, etc.
- Search services: information retrieval, web search, etc.
- Data analysis: report generation, data visualization, etc.
- Tool integration: maps, translation, file processing, etc.
- Other: services that do not belong to the above categories
3. Configure the MCP service
This is the most critical step and requires filling in the service configuration in JSON format.
Basic configuration structure:
{
  "mcpServers": {
    "服务名称": {
      "command": "启动命令",
      "args": ["参数1", "参数2"],
      "env": {
        "API_KEY": "你的API密钥",
        "BASE_URL": "服务基础URL"
      }
    }
  }
}
Configuration field descriptions:
| Field | Required | Description | Example |
|---|---|---|---|
mcpServers | ✅ | Root object of the MCP service | - |
服务名称 | ✅ | Define a unique identifier for the service | "calculator", "weather" |
command | ✅ | Command to start the MCP service | "node", "python", "npx" |
args | ✅ | Array of parameters passed to the command | ["script.js", "--port", "3000"] |
env | ⚪ | Environment variable configuration | {"API_KEY": "xxx"} |
Simple example - calculator service:
{
  "mcpServers": {
    "calculator": {
      "command": "npx",
      "args": [
        "-y",
        "@modelcontextprotocol/server-calculator"
      ]
    }
  }
}
The meaning of this configuration:
- Create an MCP service named "calculator"
- Run it using the
npxcommand - The parameter
-ymeans automatically confirm installation - The parameter
@modelcontextprotocol/server-calculatoris the npm package to run
4. Save the configuration
- Carefully check whether the JSON format is correct
- Make sure all commas, quotation marks, and brackets match
- Confirm there is no extra or missing punctuation
- Click the "Save" button
- The system will validate the JSON format and prompt you to make corrections if there are errors
Common formatting errors:
- ❌ Missing comma:
"key1": "value1" "key2": "value2" - ✅ Correct:
"key1": "value1", "key2": "value2" - ❌ Extra comma:
["item1", "item2",] - ✅ Correct:
["item1", "item2"]
5. Test the MCP
After saving, it is recommended to test immediately whether the MCP is working properly:
- Click the "Test" button
- Check whether the "MCP Tools" list is displayed on the right side
- Confirm that all expected tools have been loaded successfully
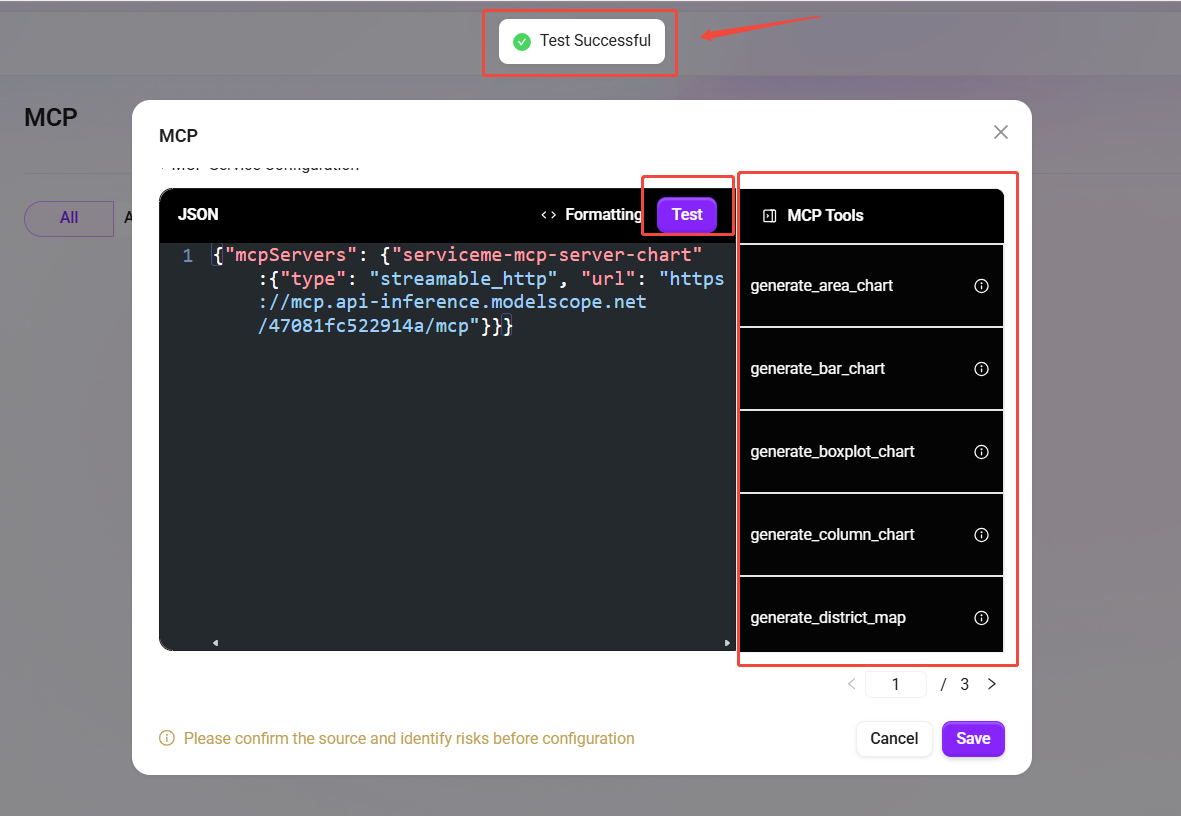
If the test fails, please check:
- Whether the JSON configuration is correct
- Whether the command and parameters are valid
- Whether the network connection is working properly
- Whether the API key is correct (if required)
Configuration Examples
To help you better understand the configuration, here are several commonly used examples:
Example 1: MCP using an npm package
{
  "mcpServers": {
    "calculator": {
      "command": "npx",
      "args": ["-y", "@modelcontextprotocol/server-calculator"]
    }
  }
}
Example 2: MCP with environment variables
{
  "mcpServers": {
    "weather": {
      "command": "node",
      "args": ["path/to/weather-service.js"],
      "env": {
        "API_KEY": "your_api_key_here",
        "BASE_URL": "https://api.weatherapi.com/v1"
      }
    }
  }
}
Example 3: MCP for a Python service
{
  "mcpServers": {
    "data-analysis": {
      "command": "python",
      "args": ["analysis_server.py"],
      "env": {
        "DATA_SOURCE": "database",
        "LOG_LEVEL": "info"
      }
    }
  }
}
Method 3: Publish an Agent as MCP
This is suitable for users who already have a mature Agent. You can package its capabilities as an MCP so that other members within the organization can call it directly without repeated configuration.
Applicable Scenarios
- You have already created a fully functional Agent and want to share its capabilities with the team
- You need to standardize specific agent capabilities (such as automated reporting, knowledge retrieval, process approval, etc.)
- You want other Agents to be able to directly call the current Agent's functions
Prerequisites
Before you begin, please make sure:
✅ A personal Agent has been created and fully configured
✅ The Agent's functions have been thoroughly tested and run stably
✅ If you need to publish it as an organization-level MCP, you must have permission to make the Agent public as an organizational agent
Steps
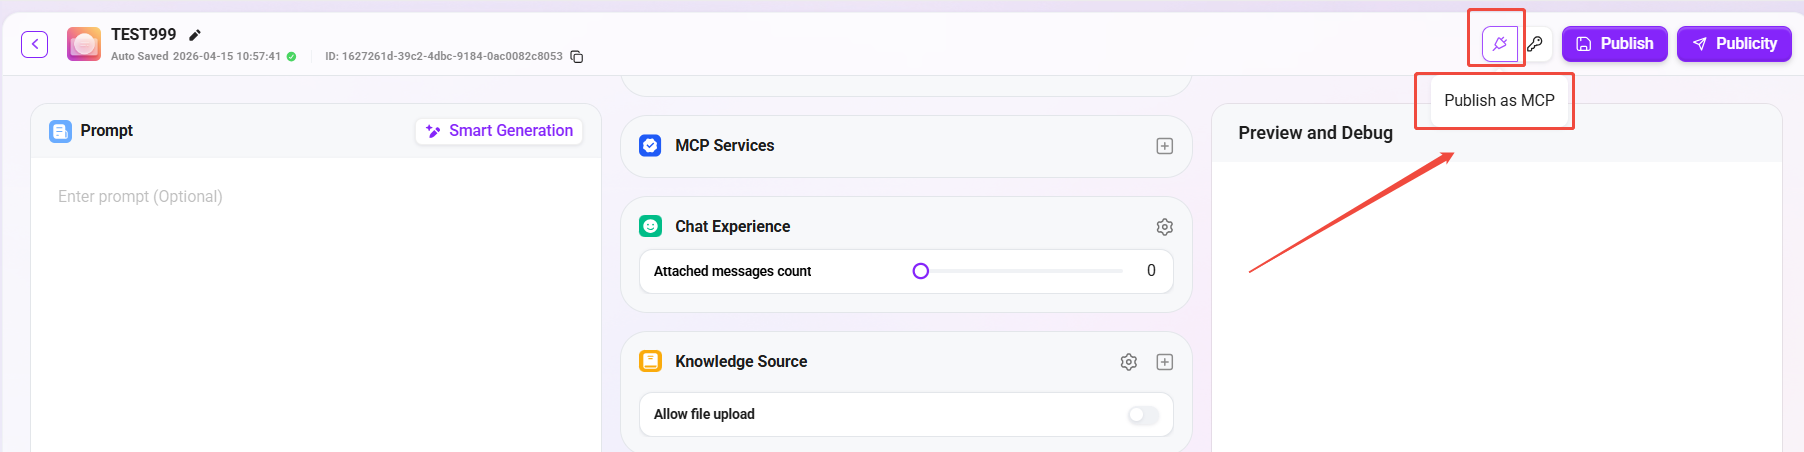
1. Go to the Agent configuration page and click Publish as MCP
- Open the Agent you want to publish in AI Asset
- Click the MCP icon button (plug-shaped icon) in the upper-right corner
- Select "Publish as MCP" from the dropdown menu
2. Confirm publishing
- The system will pop up a confirmation dialog to confirm the publishing information
- After confirmation, the Agent will automatically generate a corresponding MCP and it will appear on the AI Asset → My → MCP page
- At this point, the MCP status is Available, but it is for personal use only
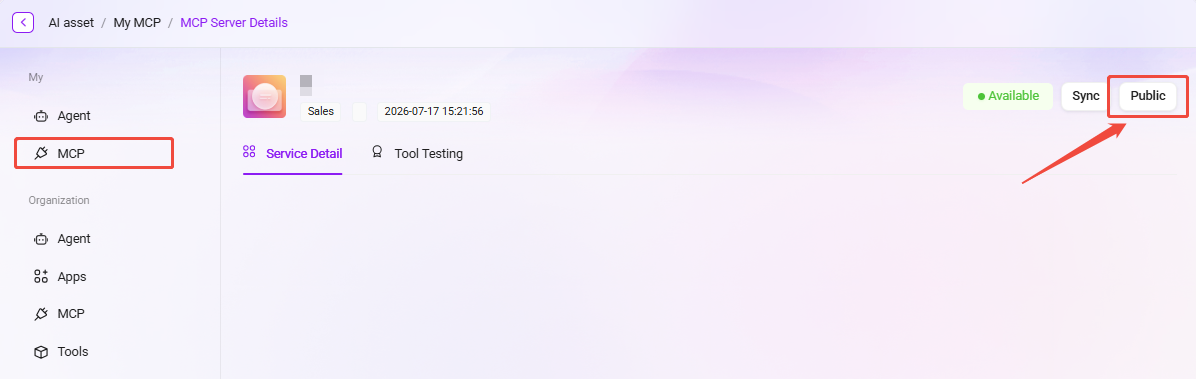
3. Make it public as an organization MCP (optional)
If you want other members in the organization to also use this MCP, you need to make it public:
- Go to the AI Asset → My → MCP page
- Find the MCP you just published and click to enter the details page
- Click the "Public" button in the upper-right corner
- After confirmation, the MCP will appear in the organization's MCP list for all members to use
Usage Instructions
After successful publishing, other users can find and use this MCP under the Org tab by following the steps in Method 1.
Notes:
- After an Agent is published as an MCP, it will not affect the normal use of the original Agent
- If the configuration of the original Agent changes (such as updates to the Prompt, tools, etc.), it is recommended to republish it to ensure the MCP stays synchronized with the Agent
- After making it public as an organization MCP, please ensure the Agent is sufficiently stable to avoid affecting other members' usage
Frequently Asked Questions
Q: After publishing as MCP, can the original Agent still be used normally?
A: Yes. Publishing as MCP is an independent operation and will not affect any functions of the original Agent.
Q: How do I cancel public access and change the MCP back to personal-only visibility?
A: Go to the MCP details page, click the settings next to the "Public" button, and change the visibility scope back to private.
Q: After the Agent is updated, will the published MCP be synchronized automatically?
A: It will not be synchronized automatically. You need to perform the "Publish as MCP" operation again to update the MCP content.