Workflow Creation Agent
Select Agent Type
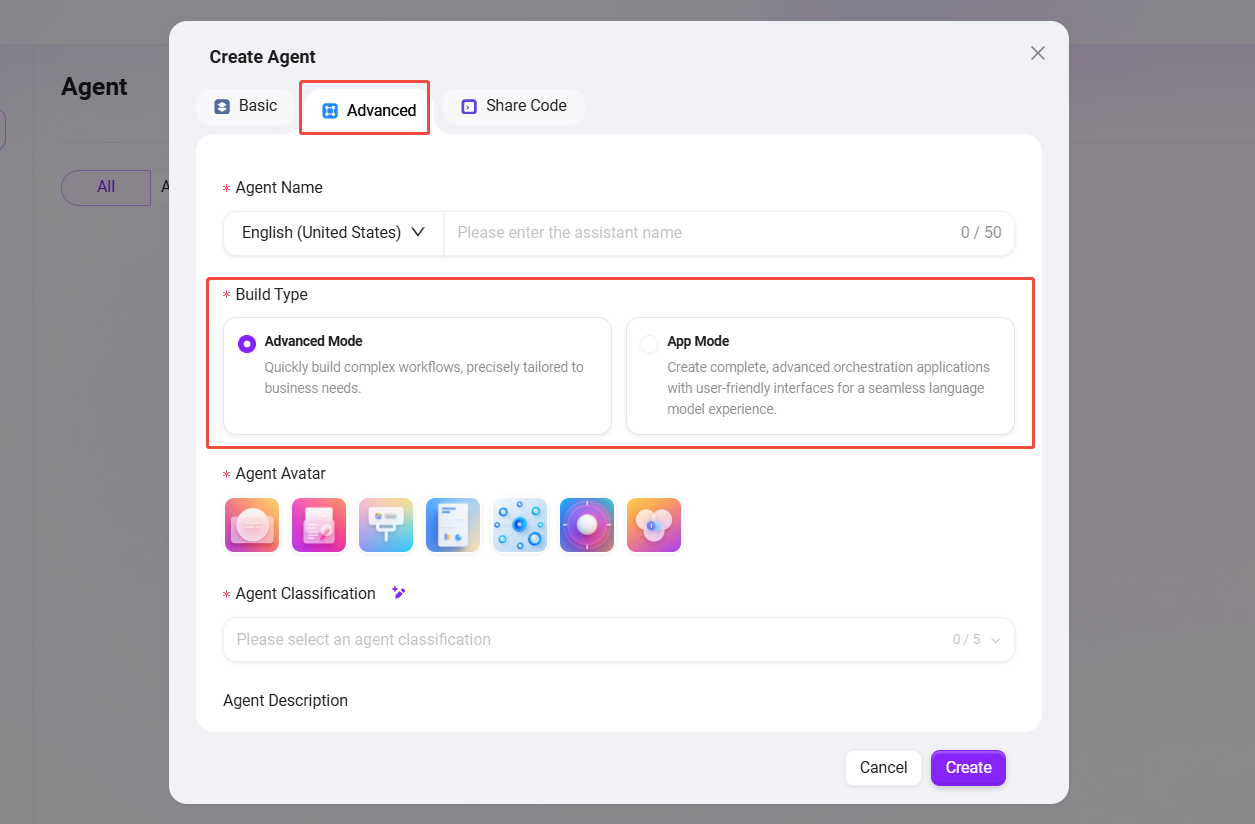
When creating an agent, select "Advanced Orchestration" (the initial creation steps are the same as for a regular agent).
- Applicable Agent Scope: Two core modes are provided to meet business needs of different complexity levels.
- Advanced Mode: Quickly build complex conversation-based workflows.
- Application Mode: Create complete, advanced orchestration applications with a user-friendly interface for a smooth large language model interaction experience.
Advanced Mode
A Q&A-style agent enhanced on top of a basic agent, with core capabilities focused on multi-turn conversations and knowledge Q&A.
Features:
- Natural language conversation is the primary interaction method.
- Suitable for business scenarios that require flexible, open-ended conversational interaction.
Typical Scenarios:
- Internal enterprise knowledge Q&A agents
- Product FAQ and technical support assistants
- Ticket handling consultation agents
Application Mode
Used to build Agent orchestration applications with UI, featuring a specific input structure for completing specific tasks. It is not primarily based on free-form conversation, but instead focuses on executing predefined task workflows.
Features:
- Has a fixed, customizable input interface (such as file uploads and form fields).
- Focuses on executing an automated or semi-automated task workflow.
- Supports complex input types such as files and structured data (Structured Data), making it suitable for business scenarios requiring strict input and output formats.
Typical Scenarios:
- Contract review App (upload contract → automatically mark risks)
- Document analysis App (upload document → automatically generate key content)
- Data cleaning App (upload Excel → automatically process data)
Configure Workflow
Configure the workflow by dragging, dropping, and connecting the following nodes according to the user's actual business logic:
- Start, End: Default input and output modules of the workflow, supporting custom input parameters and output fields;
- Model: Select the required large language model, receive variables passed from other modules, edit prompts and define output messages, and save them as variables;
- Knowledge Base Retrieval: In the selected knowledge base, recall and return the best-matching information based on input variables;
- Tool: Select one built-in tool to perform input and output operations through that tool;
- Script: Customize and create code functions based on output variables from other modules;
- Selector: Determine the workflow branch direction based on configured conditions to implement logical judgment;
- Intent Recognition: Used to recognize the intent of user input and match it with preset intent options;
- Text Formatter: Used to process the format of multiple string-type variables;
- Data Source: Specify the data source to expand the range of variable content available for reference in the workflow;
- File Retrieval: Search within uploaded files and find relevant answers based on the input question;
- Loop: Repeatedly execute a set of tasks for each item in a list, with optional parallel processing;
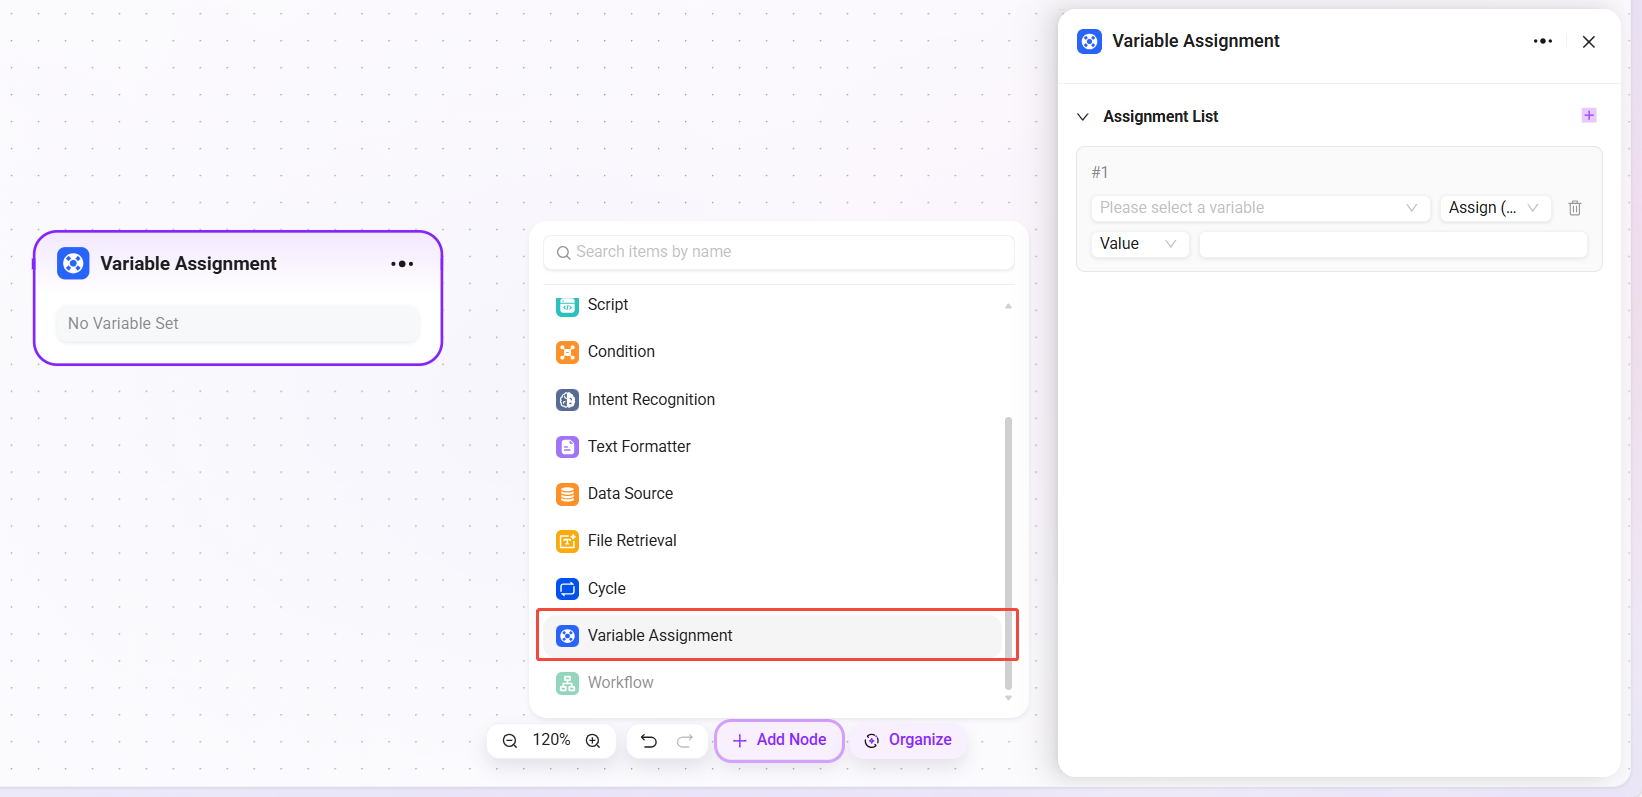
- Variable Assignment: Assign or update defined variables for passing and modifying data between workflow nodes.
- Workflow: Reference and invoke other configured workflows to achieve modular nesting and reuse.
Detailed Node Introduction
- Node Quantity Limit: The maximum total number of nodes in a single workflow is 100, and the maximum number of nodes inside a loop node is 1000.
- Global Note: You must first connect the preceding node before you can select variables from other nodes as input for the current node. This rule applies to all nodes that need to reference outputs from preceding nodes.
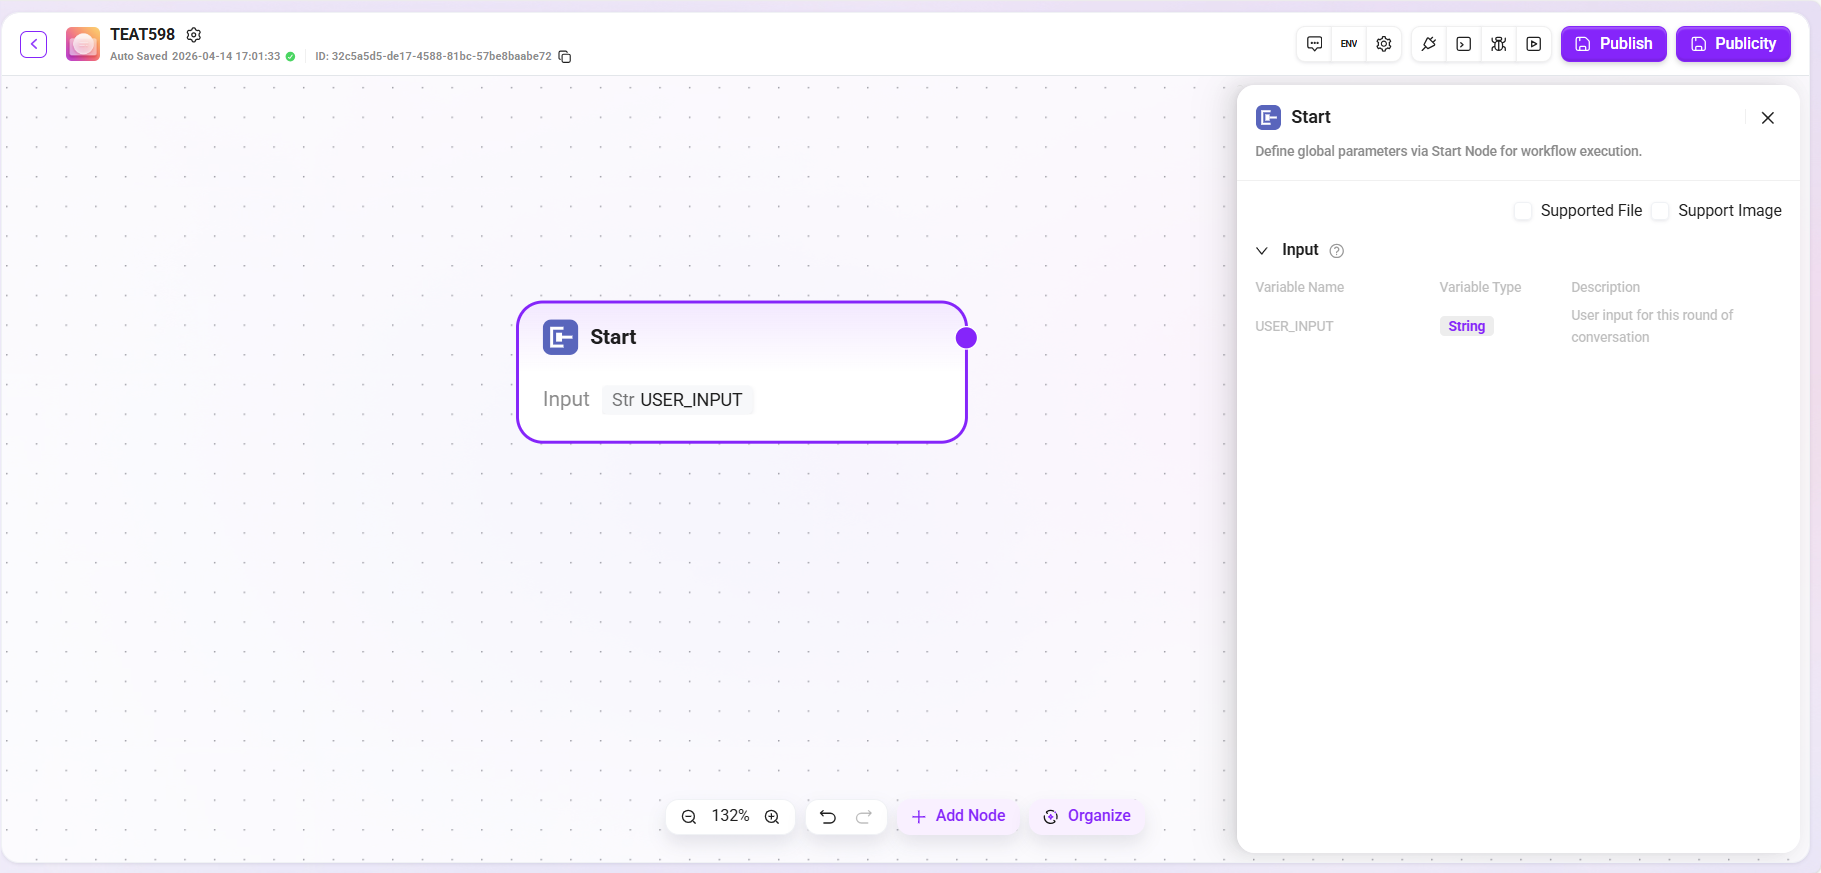
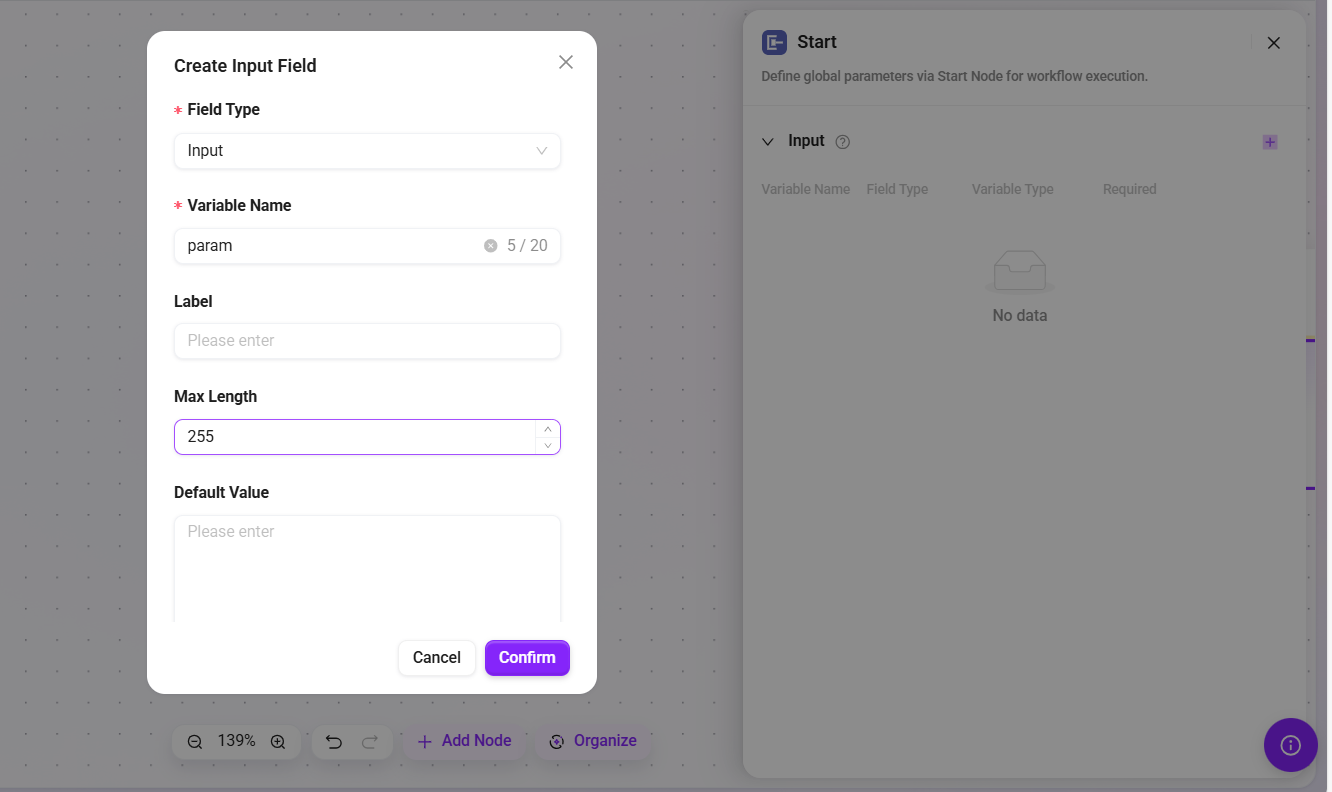
Start
The Start node is the starting node of the workflow, used to configure global parameters for workflow execution, and supports custom selection of input images and files.
- Function: Preset the basic information (input parameters) required to complete the task. When the trigger conditions are met, the system automatically collects and passes these parameters to start the workflow.
- Processing Logic: Pass-through transmission, passing the input content as-is to subsequent nodes.
- Output: All input content.
- Special Note (Application Mode): In this mode, the Start node supports defining various complex input parameter types, including text, numbers, selections, and other fields, providing a highly customizable input interface for building professional applications.
Tip: Input parameters defined in the Start node will be read by the LLM during the agent conversation, enabling it to start the workflow at the appropriate time and accurately fill in the required information.
Advanced Mode:
Application Mode:
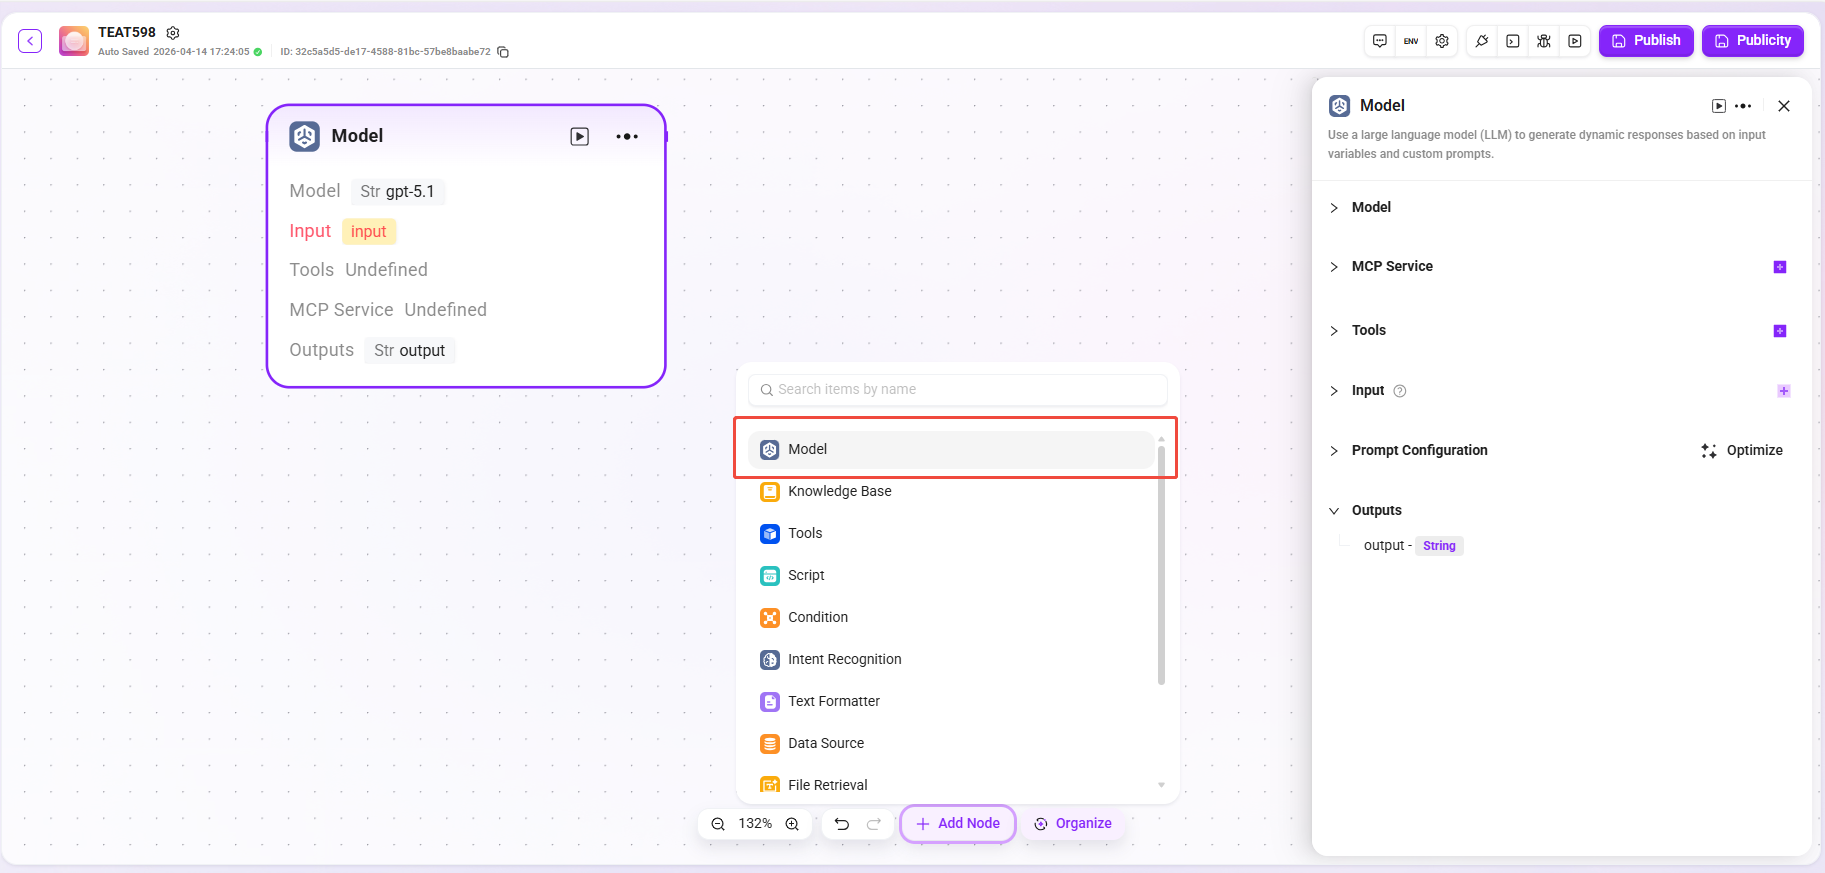
Model
Use a large language model (LLM) to generate dynamic responses based on input variables and custom prompts.
- Model: Select an available configured model from the dropdown.
- MCP Service: Optional configuration item used to connect to MCP services to extend model capabilities
- Tool: Optional configuration item used to add built-in tool invocation capabilities to the model
- Input: Define input variables and assign values to them for use in prompts or workflows. Each variable can reference a fixed value or the output variable of another variable.
- Prompt Configuration
- System Message: Provides high-level role or behavior guidance for the conversation, and supports referencing variables in input parameters using the
{{变量名}}format (prompt content limit: 5000 characters). - History Memory Count: Range from 0–20, controlling the number of historical conversation turns carried during model processing.
- User Message: Passes specific instructions, queries, or text input to the model. Also supports referencing variables using the
{{变量名}}format.
- System Message: Provides high-level role or behavior guidance for the conversation, and supports referencing variables in input parameters using the
- Processing Logic: Submit the input content to the large language model (LLM) for processing. The model generates corresponding responses based on the configured prompts and context.
- Output: Text content generated by the model.
💡 Tip: You must first connect the preceding node before you can select variables from other nodes as input for the current node.
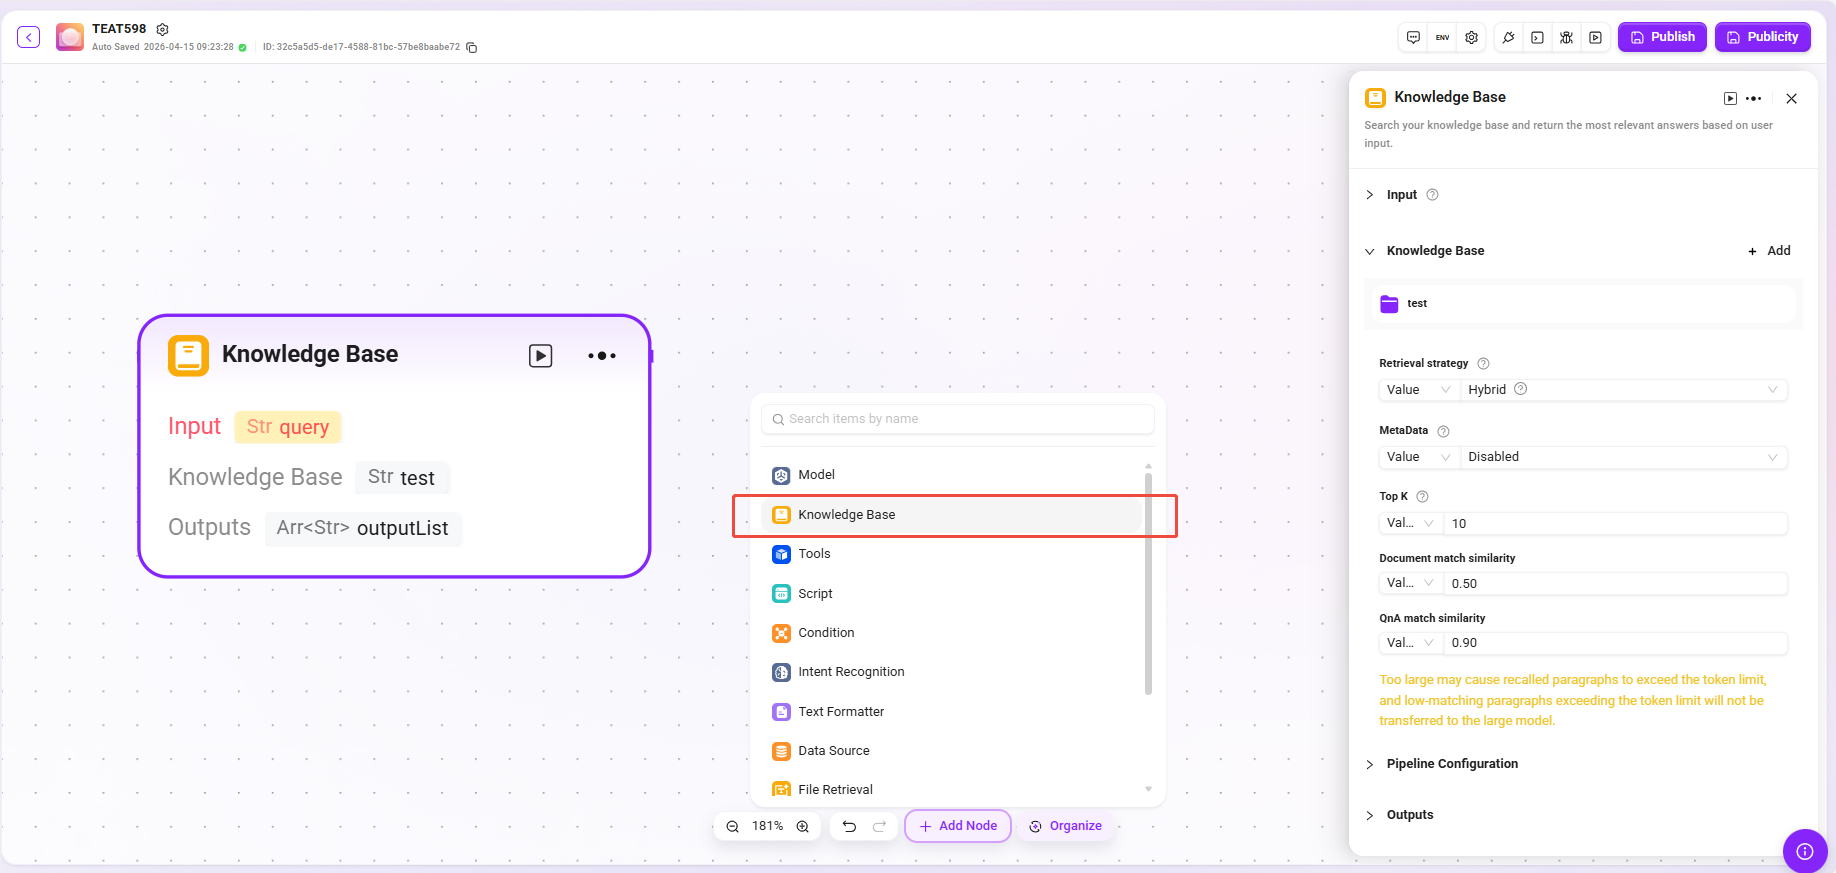
Knowledge Base Retrieval
Search in the knowledge base and return the most relevant answer based on user input.
- Input: Provide raw data such as retrieval keywords for knowledge base retrieval by defining variable names and setting parameter values.
- Processing Logic: Retrieve the knowledge base based on input and parameters, and return snippets or FAQs.
- Knowledge Base Retrieval: Select a specific knowledge base as the retrieval scope, and the system will search for matching information within this scope.
- Retrieval Strategy: Knowledge retrieval is the way information is obtained from the knowledge base. Using different retrieval strategies can more effectively locate the correct information, thereby improving the accuracy and usability of generated answers.
- Metadata Filtering (Preview): Filter recalled snippets during document retrieval to reduce noise and improve data quality and processing efficiency.
- Maximum Recall Count: Used to filter text snippets with the highest similarity to the user's question. The system will also dynamically adjust the number of segments based on the context window size of the selected model.
- Document Match Similarity: Range from 0–1, used to control the similarity threshold between recalled documents and the query.
- Q&A Pair Match Similarity: Range from 0–1, used to control the similarity threshold between recalled Q&A pairs and the query.
Tip: Setting this too high may cause recalled paragraphs to exceed the Token limit. Low-matching paragraphs beyond the Token limit will not be transmitted to the large model.
- Pipeline Configuration: Choose whether to enable Pipeline search.
- Output: Output matching information retrieved from the knowledge base in the form of specified variables for use in subsequent workflows.
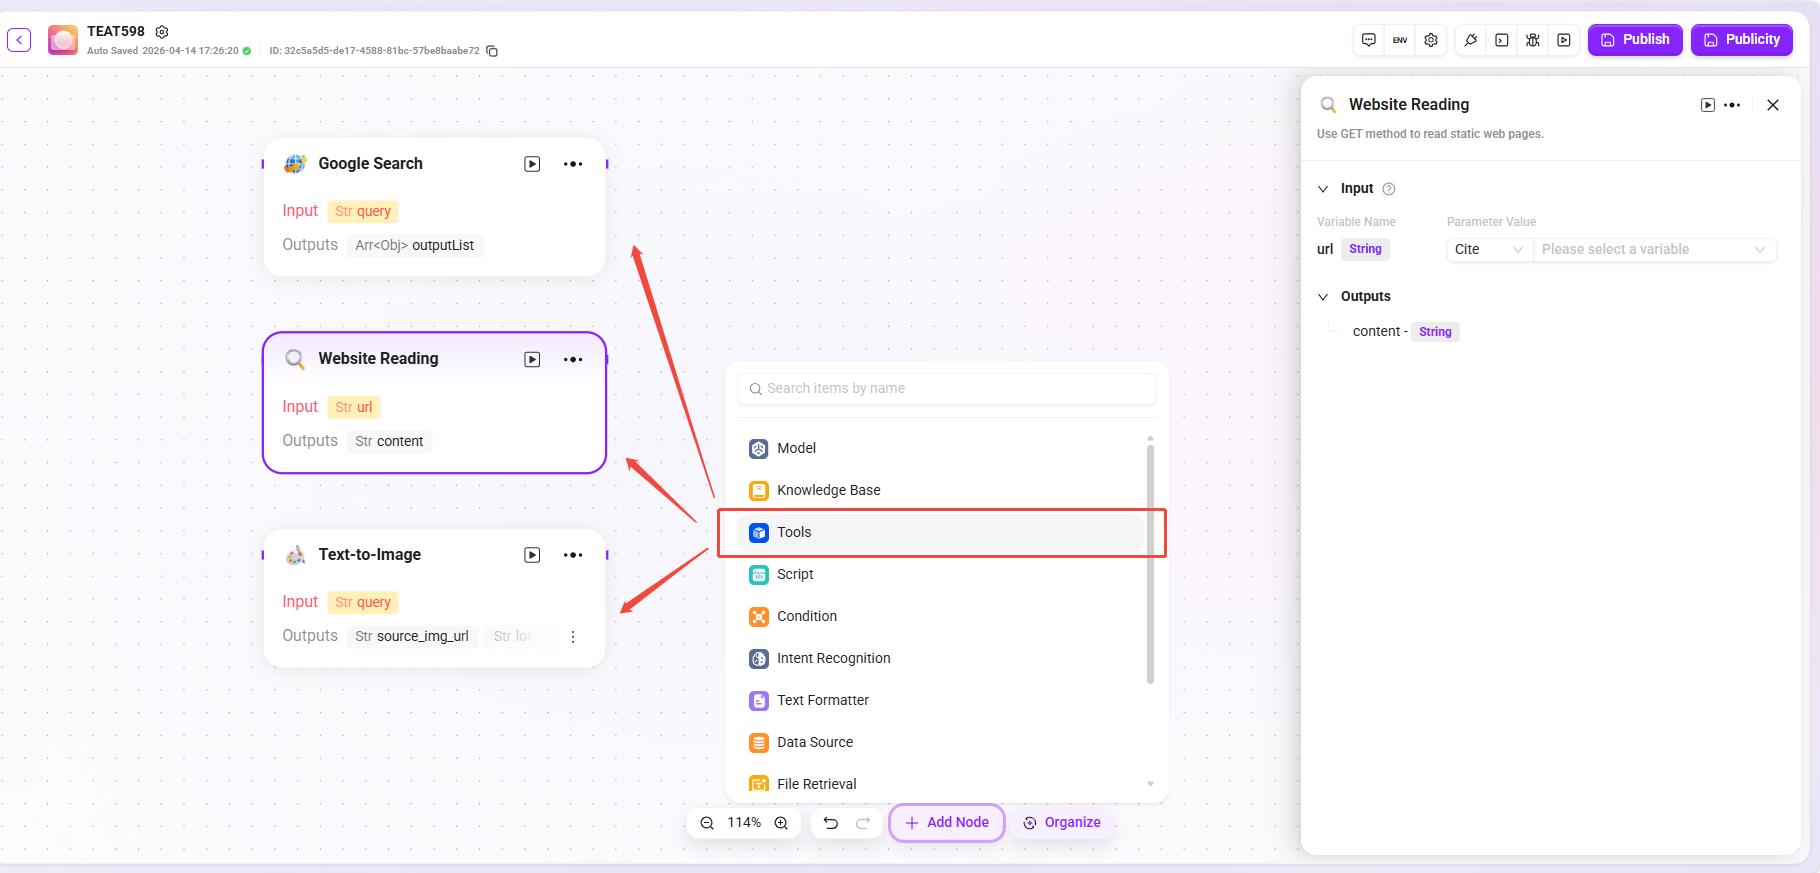
Tool (Example)
- Processing Logic: Execute the corresponding input and output actions according to the selected tool type, and pass the processing result to subsequent nodes.
- Website Reading: Can read static text on web pages (cannot obtain dynamically loaded content).
- Text-to-Image: Generate images based on descriptive text and return the image URL.
- Google Search: Call the search engine to return search results.
💡 Tip: In Advanced Orchestration mode, only built-in tools can be added; custom tools cannot be added.
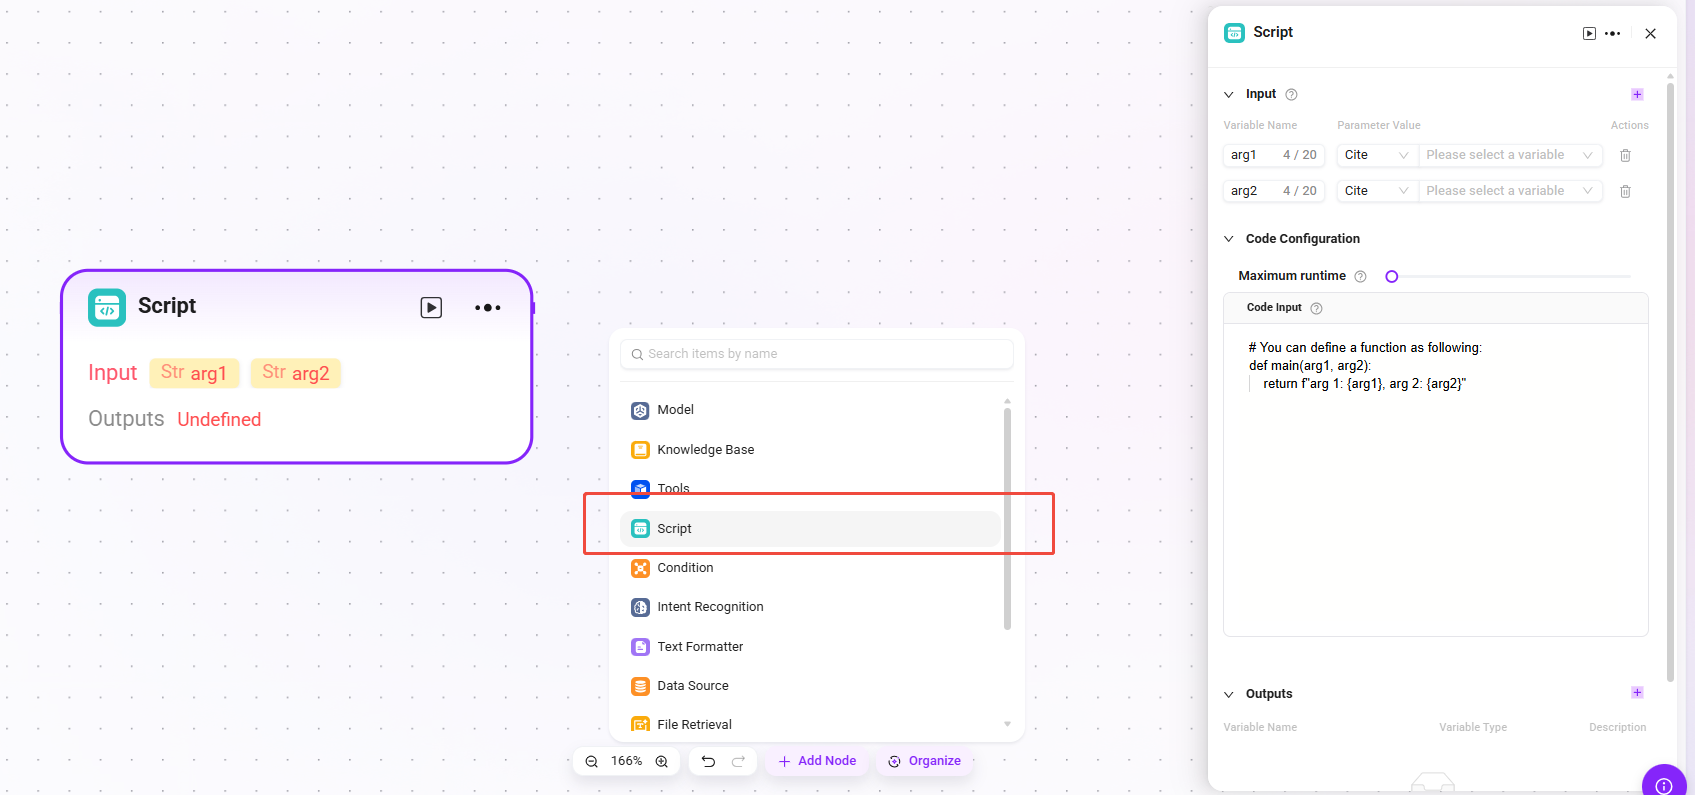
Script
Write code to process input variables and generate return values.
- Input: Used to receive externally passed variables. It is the entry point for data required for code execution and provides raw data for subsequent code processing.
- Configuration Parameters: Configure parameters related to code execution.
- Maximum Runtime: Set the time limit for code execution (up to 600 seconds) to prevent the program from running too long.
- Code Input: Refer to the code example to write the structure of a function. You can directly use variables from the input parameters and output processing results by returning an object. This feature does not support writing multiple functions. Even if there is only one output value, be sure to return it in the form of an object.
- Processing Logic:
- Run code in a secure sandbox environment (based on RestrictedPython or the specified platform).
- Restrict runtime and access permissions to avoid security risks.
- Output Result: After the code processes the input data, the result is output in the form of a specified variable. This is the output point of the code processing result. You need to define the output variable yourself.
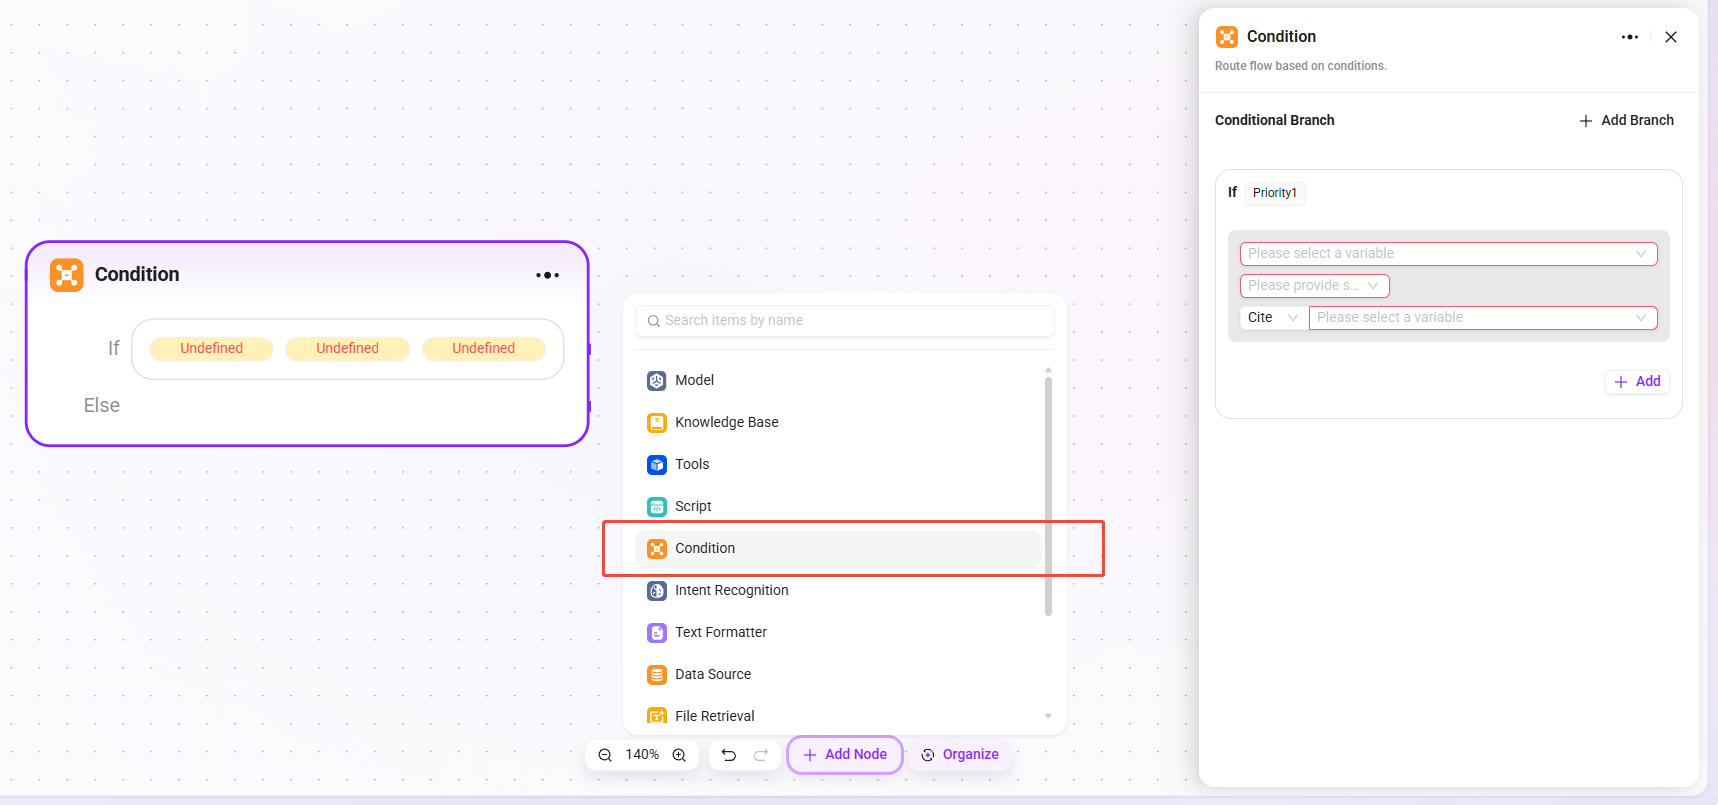
Selector
Acts as a conditional judgment component in workflow orchestration. It connects multiple downstream branches and determines the execution path based on configured conditions.
- Conditional Branches:
- Multiple conditions can be set, such as "if - priority 1". The number of branches is unlimited, but the total number of conditions is capped at 20.
- By configuring referenced variables, selecting conditions (such as equals, greater than, and other comparison logic), and comparison values, the system determines whether a condition is met. If it is met, the corresponding branch workflow is executed.
- Processing Logic: Follow different paths based on different conditions (if no condition is met, go to Else).
- Output Result: No direct output; it only determines the direction of the next node.
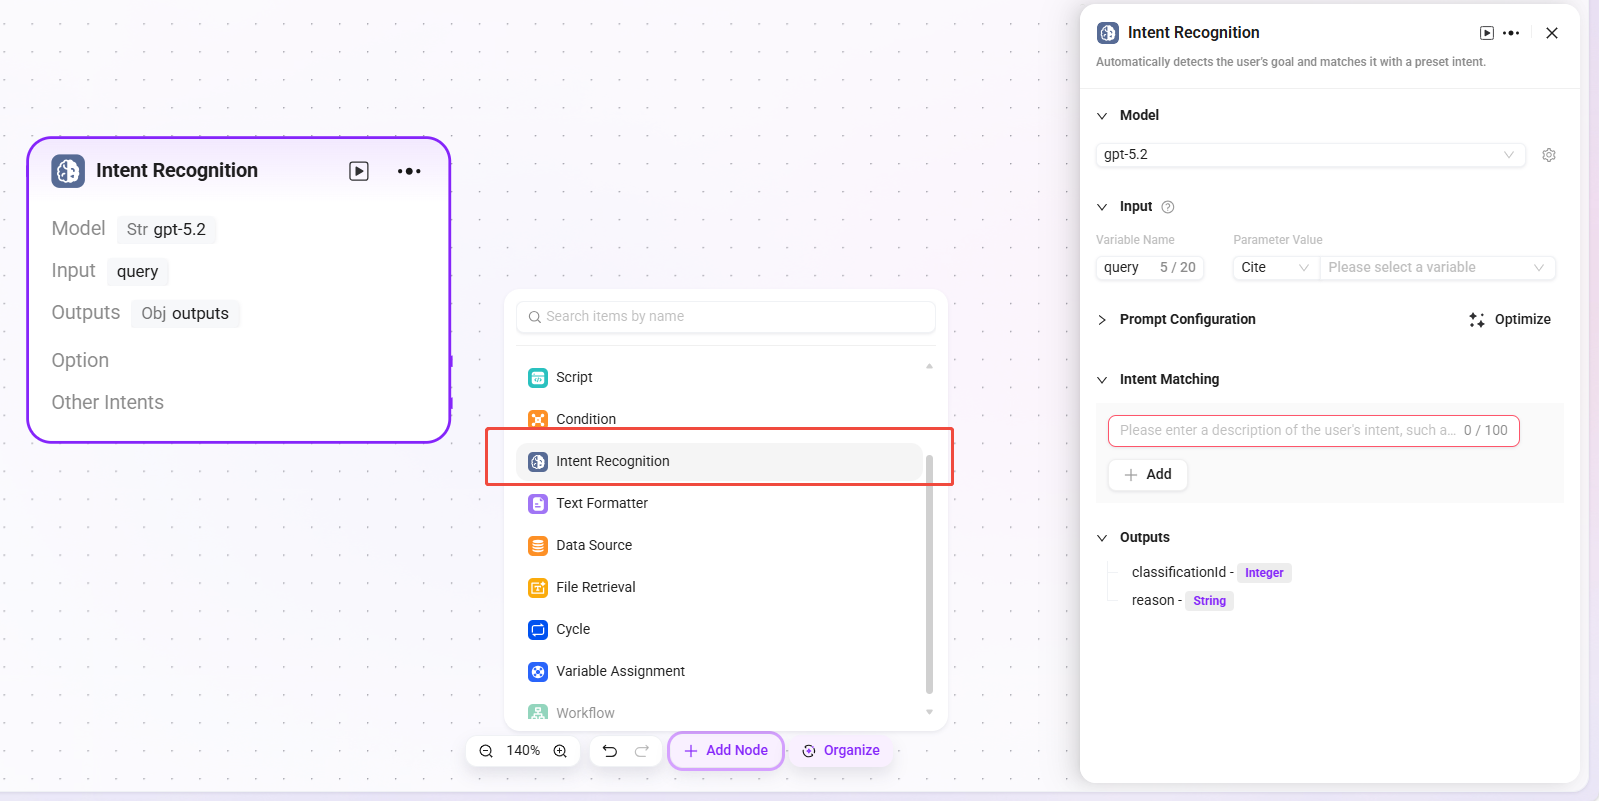
Intent Recognition
Intent recognition is a key part of natural language processing. This module analyzes user input, determines the user's actual intent, and matches it with preset options.
- Model: Select the model used for intent recognition. The model determines the capability and effectiveness of intent recognition.
- Intent Matching: You can pre-enter user intent descriptions as matching criteria, and also add other intents. The system uses this to determine which preset intent the user input matches.
- Advanced Settings:
- System Prompt: You can customize prompt content and reference input variables to optimize prompt effectiveness (prompt content limit: 5000 characters).
- History Memory Count: Set the number of historical conversation turns to reference, allowing the model to improve recognition accuracy by combining contextual information.
- Processing Logic: Determine the user's actual intent and classify the input into the corresponding category.
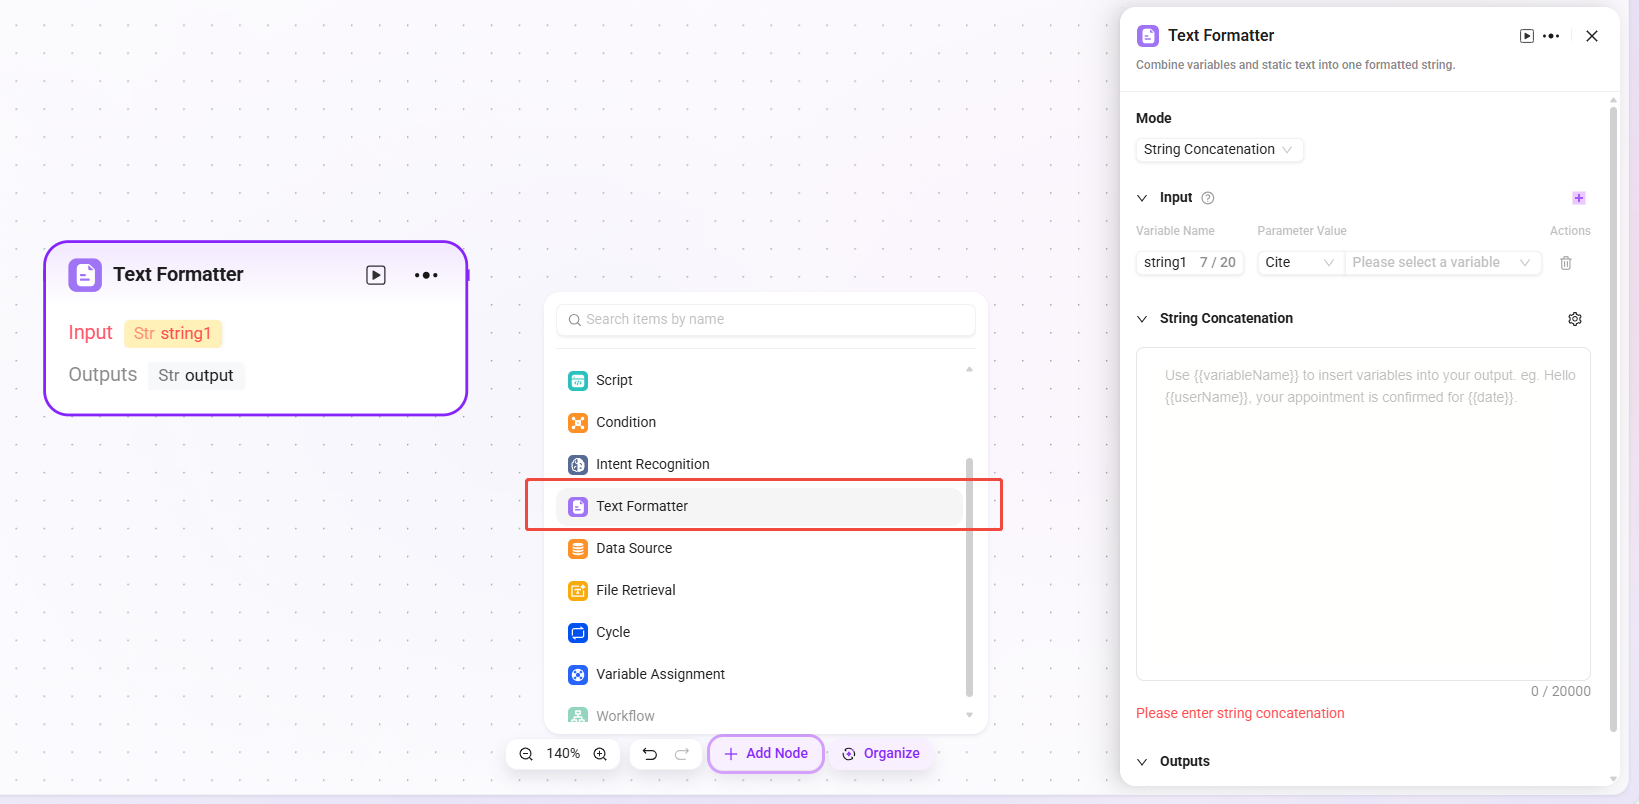
Text Formatter
Used to combine variables and fixed text into a formatted string.
- Input: Variable names can be defined, and parameter values can be obtained through references, providing raw string data for subsequent text processing.
- Processing Logic: Perform simple text processing.
- String concatenation
- String splitting
- Delimiter: Can be customized or selected
- String Concatenation: Provides a text editing area where input variables can be referenced by variable name as needed to concatenate multiple strings and perform other formatting operations.
- Usage Limit: In a single workflow, the maximum number of Text Formatter nodes is 20.
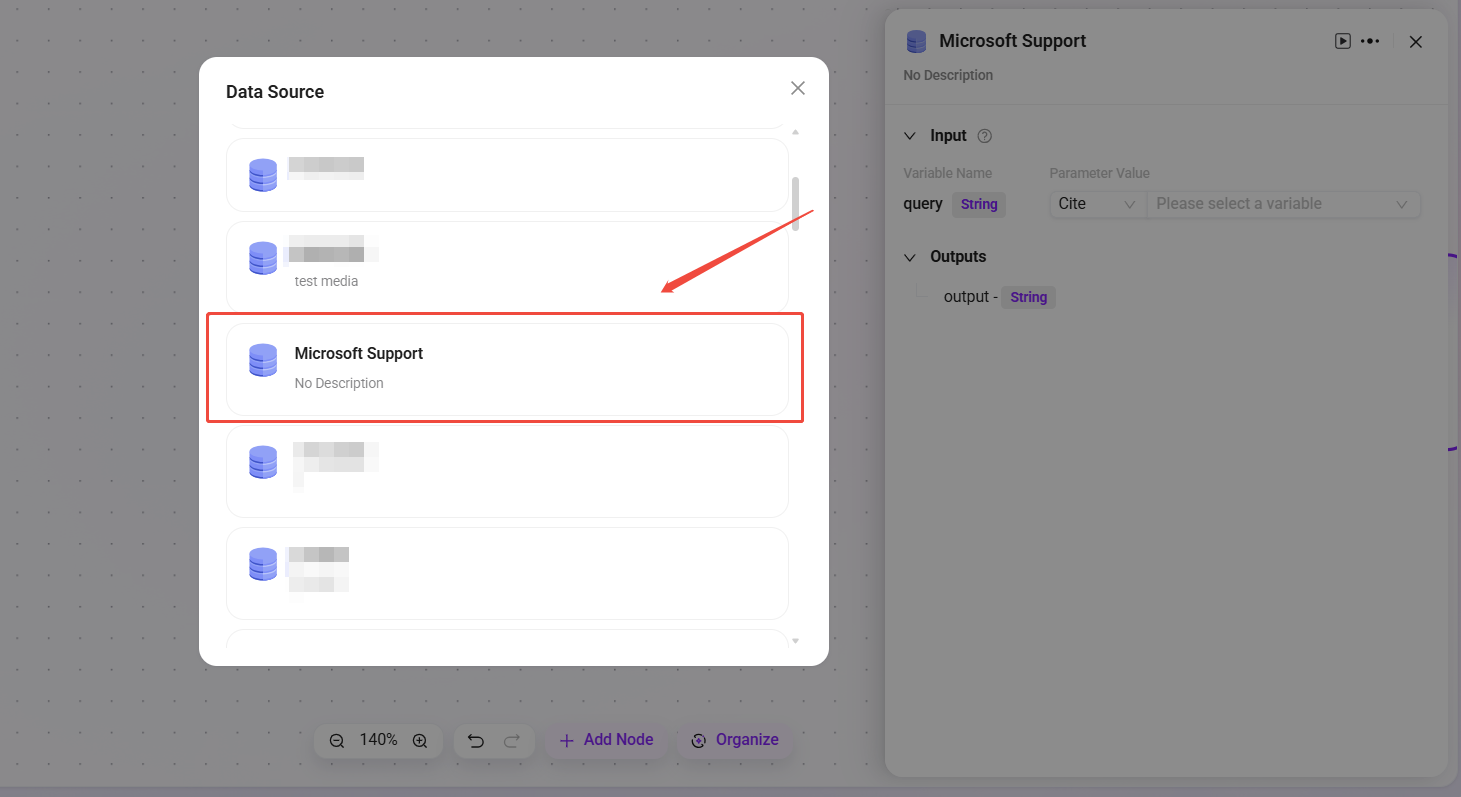
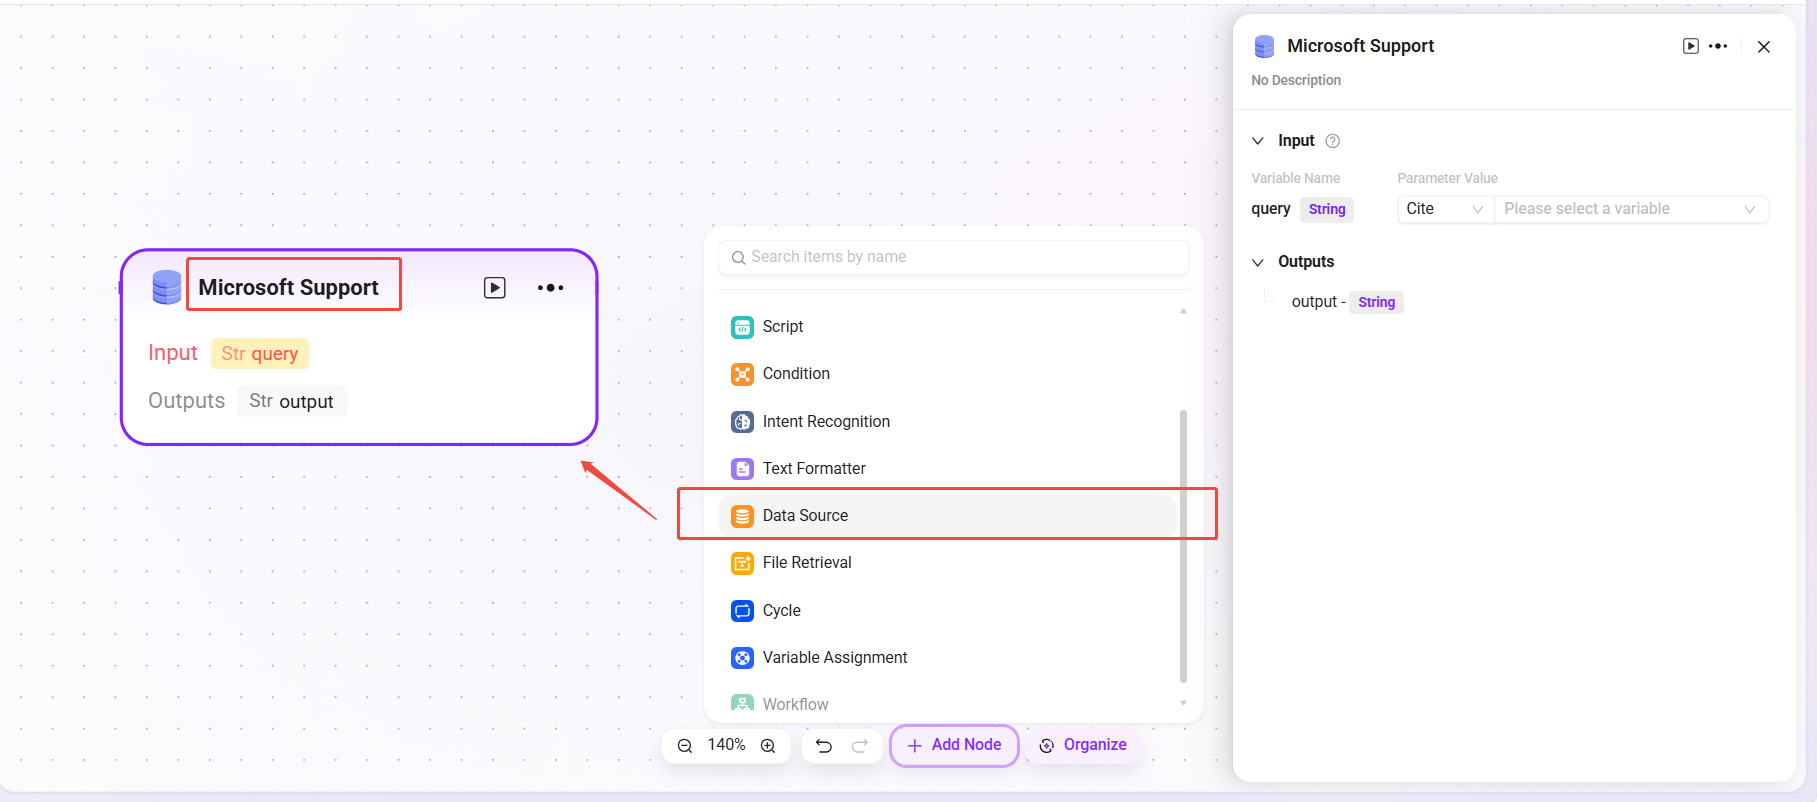
Data Source
- Data Source: Select the data source to connect.
- Processing Logic: Convert natural language into SQL to query the database and return results.
- Output: Output data from the data source to the next node.
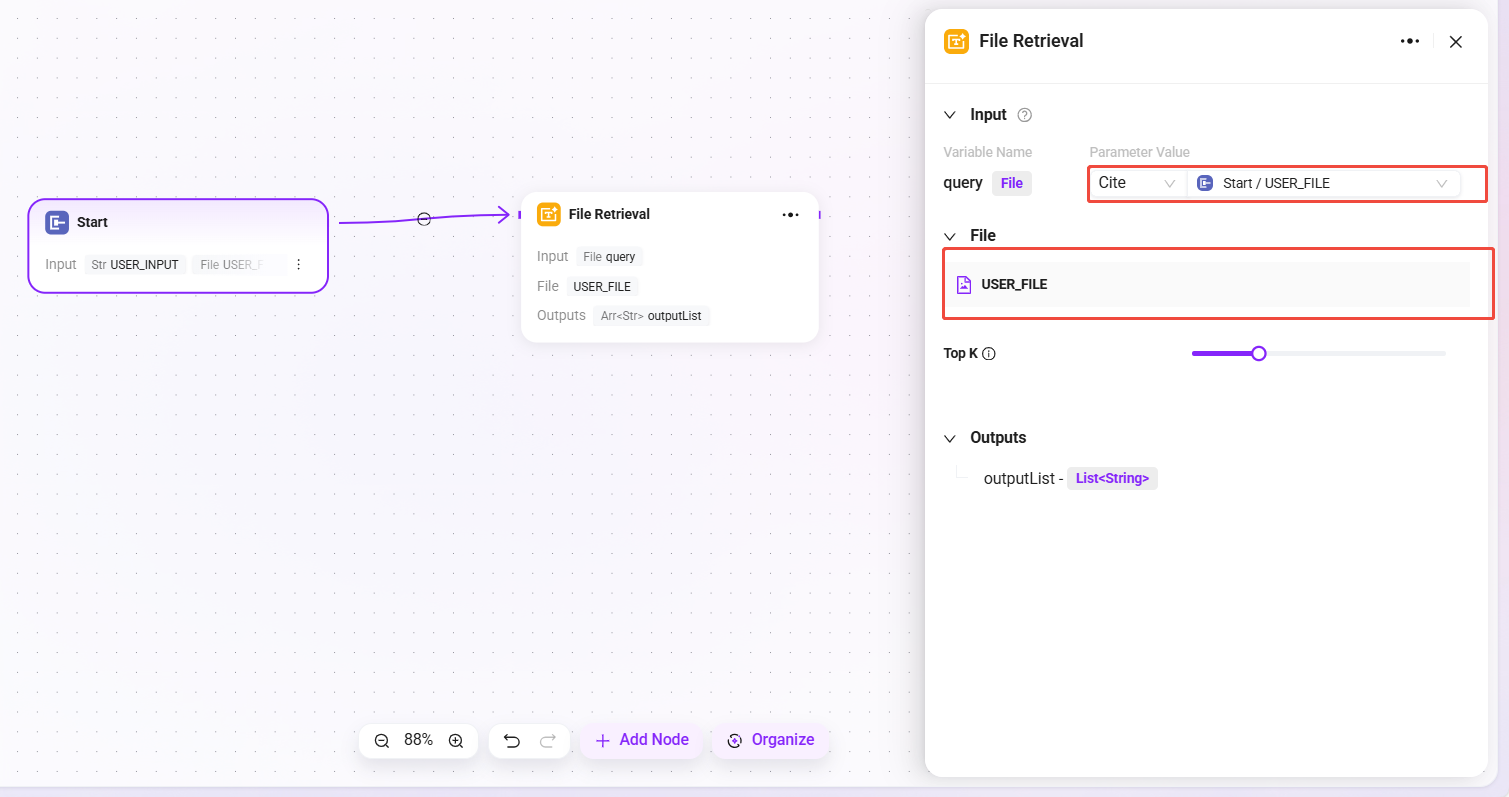
File Retrieval
File Retrieval is a functional module for retrieving file content and performing related operations.
- Input: Provide input information such as retrieval keywords by defining variable names and referencing parameter values, serving as the basis for file content lookup.
- File: Files to be processed can be added to this node to determine the file scope for retrieval.
- Processing Logic: Based on the input retrieval keywords, perform content matching and searching within the specified file scope to locate relevant snippets or information.
Configure File Retrieval
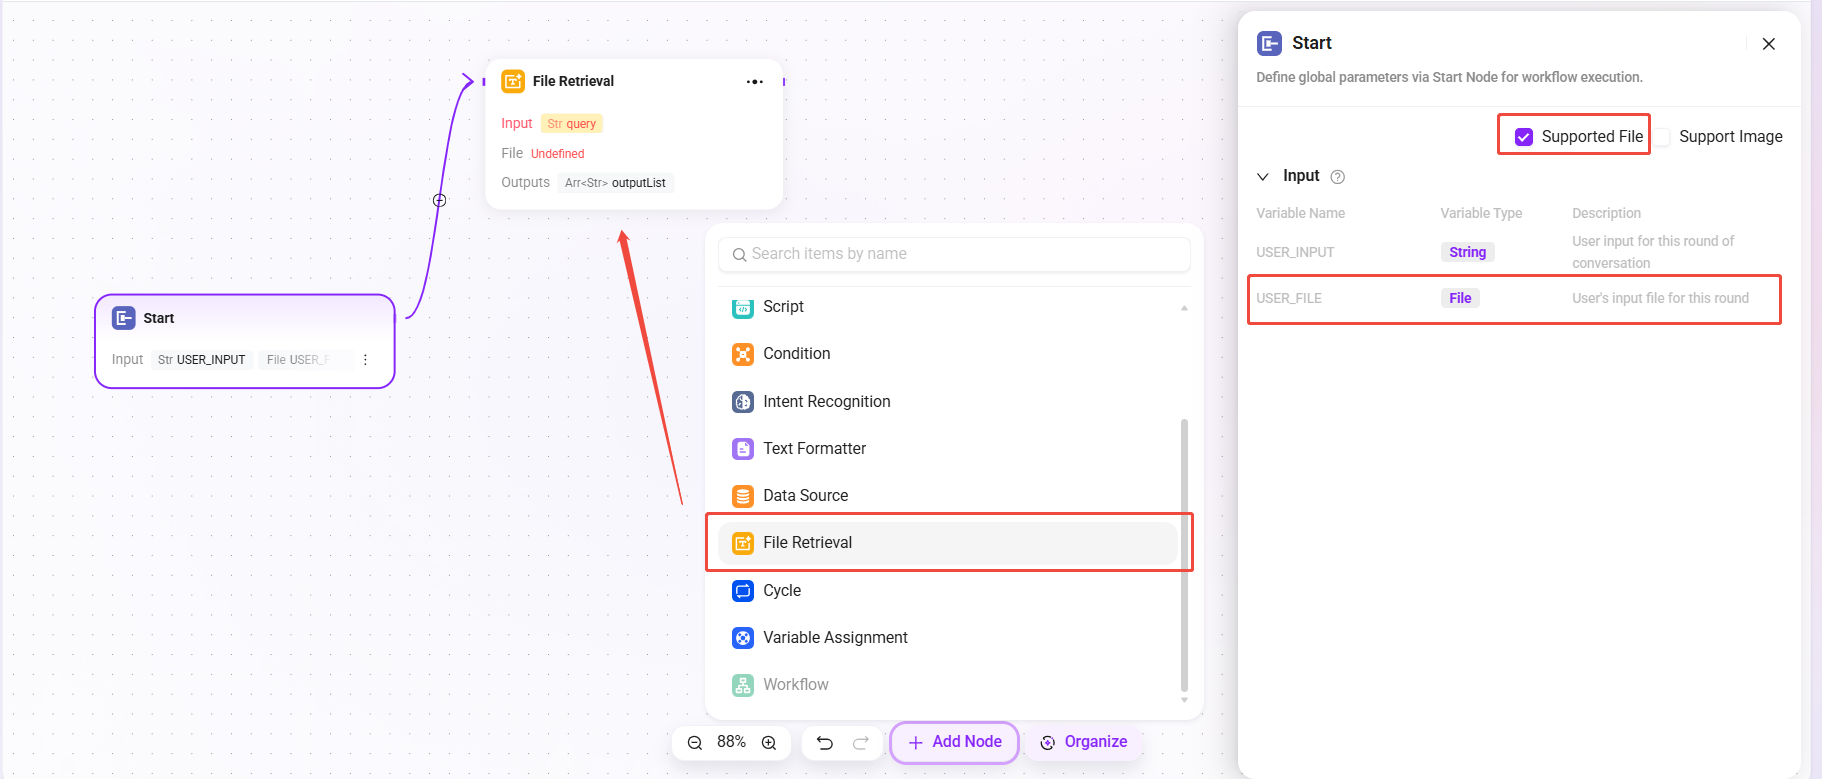
- First, check "Support Files" in the "Start" node
- After checking it, the variable "USER_FILE" will appear in the Start node, referring to the file input by the user in the current turn
- Then connect the "Start" node and the "File Retrieval" node
- After connection, the File Retrieval node can add "USER_FILE" as the file to be retrieved.
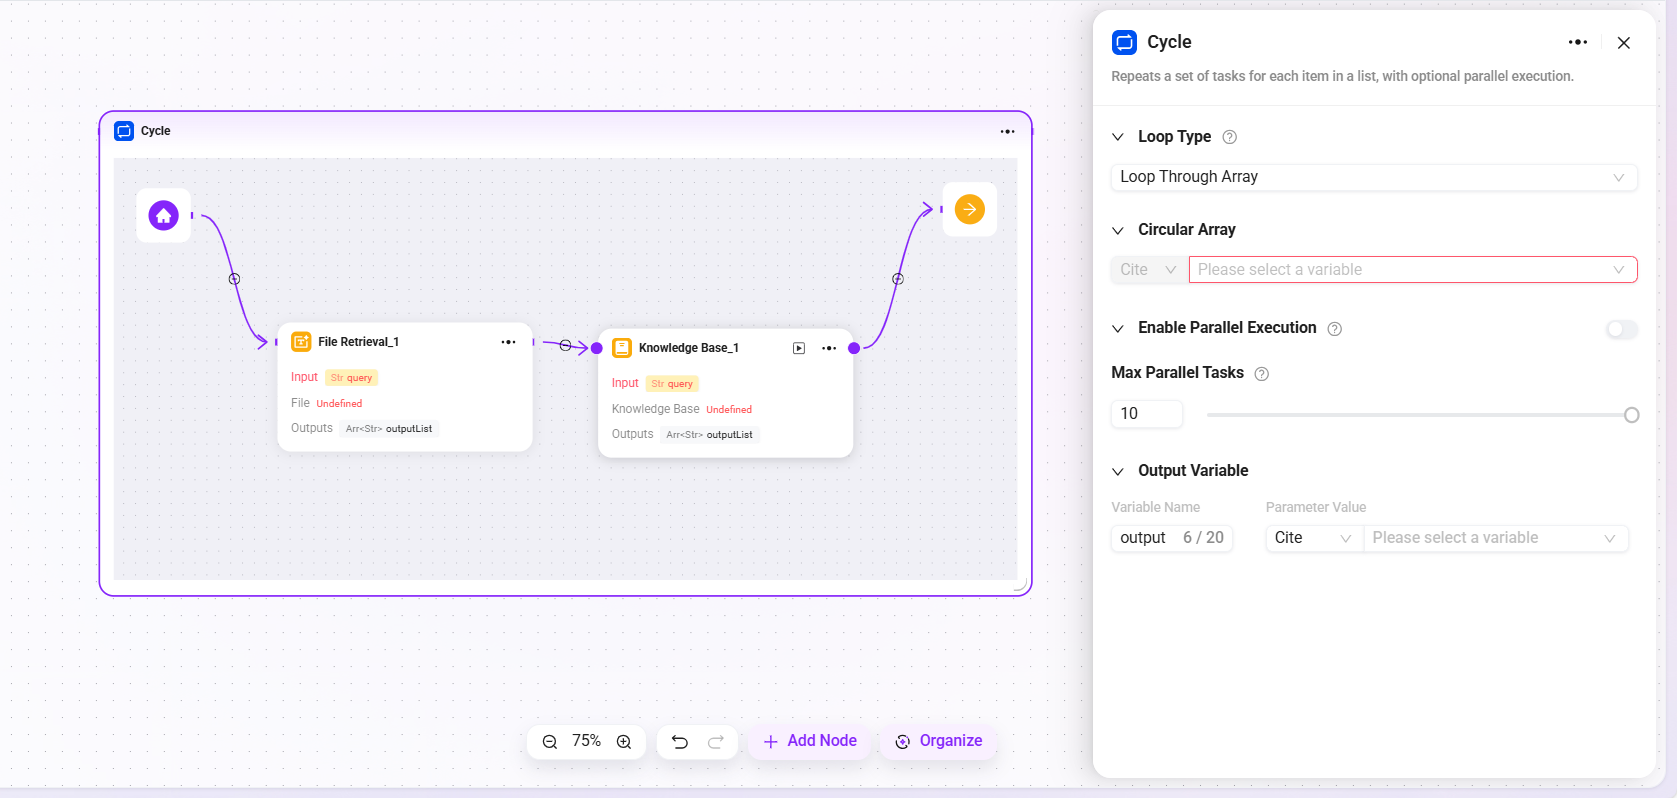
Loop
Used to repeatedly execute a set of tasks according to a specified number of times or a specified data set. By configuring different loop modes, batch processing or repeated operations can be implemented flexibly.
- Loop Type: Supports two modes
- Use array loop: Execute tasks sequentially for each element in the input array.
- Use numeric loop: Execute tasks repeatedly according to the specified number of times.
- Loop Value/Array:
- When "Numeric Loop" is selected, a specific number must be entered, for example
2, which means the task will be executed 2 times. - When "Array Loop" is selected, an array variable must be provided, and the system will take out each element in the array one by one as input to execute the task.
- When "Numeric Loop" is selected, a specific number must be entered, for example
- Parallel Execution: Optional feature. When enabled, the system processes multiple loop tasks simultaneously to improve efficiency. Users can set the maximum parallel count to control resource usage.
Workflow
Used to reference and invoke other configured workflows, enabling modular nesting and workflow reuse.
- Workflow Selection: Select the sub-workflow to invoke from the existing workflow list.
- Input Mapping: Map variables in the current workflow to the input parameters of the sub-workflow.
- Output Mapping: Map the output results of the sub-workflow back to variables in the current workflow for use by subsequent nodes.
- Processing Logic: Execute the referenced sub-workflow and wait for it to complete before returning the result.
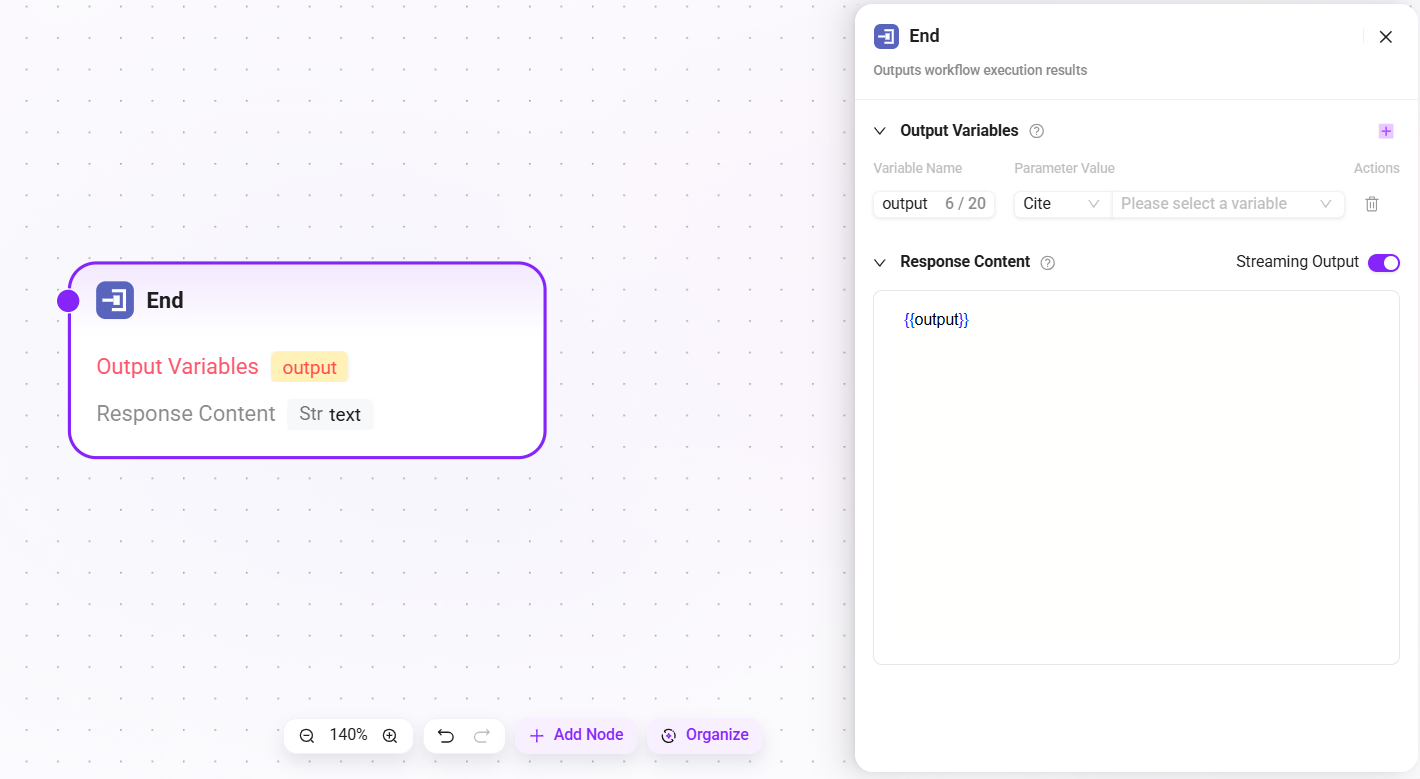
End
The final node of the workflow, used to return result information after workflow execution.
- Output Variables: After the agent invokes the workflow and completes execution, these variables will be output.
- Response Content: Edit the agent's reply text. After the workflow finishes running, the LLM in the agent will no longer generate language on its own, but will directly use the original text edited here for the reply. Supports referencing output variables using the
{{变量名}}format. - Streaming Output: You can choose whether to enable streaming output.
Workflow Example
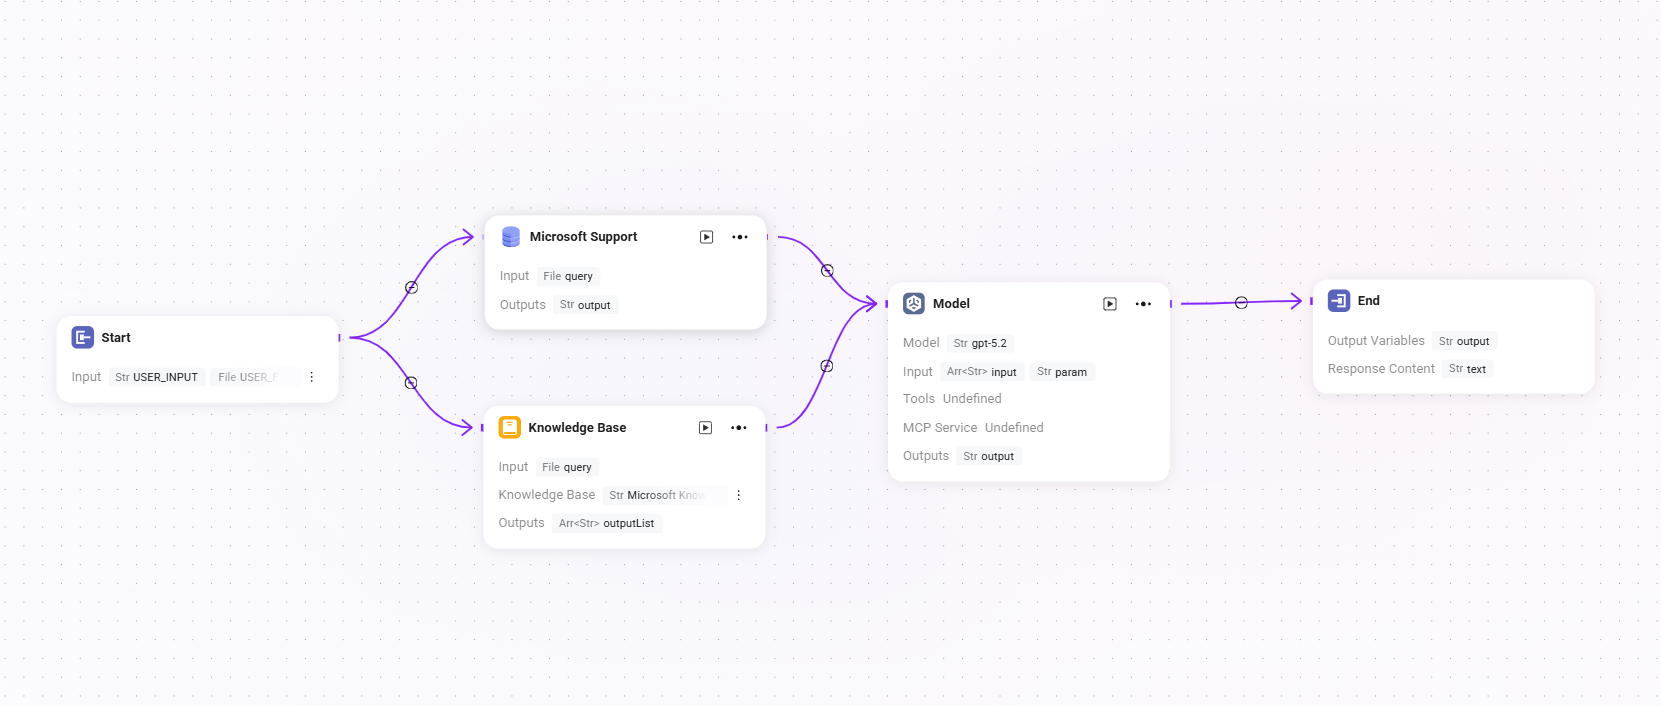
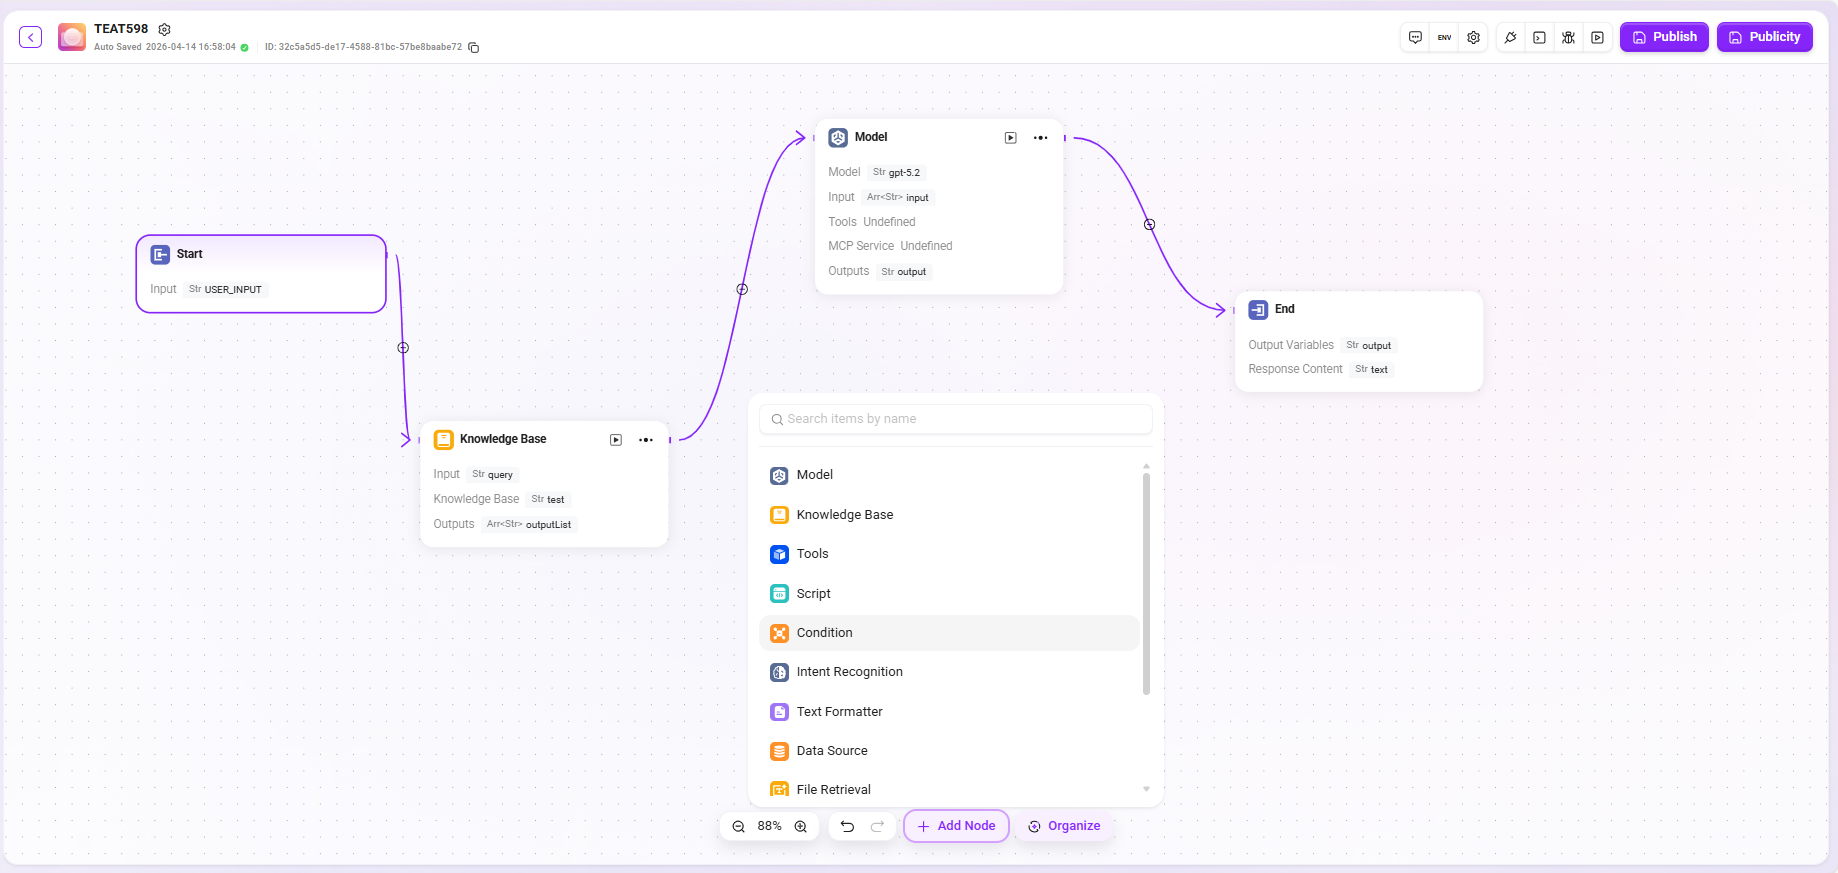
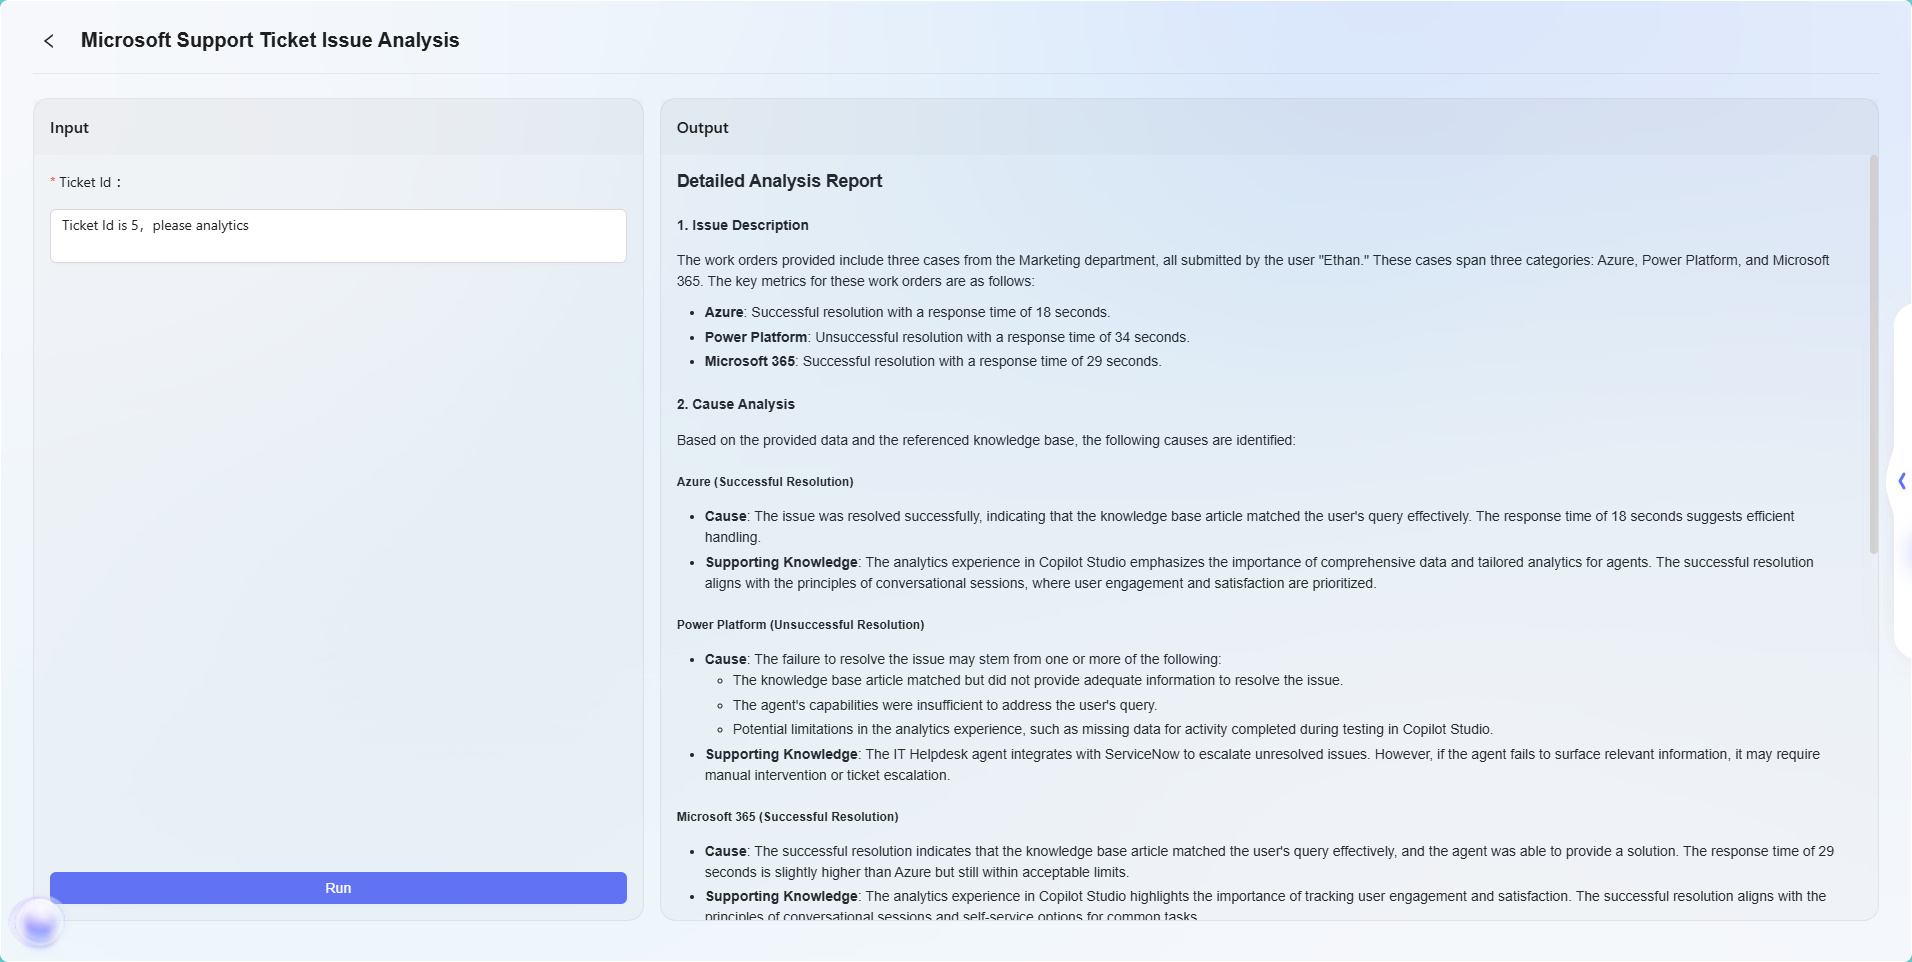
In this scenario, the workflow feature is used to build a complete "Microsoft Support Ticket Issue Analytics" process. The specific workflow is as follows:
- Start Node
The starting point of the workflow, included by default in the system. - Data Source Node
Used to connect the raw data required for ticket analysis. - Knowledge Base Node
Connects knowledge documents containing analysis reference materials as the theoretical support for AI analysis. - Model Node
Based on the AI model, combines the data source and knowledge base content for comprehensive analysis and generates ticket issue analysis results. - End Node
The endpoint of the workflow, outputting the analysis result from the Model node. This node is included by default in the system.
The Data Source node and Knowledge Base node are configured in parallel, while the Model node aggregates and processes information from both, ensuring that the output results are supported by both data and theory.
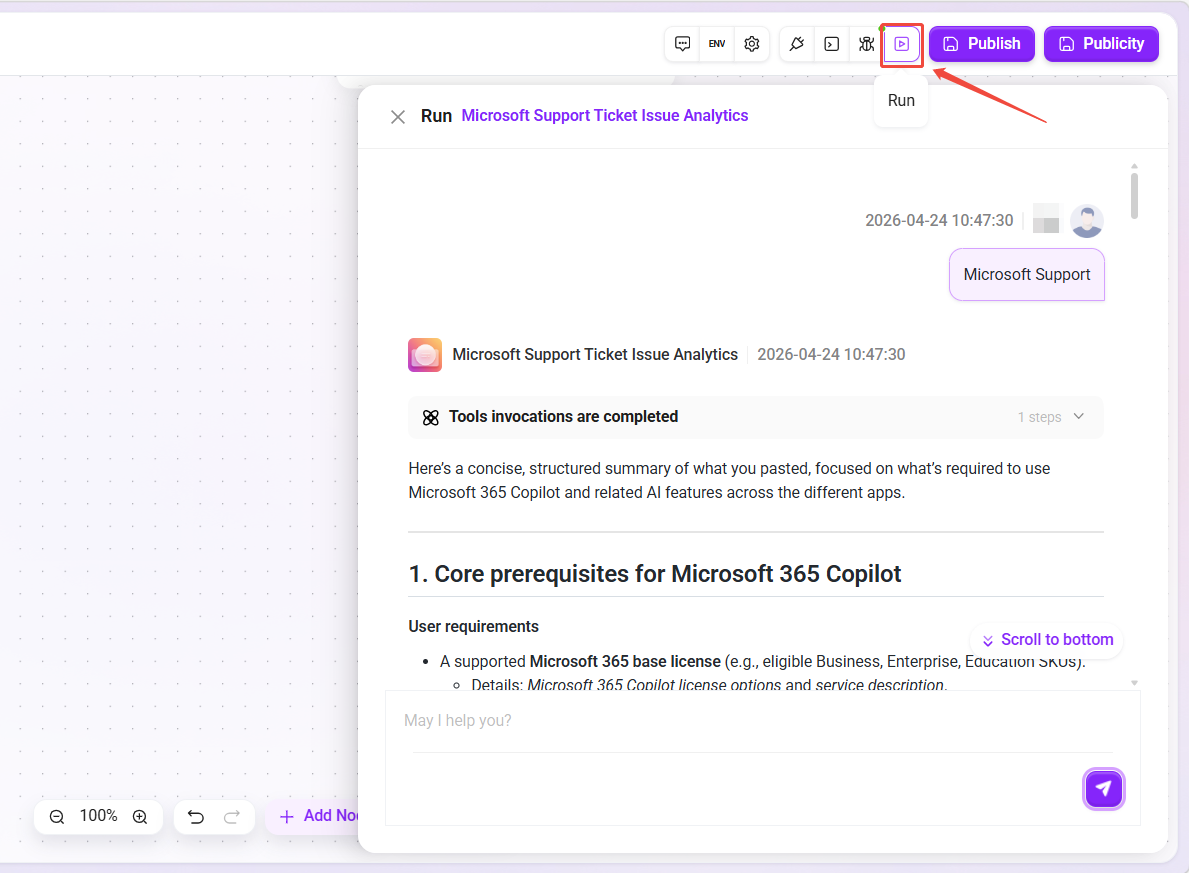
The final effect is as follows:
Note: This example is only a basic demonstration of the workflow feature. Workflow orchestration is highly flexible and scalable. By combining various types of nodes, extremely complex business logic and automation processes can be implemented to meet the needs of a wide range of business scenarios.
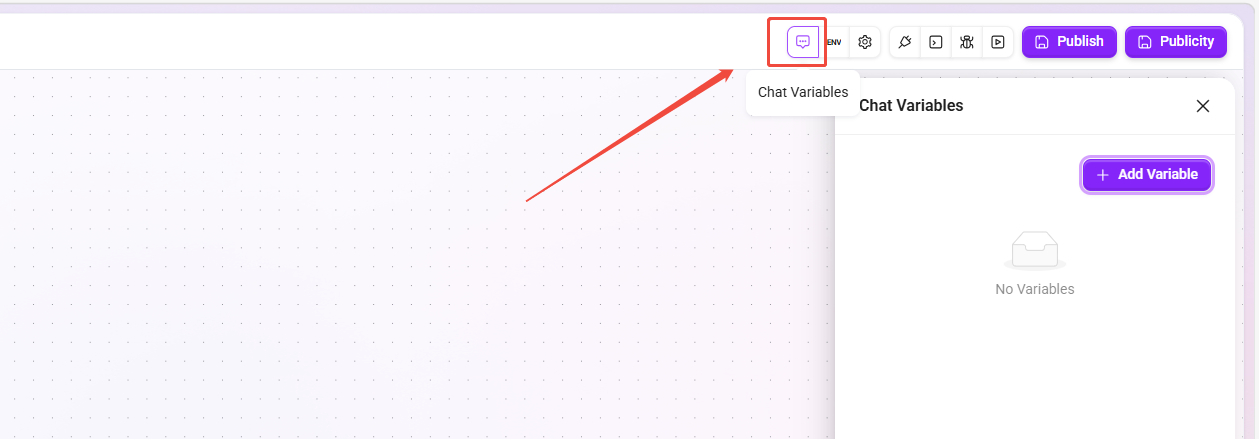
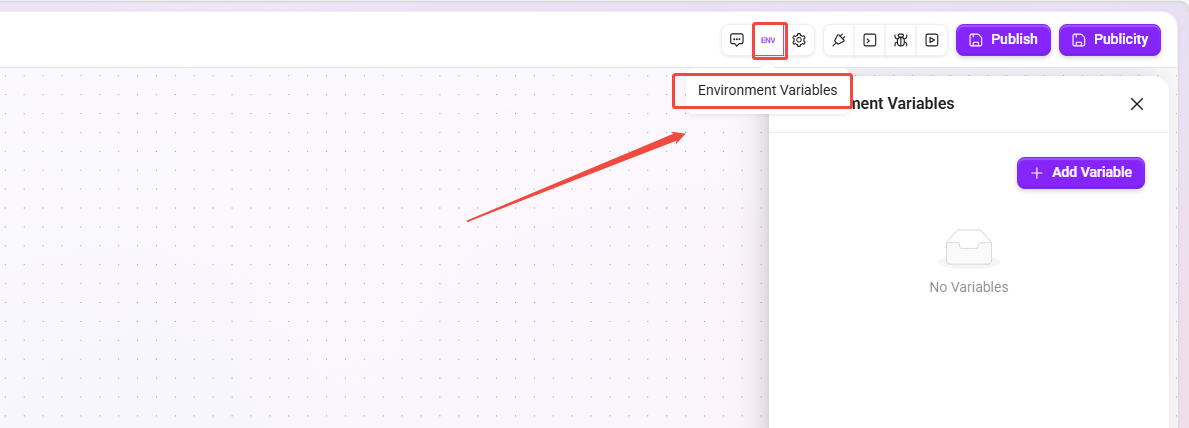
Variable Management
To enhance orchestration flexibility and reduce explicit coupling between nodes, workflows support two mechanisms: environment variables and session variables, which are used to store configuration parameters and runtime intermediate states respectively. All variables can be directly invoked through input variables in node configuration items.
- Configuration Entry: The variable management panel is located in the upper-right corner of the canvas. Click the corresponding icon to expand it.

Chat Variables
Chat variables are used to store intermediate states, contextual results, or temporary user input during workflow execution (such as previous analysis conclusions, execution flags, user preferences, etc.). Their scope is at the Workflow runtime instance level. All nodes within the same instance share them, while different instances or user contexts are strictly isolated.
- Read/Write Permissions: Readable and writable, supporting dynamic assignment, overwrite, or clearing within nodes.
- Supported Types: Supports
String,Number,Boolean,Integer,Object,List<String>,List<Number>,List<Boolean>,List<Integer>,List<Object>. - Application Scope: Shared by all nodes within the same runtime instance.
Cleanup Mechanism:
- Manual Cleanup: If an Agent uses session variables, a broom icon will appear on its icon. Clicking it will open a secondary confirmation dialog that supports multi-select cleanup items, with "Clear Context" and "Session Variables" selected by default.
- API Cleanup: A dedicated session variable cleanup API is provided, making it convenient for external systems to call in delivery scenarios and enabling automated session state reset.
Environment Variables
Environment variables are used to store configuration-type, system-level parameters, such as API keys, global switches, model names, etc. Their scope is at the Workflow definition level, and all runtime instances of the same workflow share this configuration.
- Read/Write Permissions: Read-only. Variable values are fixed at definition time and cannot be modified at runtime.
- Supported Types:
String,Number,Secret(encrypted string used to store sensitive information such as API Key). - Application Scope: Can be referenced by all nodes within the workflow.
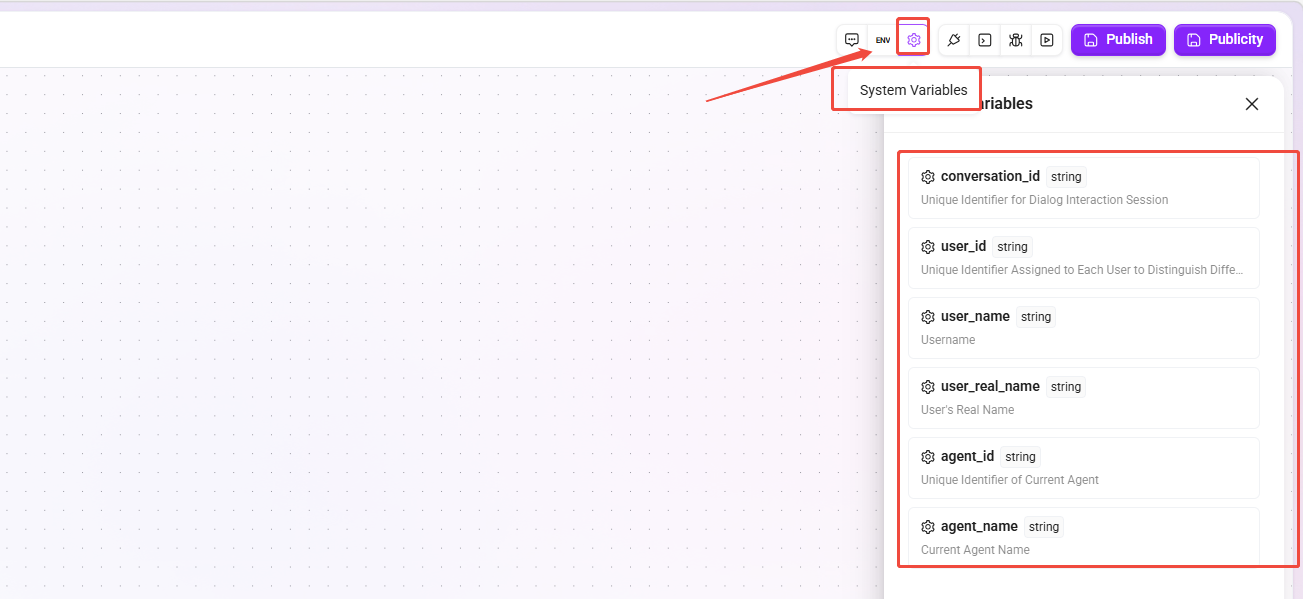
System Variables
System preset read-only variables used to obtain metadata information of the current session or agent. No manual creation is required, and they can be directly referenced in nodes.
| Variable Name | Type | Description |
|---|---|---|
conversation_id | string | The unique identifier of the current chat interaction session. |
user_id | string | The unique identifier of the current conversation user. |
user_name | string | Username. |
user_real_name | string | User's real name. |
agent_id | string | The unique identifier of the current agent. |
agent_name | string | The name of the current agent. |
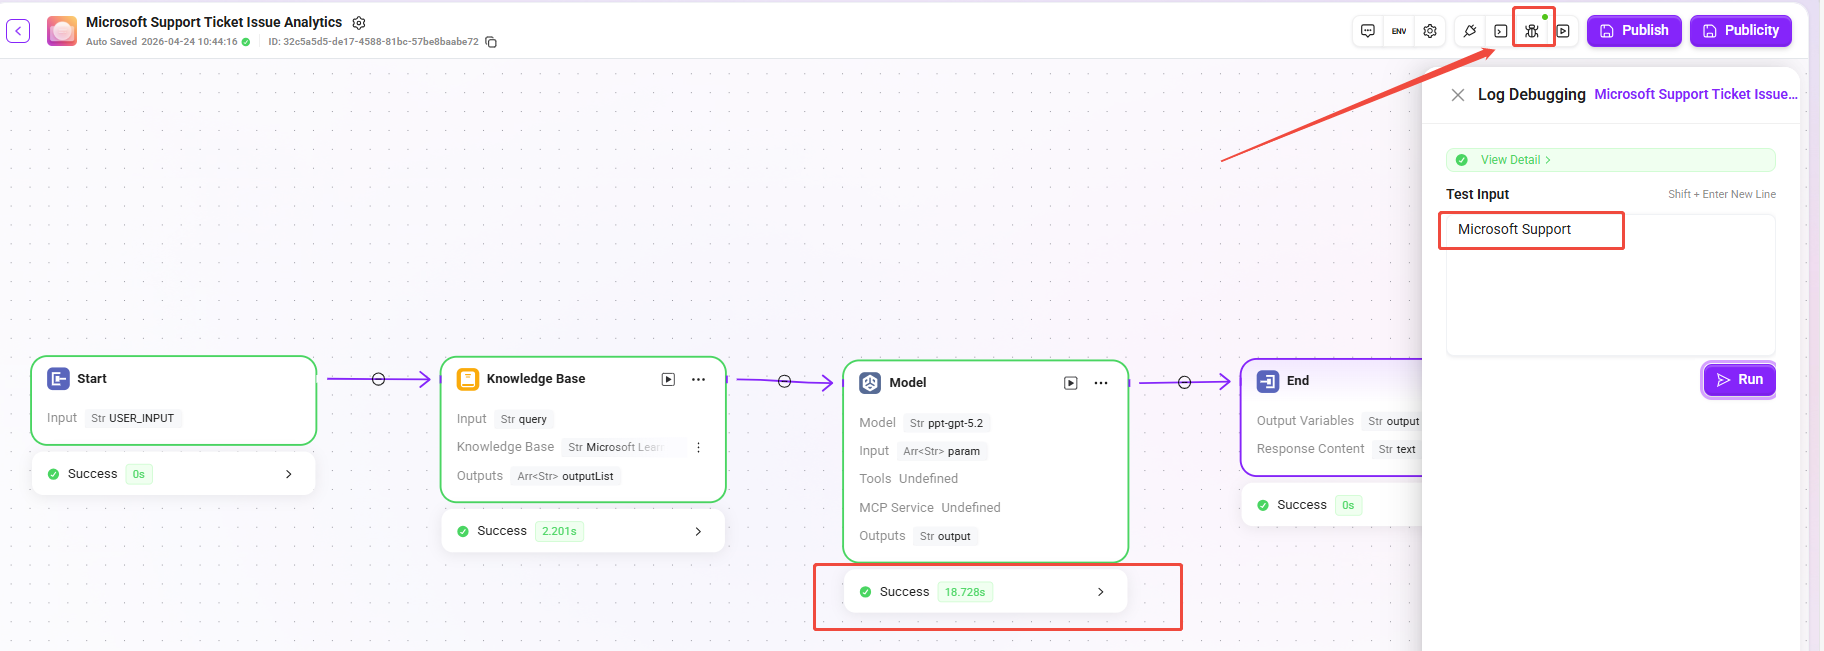
Log Debugging
Log debugging is used to locate workflow issues during the orchestration stage. After the user enters a specific question, input and output variables can be viewed node by node to quickly check whether data transmission meets expectations.
- How to Start: Click the "Log Debugging" button in the upper-right corner of the canvas, enter a question in the test input box (such as
Microsoft Support), and click Run. The system will automatically execute the current workflow. - Execution Process: During execution, successfully executed nodes will turn green, and the running status and duration will be displayed below the nodes. Click a node to view details of its input and output variables.
- View Details:
- A "View Details" button is provided above the test input box.
- Hover the mouse over the button to quickly preview the total runtime of this execution, the input/output Token consumption, and the total Token count.
- Click the button to enter the details panel, where you can view the complete input and output content (in JSON format) of each node, as well as metadata (including start time, runtime, and detailed Token consumption)

Trial Run
Trial Run is used to simulate real Q&A scenarios and verify the overall orchestration effect of the workflow and the quality of the assistant's final reply.
- How to Start: Click the "Trial Run" button in the upper-right corner of the canvas, enter a test question in the conversation panel, and the workflow will execute completely according to the published logic.
- Effect Preview: After execution ends, the panel displays the assistant's final response content, allowing you to intuitively judge whether the reply meets business expectations.
- Instant Adjustment: If the reply effect is not ideal, you can directly modify node configurations (such as prompts, parameters, etc.) in the Trial Run interface without repeatedly switching back to the canvas configuration page, improving debugging efficiency.
Note: Trial Run will not affect the real conversation records of online agents. All test data is only valid within the current debugging session.