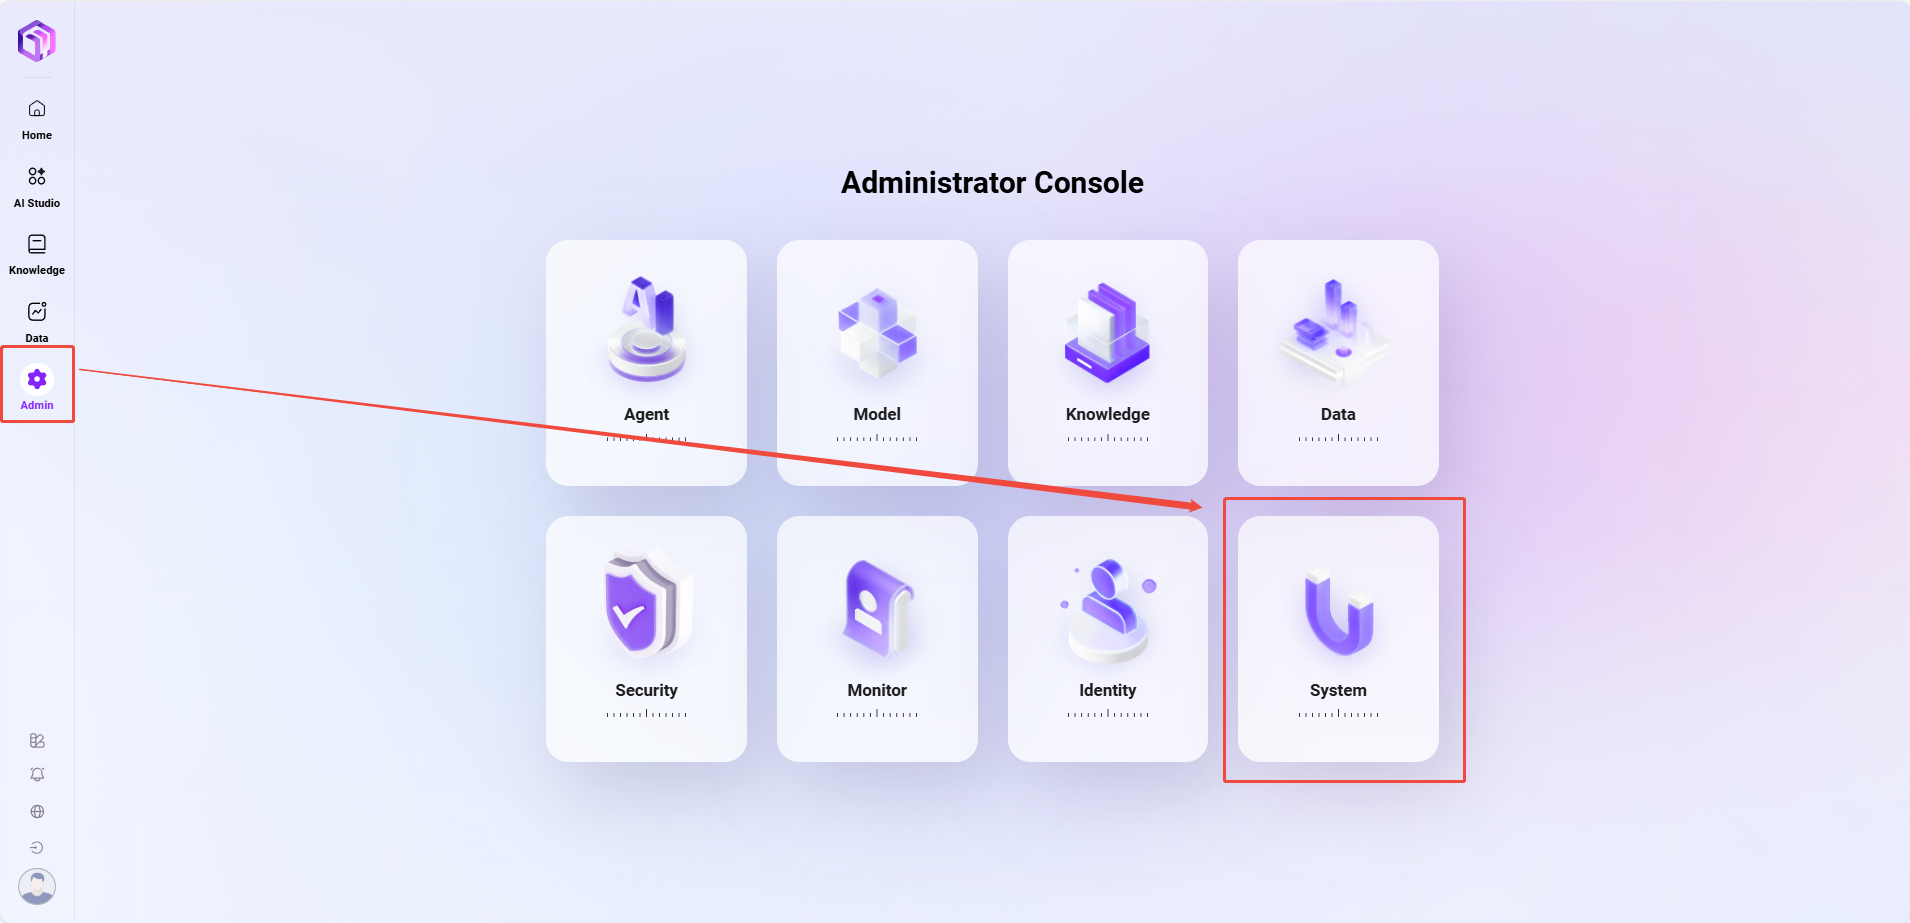
System Management
The entry point for system settings is shown below:
Prompt Management
💡 Note: This feature is only supported in V4.1 and above.
"Prompt Management" is used to centrally manage the prompt content used by various system features. Administrators can use this module to manage prompt versions, switch active versions, or perform edit and copy operations, allowing flexible adjustment of prompt logic and expression for each feature.
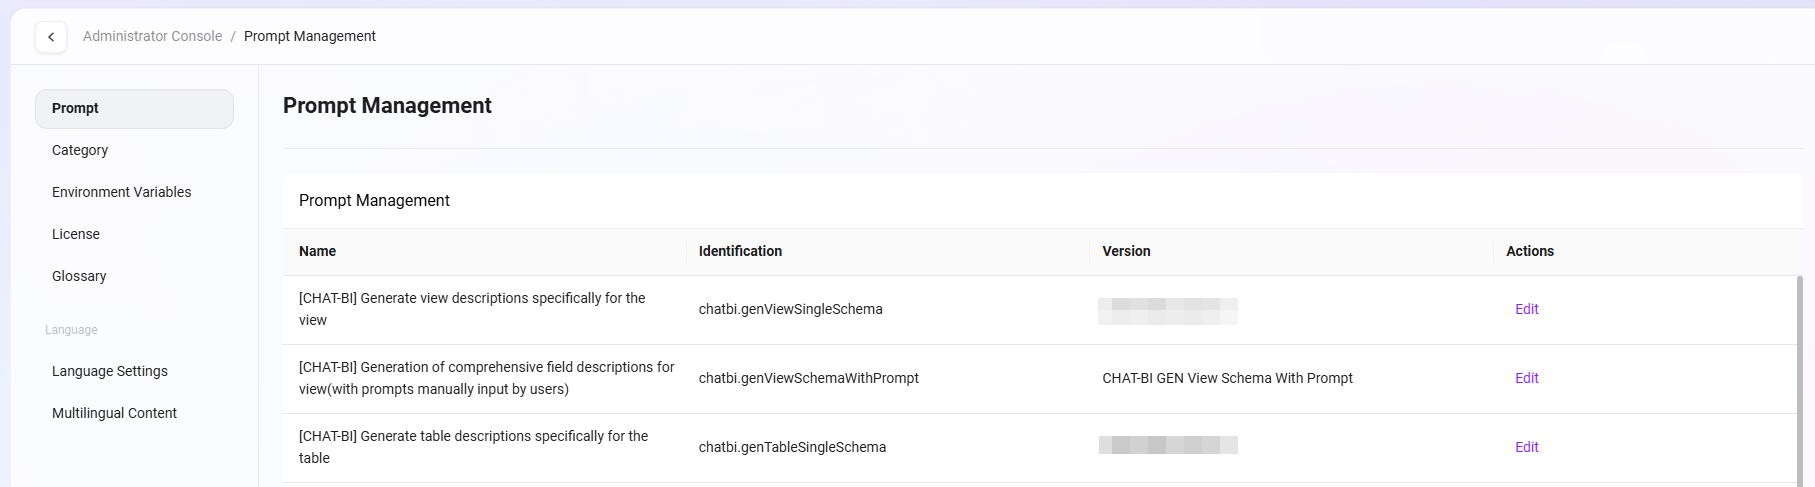
Prompt Management List
The prompt management list displays the prompt information for all system features, including the following fields:
- Feature Name: The business feature name corresponding to the prompt.
- Feature Identifier: The unique identifier used internally by the system to recognize the feature, such as
chatbi.genViewSchemaWithPrompt. - Current Active Version: The prompt version currently in use for the feature.
- Actions: Provides the "Configure & Manage" entry for viewing, editing, and managing prompt versions.
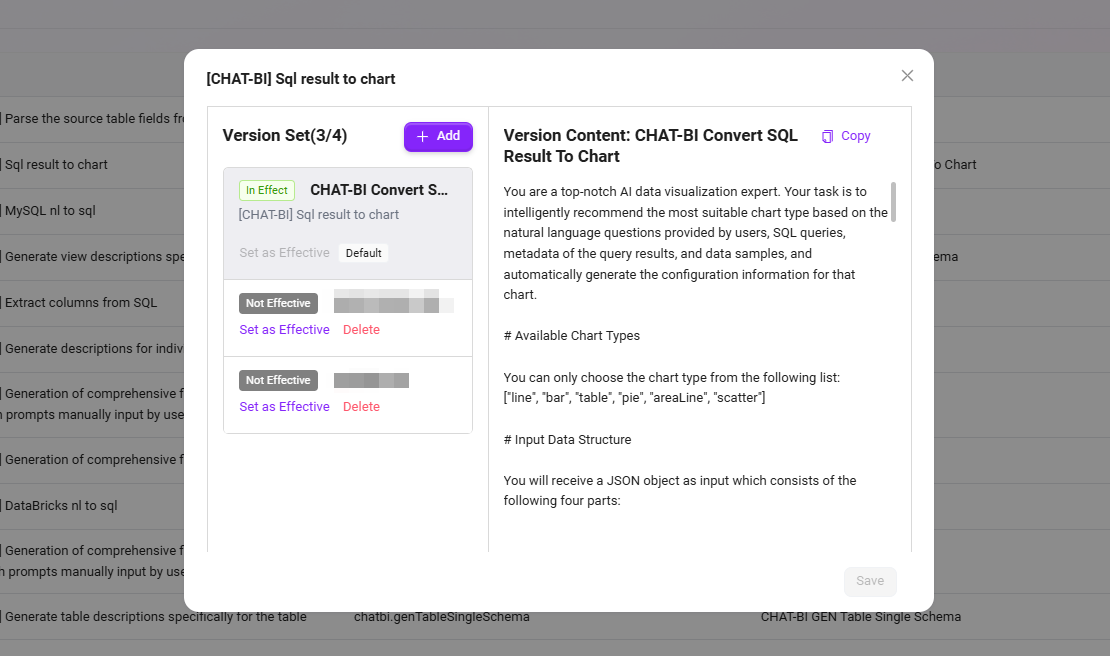
Configure & Manage
Clicking "Configure & Manage" opens a detailed configuration dialog, with the interface divided into left and right sections:
Version Set Management
- Displays all prompt versions under the feature.
- Supports manual addition of versions, with up to 4 versions per feature.
- Supports selecting the active version: only one version can be active under the same feature.
- Supports copying versions: quickly copy an existing version to create and modify a new version.
Prompt Content Editing
- Displays the prompt body content of the currently selected version (especially the active version);
- Administrators can directly edit the prompt text here, and saving will update the version content.
Usage Example
For example, the feature identifier chatbi.genViewSchemaWithPrompt indicates that the prompt is used for system prompt logic when generating view schemas in the ChatBI module. Administrators can create multiple versions (such as Test Version, Official Version) under this feature, and after verifying the content effect, manually select one version to activate, allowing flexible control over the application of different prompt versions.
Category Management
Administrators can manage SERVICEME Assistant Categories and Application Categories in Category Management. Category Management allows administrators to add, edit, view, and delete categories, ensuring cleanliness and effective use of categories.
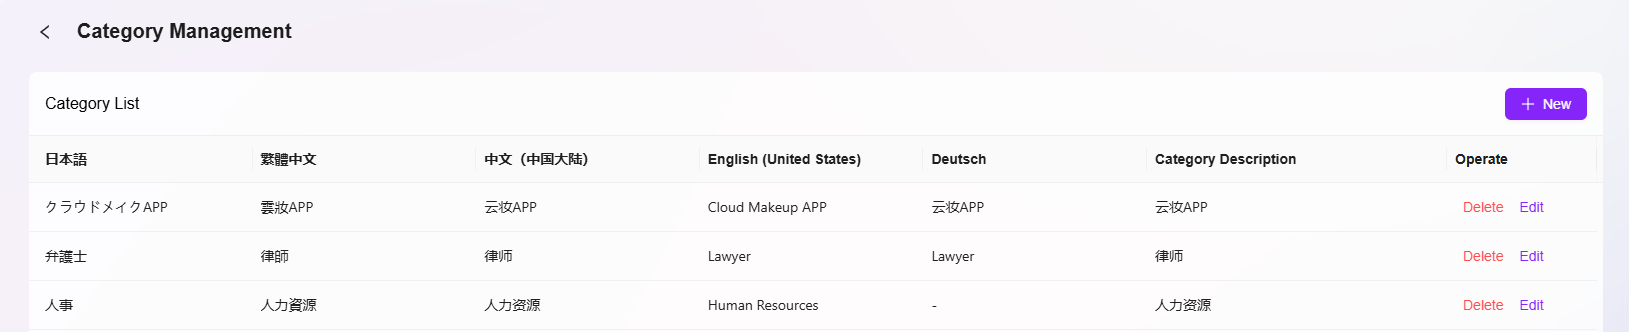
View Category List
- Enter Category Management Page: Select "Category Management" in system settings to enter the page.
- View Categories: The category list displays category information in different languages, including Japanese, Traditional Chinese, Simplified Chinese, and English, as well as descriptions for each category.
- Perform Actions: Administrators can edit or delete each category. Click the "Edit" button to modify category information, or the "Delete" button to remove a category.
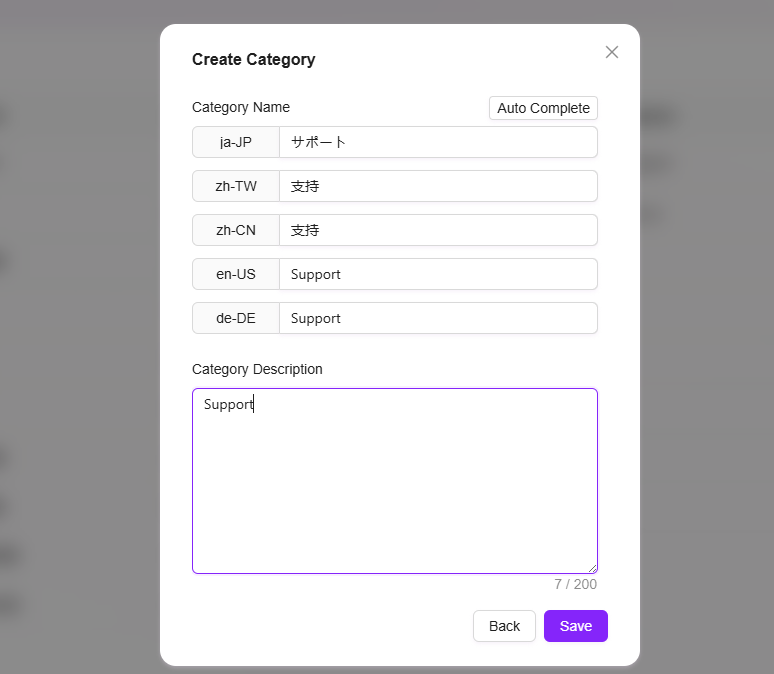
Add Category
- Click "New" Button: Navigate to Settings > System Settings > Category Management and click the "New" button on the right to start adding a new category.
- Fill in Category Information:
- Category Name: Specify a unique name for the category. Fill in category names for different language versions, including Japanese (ja-JP), Traditional Chinese (zh-TW), Simplified Chinese (zh-CN), and English (en-US).
- Category Description: Provide a detailed description for the category to ensure it is easy to identify and use.
- Click "Save": After filling in all required information, click the "Save" button to create the new category.
💡 Note: Supports one-click completion of names in different languages.

Edit Category
- Select Category to Edit: Select the category to edit from the category list.
- Click "Edit" Button: Enter the edit page, where administrators can modify the category name, description, and other details.
- Save Changes: After editing, click the "Save" button to update the category information.
Delete Category
- Select Category to Delete: Select the category to delete from the category list.
- Click "Delete" Button: Click "Delete" and confirm to remove the category.

Environment Variable Management
Administrators can manage environment variables in the system, which are used to configure the system's runtime environment. Through environment variables, administrators can set specific configuration items, such as upload file size limits, supported file types, etc.
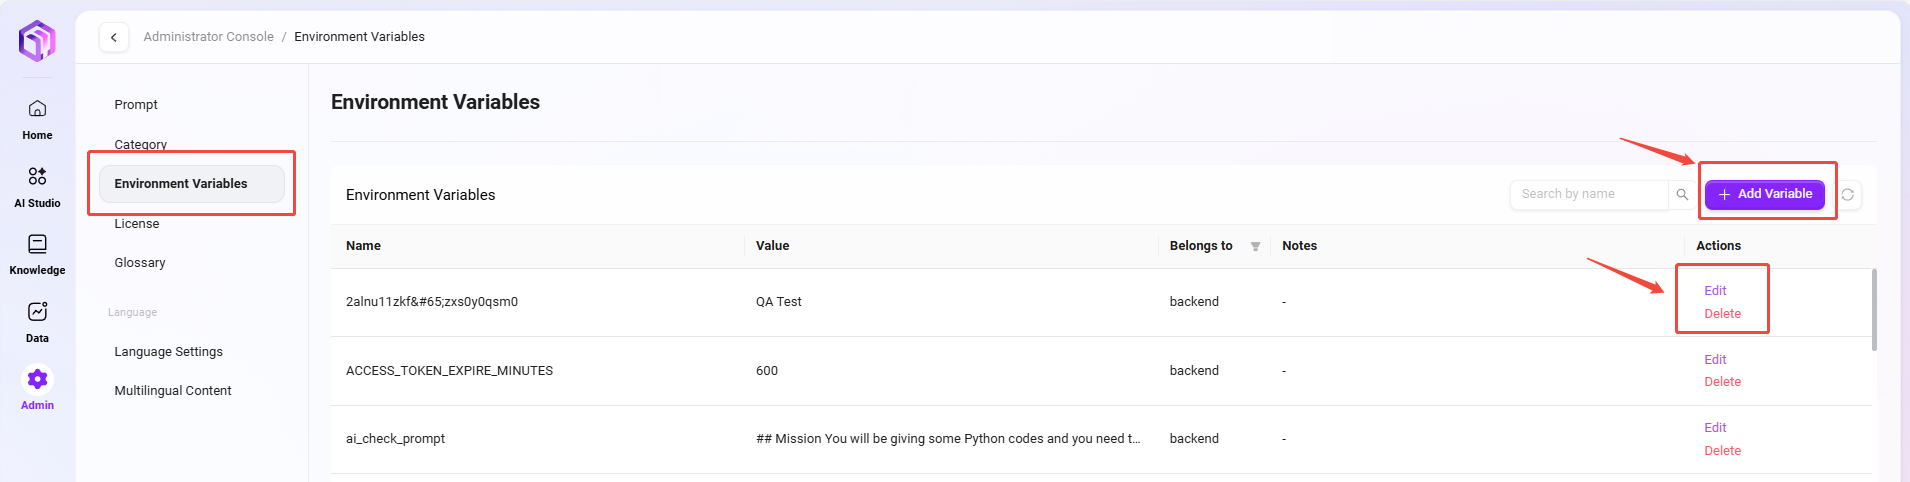
View Environment Variable List
- Enter Environment Variable Management Page: Navigate to Settings > System Settings > Environment Variables;
- View Configured Environment Variables: The system lists all configured environment variables, including the name, value, associated module, and remarks for each variable.
- Example: Environment variables such as
TITLE_FILTER,logo,slides_type, etc., can all be viewed in the list.
- Example: Environment variables such as
💡 Note: Environment variable names are limited to 100 characters. Please pay attention to the character limit before operating.
Add Environment Variable
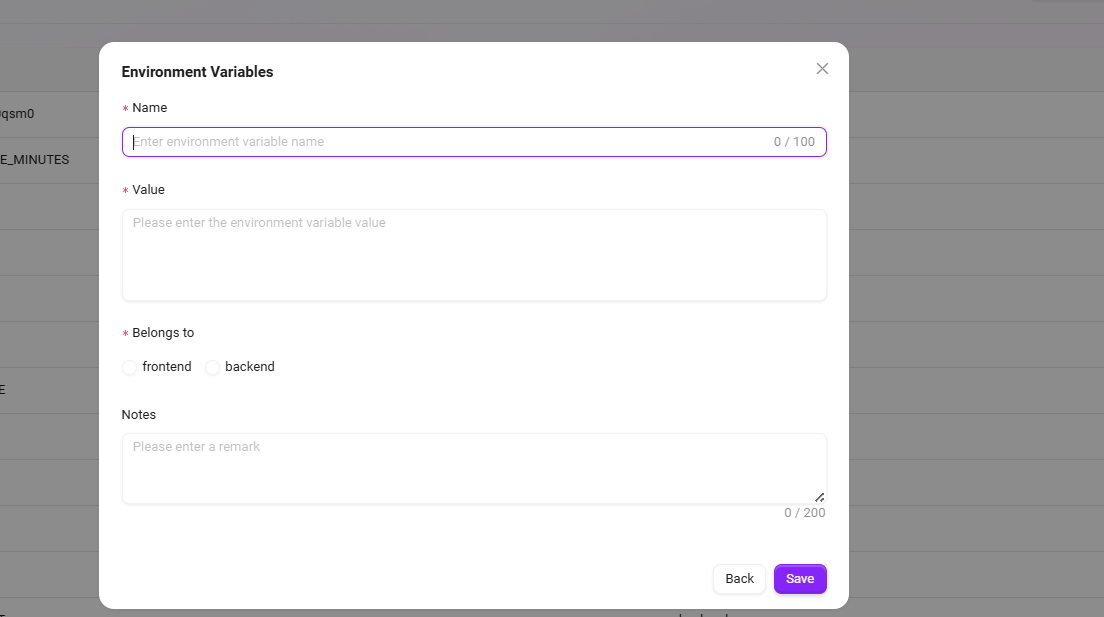
- Click "New" Button: On the environment variable management page, click the "New" button on the right to start creating a new environment variable.
- Fill in Environment Variable Information:
- Environment Variable Name: Specify a unique name for the new environment variable.
- Environment Variable Value: Specify the corresponding value for the environment variable. For example, the value of
slides_typecan be["Proposal seeking endorsement", "Information sharing"]. - Associated Module: Select which module the variable belongs to (such as
frontendorbackend). - Encryption Option: Once encryption is enabled, the field content cannot be viewed. Only backend fields support encryption; frontend fields are sent to the browser, so do not store sensitive information in frontend fields.
- Remarks: You can enter remarks to help other administrators understand the purpose of the environment variable.
- Click "Save": After filling in all information, click the "Save" button to successfully create the new environment variable.
Edit Environment Variable
- Select Environment Variable to Edit: Select the item to edit from the environment variable list.
- Click "Edit" Button: Enter the edit page, where administrators can modify the name, value, associated module, and other details of the environment variable.
- Save Changes: After editing, click the "Save" button to update the environment variable.
Delete Environment Variable
- Select Environment Variable to Delete: Select the environment variable to delete from the list.
- Click "Delete" Button: After secondary confirmation, the environment variable can be deleted.
License Management
💡 Note: This feature is only supported in V4.1 and above.
"License Management" is used to display and manage the current system's authorization information, ensuring the platform operates within the legal authorization scope. Administrators can view license details and usage on this interface, and manually upload new license files when the license expires or is updated.
The license management interface mainly displays the following information:
- System Status: Shows whether the system is currently activated.
- Environment Unique Code: A unique identifier automatically generated by the system to distinguish different deployment environments.
- Issue Date: The license issue date, used to track the start of authorization.
- Expiration Date: The expiration date of the current license; after expiration, system functions will be restricted.
- Remaining Agent Quantity: Shows the number of Agents that can still be created or used under the current license.
- Remaining User Quantity: Shows the number of users that can still be added under the current authorization.
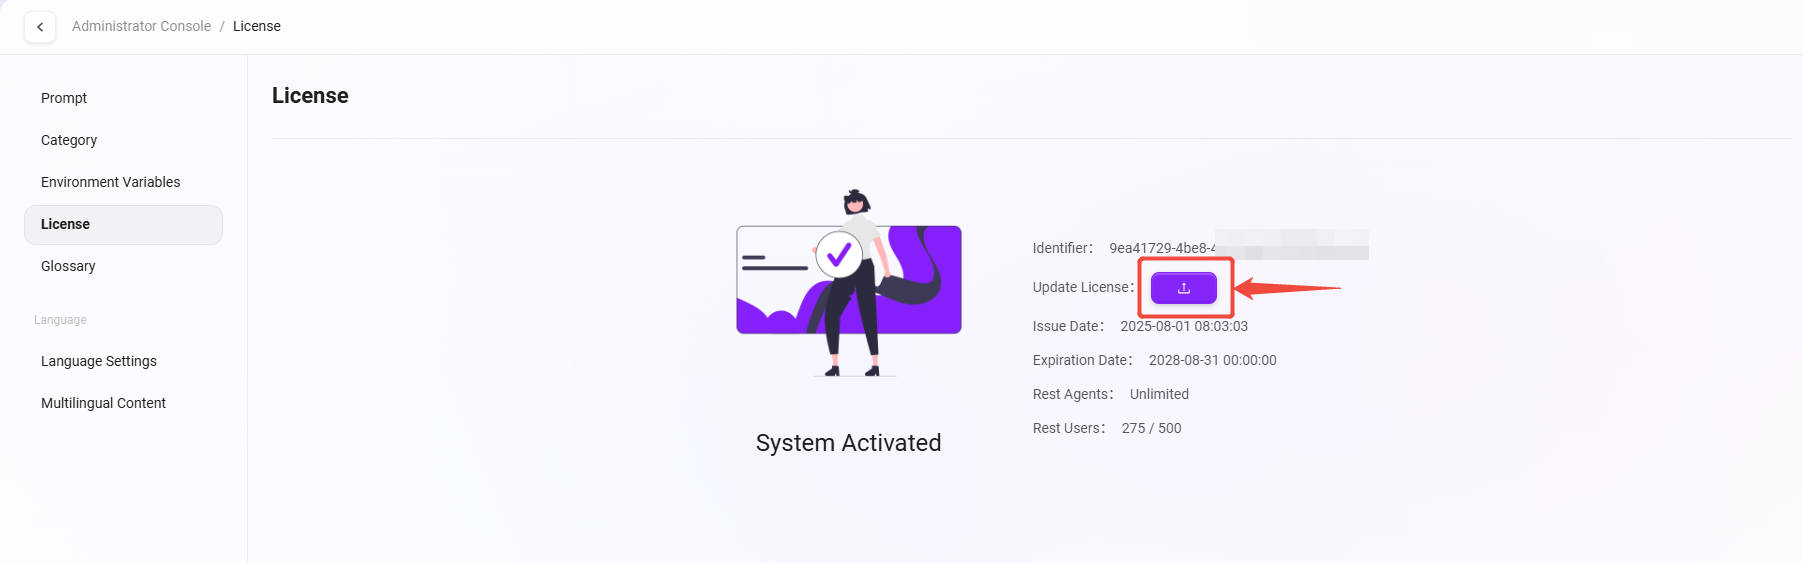
License Update
When the license is about to expire or the authorized quantity changes, you can update it as follows:
- Click the "Update License" button;
- In the pop-up window, select the new license file;
- After successful upload, the system will automatically verify and apply the latest authorization information.
Glossary
💡 Note: This feature is only supported in V4.1 and above.
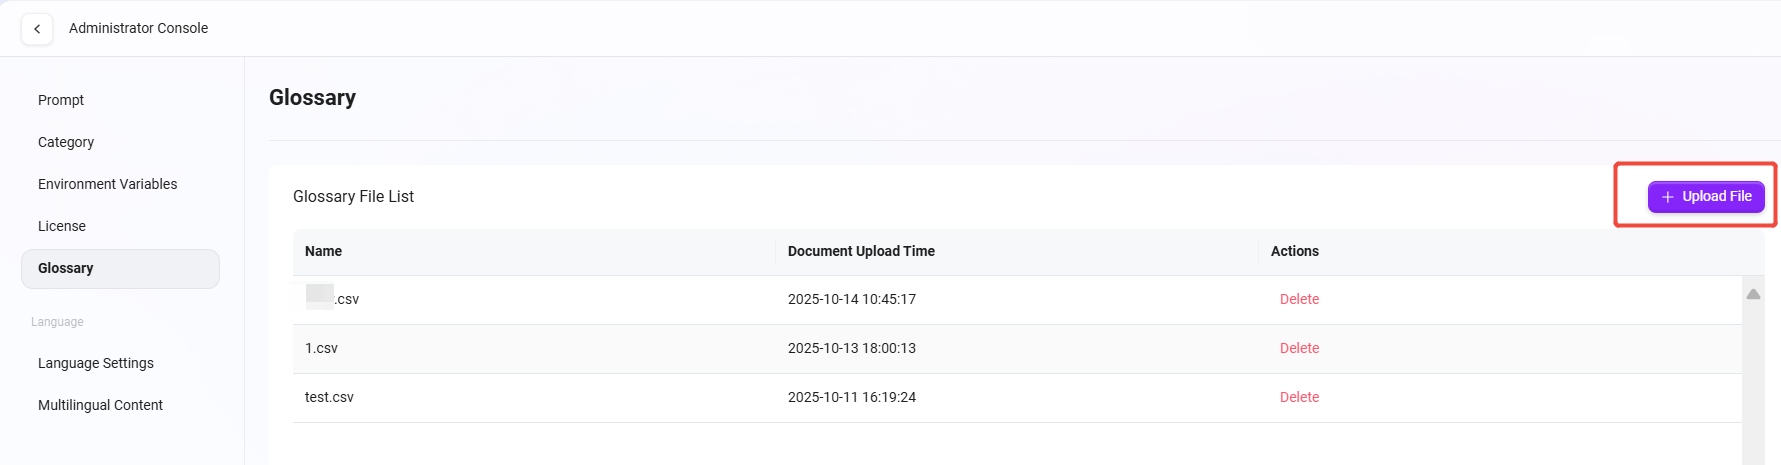
The glossary is used to centrally manage proprietary terms, term translations, and synonym mappings used within a project or enterprise, helping AI maintain term consistency and understanding accuracy during retrieval, Q&A, and text processing. Administrators can import standardized glossary files in one click, and the system will prioritize referencing glossary content when building indexes or performing semantic matching.
Supported Formats & Restrictions
- File Format: Only CSV (Comma Separated Values) format is supported.
- Maximum Upload Quantity: 1 file (only one glossary file can be uploaded at a time; to replace, delete the old file before uploading a new one).
- Single File Size Limit: 10 MB.
- Recommended Encoding: UTF-8 (to avoid issues with Chinese or special characters due to encoding problems).
- Field Suggestions: It is recommended to include columns such as "Term", "Alias/Synonym", "Definition", "Language", with the first row as field names.
Language Configuration Management
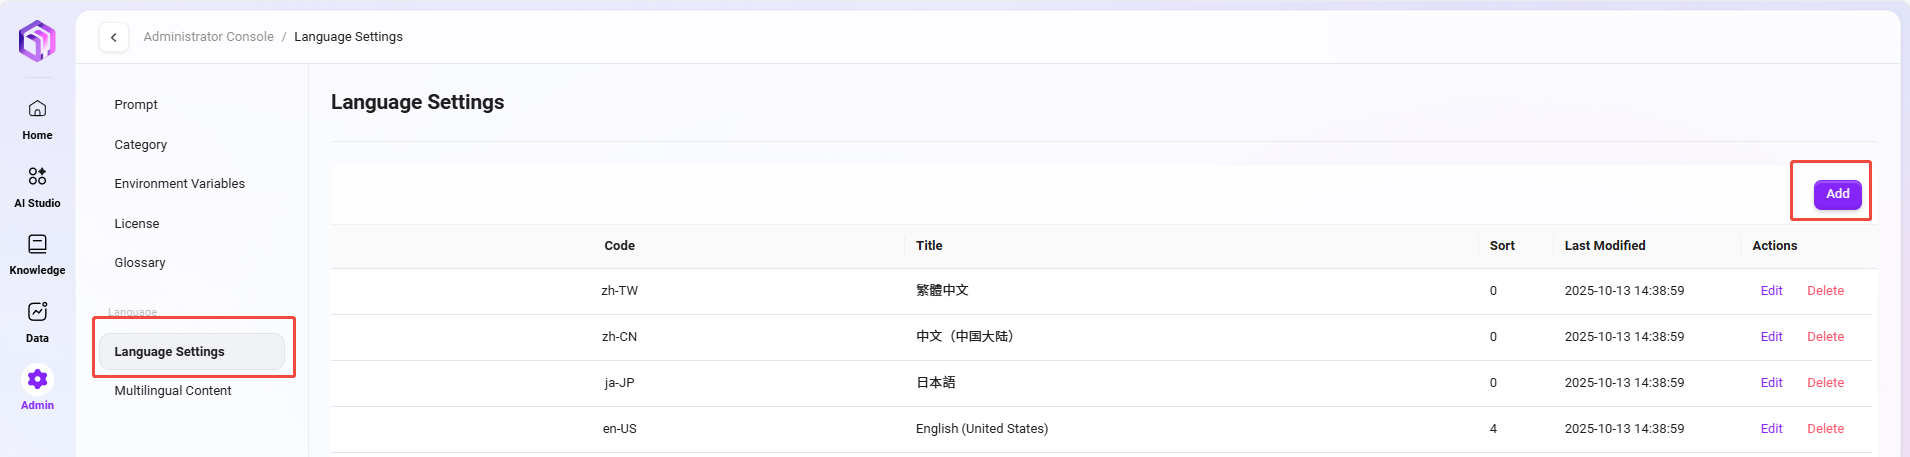
Administrators can configure languages in the system. Currently, SERVICEME supports Japanese, Traditional Chinese, Simplified Chinese, and English. Administrators can add, edit, or delete languages as needed.
Add Language
- Navigate to Language Configuration Page: Enter "System Settings" and select "Language Configuration".
- Click "Add": Click the "Add" button on the right side of the page to start adding a new language.
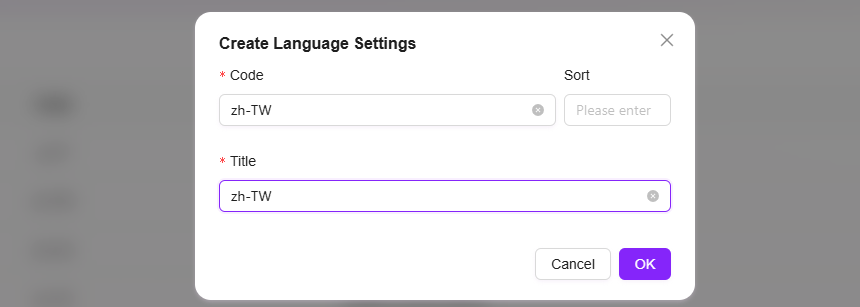
- Enter Language Information:
- Language Code: Fill in the unique identifier for the language.
- Language Title: Enter the name of the language.
- Confirm Creation: Click the "Confirm" button to successfully add the new language.
💡 Note: Newly added system languages must be within the range of 46 language codes.
Edit Language
- Select Language to Edit: Select the language to modify from the language list.
- Click "Edit": Enter the language edit page.
- Modify Language Information:
- Editable content includes Language Title and Language Code.
- Save Changes: Click the "Save" button to update the language information.
Delete Language
- Select Language to Delete: Select the language to delete from the language list.
- Click "Delete": Click the "Delete" button on the right.
- Confirm Deletion: After secondary confirmation, the language will be successfully deleted.

Multilingual Content Configuration
Administrators can configure multilingual content in the system, supporting management and editing of multiple languages. The following are the relevant steps and instructions:
View Multilingual Content Configuration
- Enter Multilingual Content Configuration Page: Administrators can find the "Multilingual Content Configuration" option in system settings and enter the page.
- View Configured Content: In the table, administrators can view configured content for each language, supporting display of translations in different language versions.
- The table lists the name of the configuration item, content for each language (such as Japanese, Traditional Chinese, Simplified Chinese, English, etc.), and corresponding action buttons like "Edit" and "Delete".
- Perform Actions: Administrators can edit or delete each row of content. Click the corresponding "Edit" button to modify language content; click the "Delete" button to remove unnecessary configuration items.
- Write Protection: For system built-in or critical configuration items, the system supports "write protection". When a configuration is write-protected, it cannot be directly edited or deleted to prevent accidental operations. To modify such content, write protection must be removed or unlocked by a system administrator.
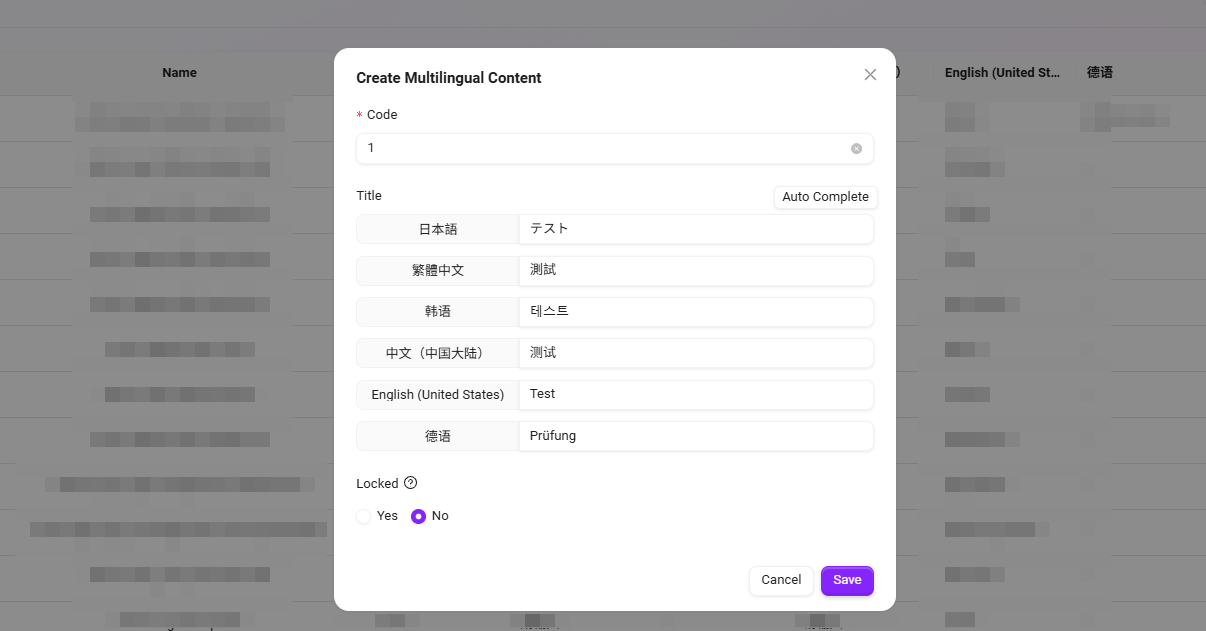
Add Multilingual Content
- Click "Add" Button: On the multilingual content configuration page, click the "Add" button on the right to start creating a new multilingual configuration.
- Fill in Code: Specify a unique code for the new configuration item to ensure correct identification.
- Enter Titles for Each Language: Enter titles for each supported language. Currently supported languages include:
- Japanese (ja-JP)
- Traditional Chinese (zh-TW)
- Simplified Chinese (zh-CN)
- English (en-US)
- Click "Confirm": After filling in all required information, click the "Confirm" button to save the configuration item and successfully add new multilingual content.
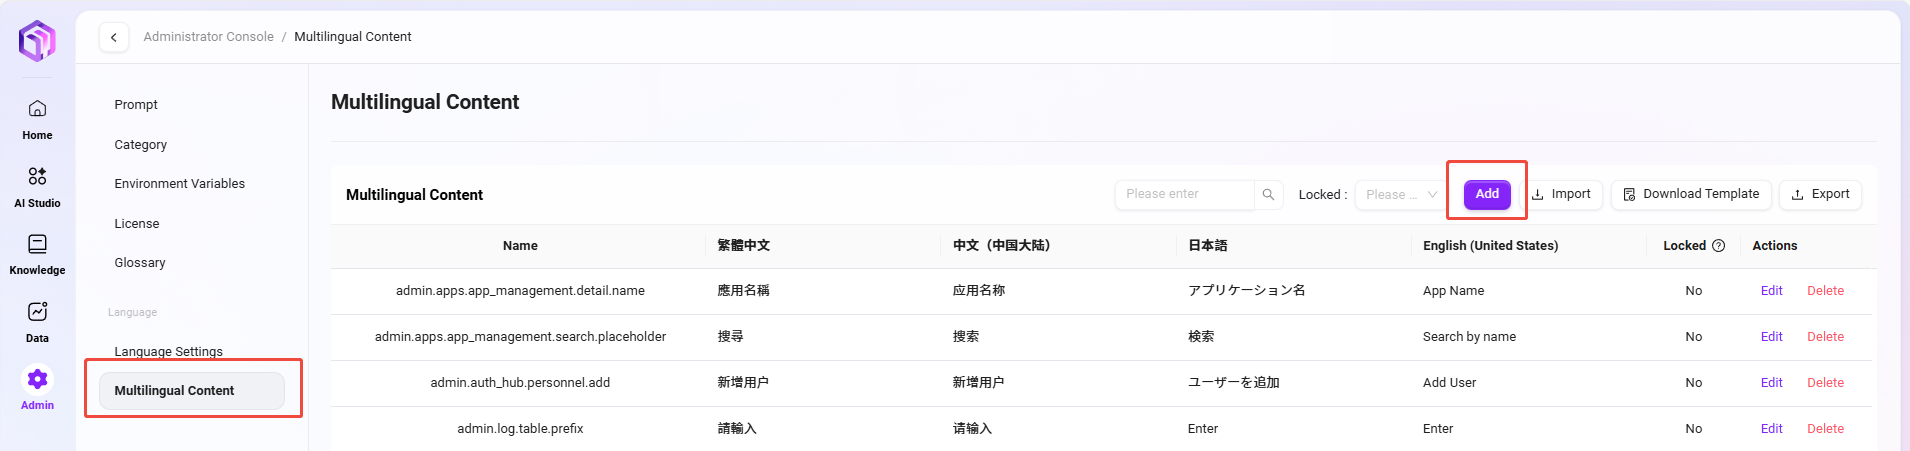
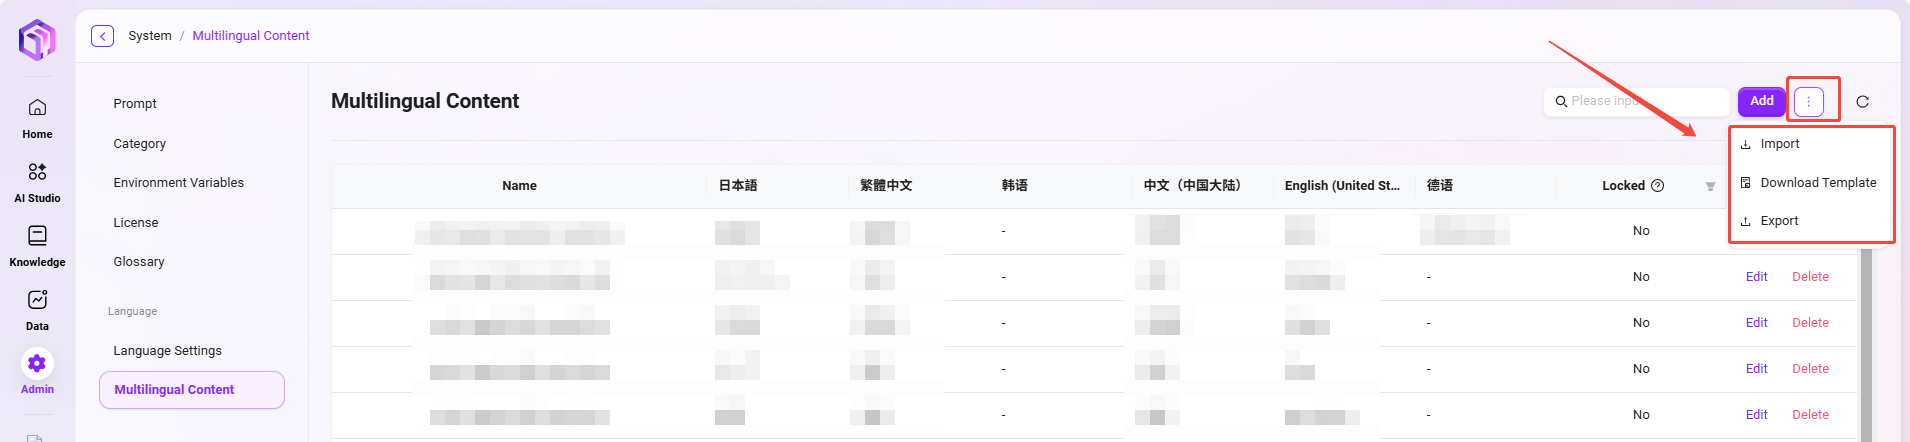
Import & Export
-
Import Multilingual Content:
- Administrators can click the "Import" button at the top right of the page to import a prepared multilingual configuration file into the system (only single file upload is supported).
- The file format is usually CSV or Excel and must include the code (Code) and content columns for each language.
- During import, the system will automatically validate the data format and field completeness. If there are duplicate codes, you can choose to overwrite or skip.
-
Export Multilingual Content:
- Click the "Export" button to export the current multilingual configuration items in the system as a file for backup or reuse in other environments.
- The exported file will contain content for all languages and supports CSV or Excel format.
-
Download Import Template:
- The system provides a standard import template. Click the "Download Import Template" button to download it.
- The template contains standardized field names (such as Code, ja-JP, zh-TW, zh-CN, en-US). Administrators can fill in content directly in the template before importing to ensure the format is correct.