Model Management
Create a New Model Set
Administrators can create a new model set by following these steps:
-
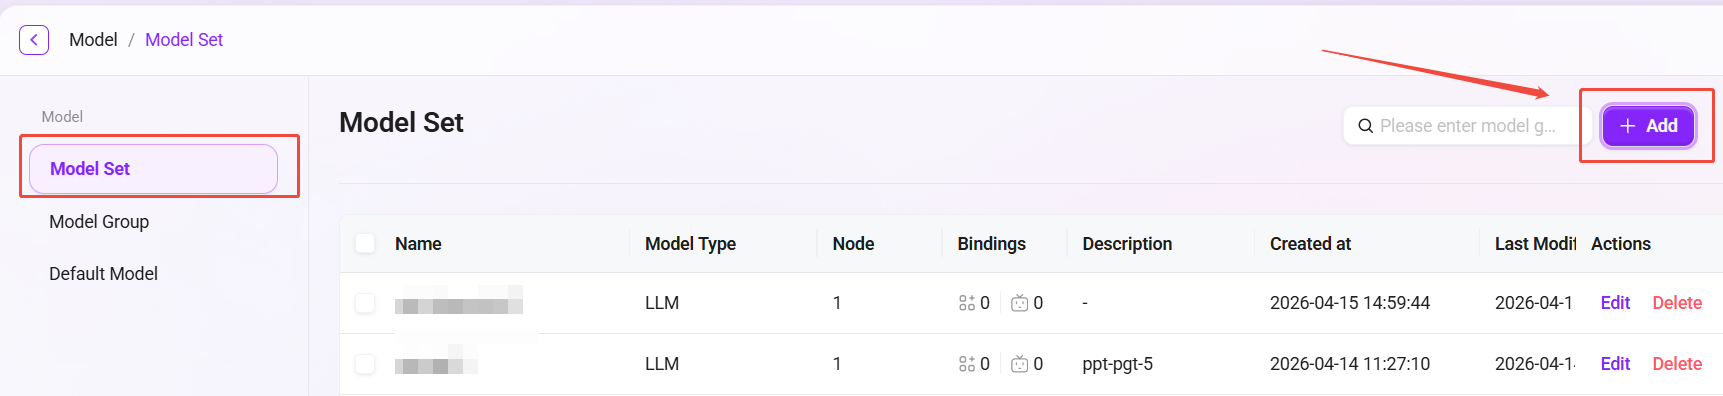
Navigate to the model set management page: Go to Model Management, then click "Model Set".
-
Click "New": Click the "New" button on the right side of the page to start creating a new model set.
-
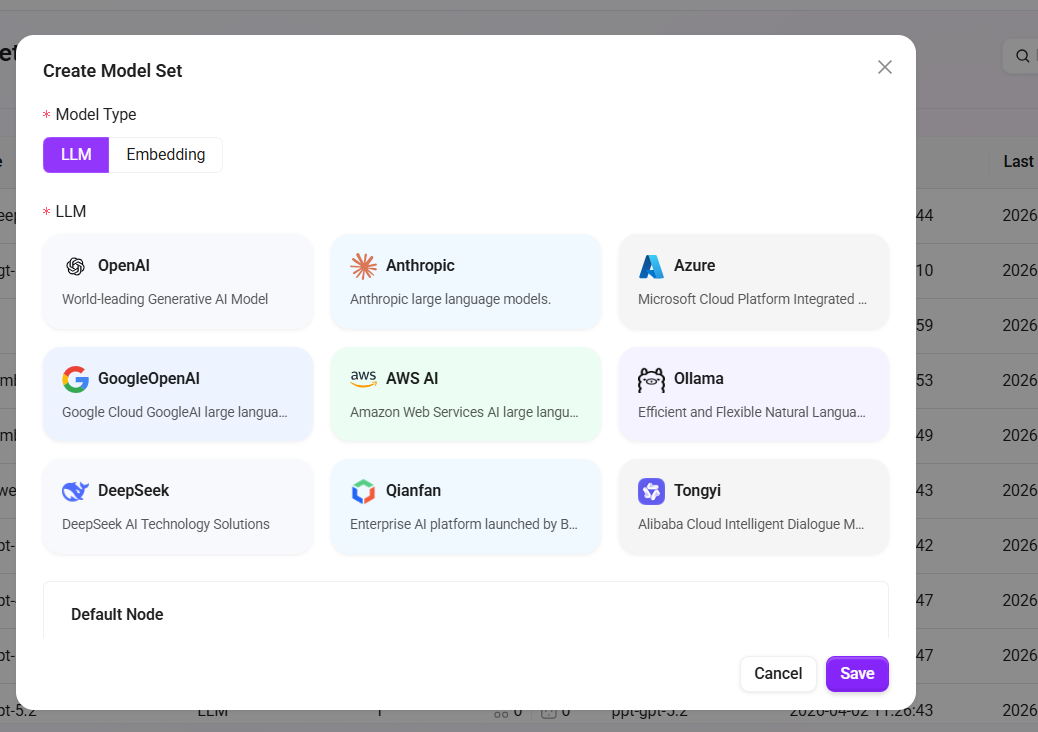
Select the model type: In the pop-up window, choose the model type. Available types include:
- LLM (Large Language Model)
- Embedding (Embedding Model)
⚠️ Note: V4.2 version supports integrating multiple Embedding models.
-
Select the language model: Choose an appropriate language model based on your needs. The currently supported language models include:
- LLM language models: OpenAI, Deepseek, Azure, Ollama, Tongyi, Qianfan, Anthropic, VertexAl, AWS AI;
- Embedding language models: OpenA Embeddings、Azure Embeddings、AliEmbeddings、Ollama Embeddings、Amazon Bedrock Embeddings、VertexAlEmbeddings;
- Fill in model set information: Enter the name and description of the model set, ensuring the information is clear and accurate (name within 50 characters, description within 200 characters).
- Select additional settings: Based on your needs, choose whether to support image Q&A and whether it is a reasoning model.
- Confirm creation: After completing the form, click the "Confirm" button to finish creating the model set.
By following these steps, administrators can successfully create a new model set and configure the corresponding settings.
When using an Embedding model, please note the vector dimension limits:
- PgSQL vector fields support a maximum of 2000 dimensions;
- When purchasing an Embedding model, ensure that its output vector dimension is less than 2000 (some models can be adjusted in the configuration);
- When adding a vector model in the system, please enter a vector dimension value less than 2000, otherwise it may cause storage exceptions or indexing failures.
- The recommended Token context limit is 8192.
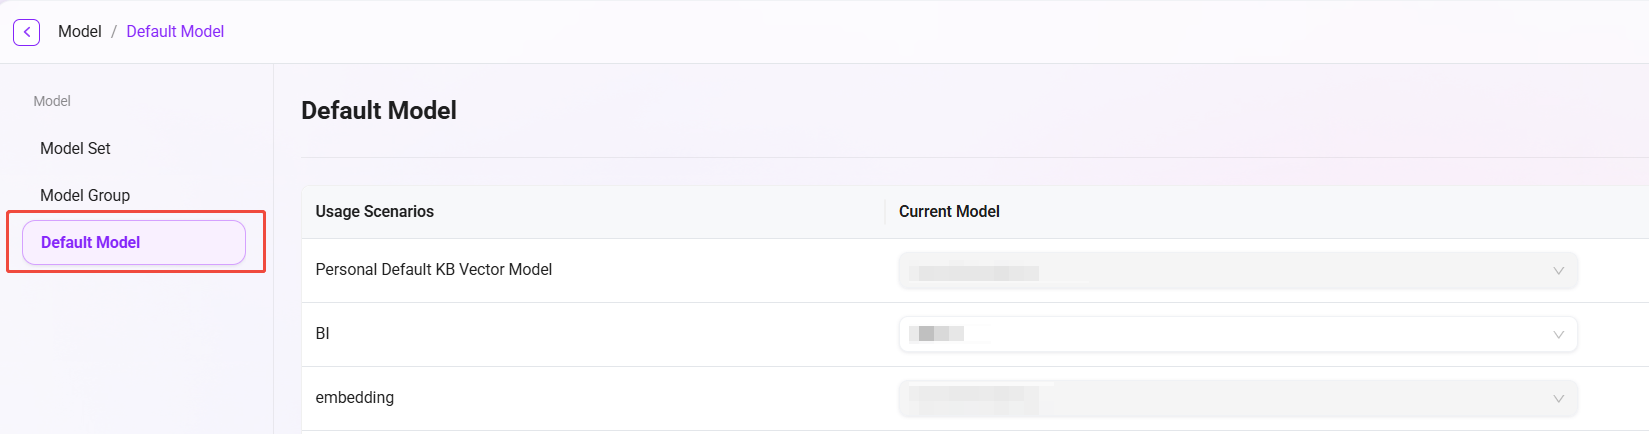
Default Model Settings
In model management, administrators can configure default models to specify suitable models for different usage scenarios. For example, in scenarios such as BI (Business Intelligence) and translation (Translate), the default model can be set to the Azure-4o model. In this way, the system will automatically use the preset default model in the corresponding scenarios, improving work efficiency and consistency.
The setup steps are similar to model set creation. Administrators can select an appropriate model as the default model for a scenario based on actual needs.
Usage Scenarios
| Feature Name | Description | Typical Scenario Example |
|---|---|---|
| RAG | Combines a knowledge base for retrieval augmentation to improve the accuracy and reliability of large model responses | Enterprise knowledge base Q&A, intelligent customer service |
| i18n translation | Enables multilingual translation and interface internationalization, supporting global deployment | AI products for overseas users, international operation platforms |
| gallery ssn writing | Records each user interaction or content generation process for convenient viewing and secondary editing | Conversation record archiving, content creation retention, version traceability |
| gallery rednote | Users can mark key information or write annotations to assist review and content auditing | Reviewing AI-generated content, collaborative user creation, highlighting key segments |
| gallery mindmap | Converts text content into a structured mind map to enhance information understanding | Project organization, knowledge graph generation |
| optimize prompt | Optimizes user input prompts to improve model understanding and output quality | Assisted rewriting when user input is unclear, low-threshold question optimization |
| recommend question | Automatically recommends the next potentially interesting or relevant question to improve interaction experience | Chatbot conversation continuation, recommendation guidance |
| gallery chat lead | Provides conversation guidance templates or "opening phrases" to help users initiate clearer questions or creative requests | Chat template library, creative prompts |
| recommend config | Automatically recommends large model parameter configurations based on the task (such as temperature, whether to use RAG) | Agent configuration panel, low-code/no-code intelligent recommendation |
| pdf_markdown | Parses PDF files into Markdown structured format for easier reading and subsequent processing | Importing documents into a knowledge base, summary generation |
| translate | Automatically translates user input or model output to enable cross-language communication | Multilingual conversations, multilingual customer service |
| BI | Uses large models to process structured data and generate visual analysis or business insights | Natural language report analysis, chart generation, BI Q&A agents |
| llm_ocr | Extracts text from images into structured text and combines large models to understand semantics | Image Q&A, form recognition, PDF screenshot interpretation, image document search, etc. |
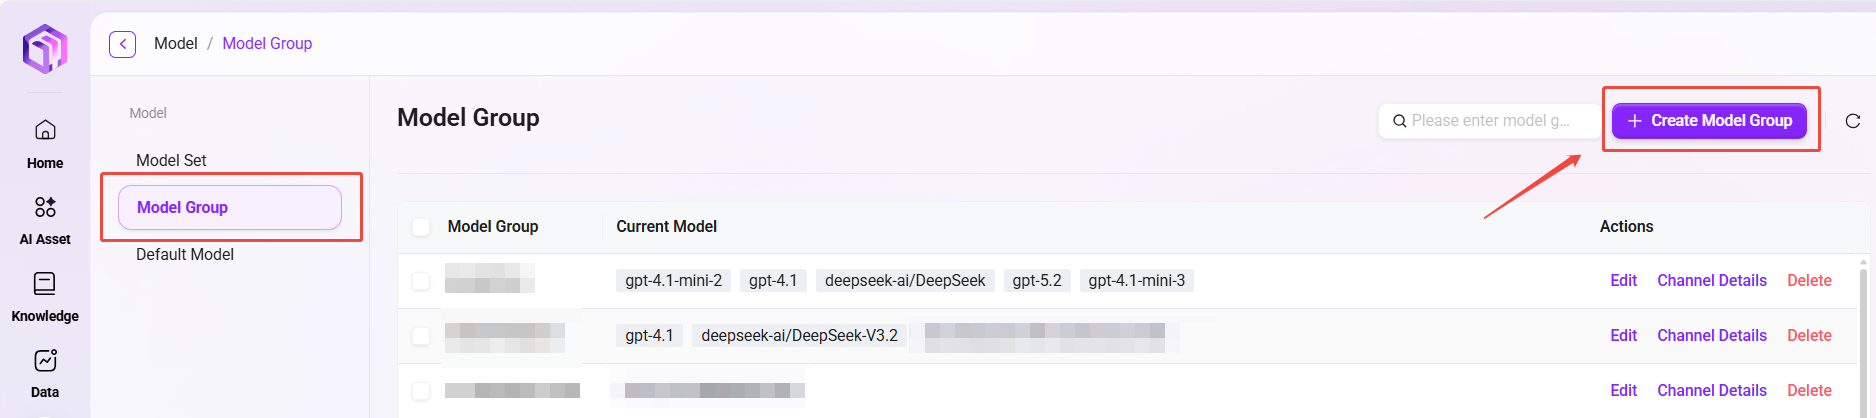
Create a Model Group
Administrators can create model groups in model management. The created model groups can be used to configure suitable model groups when creating agents.
The following are the steps to create a model group:
- Navigate to the model group management page: Go to Management, select "Model Management", then click "Model Group".
- Click "New Model Group": Click the "New Model Group" button on the right side of the page to start creating a new model group.
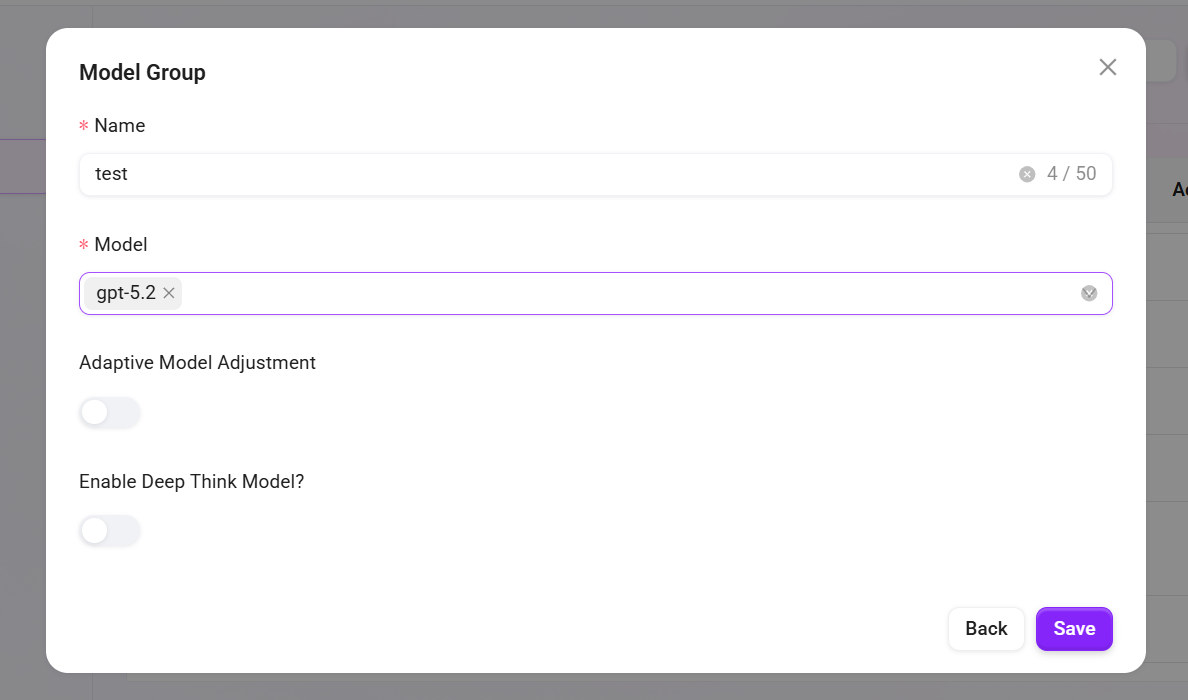
- Enter the model group name: Specify a unique name for the model group to ensure easy identification (within 50 characters).
- Select models: Choose the models to be included in the model group from the available model list. Multiple selections are supported.
- Choose whether to enable adaptive model deployment: Based on your needs, choose whether to enable the adaptive model deployment feature to improve model flexibility and adaptability.
- Choose whether to enable deep thinking models: Based on your needs, choose whether to enable deep thinking models to enhance the model's intelligent processing capabilities.
- Click "Save": After confirming that all settings are correct, click the "Save" button to successfully create the model group.
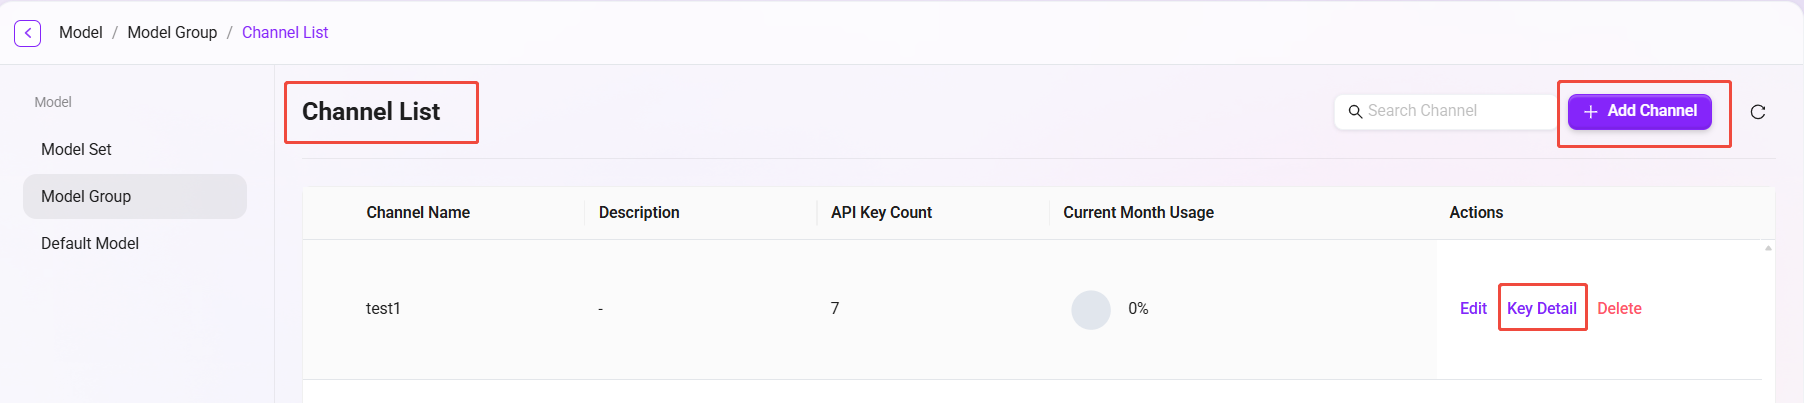
Model Group Channel Details
After creating a new model group, you can enter the "Channel Details" page to view all configured channels. Based on your needs, you can:
- Create a new channel: Create a new invocation channel for the model group.
- Manage keys: Click "Key Details" on the right to view all key information under that channel, and create new keys.
This page makes it convenient to centrally manage all channels and their corresponding API Keys.

API Key Feature Description
The API Keys provided by our platform have a high degree of independence and authorization effectiveness. Each API Key is equivalent to an independent "pass", with complete access and invocation permissions. Details are as follows:
-
Independent of the platform user system
A caller holding an API Key does not need to be a registered platform user, nor does it need any specific user permissions. As long as a valid API Key is included in the request, it will be regarded as a legally authorized request, and the system will process and respond normally. -
Not restricted by License limits
Calls initiated through API Keys do not consume the platform's user License quota. Therefore, even if the actual number of registered users on the platform is limited, more service integrations and business scenarios can still be flexibly supported through API Keys, enabling large-scale usage without additional authorization or capacity expansion. -
Flexible configuration on demand
Different API Keys can be configured with different validity periods and permission scopes (such as access modules, data scope, etc.) as needed, adapting to different integrated systems or business parties. It is recommended to generate a separate API Key for each integration party to facilitate subsequent management and usage tracking.
⚠️ Security Tip: Please manage API Keys properly and avoid leakage. Once abused externally, all requests initiated through that Key will by default have full permissions, which may pose risks to data and system security.
Agent Conversation API Upgrade
Based on the original API Key invocation method, an SSE (Server-Sent Events) session management method for user Token access to the Agent API has been added.
- User authentication upgrade: Solves the issue that the traditional API Key method cannot identify specific user identities, and supports third-party applications invoking through user Tokens to clearly distinguish request sources from different users.
- Context management optimization: Supports third-party applications to "actively" control conversation context, allowing flexible creation of new sessions or continuation of the previous conversation, enhancing conversation continuity and management flexibility.
- Enhanced compatibility: The new invocation method can be debugged and invoked using API testing tools such as Apifox, facilitating development and integration testing.
This upgrade is especially suitable for third-party application integration scenarios that require precise user identity recognition, providing more refined control capabilities for Agent invocation in multi-user environments.
Model Configuration Instructions
This product supports integration with the following enhanced features, all of which rely on services provided by Azure or external platforms. You need to go to the relevant platforms based on your own needs to select and obtain the necessary access credentials (API Key, Endpoint, etc.):
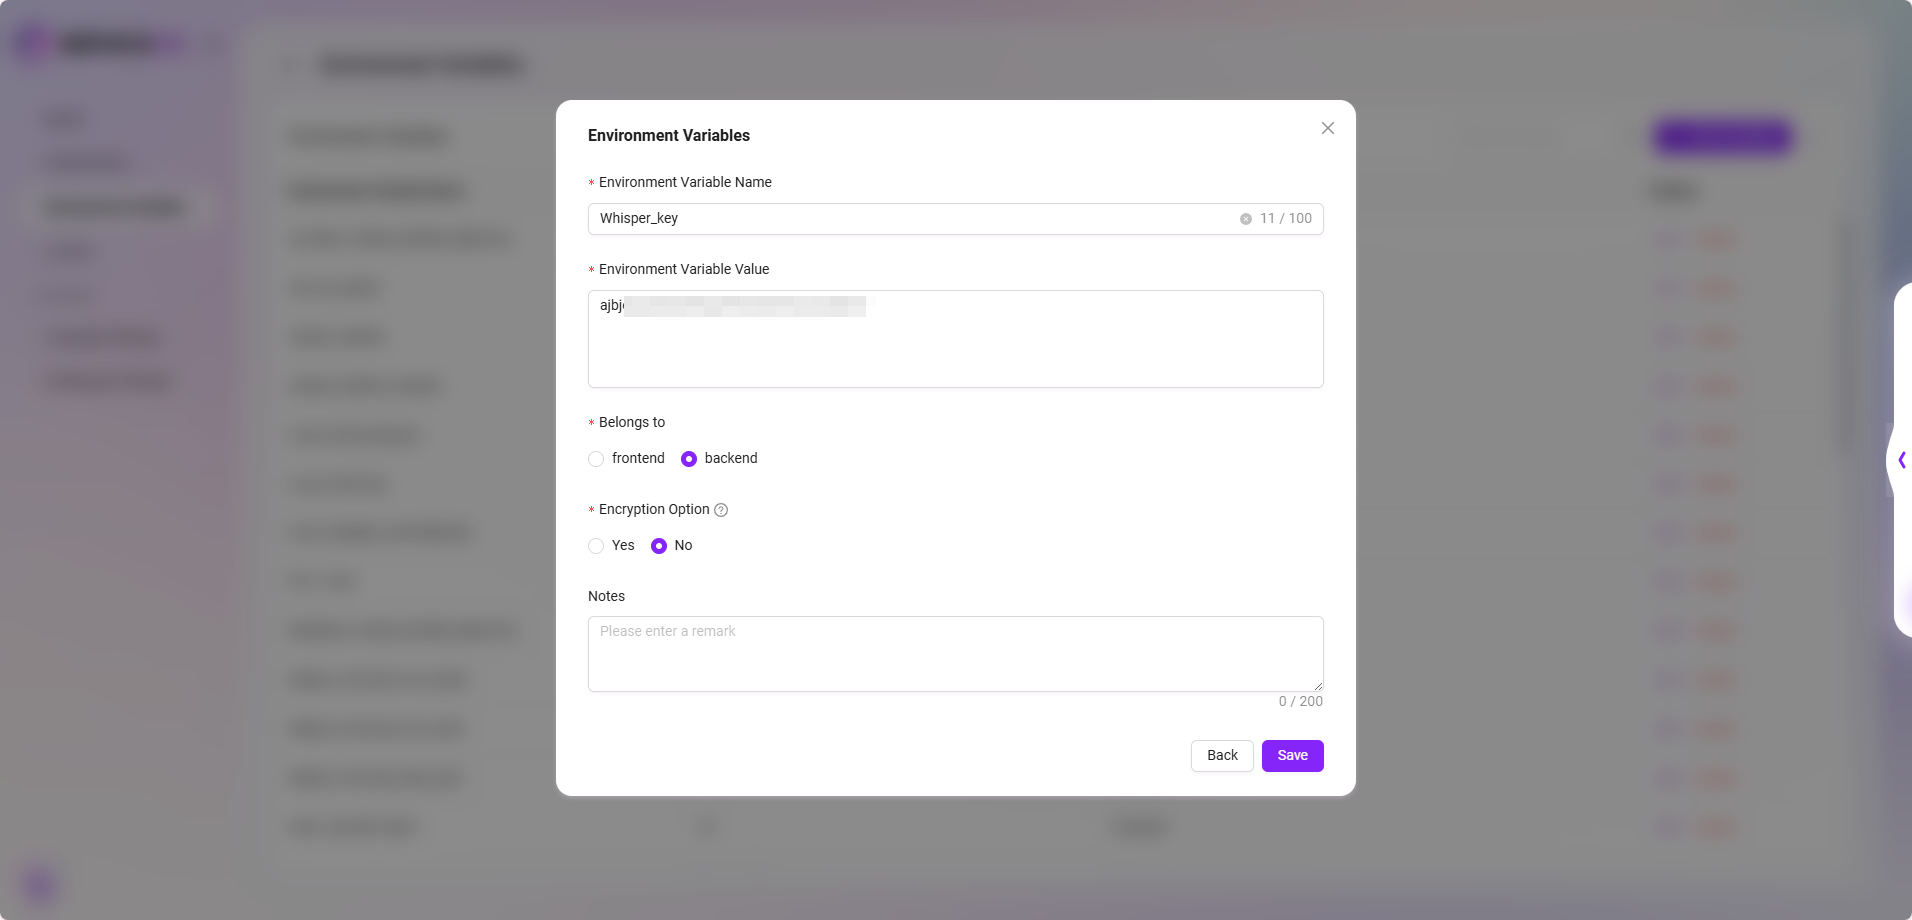
- Voice Input Feature (Whisper Service)
- Service description: Purchase and deploy the Whisper service on Azure to enable speech-to-text functionality.
- Configuration method: Supports configuring multiple Whisper Keys through environment variables. The variable name must explicitly contain the word "Whisper"; if not configured, the voice input button will not be displayed.
- Compatibility note: Also supports configuring the Whisper service through SQL initialization. The configuration content will be automatically written into environment variables and can be modified later.
- Azure OCR Mode (Azure Document Intelligence)
- Service description: OCR capability based on Azure Document Intelligence, supporting two recognition modes: "Basic" and "Advanced".
- Configuration method: The KEY and Endpoint for Azure OCR mode must be set in environment variables; if not configured, this OCR mode cannot be selected.
- Interaction prompt: The interface will automatically display available modes based on the configuration status and restrict the selection of invalid options.

- If you need to purchase services or obtain API Keys and Endpoints, please visit the official Microsoft Azure website or the relevant service provider pages and choose an appropriate pricing plan as needed.
- We recommend that customers prioritize evaluating data security, response timeliness, and pricing factors before configuration. If deployment support is needed, please contact the technical support team.