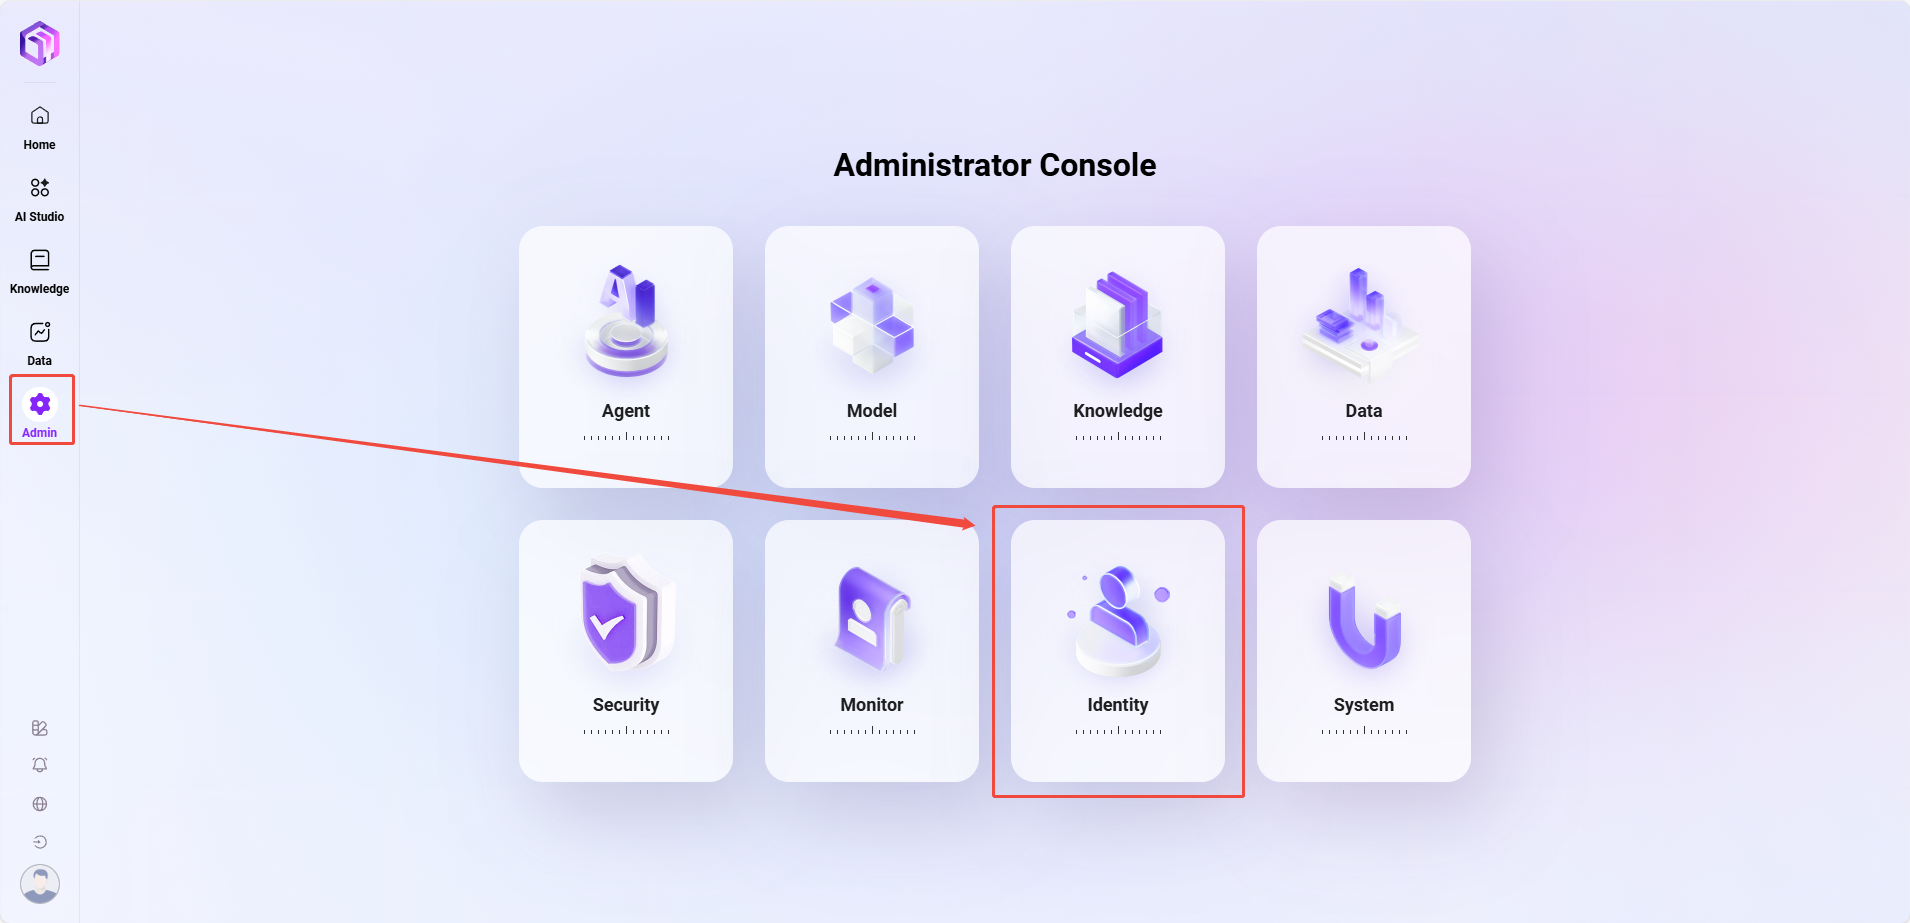
Identity
The entry point for Identity is as shown below:
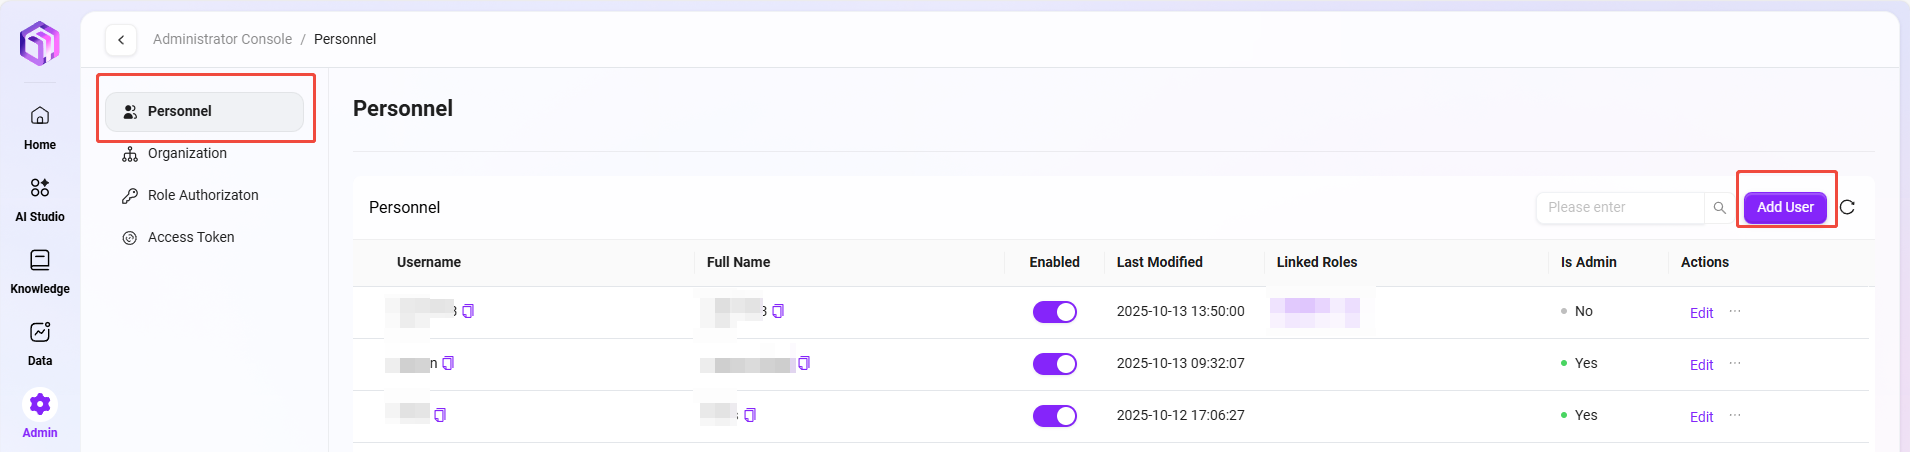
Personnel Management
How to Add a New User?
Specific steps to add a new user:
- Go to Admin > Identity > Personnel page.
- Click the Add User button on the right to enter the Add User page.
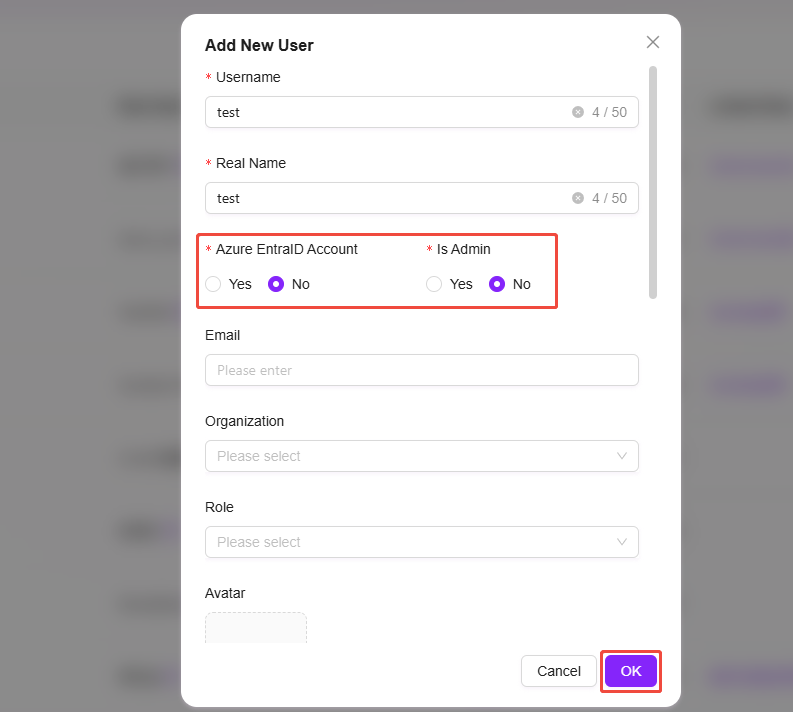
- Fill in user information:
- Username: Enter the new user's username (within 50 characters).
- Real Name: Enter the user's real name (within 50 characters).
- Is Azure Entra ID Account: Choose whether it is an Azure Entra ID account.
- Is Administrator: Choose whether to set this user as an administrator.
- Other information (such as email, organization, role, etc.) is optional; fill in as needed.
- After completing the information, click the Confirm button to finish creating the new user.
💡 Tip: If the new user is selected as an Azure Entra ID, then the email is a required field.
How to Change a User's Password?
The system supports changing user passwords through the following two methods:
-
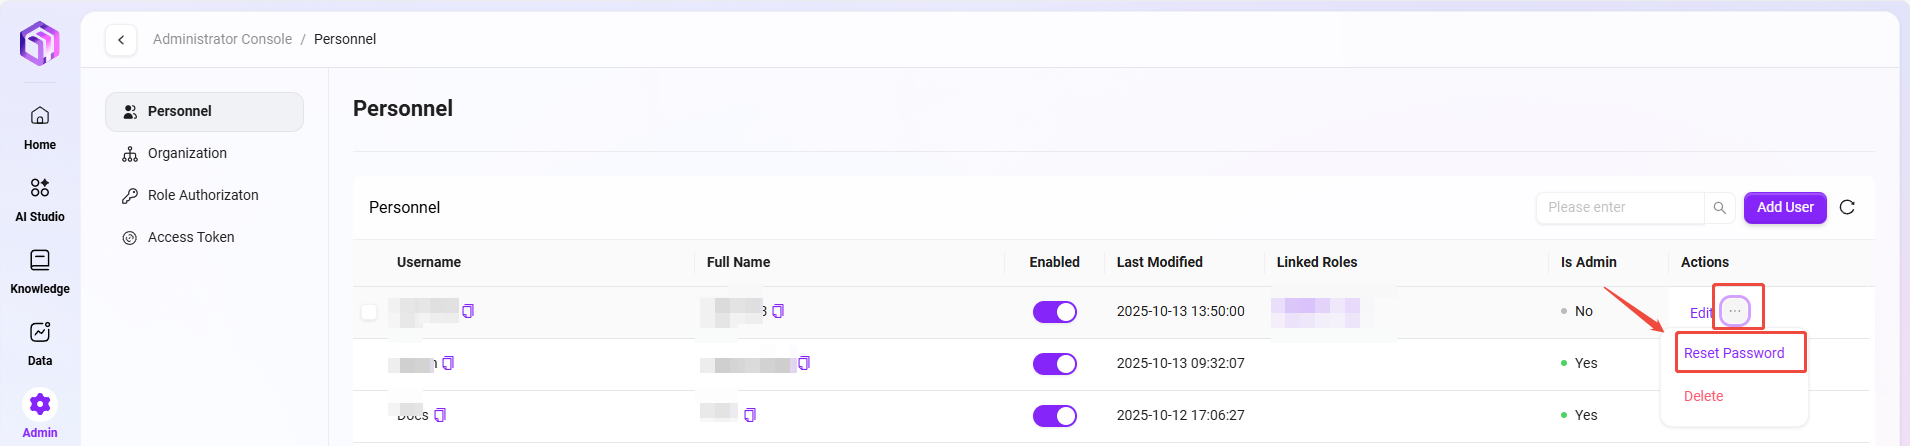
Method One: Administrator Resets Password (Applicable when user forgets password or for initial setup)
The administrator can generate a temporary random password for the user. The user must change it immediately upon first login with this password.
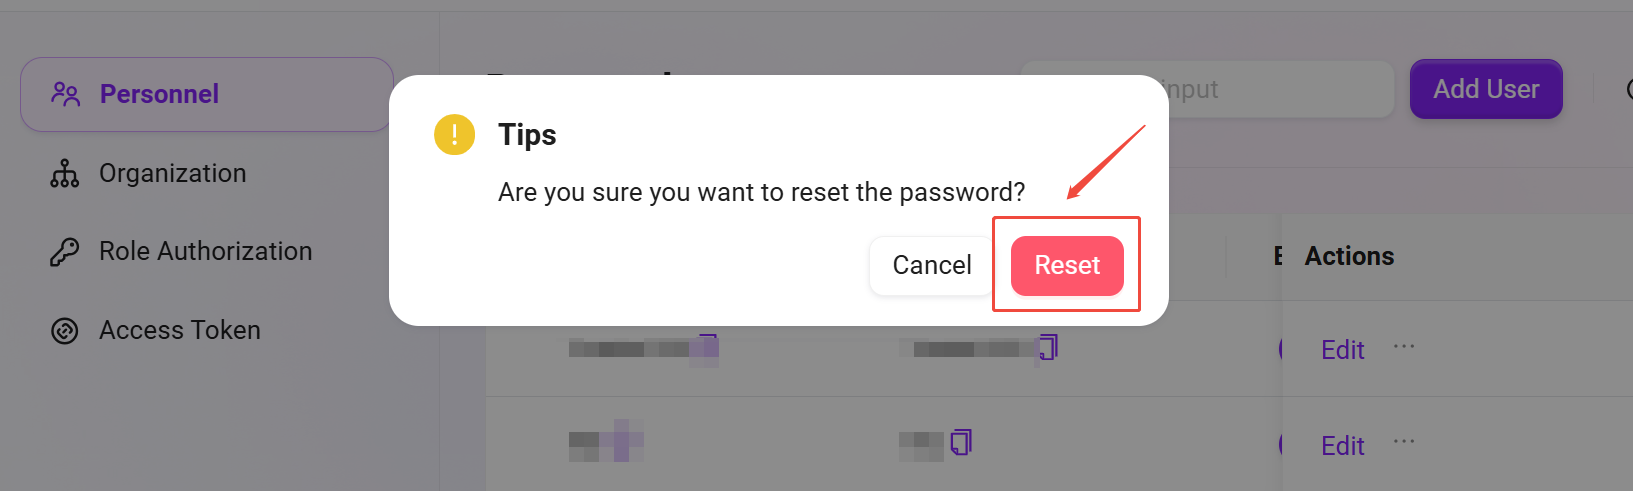
- Navigate to Admin > Identity > Personnel page.
- Find the user whose password needs to be reset, click the three dots behind that user, and select Reset Password.
- In the pop-up confirmation dialog, click Confirm. The system will generate a new random password.
- Copy the new password and provide it to the user to complete the password reset operation.
💡 Tip:
- After the password is reset, the user must change the password upon first login, thus achieving the purpose of password change.
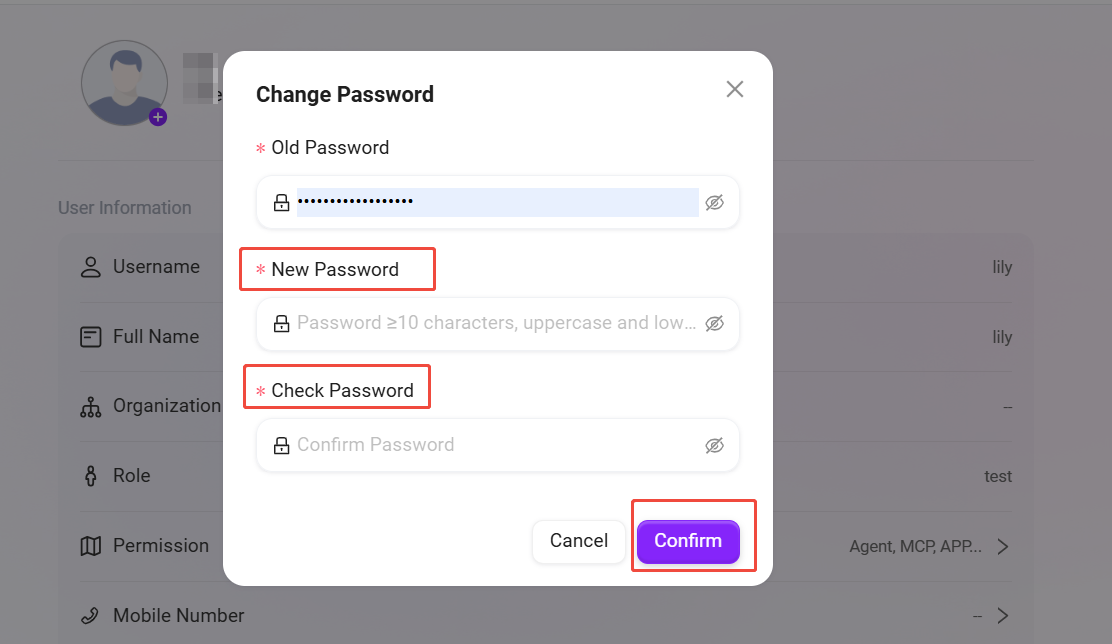
- The password must be at least 10 characters long and contain uppercase letters, lowercase letters, numbers, and special symbols.
-
Method Two: User Self-Service Password Change
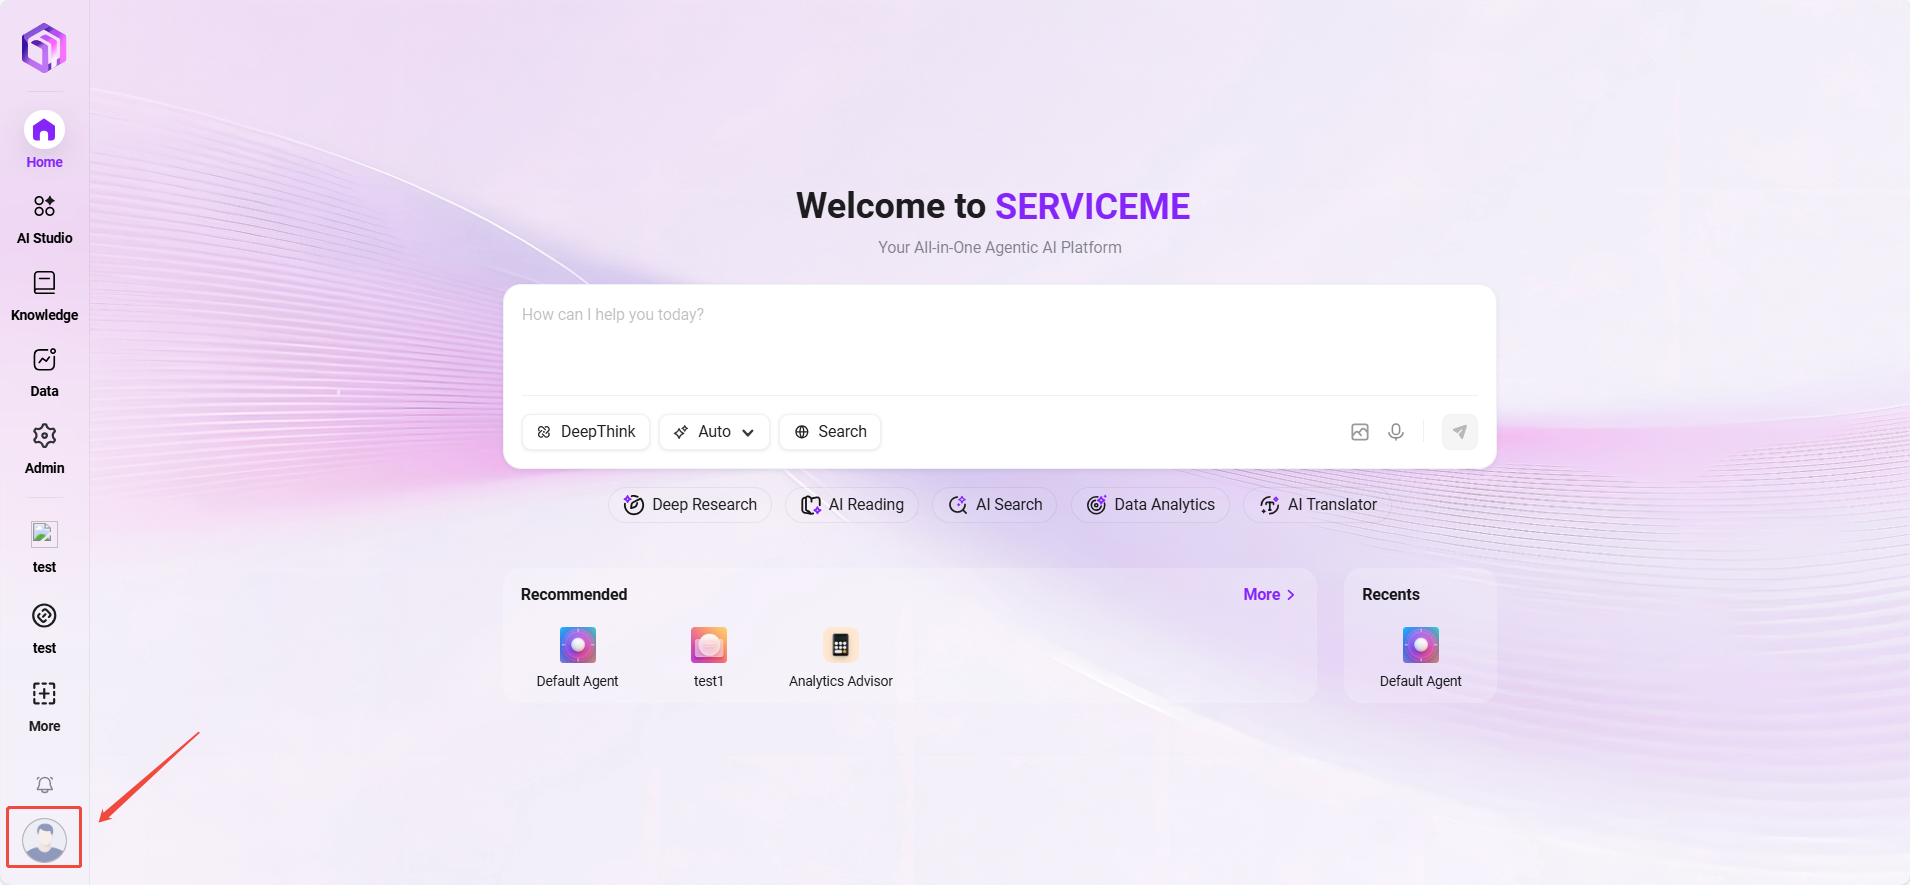
After logging in, users can change their own password at any time in their Personal Center.
- Click the user avatar in the lower right corner of the system interface to enter the Personal Center.
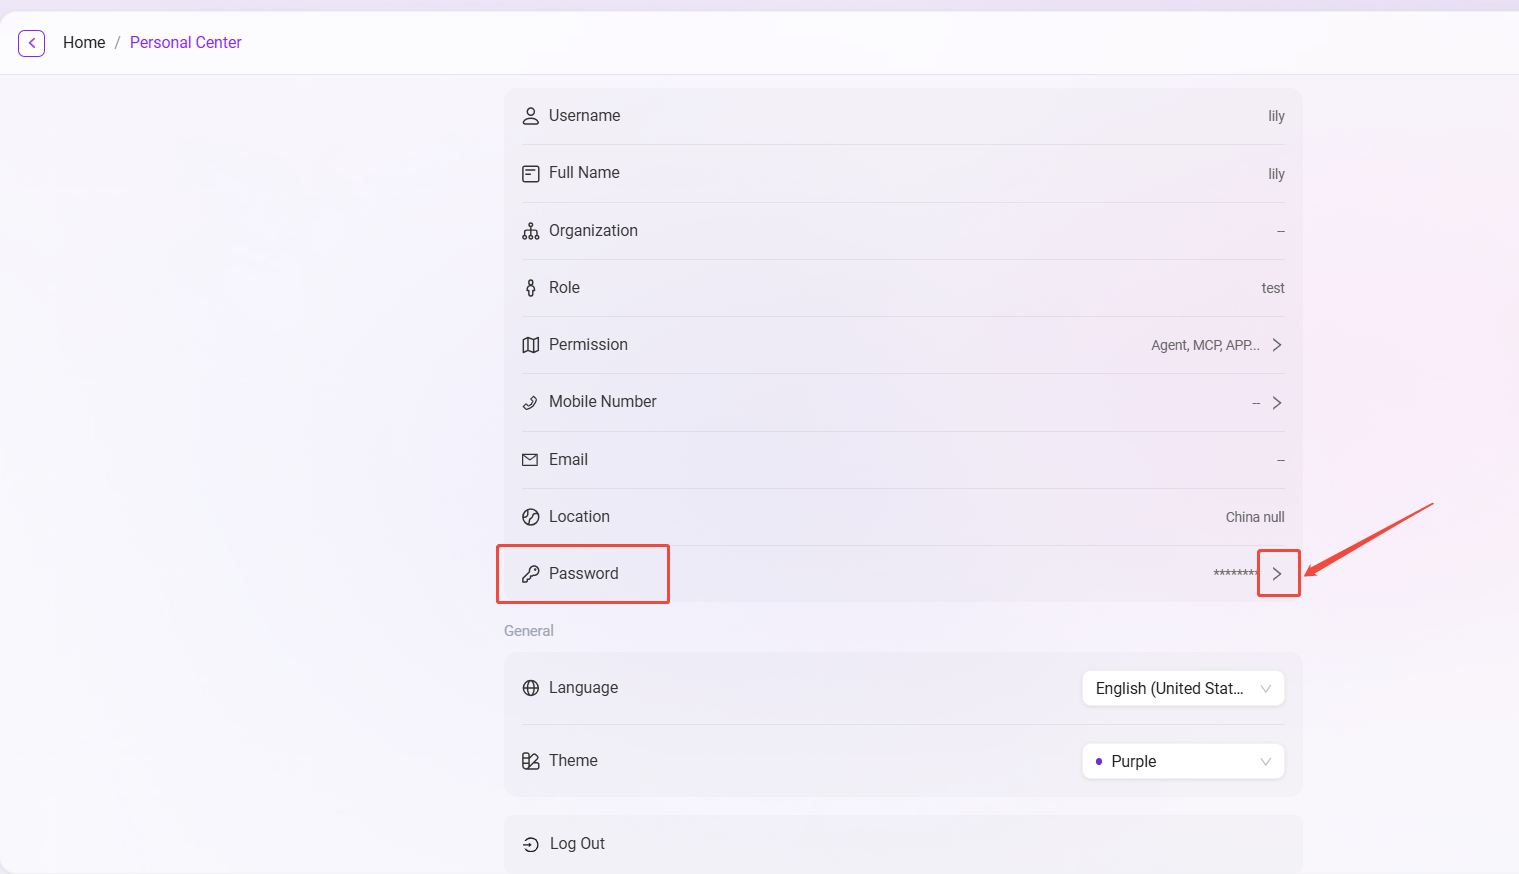
- Click Password, enter the old password (the system usually auto-fills the password of the currently logged-in account);
- According to the aforementioned password rules, enter and confirm the new password, click Confirm to successfully change the password.
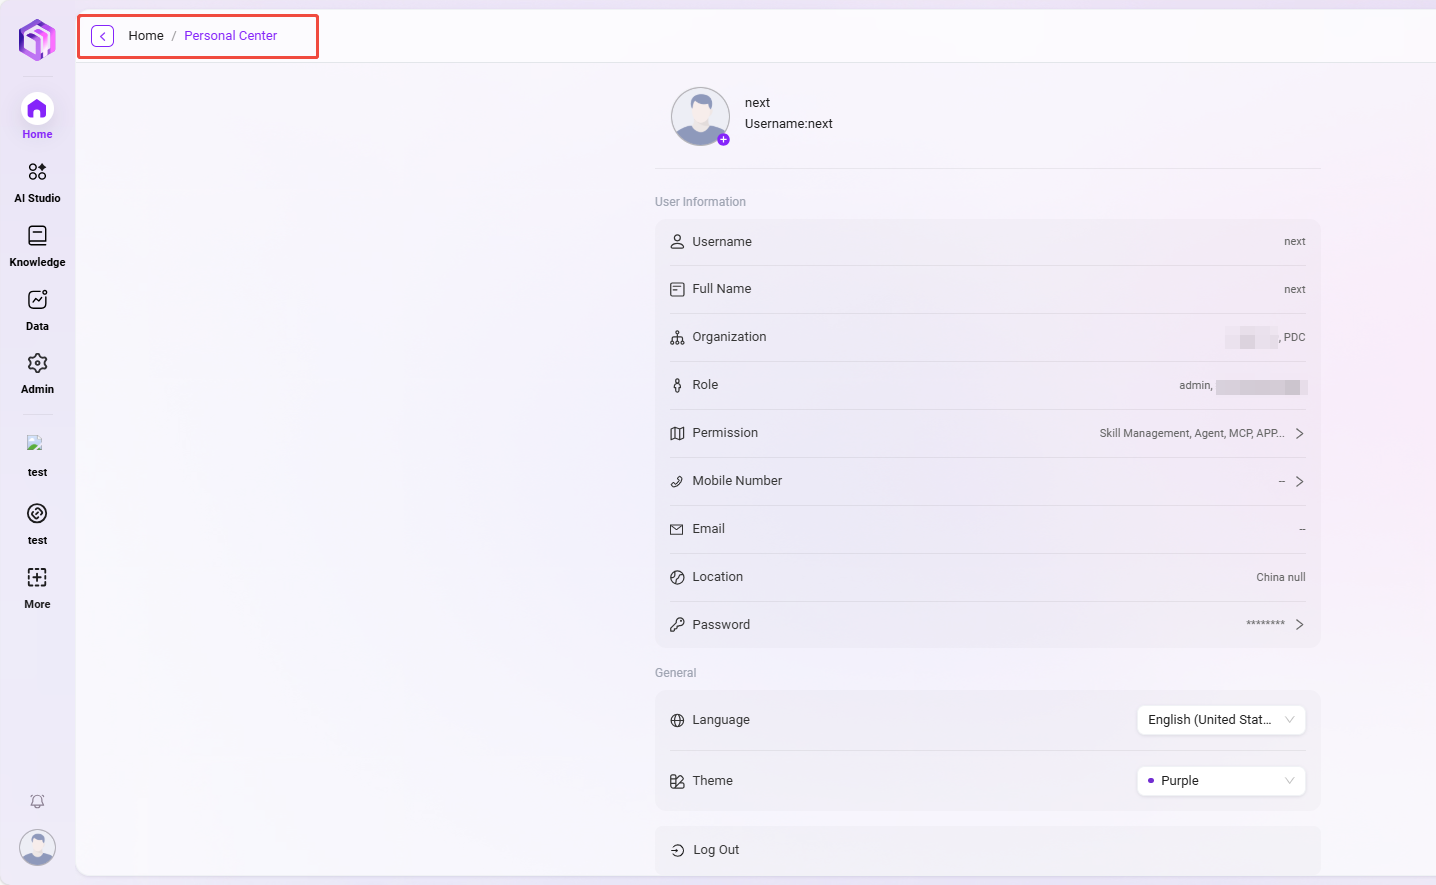
Personal Center
The Personal Center is the core page for users to view and manage their own account information and preferences. You can check personal details, view assigned permissions, and customize the system display language and theme here.
Access Path: Click the user avatar in the lower right corner of the system interface.
User Information
This area displays basic identity information for the user account.
- Avatar: Click the avatar to modify the personal avatar.
- Username: The user's system login account.
- Real Name: The real name registered by the user in the system.
- Organization: The organization or department the user belongs to.
- Role: The system role granted to the user (e.g.,
admin,Administrator). - Permissions: List of specific operation permissions the user possesses (e.g.,
Skill Management,Agent,MCP, etc.), determined by the administrator. - Phone Number and Email: Bound contact information, which can be used for login or receiving notifications.
- Password: Displayed as asterisks (
*******). To modify, click the ">" button to enter the password change interface.
General Settings
Users can personalize the system interface here for a more customized user experience.
- Multi-language: Switch the interface display language of the entire system. Available languages include: English, Chinese (Simplified), Traditional Chinese, Japanese.
- Theme: Switch the overall visual theme color of the system. Currently, Purple and Blue theme schemes are provided.
- Logout: Click this button to securely log out of the current account.
💡 Tip: Most information displayed in the Personal Center (such as organization, role) is in read-only state, uniformly configured and maintained by the system administrator in the backend. If you need to modify information like "Real Name" or "Organization", please contact your system administrator.
Organization Management
Administrators can perform organization management in the system, creating, editing, and deleting organizations, and associating users with organizations. Organization management helps efficiently manage various internal teams and external partners within an enterprise.
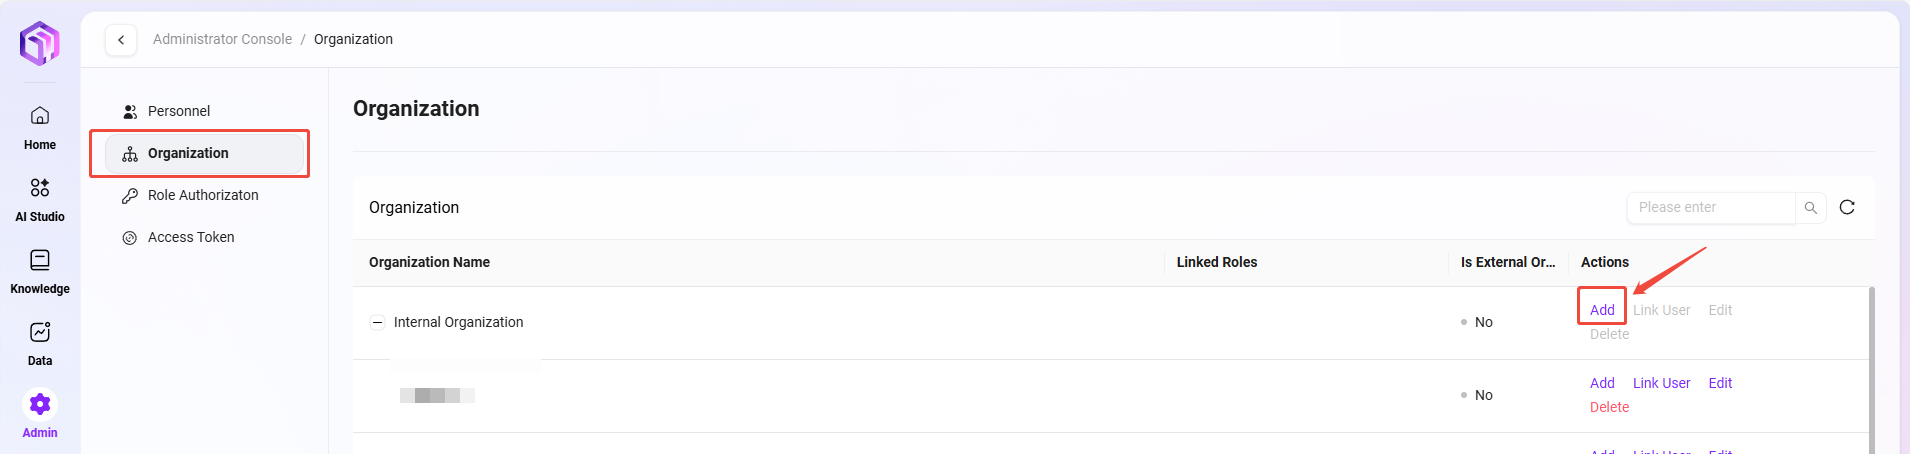
Viewing the Organization List
- Access the Organization Management Page: Select "Organization Management" in the system settings to enter the page.
- View Created Organizations: The system displays all existing organization information, including organization name, associated roles, and whether it is an external organization.
- There is an "Edit" button on the right side of each organization. Administrators can modify the organization or click the "Delete" button to delete it.
How to Create a New Organization?
- Click the "Add New" Button: On the Organization Management page, click the "New" button on the right to start creating a new organization.
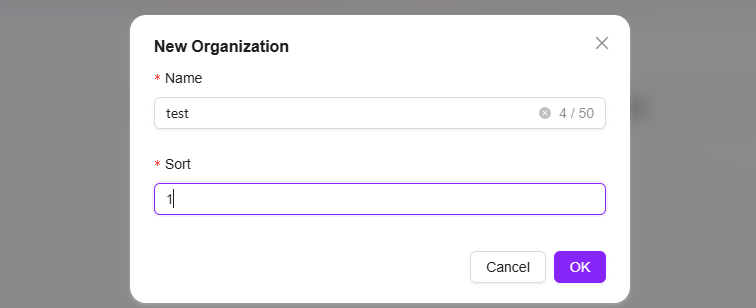
- Fill in Organization Information:
- Organization Name: Specify a unique name for the organization.
- Sort Order: Assign a sort number to the organization for easier management.
- Click "Confirm": After filling in all necessary information, click the "Confirm" button to successfully create the new organization.
💡 Tip: It is recommended that the organization hierarchy does not exceed 7 levels.
How to Edit an Organization?
- Select the Organization to Edit: In the organization list, select the organization that needs editing.
- Click the "Edit" Button: Enter the edit page. The editable content is the same as during creation. Administrators can modify the organization's name, sort order, and other information.
- Save Changes: After editing, click the "Save" button to update the organization information.

How to Delete an Organization?
- Select the Organization to Delete: In the organization list, select the organization to be deleted.
- Click the "Delete" Button: After secondary confirmation, the organization can be deleted.

Associate Users
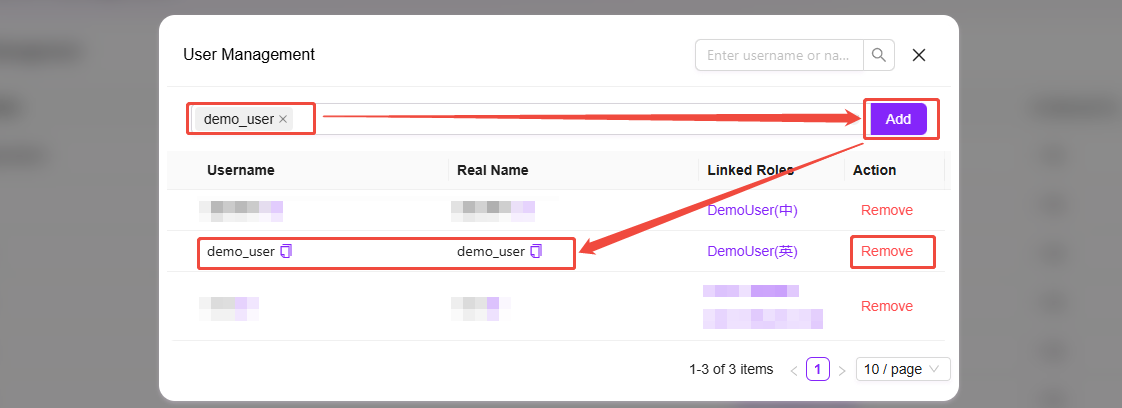
Specific steps for adding associated users and removing associated users:
- Click "Associate Users": On the Organization Management page, select the organization to associate users with, and click the "Associate Users" button on the right.
- View Already Associated Users: After entering the Associate Users page, the administrator can see all users already associated with this organization.
- Remove Already Associated Users: The administrator can select an already associated user and click the remove button to remove that user from the organization.
- Add New Associated User: Select the user to add from the dropdown box, click the "Add" button to associate the new user with the organization.

Role Permissions
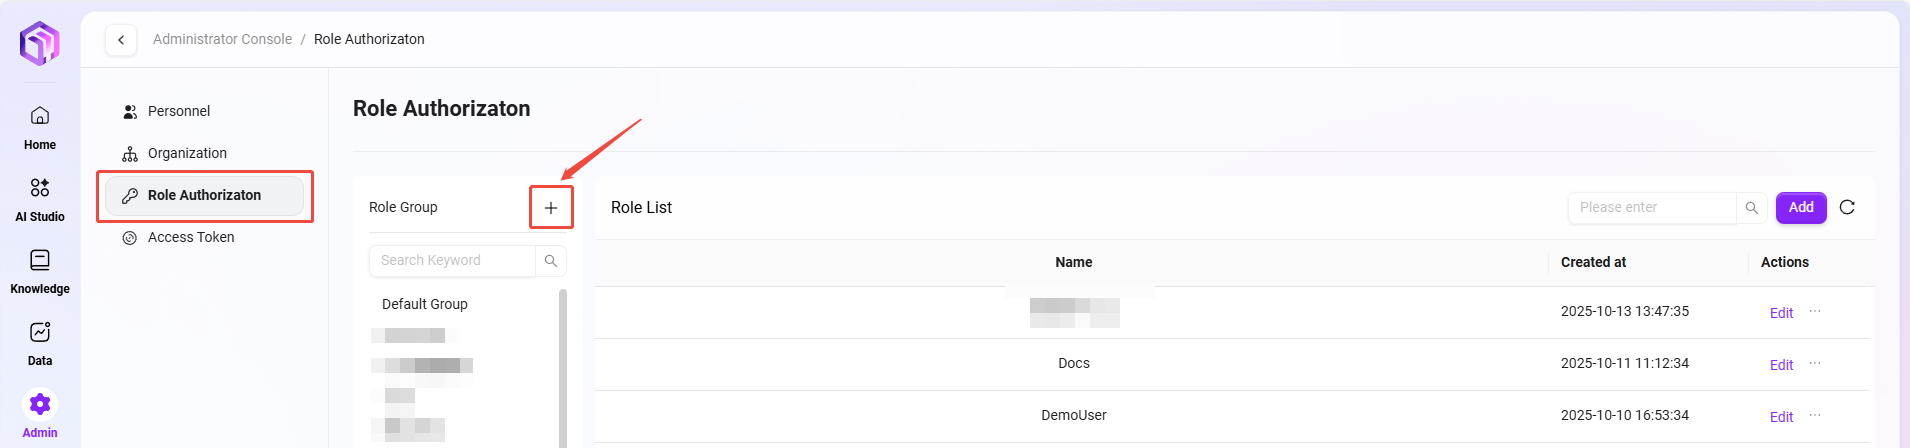
How to Create a Role Group?
In role permission management, administrators can create new role groups. After creating a role group, administrators can also create new roles within the group and authorize them.
- Navigate to Admin > Identity > Role Permissions page.
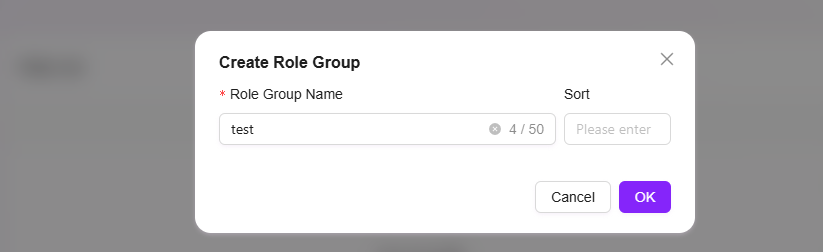
- Above the left role group list, click the + button to create a new role group.
- In the pop-up window, enter the name and sort order of the role group.
- Click Confirm to complete the creation of the role group.
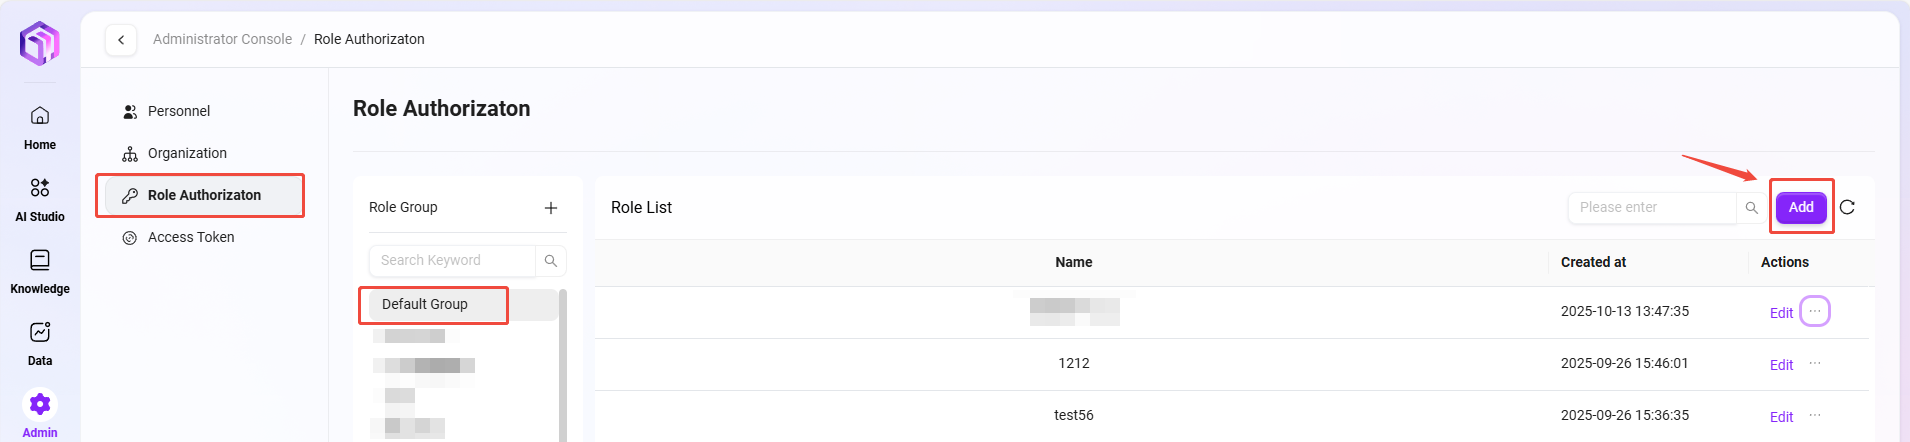
How to Add a New Role?
- Navigate to Admin > Identity > Role Authorization page.
- Select the role group where you want to create a new role.
- On the role group page, click the Add New button on the right side of the role list.
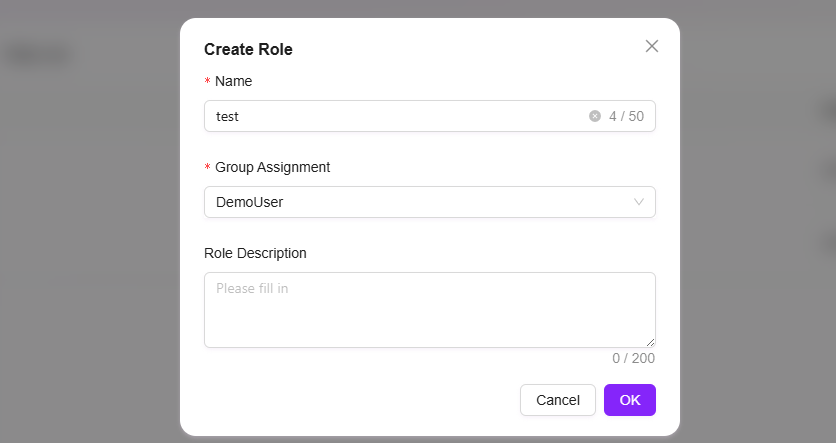
- Enter the name of the new role, select the group the role belongs to, and fill in the role description.
- Click Confirm to complete the creation of the new role.
💡 Tip: The number of characters for both the role name and description must be controlled within 200. Please note the character limit before operation.
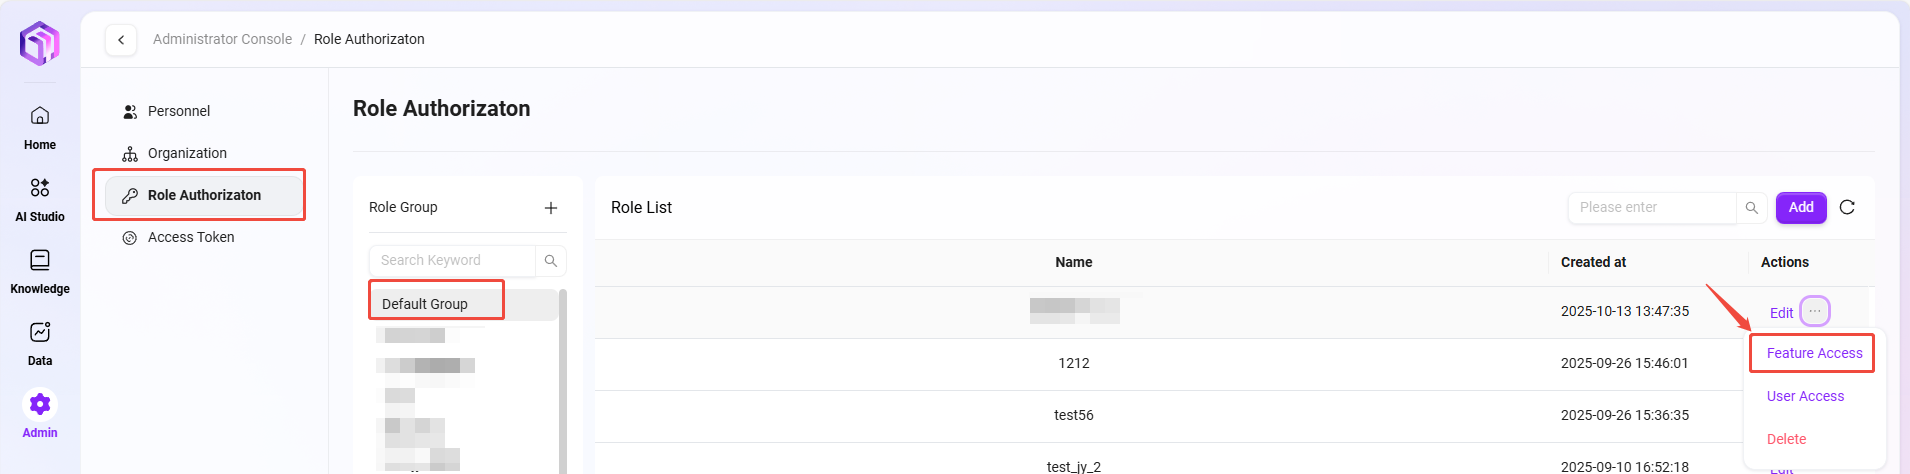
How to Perform Functional Authorization for a Role?
Functional authorization for a role can be understood as what functions this role can have.
Steps to perform functional authorization for a role:
- Navigate to Admin > Identity > Role Authorization page.
- Select the role that needs functional authorization.
- Click the Functional Authorization button behind that role to enter the functional authorization page.
- On the authorization page, you can authorize the following functions for the role:
- Model Management
- Model Channel Management
- Application Market
- Basic Modules
- Data Analysis
- Knowledge Base
- Content Security Management
- After checking the desired functions, click Confirm to complete the role's functional authorization.

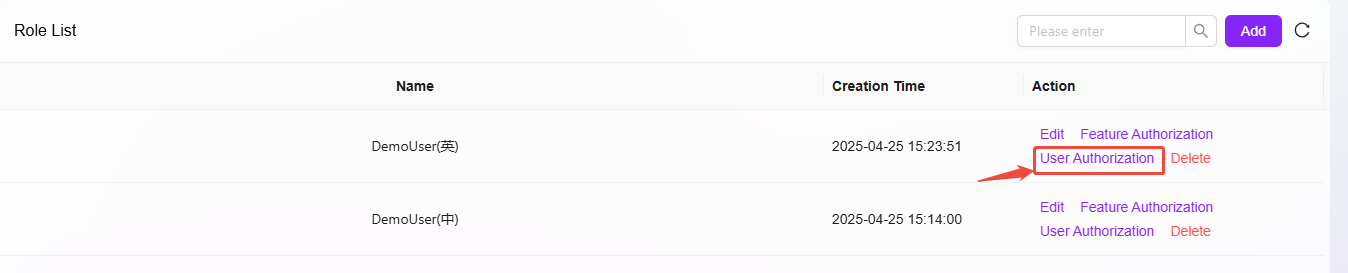
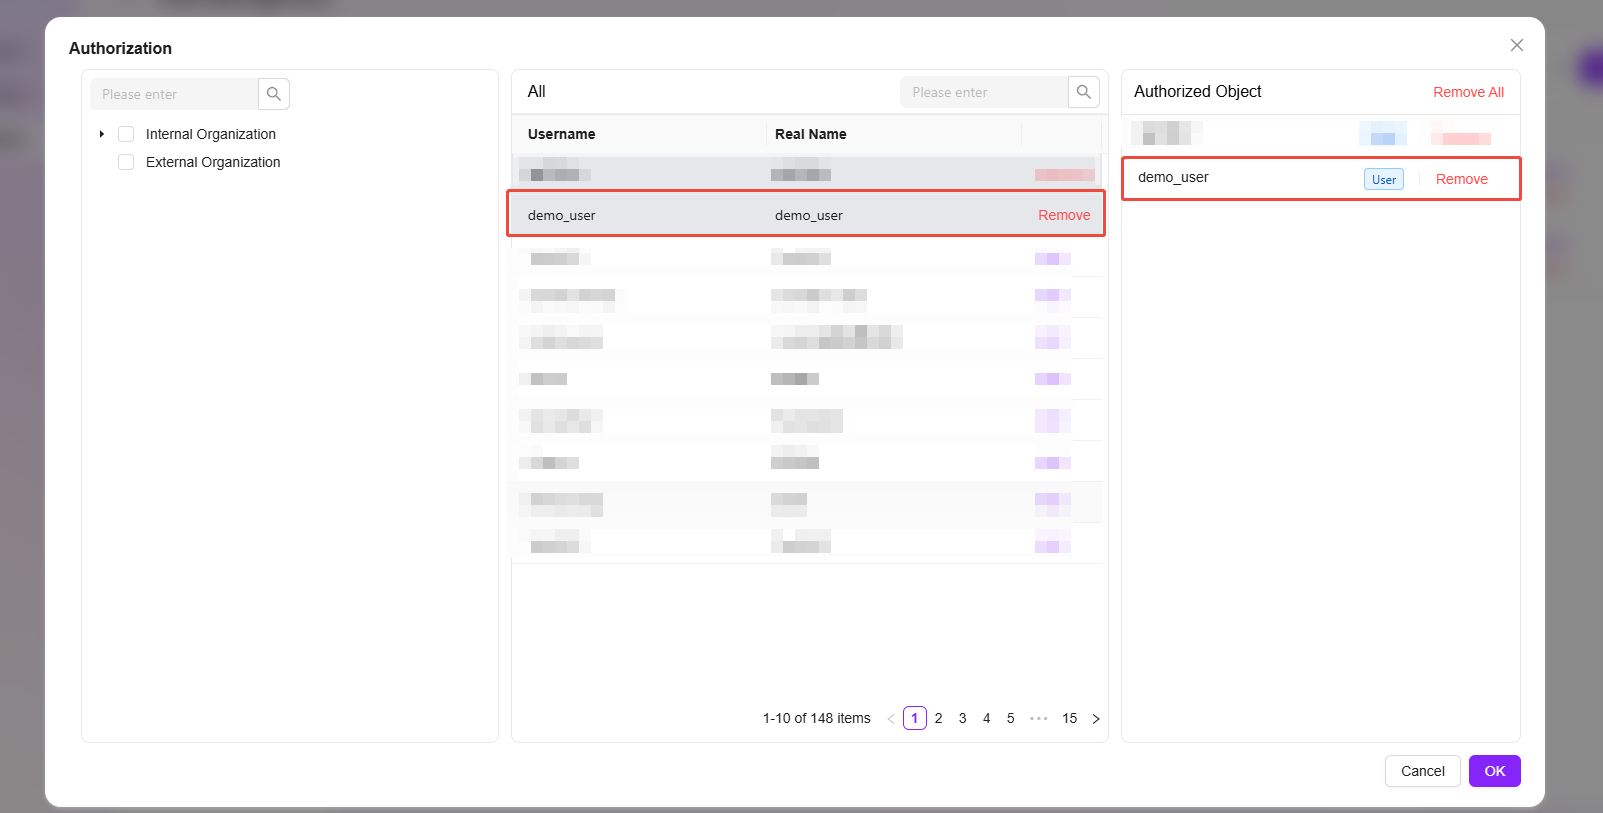
How to Perform User Authorization for a Role?
User authorization for a role can be understood as assigning a certain role to a user.
Steps to perform user authorization for a role:
- Navigate to Admin > Identity > Role Permissions page.
- Find the role to be authorized, and click the User Authorization button behind that role to enter the user authorization page.
- On the user authorization page, find and check the users that need authorization based on their organization.
- Successfully selected users will appear in the authorized objects column.
- After completing the selection, click Confirm to complete the user authorization for the role.
Token Management
💡 Tip: This feature is only supported in V4.1 and later versions
Token Management is an important new functional module in this update, aimed at optimizing the original API Key generation and usage method. The new version upgrades the originally dispersed, resource-bound API Key mechanism to a centralized, user-permission-centric Access Token management system, achieving higher security and controllability.
In the new system, Access Tokens are strongly associated with user permissions. The access scope, validity period, and management permissions of each token are uniformly controlled by the system, ensuring the security and controllability of system resources.
Access Token Supported Scope
Currently, Access Tokens can be used for the following API interfaces:
- Agent Configuration Query OpenAPI — Supports secure access to Agent-related configurations via tokens.
- FAQ List OpenAPI — Supports external systems securely obtaining FAQ data.
- All MCP Server Interfaces Published from Agent — Ensures that Agent's external service access is controlled by the token system.
Token Management Interface Description
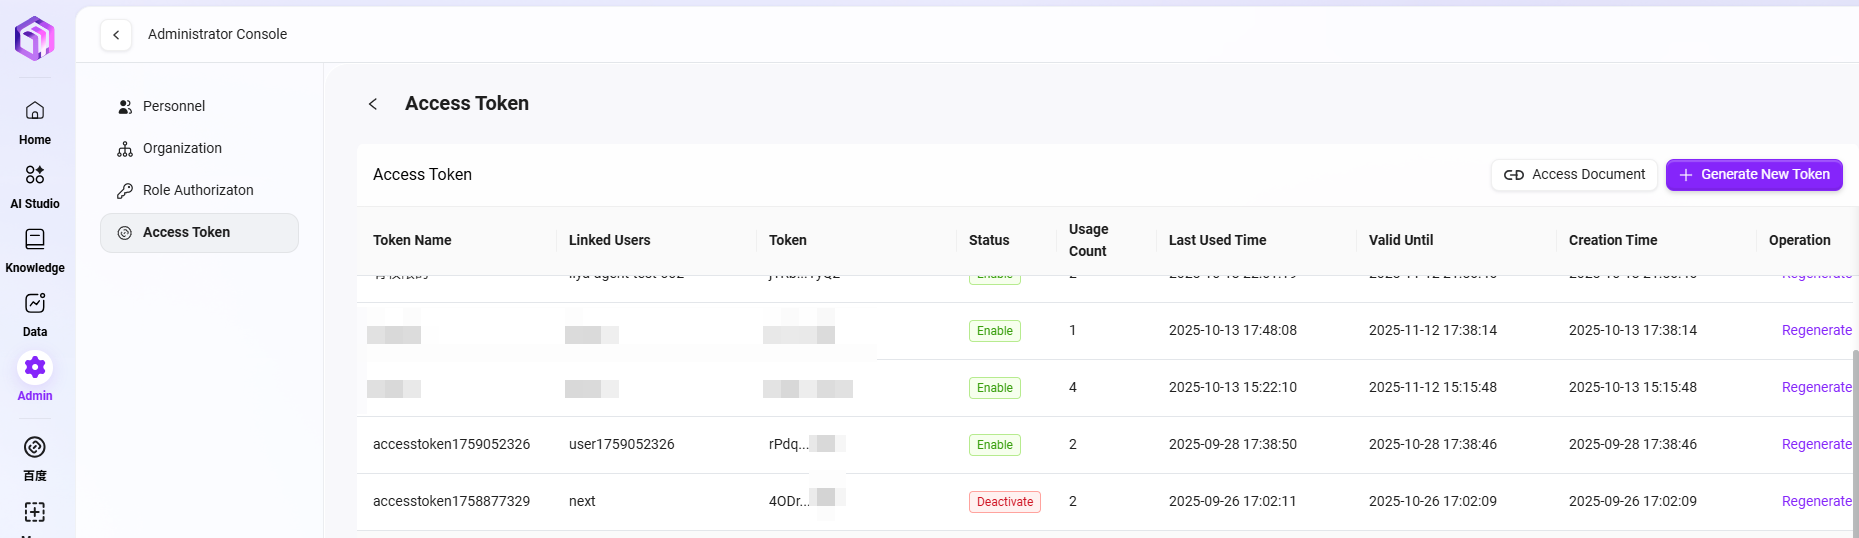
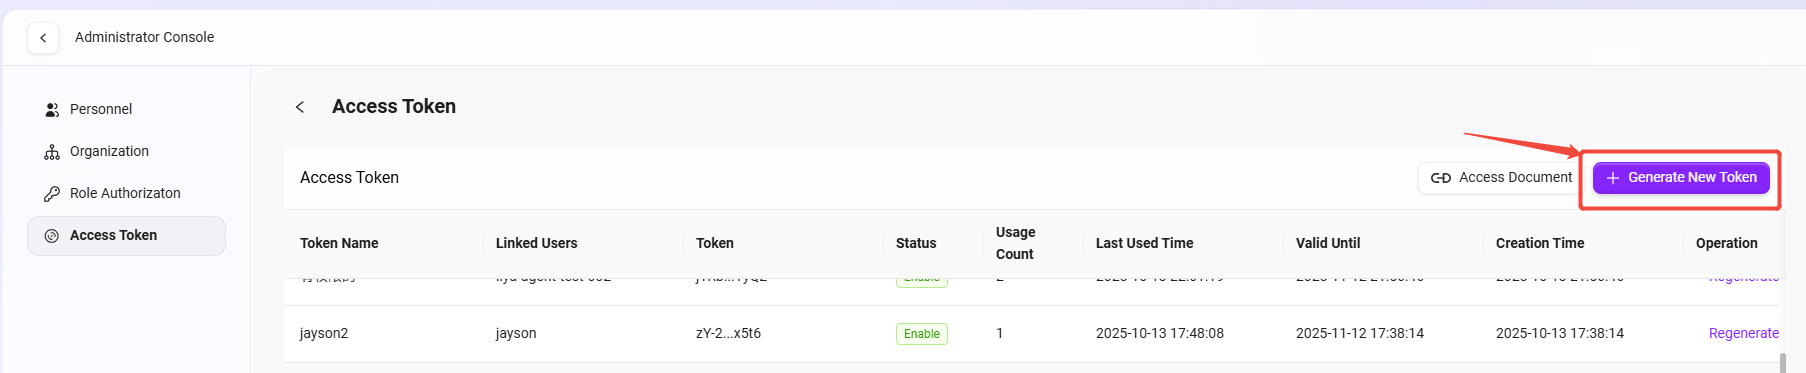
On the "Token Management" page, the system displays all currently created access tokens in table form, containing the following information:
- Token Name: A token identifier customized by the administrator to distinguish tokens for different purposes.
- Managed User: The user bound to this token. The token's access permissions are inherited from this user.
- Token: The Access Token string automatically generated by the system.
- Status: Includes three statuses: Enabled, Disabled, Expired, clearly reflecting the token's current availability.
- Usage Count: Statistics on the number of times the token has been called, facilitating administrator monitoring of usage frequency.
- Last Used Time: Displays the most recent time the token was used.
- Validity Period: Shows the valid duration of the token (e.g., 7 days, 30 days, 90 days, or permanent).
- Creation Time: Records the time the token was generated.
- Operation: Provides a "Regenerate" button for updating the token value to ensure security.
Generate a New Token
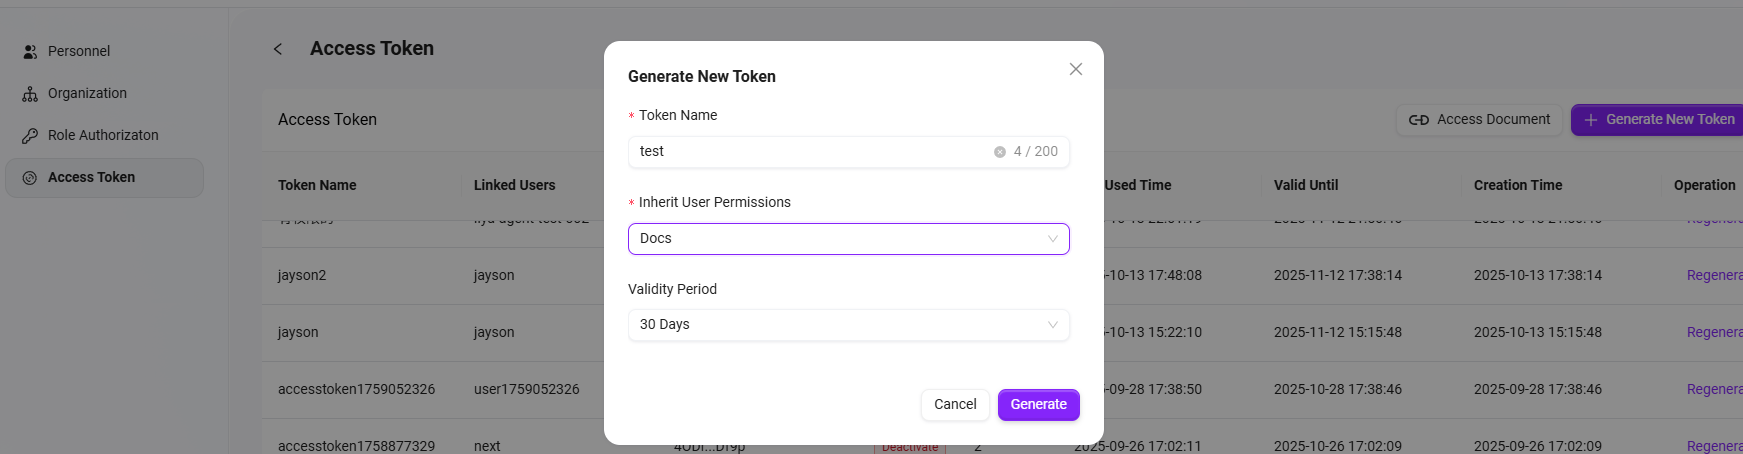
- Click the "Generate New Token" button in the upper right corner of the page.
- Fill in the following information in the pop-up window:
- Token Name: Enter a meaningful name for the token for easy identification of its purpose.
- Inherit User Permissions: Select the system user whose permissions need to be inherited. The token will automatically have the access scope of this user.
- Validity Period: Can choose from four validity periods: 7 days, 30 days, 90 days, or Permanent.
- Click the "Generate" button to generate a new Access Token.
The generated token will be immediately displayed in the list. The administrator can copy this token for subsequent API access.
Token Usage Instructions
The generated Access Token can be used to call controlled API interfaces (such as Agent, FAQ, MCP Server, etc.). When using it, the token must be added to the request header as an authentication credential, for example: