Service Integration Guide
This document describes how to integrate the SERVICEME NEXT application with other websites or SSO (Single Sign-On) services to achieve unified identity authentication and seamless access across systems.
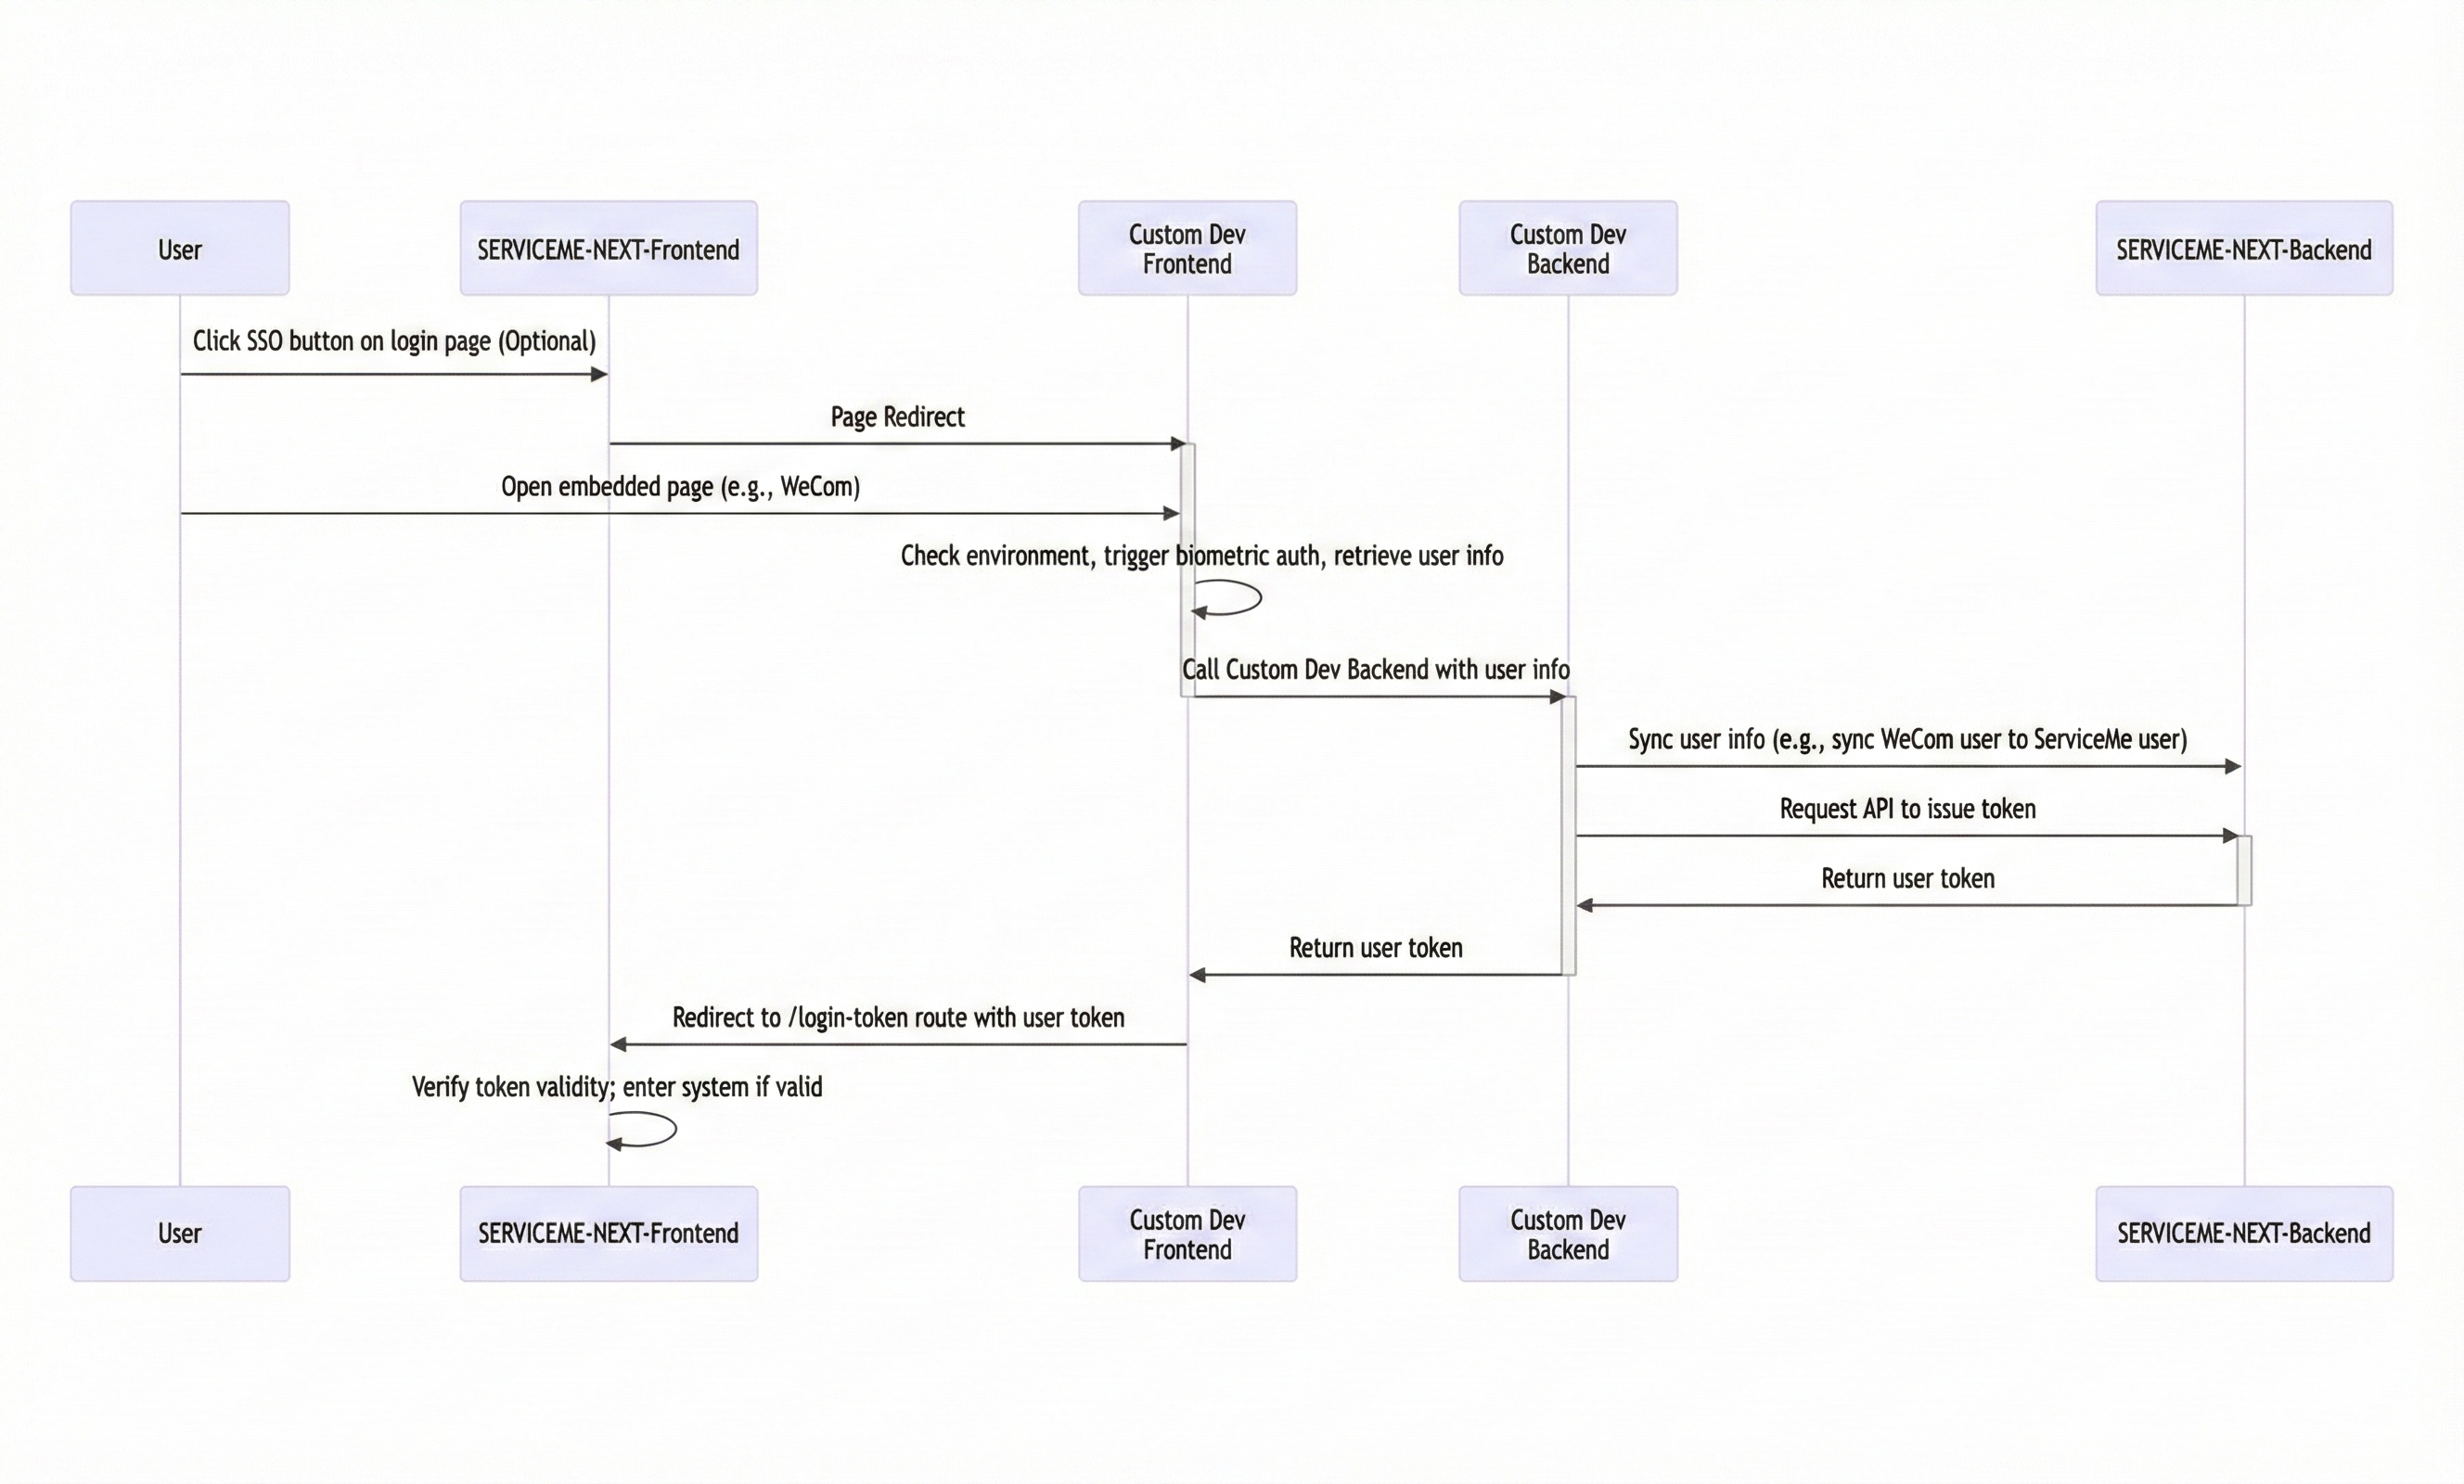
1. Basic Process
The overall process of service integration is as follows:
-
Configure login button on the SERVICEME NEXT login page (optional)
- Used to display the single sign-on entry on the product login page.
-
Redirect to custom SSO frontend page
- Handles login logic with the customer system (such as user information retrieval, biometric authentication, etc.).
-
Access custom SSO backend API
- Completes interaction with the SERVICEME backend, such as unified user registration, token issuance, etc.
-
Redirect back to the SERVICEME NEXT login page
- Redirects back to SERVICEME NEXT with the token to achieve automatic login.
Process Diagram:
2. Detailed Operation Instructions
2.1 SSO Login Button Configuration on Login Page
This step is optional. If you want to provide a "Custom Login" button on the login page, you can add the configuration in the environment variables.
Go to the SERVICEME NEXT Environment Variable Management page and configure the following in SSO_LOGIN_CONFIG:
{
  "type": "Custom",
  "code": "my-custom-sso",
  "config": {
    "LOGIN_BUTTON_I18N_KEY": "login.sso.custom.login",
    "LOGIN_URL": "/custom-login",
    "APP_ID": "BskGfSXPNt5AfQXMO6b1M"
  }
}
After configuration, a button will be displayed on the login page. Clicking it will redirect to the target link:
https://<frontend-deploy-host>/custom-login?code=my-custom-sso&APP_ID=BskGfSXPNt5AfQXMO6b1M
To customize the mounting page, please refer to Product Frontend Custom Static Resource Mounting Guide - Overview.
2.2 Custom Development of Single Sign-On Page
The page corresponding to LOGIN_URL is the customized login page, which needs to implement the following logic:
- Authenticate and interact with the customer SSO system;
- Synchronize information with the custom SSO backend;
- After obtaining the token, redirect to the SERVICEME NEXT login route.
The redirect format is as follows:
https://<frontend-deploy-host>/login-token?token=<new-jwt-token>
The SERVICEME frontend will verify the validity of the token. If it passes, you can log in to the system.
Please ensure the JWT token is valid and issued by a legitimate client.
2.3 Custom Development of SSO Backend
The custom SSO backend is mainly responsible for user token issuance and account management.
Issuance relies on Client ID + Secret. Please create a client in the SERVICEME backend first.
Related APIs include:
- User API: Query, create, and update users; supports search by username, email, and employee ID;
- Third-party Login API: Manage third-party account binding;
- Client API: Issue tokens (ignore trusted domain field);
- Role/Organization API: Used for role and department synchronization.
2.4 Mounting Custom Frontend and Backend Services
The SERVICEME NEXT frontend image provides two mounting points:
| Mount Path | Description |
|---|---|
/etc/nginx/custom_conf | Mount custom Nginx configuration |
/usr/share/nginx/static | Mount custom static resources (frontend pages) |
2.4.1 Mounting Custom Frontend Pages
Place your custom HTML pages in:
/usr/share/nginx/static/app2/
And add the following content to custom.conf:
location /app2 {
  root /usr/share/nginx/static/;
  index index.html index.htm index.shtml;
  try_files $uri $uri/ /index.html;

  if ($request_filename ~* .*\.html$) {
    add_header Cache-Control "no-cache, no-store";
  }
}
Mount the directory when running the container:
docker run -p 80:80 \
-v ./custom.conf:/etc/nginx/custom_conf/custom.conf \
-v ./static:/usr/share/nginx/static \
servicemerelease.azurecr.io/serviceme-frontend:4.0.0
2.4.2 Mounting Custom Backend Services
Suppose the custom backend service is located at the intranet address http://delivery-backend,
and you want to access it under the /custom-backend/ path on the frontend. You can add the following configuration to custom.conf:
location /custom-backend/ {
  proxy_pass http://delivery-backend/;
  proxy_connect_timeout 240s;
  proxy_read_timeout 240s;
  proxy_send_timeout 240s;
  proxy_buffering off;
}
Conclusion
By following the above steps, you can achieve seamless integration between SERVICEME NEXT and your enterprise internal systems,
supporting single sign-on (SSO), unified user authentication, and flexible frontend and backend custom extensions.