General Agent Creation
General Creation
1. Select "Basic Agent"
2. Creation Steps
-
After clicking "Create Agent" from the agent creation entry, select "Basic Orchestration Creation"
-
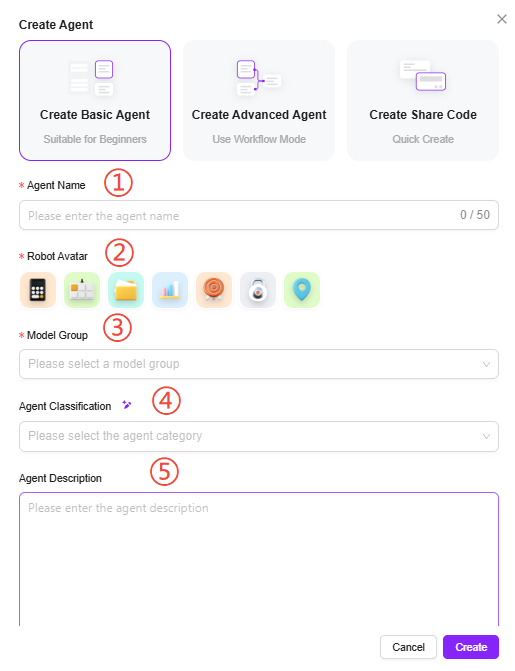
Enter the agent name, select the agent avatar, select the model group, select the agent category, and add an agent description:
① Agent Name: Enter the name of the agent, which will serve as its identifier.
② Agent Avatar: Select the default avatar for the agent. Uploading custom avatars is not supported at this time.
③ Model Group: Configure an appropriate model group for the agent.
④ Agent Description: Enter a brief description to explain the agent's functions and use cases.
⑤ Agent Category: Select the group(s) to which the new agent belongs; multiple selections are supported. -
Click "Create". After the agent is created, you will enter the basic orchestration agent configuration page. Configure and publish the agent to put it into use.
3. Agent Configuration
There are two ways to enter agent configuration:
- Enter the agent configuration page directly after creating the agent
- Click the "..." to the right of the agent name and select "Configure"
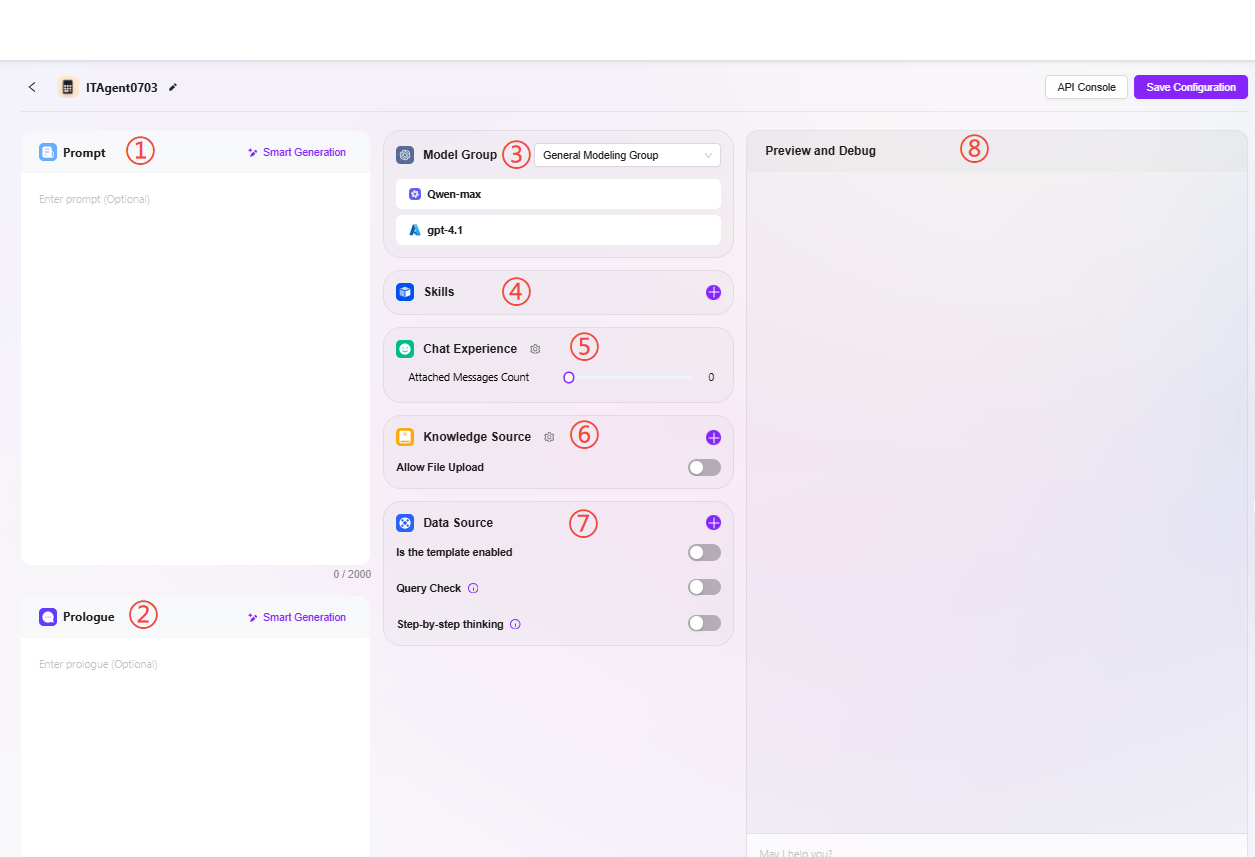
① Prompt: Enter the agent prompt. You can also use intelligent generation for existing prompts. The prompt is limited to 2000 characters.
② Opening Statement: Enter the agent's opening statement. Intelligent generation based on the prompt or existing opening statement is also supported. The opening statement is limited to 2000 characters.
③ Model Group: Click "+" to add a model group. Multiple selectable models are supported.
Note: Model groups must first be added by an administrator in System Management. Multiple different models can be added to the same model group, which can then be configured for the agent.

Add Model Group
-
Path: Settings → System Management → Model Management → Model Group → Create Model Group (Only administrators can add models)
-
Steps to add:
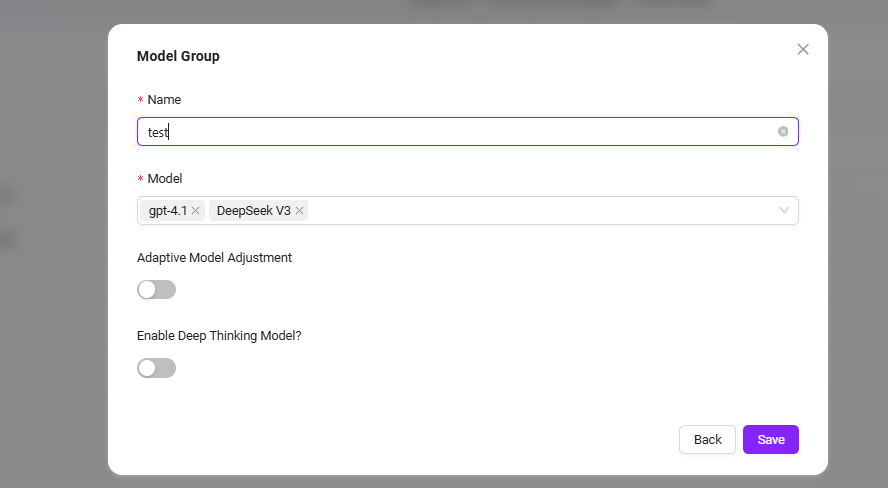
- Click "Create Model Group"
- Complete the following configurations:
- Enter the model group name
- Select the models to add to the group; multiple selections are supported
- Choose whether to enable adaptive model deployment
- Choose whether to enable deep thinking models
- Click "Save"
④ Skills: Click "+" to add one or more skills, or add recommended skills

There are 4 default skills: Internet Search, News Search, Website Reading.
- Internet Search: Connects to the internet to retrieve publicly available content (such as news, information, etc.).
- News Search: A dedicated tool for searching and obtaining various news information.
- Website Reading: Extracts webpage text, data, and other content, and parses webpage information.
Additional skills can be added, which require administrator operation and configuration.
⑤ Conversation Experience:
-
Conversation Settings: You can enable settings such as "User Question Suggestions, Question Guidance, Chat History, Conversation Feedback, Keyword Review", etc.
- User Question Suggestions: After the agent responds, provide users with suggested questions based on the previous conversation.
- Question Guidance: During the conversation between the user and the agent, relevant question guidance will be provided. The model's capabilities are used to predict possible user questions and complete user queries.
- Chat History: Whether to retain the agent's chat history. If disabled, chat history will not be accessible.
- Conversation Feedback: Users can like or dislike the agent's responses to help optimize its answers.
- Enable Keyword Review: At least one of input or output content review must be enabled. Once enabled, both prompts and AI feedback results will be checked for sensitive words, which can be maintained in advance.
⑥ Knowledge Base:
-
Knowledge Base: Click "+" to add a knowledge base
-
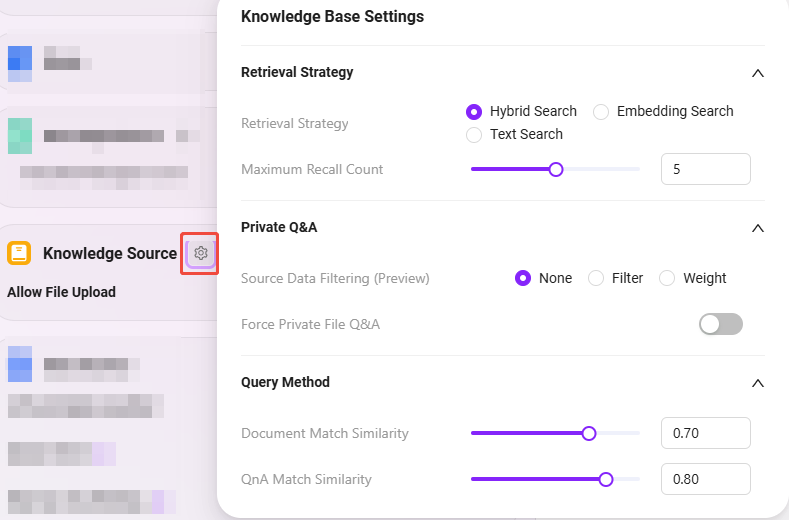
Knowledge Base Configuration: You can modify detailed settings such as "Retrieval Strategy, Private Q&A, Query Method", etc.
- Allow File Upload:
- If file upload is enabled, you cannot add knowledge base content as a knowledge source
- If file upload is disabled, you can selectively add knowledge bases from personal or enterprise spaces as knowledge sources

- Knowledge Base Configuration:
-
Retrieval Strategy: Hybrid Search, Embedding Search, Text Search
- Hybrid Search: Combines results from vector search and full-text search, returning re-ranked results
- Embedding Search: Finds segments based on similarity, with some cross-lingual generalization capability
- Text Search: Finds segments based on keywords, suitable for searches containing specific keywords or noun segments
-
Maximum Recall Count: Range 1–8. It is not recommended to set this too high or too low. The suggested value is 3–5.
-
Source Data Filtering(Preview): None, Filter, Weight
-
Force Private File Q&A: When enabled, skills such as web search will not be used. The agent's answers will be based solely on the knowledge base content.
-
Document Match Similarity: Range 0–1. The higher the similarity, the more similar the recalled document content. The suggested value is about 0.8 (i.e., 80%).
-
QnA Match Similarity: Range 0–1. Similar to document content similarity matching. The suggested value is about 0.9 (i.e., 90%).
-
Show References: When enabled, the agent will list the references used in its answers to increase credibility.
💡 Tip: Whether it's maximum recall number, document match similarity, or QnA match similarity, higher or lower is not always better. It is recommended to set these according to actual needs. If there are no special requirements, it is recommended to keep the default values.
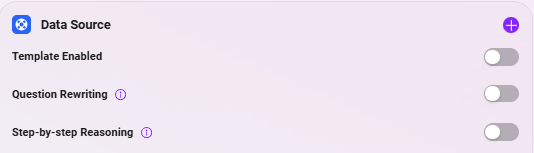
⑦ Data Source: Click "+" to add a data source as the agent's Q&A data source.
-
Template Enabled: Whether to enable the preset mapping template between natural language and SQL.
When enabled, it works as follows:
- When a user enters a natural language question (e.g., "
What was last month's sales?"), the system will first attempt to match a preset template. - If a matching template is found (e.g., a generic question like "
Query sales for a specific time period"), the system will use the existing SQL structure from the template as a reference, and then combine it with the specific fields/table names to generate the final SQL statement.
- When a user enters a natural language question (e.g., "
-
Question Rewriting: When enabled, the system will automatically optimize the user's question to ensure accurate data querying.
Example:
- Original question:
Check sales(incomplete information) - After rewriting:
Query the total sales of all products in July 2024(time and scope added)
- Original question:
-
Step-by-Step Reasoning: When enabled, before generating the final SQL, the system will output detailed reasoning steps explaining how it analyzed the question and constructed the SQL.
Example:
- Step 1: Identify keywords "
July 2024", "sales" - Step 2: Determine data table
Orders, fieldsorder_dateandsales_amount - Step 3: Build date range condition
2024-07-01to2024-07-31 - Step 4: Generate SQL
- Step 1: Identify keywords "
⑧ Agent Preview and Debugging: You can preview and test the agent on the right side of the interface. After successful testing, save the configuration.
API Key Management Guide
During Agent configuration, you can centrally manage API Keys via the “API Console” in the top right corner of the interface. Details are as follows:
View API Channel Info
- Click “API Console” in the top-right corner to view all configured API channels;
- Each channel shows the following details:
- Channel Name
- Channel Description
- Number of API Keys


Manage API Keys
- Click “Learn More” next to a channel to enter its details page;
- You can view the following info for each API Key under the channel:
- Name
- Key (visible only at creation)
- Start Date
- Deadline
- Final Use


Access Document
- The “Access Document” link is available in the top-right of each channel’s details page;
- Click to view detailed API access documentation for quick integration.

Key Storage Notes
- The key is only shown once at creation;
- Please copy and store it securely immediately after creation;
- You won’t be able to view it again after closing the page. A new API Key must be generated if not saved.
Special Note: API Key = Access Pass
API Keys provided by our platform are highly independent and fully authorized. Each API Key acts as a standalone "access pass", with full access and call rights:
-
Independent from the user system
Anyone holding a valid API Key can call the API without being a registered user or having specific platform permissions. The request will be recognized as valid and authorized. -
Not limited by license
Calls via API Key do not consume platform license quota. This enables flexible scaling without additional licenses or user expansion. -
Flexible configuration
Each API Key can have its own validity period and access scope (modules, data, etc.). It’s recommended to generate a separate API Key for each integration party for easier management and tracking.
⚠️ Security Tip: Keep API Keys secure. If leaked, all requests using that Key will be treated as fully authorized, posing a risk to your data and systems.