Deployment on Azure
Preparation Before Deployment
Required Resources
- A new subscription dedicated to product deployment, and ensure that this subscription can create OpenAI-related resources.
- An Azure AD account with Owner permissions for the subscription.
- You can add an existing AAD account as a Guest to the tenant and grant permissions, or create a dedicated AAD account for deployment.
- The account must be able to create and configure AAD application registrations (e.g., grant: Application Developer role).
Required Tools
- A database client that can connect to Azure SQL and PGSQL (e.g., DBeaver)
- Azure Storage Explorer
- Az CLI command line
- Terraform command line installation
Recommended Knowledge
- Basic understanding of Azure resources (e.g., App Service, Azure SQL, Storage, Key Vault, etc.), and ability to manage resources via Azure Portal
- Basic understanding of SERVICEME product features and operations
- Understand basic product features (e.g., Agent Q&A, document upload, preprocessing, document translation, etc.)
- Understand creation, configuration of users, organizations, roles, and user password reset
- Understand Agent creation, authorization, configuration
- Understand space creation, authorization, configuration
- https://docs.serviceme.com/
- Basic understanding of Terraform, complete the official azure-get-started tutorial
Product Deployment Architecture and Resource List
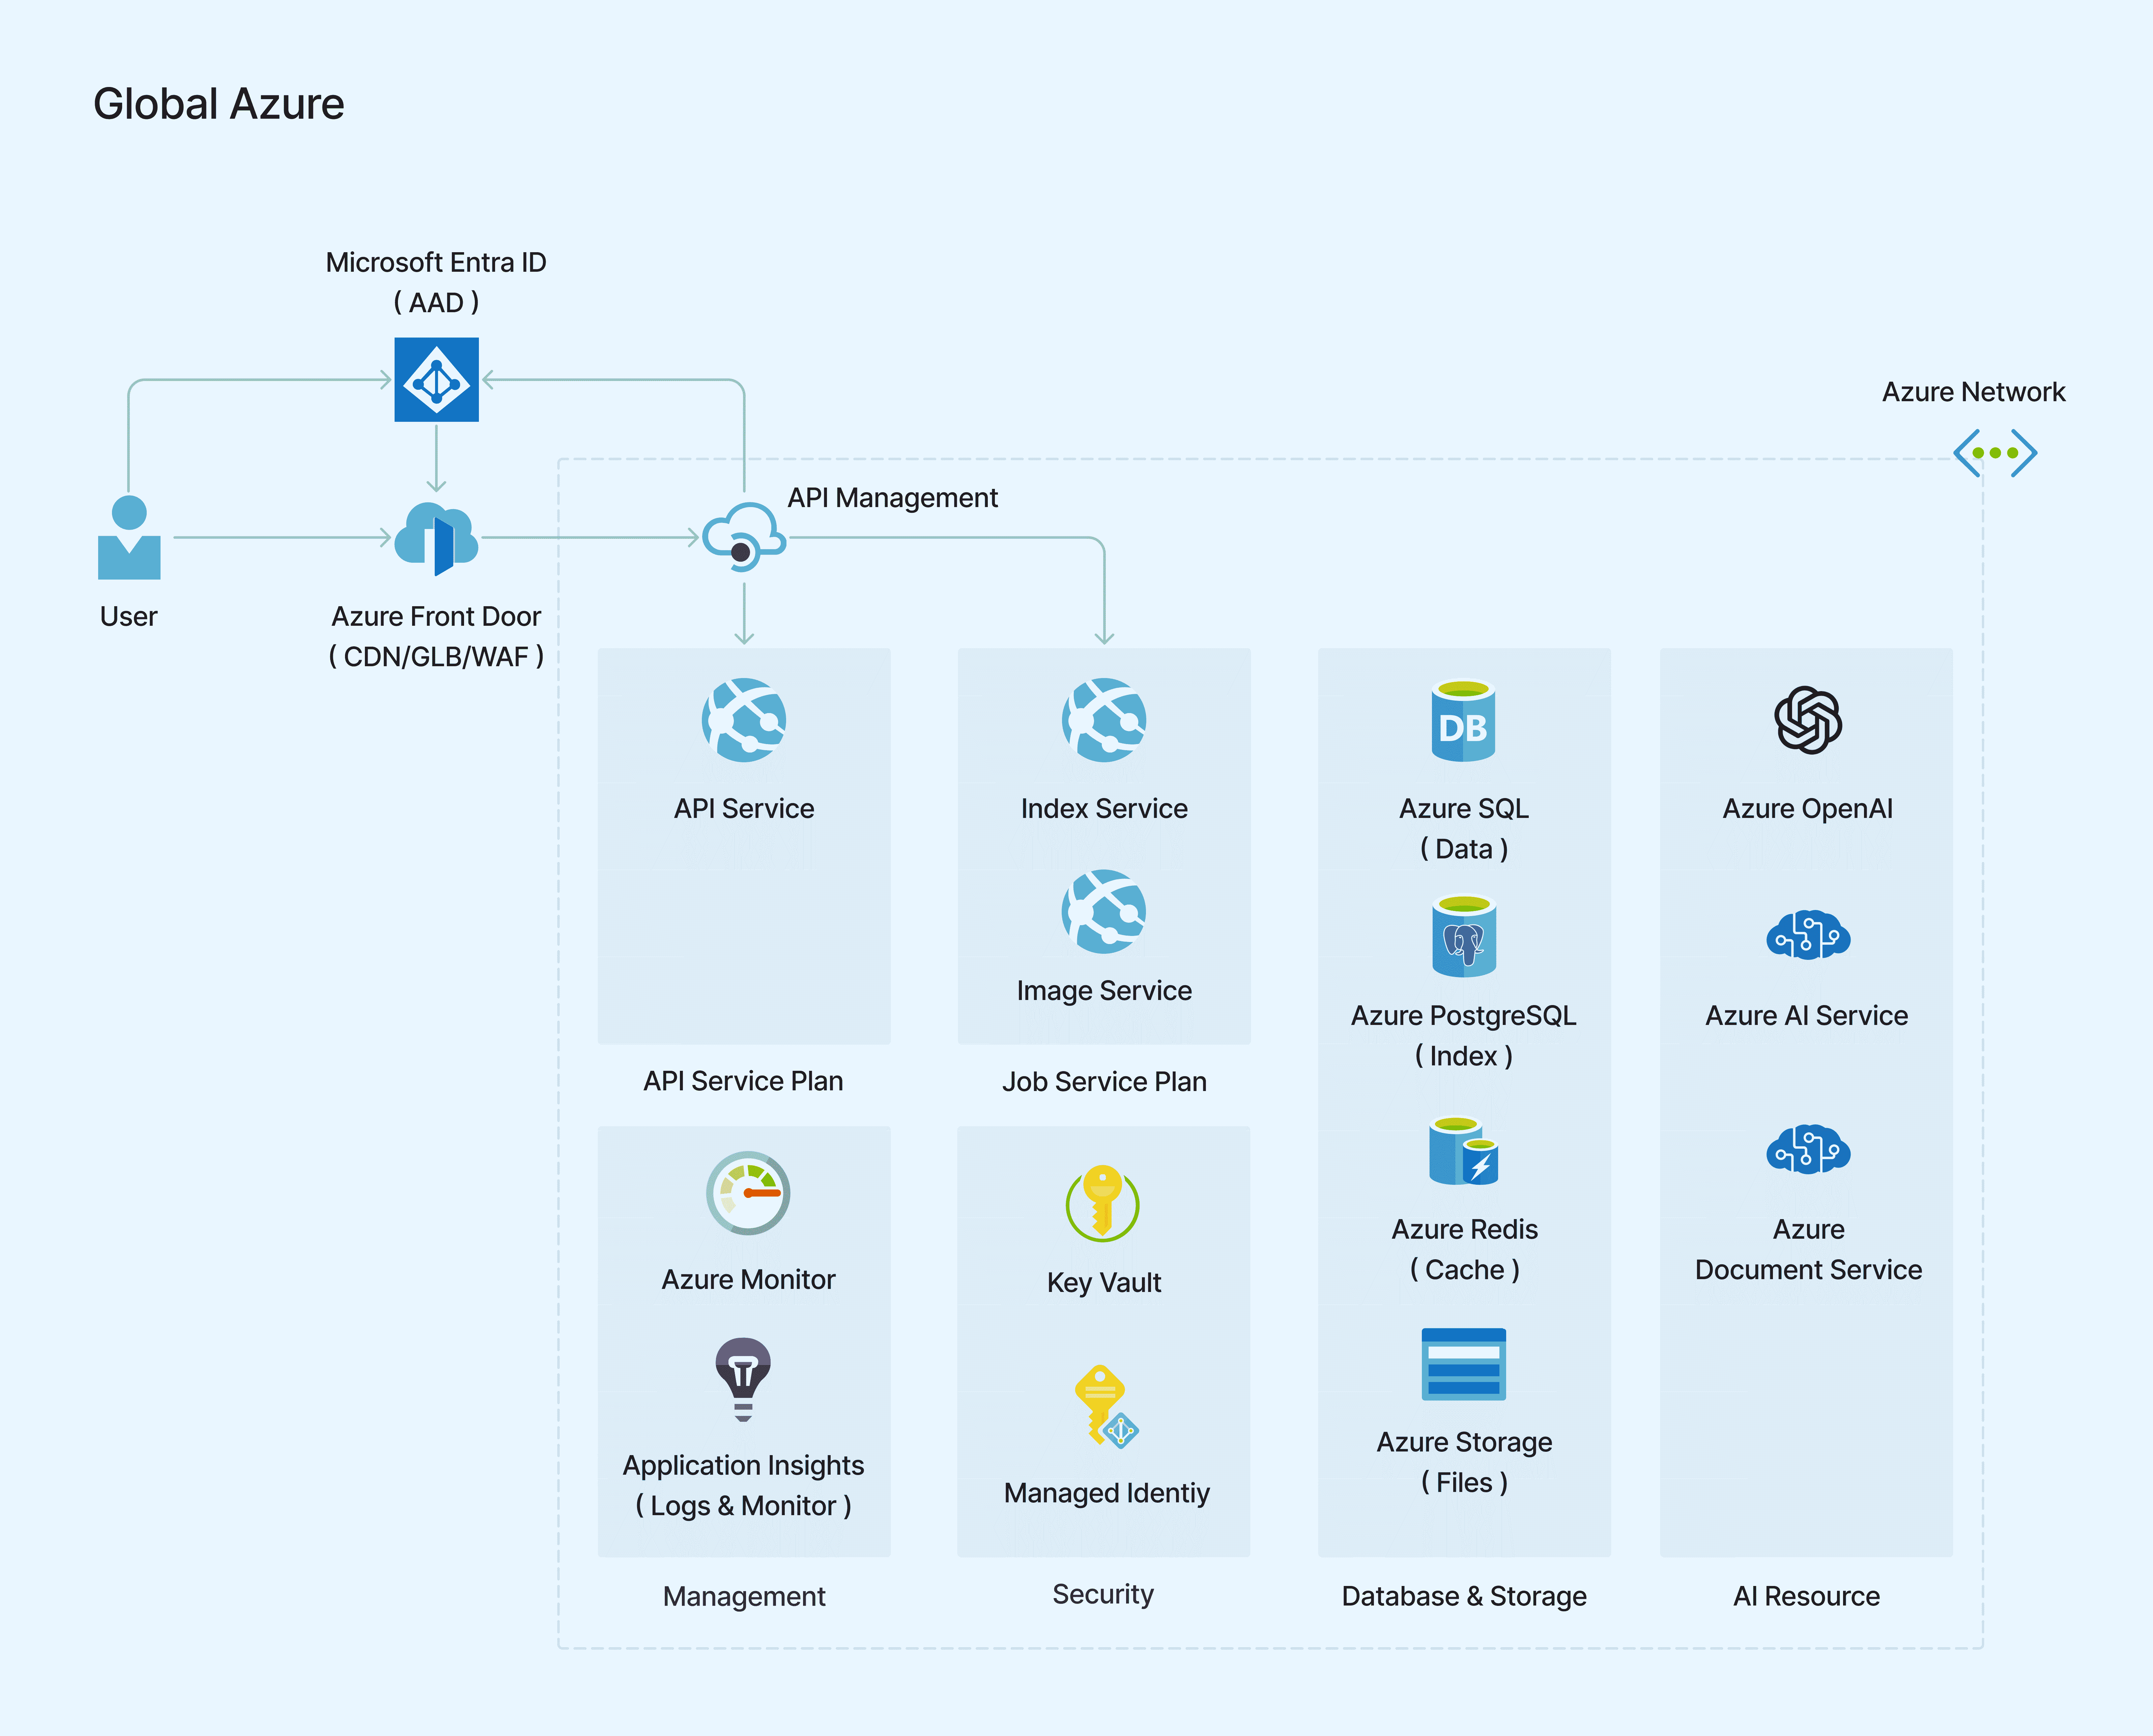
We provide two deployment options in the Terraform script, which can be selected as needed.
Standard Deployment Architecture
Private Endpoint Deployment Architecture, which achieves internal resource network isolation via Private Endpoint/Vnet for enhanced security.
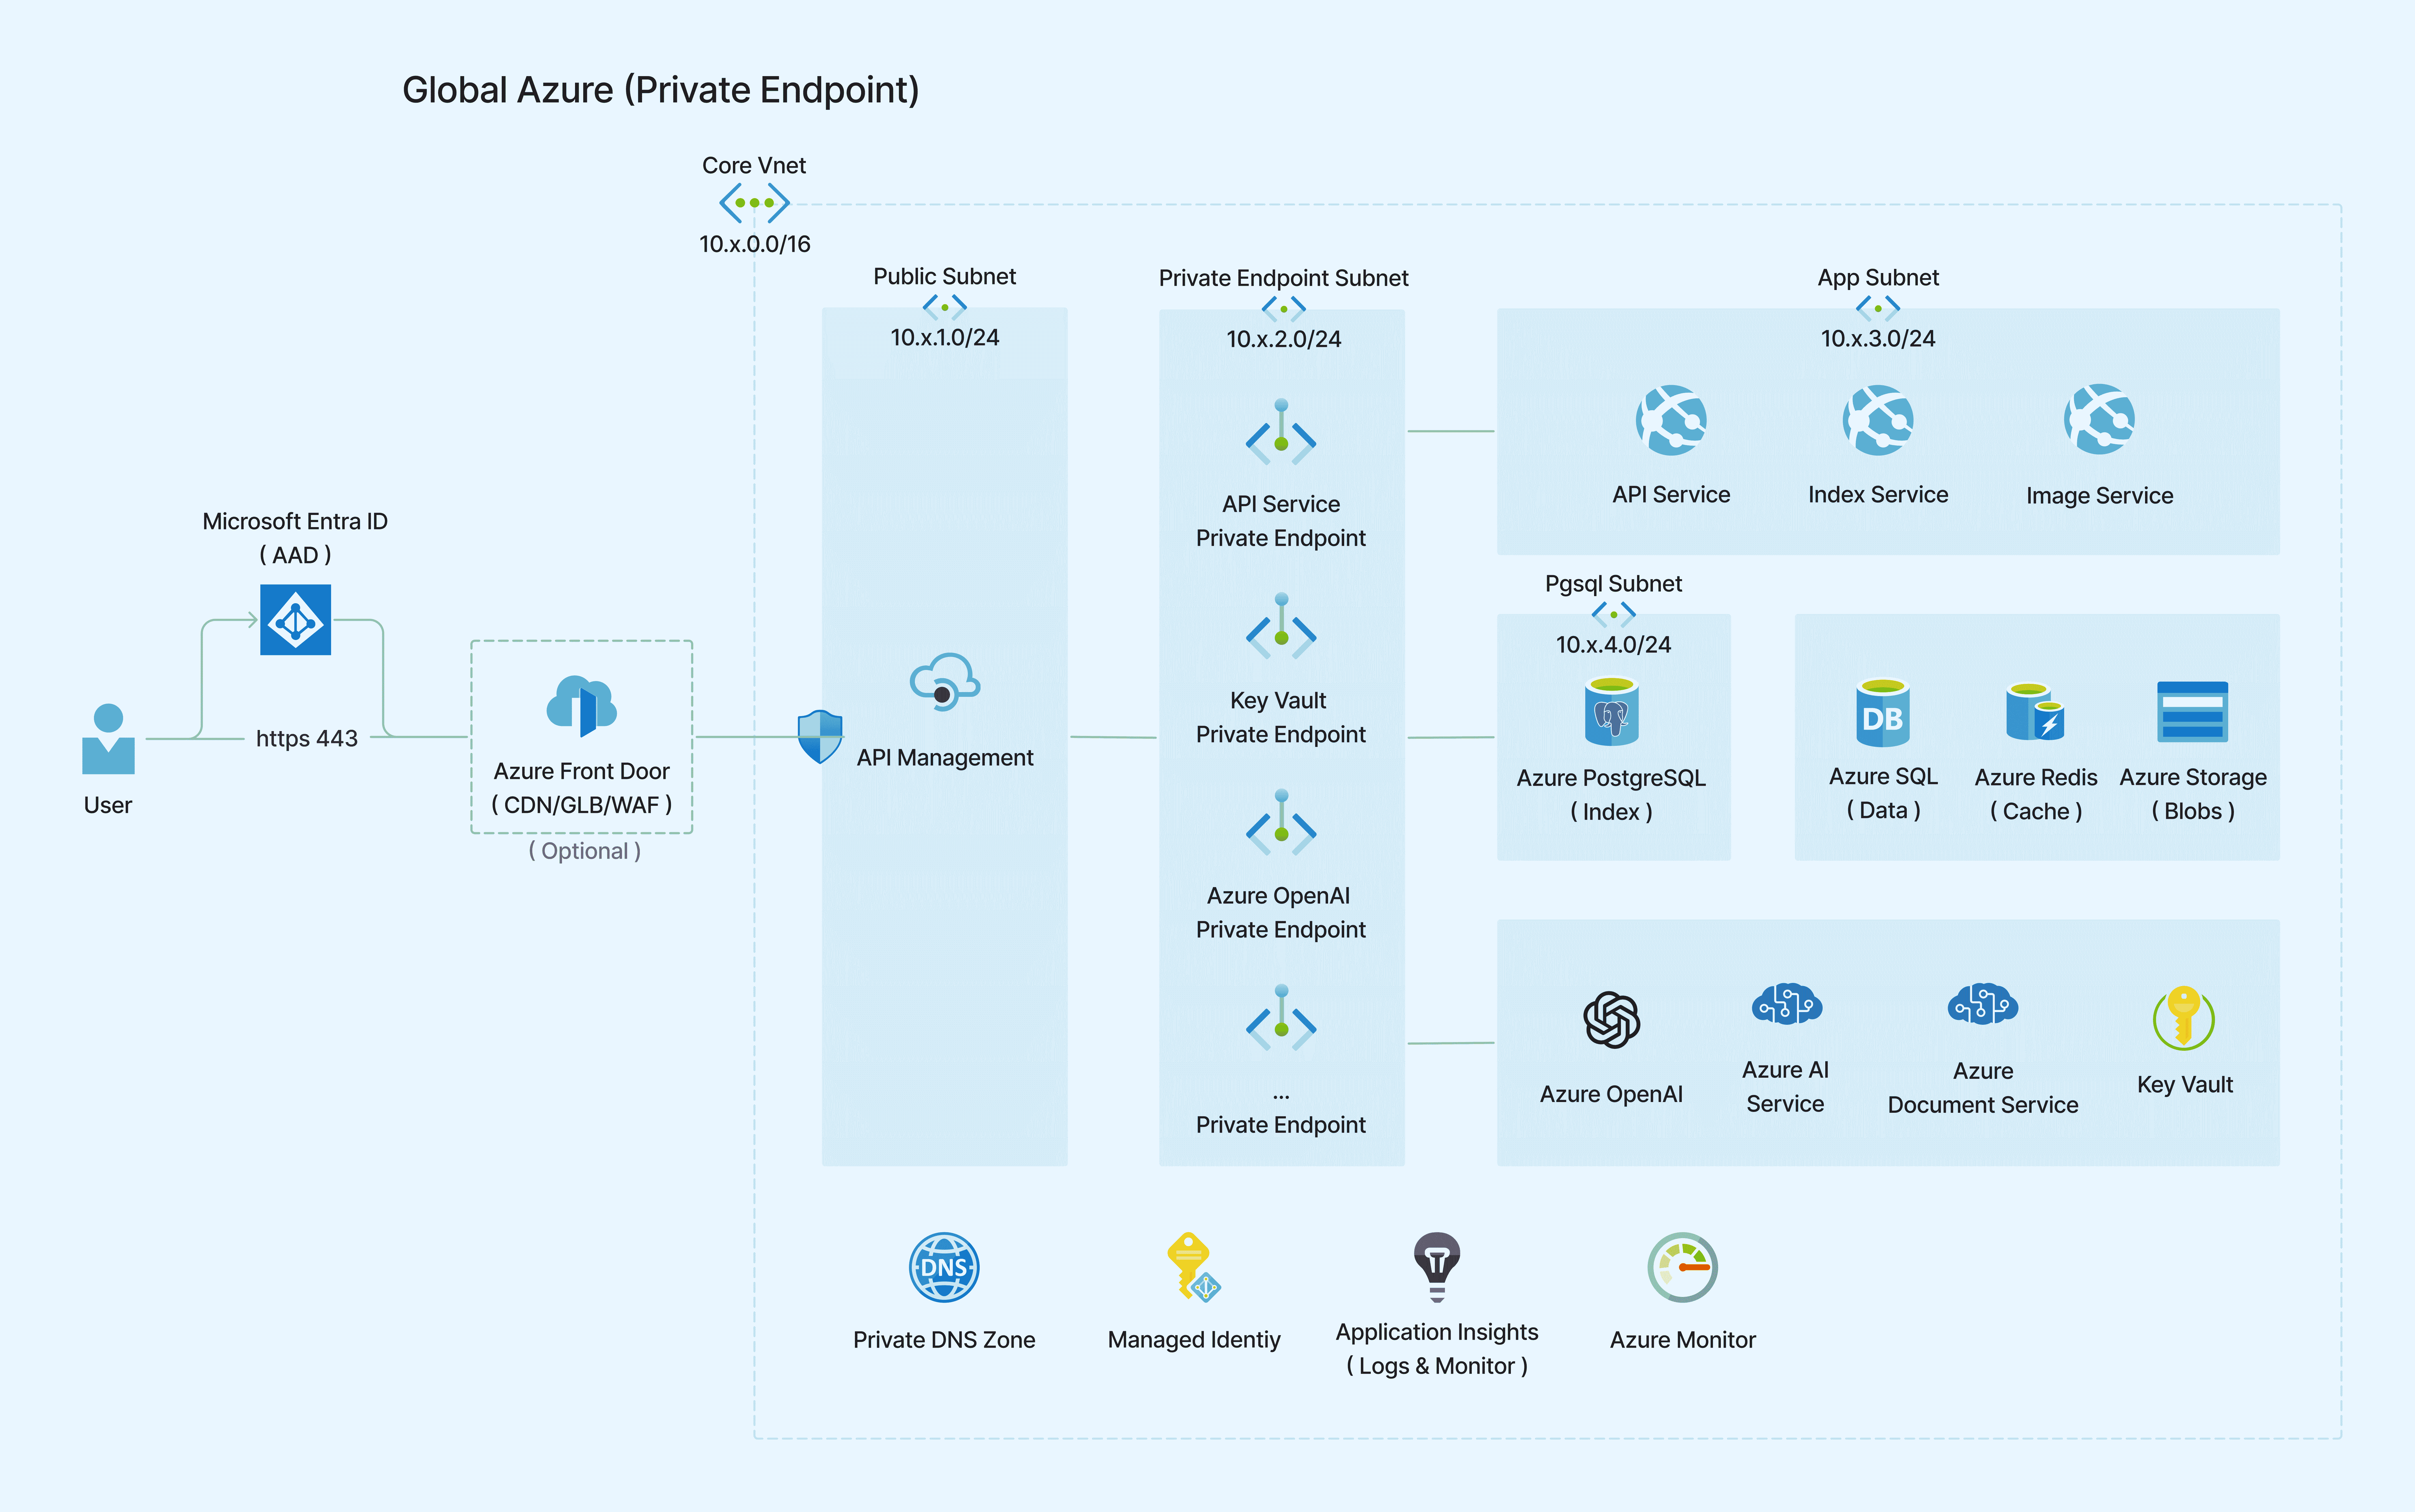
When using Private Endpoint, in addition to basic quantity-based billing, there will be additional network traffic charges.
Component Usage Description
| Type | Custom Name | Usage Description |
|---|---|---|
| Azure Front Door | CDN | (Optional) Content Delivery Network, used to accelerate access to static resources |
| Azure Front Door | API Acceleration | (Optional) API acceleration, used to speed up API access |
| API Management | API Endpoint | API management endpoint, used to manage APIs |
| App Service | API Service | API service, used to handle API requests |
| App Service | Job Service | Job service, used to handle high-load tasks and scheduled jobs |
| Azure OpenAI Service | LLM-Primary | Primary large language model, used as the main model for Agent Q&A (e.g., gpt-4o) |
| Azure OpenAI Service | LLM-Secondary | Secondary large language model, used as an auxiliary model for document processing (e.g., gpt-4o-mini) |
| Azure OpenAI Service | Embedding | Vector embedding, used for processing vector data |
| Azure OpenAI Service | Text to Image | Text-to-image generation, used for text-to-image tasks |
| Azure OpenAI Service | Whisper | Speech recognition, used for speech recognition tasks |
| Azure AI Document Intelligence | Document OCR | Document OCR recognition, used for document OCR tasks |
| Azure AI services | Document Translate | Document translation, used for document translation tasks |
| Azure SQL Database | Data | Data storage, main database, most system data is stored here |
| Azure Database for PostgreSQL | Index | Index database, mainly stores document-related index data |
| Azure Cache for Redis | Cache | Cache service, used for caching data |
| Storage Accounts | Files | File storage, used for storing user-uploaded files |
| Key Vault | - | Key management, used for storing keys |
| Azure Monitor | - | (Optional) Resource monitoring service, collects and analyzes resource metrics |
| Application Insights | - | (Optional) Application monitoring service, used for application performance monitoring and diagnostics |
| Vnet/Subnet | - | (Optional) Defines logical isolation networks and subnets for Azure resources |
| Private Endpoint | - | (Optional) Securely connect to Azure services via private IP |
| Private DNS Zone | - | (Optional) Private DNS, resolves service FQDNs to private IPs |
| Managed Identity | - | (Optional) Managed identity, credentials for resource communication |
| Public IP | - | (Optional) Public IP address, required for API Management in Standard tier when using Private Endpoint deployment architecture |
| Network Security Group | - | (Optional) Network security group, used to control resource network access |
Reference Configurations
- 500 user configuration
- 3000 user configuration
- Above 3000 user configuration
- Private Endpoint configuration
The above configurations are for reference only and should be adjusted according to actual load conditions.
Product Deployment
Deployment Process
- Execute Deployment
- Create AAD application registration
- Prepare deployment package
- Log in to Azure account, switch subscription
- Execute deployment
- Update AAD application registration
- Upload resource package, start the system
- Install frontend deployment package, font package, icon resources
- Install License
- Start the system, check if it starts successfully
- System check
- Administrator logs in to the system
- Test if system functions are normal
- Complete configuration
- Modify system settings
- Agent settings
- Space settings
- Test document upload
Terraform Deployment
Create AAD Application Registration
Create an AAD application registration in Azure Entra ID and obtain client_id
Naming convention: appreg-[app-name]-[environment]
eg. appreg-serviceme-trial
Prepare Deployment Package
Please contact the product team to obtain the latest deployment package (including Terraform deployment package, font package, icon resources, Web frontend deployment package, mobile deployment package, browser extension package)
Refer to the README.md file in the Terraform deployment package and configure the parameters in the variables.tf file as instructed.
To enable Private Endpoint functionality, set the deploy_private_network variable to true in the variables.tf file. Configure Vnet and subnet IP addresses in the network.tf file.
About the enable_public_network_access variable:
- This variable controls public network access for all resources except APIM
- It is recommended to set this option to
falseonly after all deployments are complete - If closed prematurely, it may affect the normal execution of Terraform scripts
- Once closed, resources including keyvault and databases cannot be accessed from outside the vnet; you will need to deploy a VPN Gateway or jump server
Azure Account Login and Subscription Switch
Open PowerShell in the working directory of the deployment package and execute the following command to log in to Azure. TENANT_ID is the tenant ID provided by the customer.
Global Cloud login command
az login --tenant TENANT_ID
For non-Global cloud, specify the --cloud parameter, for example:
China Cloud login command
az login --tenant TENANT_ID --cloud AzureChinaCloud
Set subscription ID, [subscriptionId] is the subscription ID provided by the customer
az account set --subscription "[subscriptionId]"
View current subscription to ensure you are logged into the correct subscription
az account show
Execute Deployment
First, check whether the upcoming changes meet expectations
terraform plan
+ means adding resources
- means deleting resources
~ means updating resources
If there are no issues, formally apply these changes. Note that Terraform will check and output the changes again; review and enter yes to confirm
terraform apply
Wait for deployment to complete (about 20~60 minutes, APIM deployment takes longer)
If no errors occur, Terraform will indicate how many resources were created and that deployment was successful.
If errors occur, troubleshoot according to the error message. Common issues include:
- Network error, request timeout during execution
- Re-running Terraform apply usually resolves the issue
- Resource already exists error during execution
- Check via Azure Portal whether the resource already exists; if so, delete it via Azure Portal. (Some resources have Purge Protection and may require special az cli commands to delete)
- OpenAI resource creation failed due to insufficient quota
- Check if the OpenAI resource quota in the Region is sufficient; if not, switch to another region
Update AAD Application Registration
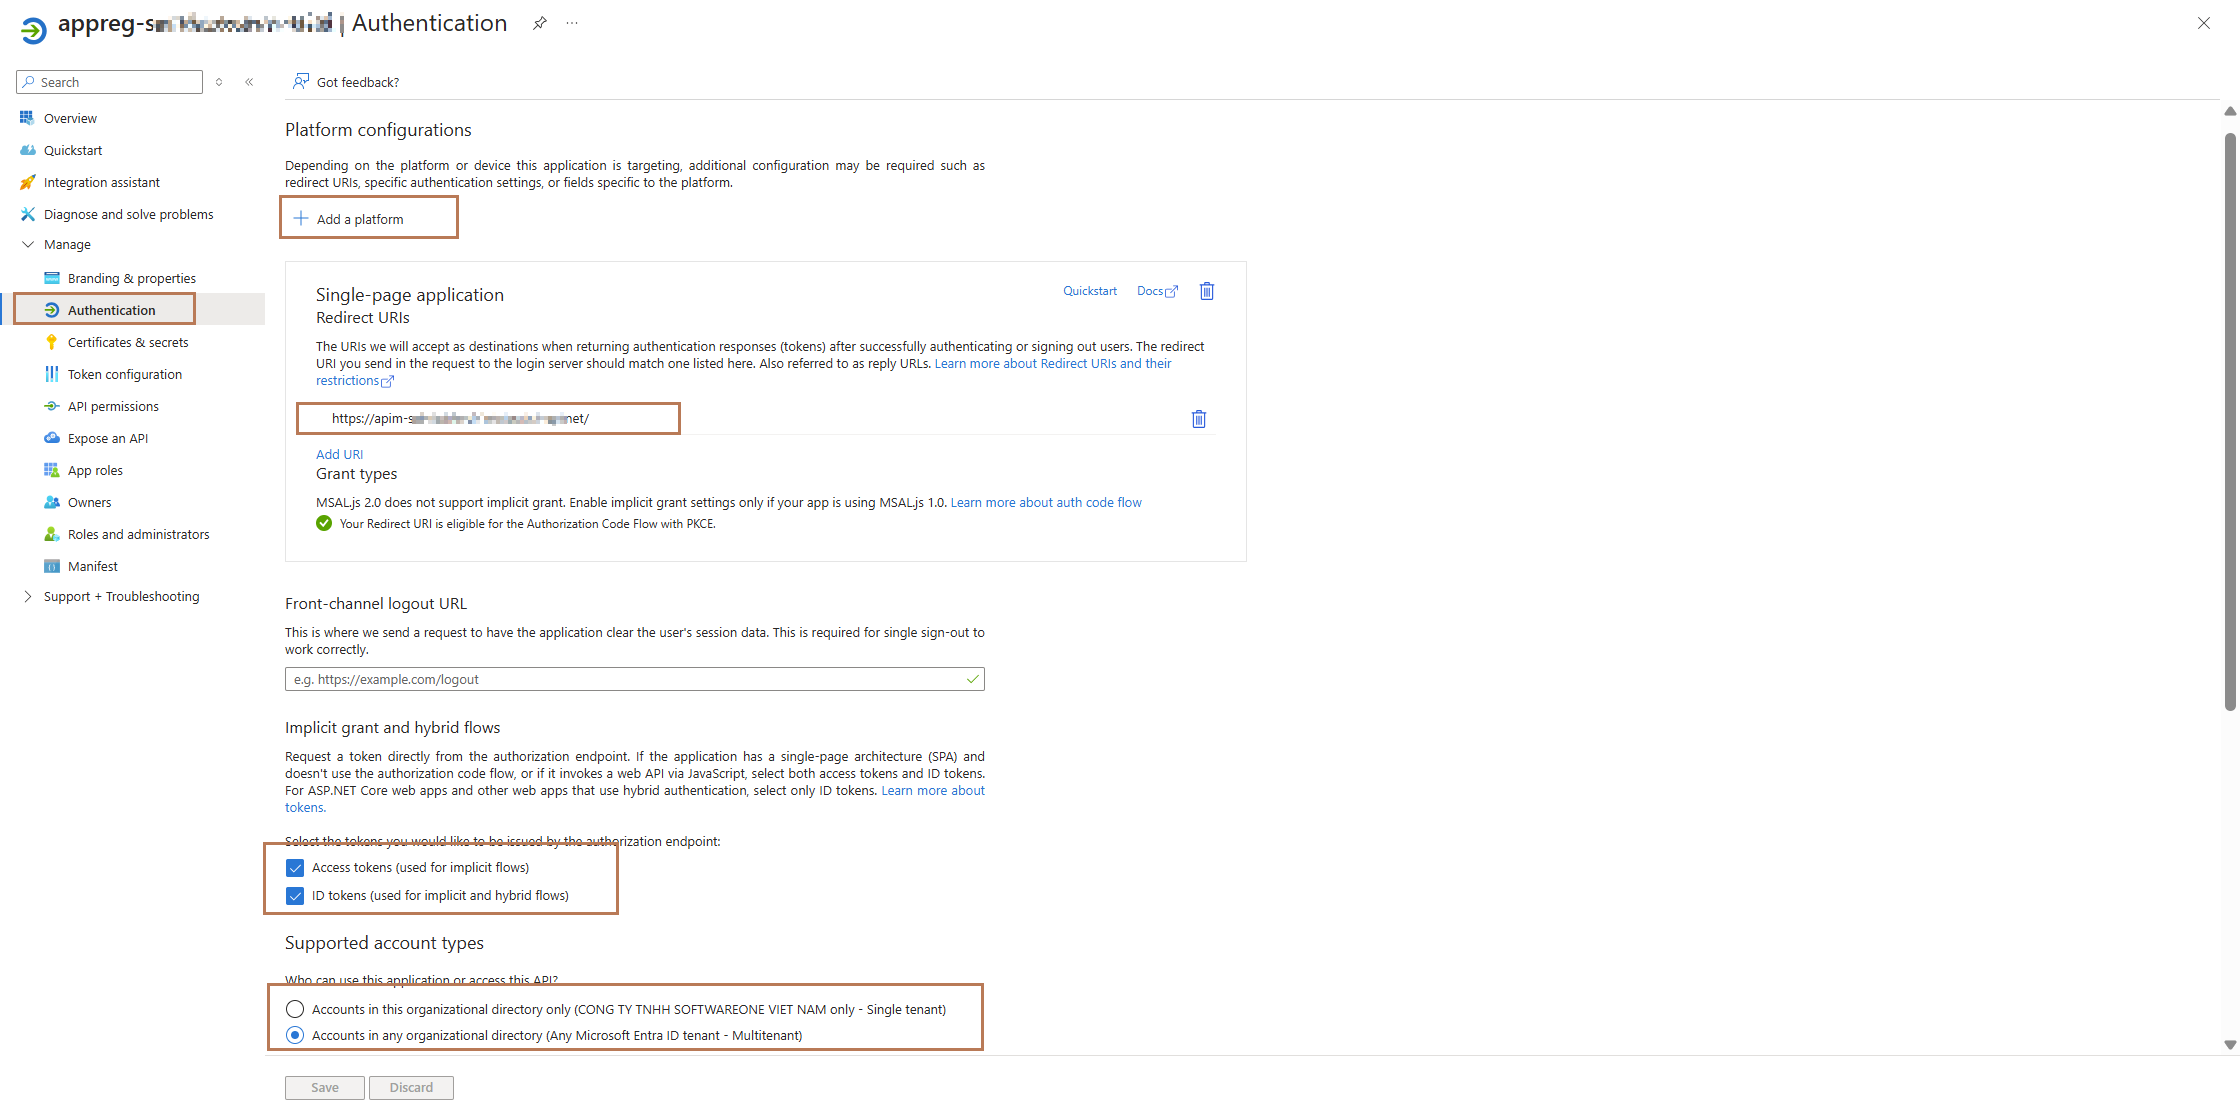
Update the APIM URL in the AAD application registration (rule: $APIM_GATEWAY_URL + "/", eg. https://xxx-apim.azure-api.net/ ), and make sure to check access token and ID token
Upload Resource Package and Start System
Install Frontend Deployment Package, Font Package, Icon Resources
Upload the following resources to the corresponding containers in Azure Storage Account, using Azure Storage Explorer or az cli commands
- Upload font package to
backend-core-fontscontainer - Upload icon resources to
iconscontainer - Upload Web frontend deployment package to
static-sitecontainer (do not overwrite the existing config.js file) - Upload browser extension deployment package to
extensioncontainer (create manually if not present) - For mobile deployment, create a
mobilefolder in thestatic-sitecontainer, configure the config.js in the mobile deployment package, and upload to this folder
Reference PowerShell commands (for versions before 3.2_u4, you need to grant appropriate Storage access permissions to the script execution user)
$Env:AZCOPY_AUTO_LOGIN_TYPE="AZCLI"

azcopy copy 'https://stservicemedeployassets.blob.core.windows.net/icons' 'https://xxx.blob.core.windows.net/icons' --recursive=true --overwrite=ifSourceNewer

azcopy copy 'https://stservicemedeployassets.blob.core.windows.net/frontend/3.2.41/*' 'https://xxx.blob.core.windows.net/static-site' --recursive=true --overwrite=ifSourceNewer --exclude-path 'config.js'

azcopy copy 'https://stservicemedeployassets.blob.core.windows.net/fonts' 'https://xxx.blob.core.windows.net/backend-core-fonts' --recursive=true --overwrite=ifSourceNewer
Install License
Upload the License file to the static-site container in Azure Storage Account
Start System and Verify Deployment Status
-
Modify configuration to enable App Service
- Open the
variables.tffile - Update the value of
enable_app_servicevariable totrue
- Open the
-
Apply configuration changes
- Execute the
terraform applycommand - Wait for deployment to complete
- Execute the
-
Check service running status
- Log in to Azure Portal
- Check the Monitor logs for the following services:
- api_app_service
- scheduler_app_service
- pythoncore_app_service
- Confirm that all services have started and are running normally
If you find service startup exceptions, carefully review the error log information and troubleshoot according to the specific error.
For environments deployed with Private Endpoint, please note the following:
- After deployment, if you need to restrict public access, set the
enable_public_network_accessvariable tofalse - This setting will disable public network access for all resources except APIM, improving system security
- Note that after disabling public access:
- Terraform will not be able to directly access keyvault and Storage resources
- Subsequent terraform apply operations may fail
- Solutions:
- Option 1: Temporarily enable public access, execute terraform apply, then disable it
- Option 2: Connect to vnet via jump server or VPN Gateway to execute scripts
System Check
Administrator Login
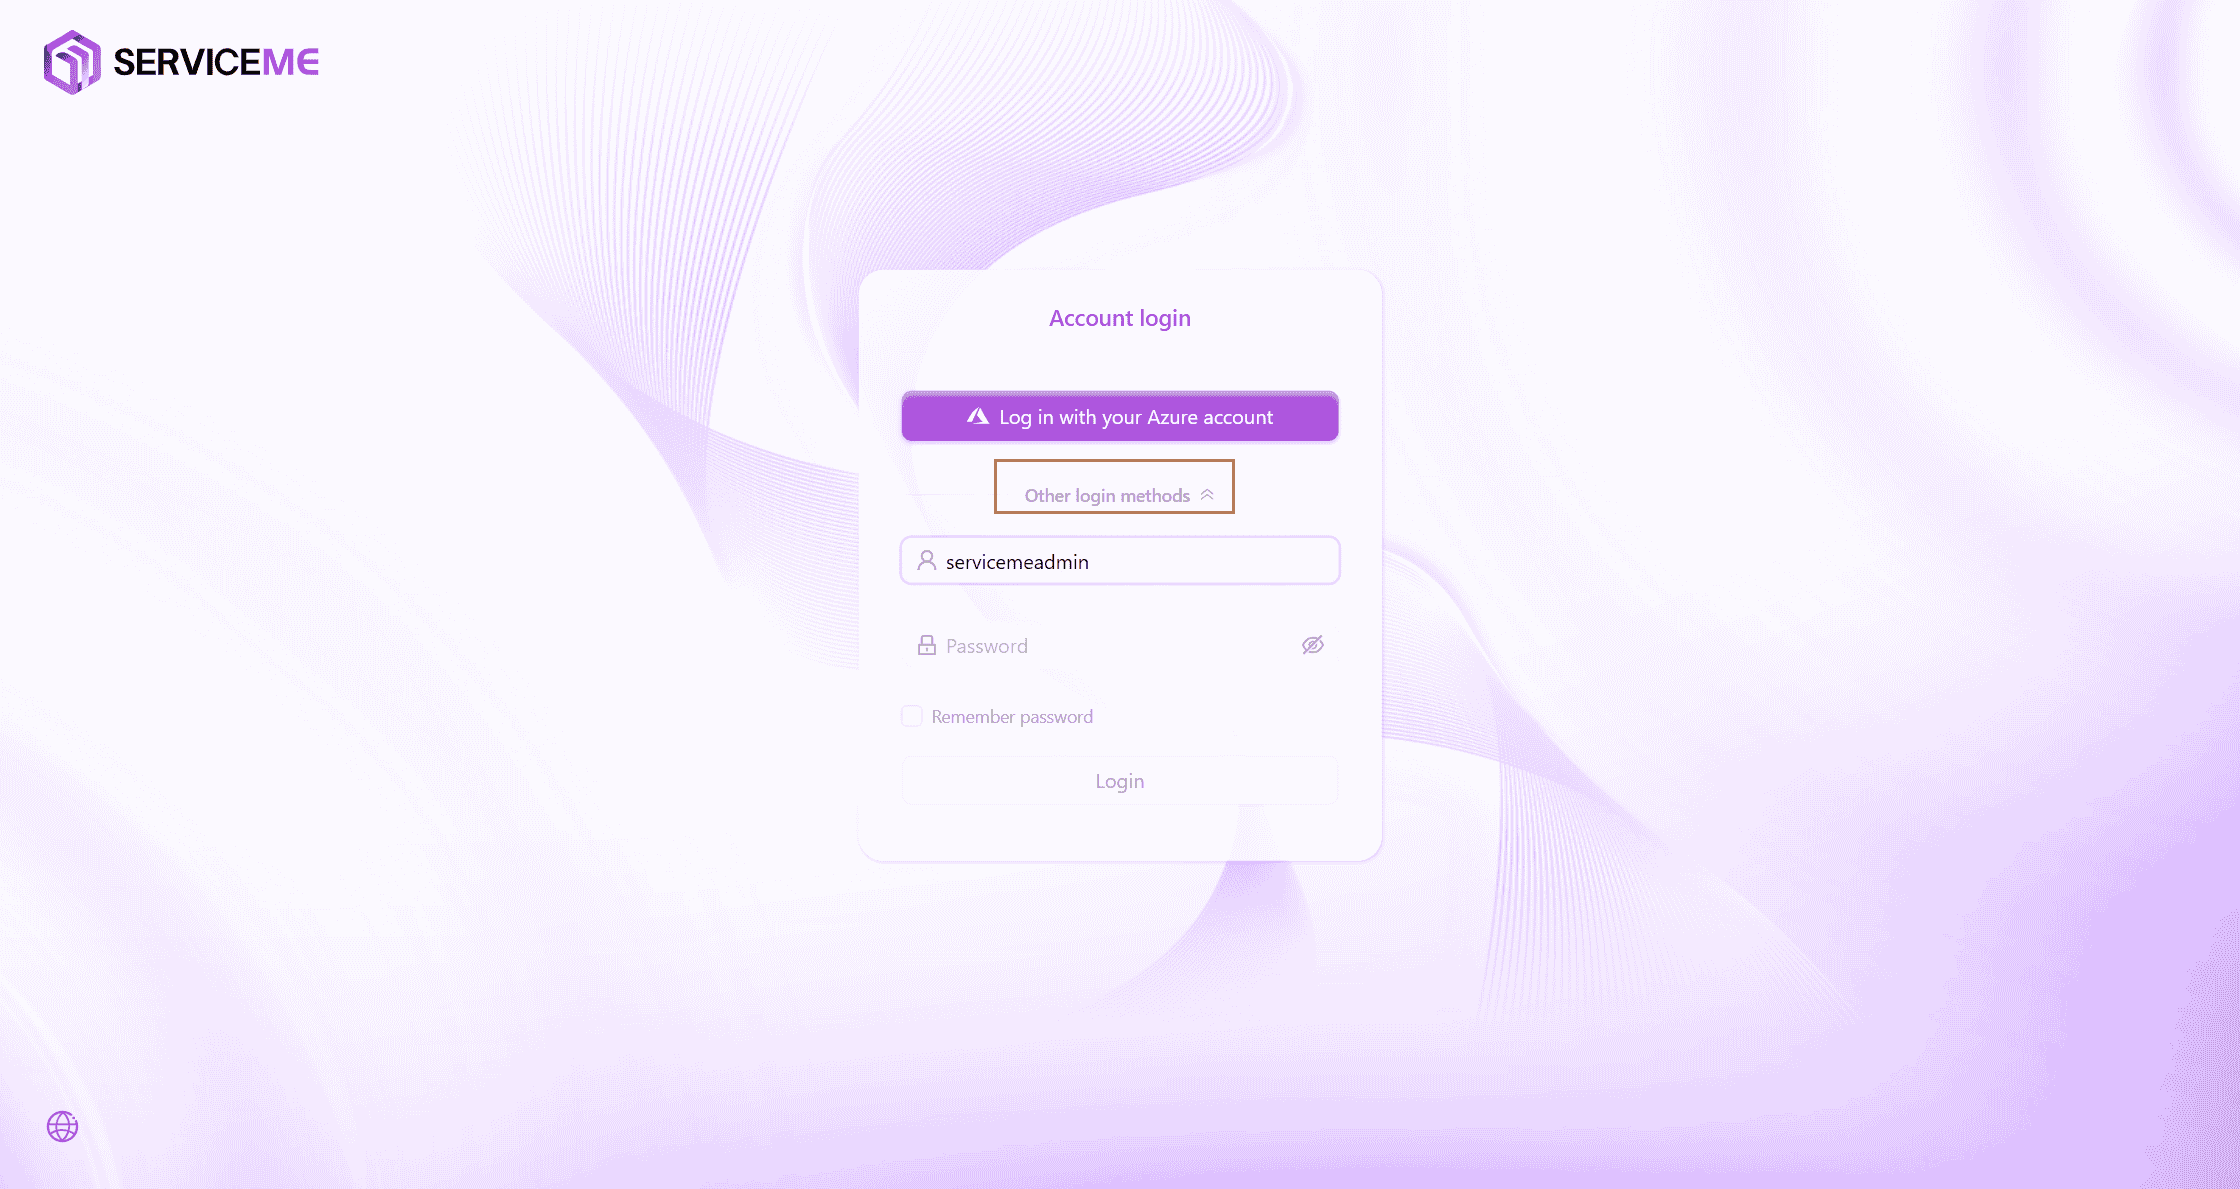
Log in to the system via the APIM URL. The default administrator account is servicemeadmin, and the default password is in the README.md file of the deployment package.
Test System Functionality
Complete Configuration
Agent Settings
The accuracy of Agent Q&A and the format of responses are greatly affected by the Prompt and related parameters.
The following links provide some examples of Agent settings, which can be modified according to customer scenarios.
Before making the Agent available to end users, thorough testing is required to ensure that relevant skills can be correctly invoked, and that the accuracy and format of responses meet user requirements.
Refer to System Configuration Best Practices
Space Settings
Settings in space and document properties will affect the document segmentation strategy during preprocessing. Please select the most appropriate settings according to different situations to achieve better document accuracy.
After adjusting settings, remember to regenerate indexes for related documents; otherwise, the settings will only apply to newly uploaded documents.
Refer to System Configuration Best Practices
Test Document Upload
You can upload some sample documents or customer-provided documents to the system. After preprocessing, test via Agent Q&A.
System Settings Modification
Modify the system LOGO and system title as needed.
